Joomla cho người mới bắt đầu part 23 ppsx
Bạn đang xem bản rút gọn của tài liệu. Xem và tải ngay bản đầy đủ của tài liệu tại đây (1.9 MB, 10 trang )
Chapter 9
[ 227 ]
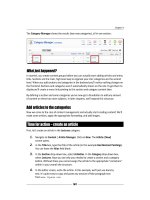
5. Click on Save. The User Manager screen now shows the new User:
What just happened?
In the site user list in the User Manager, you're no longer on your own. As Mr. Van Gogh
has been assigned to the Author user group, he is now permied to log in to the frontend
of the site and add content. However, to enable the new user to do anything we'll have to
create a way for him to log in to the frontend. Aer all, the method of logging in that you
yourself have been using (through a separate backend URL like rsite.
com/administrator) is only accessible to users with back end access—and Mr. Van Gogh
doesn't have those permissions.
Enabling team members to log in to the frontend
Once you've assigned users to the Authors, Editors, or Publishers group, you'll have to create
an entrance to the site frontend. Otherwise, they proudly own a shiny key to a secret part of
the site—but there's no door to open!
Time for action – create a Login Form
Let's enable the Login Module. It's part of the Joomla! default installaon, but it has to be
enabled to become visible.
1. Navigate to Extensions | Module Manager. In the Select Type drop-down box,
select mod_login. This will lter the long list of installed modules; only the
Login Form module will be shown.
2. Click on the name Login Form to edit the module sengs. Select Enabled: Yes to
publish the module. The Posion is set to le to display the Login Module on the
le-hand side column, below the Main Menu.
3. Make sure Menu Assignment is set to Home only; this way, the Login Module will
only show up on the home page. We can safely assume that users will probably
want to log in to the site directly from the home page, so there's no need to
cluer valuable screen real estate with a login form on other pages.
Download at Wow! eBook
WWW.WOWEBOOK.COM
Opening Up the Site: Enabling Users to Contribute and Interact
[ 228 ]
4. In this example, we'll leave the Parameters as they are. You could enter some
Pre-text or Post-text here: a short text that is shown before or just below the
Login Module.
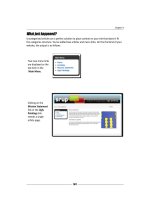
5. Click on Save and click on Preview to check the output on the frontend. In the
le-hand side column, the Login Form is now shown below the Main Menu:
Download at Wow! eBook
WWW.WOWEBOOK.COM
Chapter 9
[ 229 ]
What just happened?
You've now enabled users to access your site through a Login Form. Maybe you've noced
that as soon as you add this form, it also displays a Create an account link. By default,
Joomla! is congured to allow user self-registraon. If you don't want users to be able to
register, change a Global Conguraon seng. Navigate to Site | Global Conguraon and
select the System tab. In the User Sengs secon, make sure Allow User Registraon is set
to No (the default value is Yes). Now the Create an account link will disappear. You'll read
much more on user self-registraon later in this chapter (see the secon Allowing visitors
to register).
Threw out the Login Form? Create a new one!
In the previous example, we're just publishing a Login Form that was already
there because it is part of the Joomla! default installaon sample data. If you
haven't installed sample data, or have accidentally thrown away the Login
Form, you can easily create a new one. Aer all, the sample Login Form is just
an instance of the Login Form module that's built into Joomla!. To create a new
Login Form, navigate to Extensions | Module Manager and click on New in the
toolbar. Now select Login, click on Next, enter a Title (such as Login), and set
Menu Assignment to Home. Make sure to set Enabled: to Yes. Click on Save. The
Login Form will now appear in the le-hand side column, just like we've seen in
the previous screenshot.
Time for action – logging in as a frontend content contributor
You now have one user who's the member of the Author group, you have a Login Form set
up to enable this user to enter the site—so why don't we try how our Author can log in and
submit content?
1. Navigate to the frontend of the site and use the Login Form to log in as the new
user (in this example jvgogh):
Download at Wow! eBook
WWW.WOWEBOOK.COM
Opening Up the Site: Enabling Users to Contribute and Interact
[ 230 ]
2. Below the Main Menu, a User Menu appears. This is part of the Joomla! default
installaon and it's set to be only visible when a user has logged in—that's
why it turns up all of a sudden. The User Menu provides links to funconality
only available to registered users. For example, it allows the Author to view
and edit his or her user details. However, we're primarily interested in the pos-
sibility of entering new content, so let's click on the Submit an Arcle link. Now
here's a surprise; the Joomla! frontend turns into a live web page editor!
3. For tesng purposes, enter some arcle text, add a tle, and select the appropriate
Secon and Category (you'll nd a Secon and Category drop-down box if you
scroll down on the Submit an Arcle page). In this example, we've created a
dummy arcle called SRUP Welcomes New Members in the News secon and
General News category.
4. Click on Save to submit the arcle. You'll see a noce: Thank you for your
submission. It will be reviewed before being posted on the site.
What just happened?
You've just logged in to your own site as if you were part of the Author user group. As an
Author, you're able to contribute content on the frontend of the site.
Download at Wow! eBook
WWW.WOWEBOOK.COM
Chapter 9
[ 231 ]
Have a go hero – create a frontend User Menu
In the above example, you've seen a User Menu suddenly appear when a registered user has
logged in. This User Menu is pre-installed when you choose to install Joomla! with sample
data. Now what if you haven't installed sample data? You'll obviously want your logged in
Authors to be able to submit content. To do this, add a Submit an Arcle link to any of the
exisng menus or create your own dedicated menu for frontend users (just like the User
Menu that's included in the Joomla! sample site).
The procedure is prey straighorward; these are roughly the steps involved. In the Menu
Manager, create a new menu and call it what you like (for example, User Menu). You've now
have an empty menu—click on the Menu Items icon to add some new menu links. If you
want to enable Authors (or higher) to submit an arcle, in the Menu Item Type list add a link
of the Arcle Submission Layout type. Save your changes to display and make sure to set
your new menu module to display (set it to be enabled in the Module Manager). If you're a
bit rusty on menu creang skills, please have a look again at Chapter 8 on navigaon.
Allowing users to manage their accounts
The default login form already enables users to log in, create a new account, and
retrieve their password or user name. However, instead of using the login form
you can also create separate menu links to a login page, a self-registraon page,
or to a page enabling users to manage their account details (for example, to
change their password). You'll nd these parcular link types in the User secon
of the Menu Item Type list. We'll try a few of these User links out later in this
chapter, in the Allowing visitors to register secon.
Reviewing and publishing team content submissions
Up to now, you've seen how you can create user accounts for team members on your site
and how you can enable them to login. You've also switched to another role to see your site
through the eyes of a logged in team member: an Author, someone who's able to submit
(but not publish) content. Now let's see how you can get content submied by Authors to
show on the site.
Download at Wow! eBook
WWW.WOWEBOOK.COM
Opening Up the Site: Enabling Users to Contribute and Interact
[ 232 ]
Time for action – reviewing submitted content
Sorry, I'll have to ask you now to switch back once again to your original role—being the site
administrator. Aer all, once an Author has submied an arcle you (or another user with
publishing permissions) should review and approve the new content to get it to display on
the site. Let's see how this works:
1. Log in to the backend of your site as Administrator. Navigate to Tools | Read
Messages (or click on the lile envelope icon next to the Preview buon in the
backend Control Panel). You'll see this message:
A new Arcle has been submied by [ jvgogh ] tled [ SRUP Welcomes
New Members ] from Secon [ News ] and Category [ General News ].
Receiving submission reminders
The Private Messaging icon isn't really conspicuous—you're bound to overlook
messages alarming you about new submissions. Do you want to get an e-mail
nocaon every me new content is submied? Navigate to Tools | Read
Messages and click on the Sengs buon in the toolbar. Select Mail me on
new Message: Yes.
2. To review and publish the new arcle, navigate to Content | Arcle Manager and
locate the new arcle. You'll noce a red cross in the Published column indic-
ang
the arcle is sll unpublished. You can click on the tle of the arcle to view
and edit it as desired.
Download at Wow! eBook
WWW.WOWEBOOK.COM
Chapter 9
[ 233 ]
3. When you're sased with the arcle, click on Save. In the Published column of the
Arcle Manager, click on the cross. It will turn into a green check mark.
4. Click on Preview. In the News secon, the new arcle is shown:
What just happened?
Logging in as the site administrator again, you're able to check arcles that have been
submied by authors. You can review the arcle, possibly edit it, and publish it if you're
happy with it.
Have a go hero – explore different User Group permissions
So far you've seen what Authors are allowed to do in Joomla!. Why not explore other User
Groups permissions? It's a good idea to log in as a user with dierent permissions to get a
grasp of the possibilies. Changing user permissions only takes a few clicks. Here are a few
pointers to get you going.
Download at Wow! eBook
WWW.WOWEBOOK.COM
Opening Up the Site: Enabling Users to Contribute and Interact
[ 234 ]
Find out what editors and publishers can do
Navigate to Site | User Manager and click on the name of the user (in our example, Jim Van
Gogh) who you've added earlier and who you assigned to the Author group. Now, in the
Group box, select Editor to give the user new frontend eding permissions. Click on Save
and login to the frontend with the username and password of Mr. Van Gogh. You'll noce
a small dierence. Next to every arcle, a lile pen and paper icon is now displayed:
This old school icon opens up a range of new possibilies. When clicking on it, the web
page turns into an editor screen just like the Submit an Arcle screen (see Time for acon
– logging in as a frontend content contributor earlier in this chapter). This shows what
Editors can do (and Authors cannot). Editors can create arcles, but they can't publish them
themselves. However, they can change the text of exisng arcles by eding them in the
frontend of the site—and immediately publish the changed arcle. This basically means they
can't add content on their own, but they are allowed to make changes to exisng content on
their own (without approval of a Publisher or higher).
To nd out what Pu bl is he rs can do, change the Group that Mr. Van Gogh belongs to again.
You won't noce any dierences aer logging in to the frontend. However, aer you've
edited or created an arcle, saving the arcle will immediately publish it. The arcle won't
be submied for review rst.
Find out what backend users can do
A nal step in "upgrading" user accounts is assigning one of the three backend accounts:
Manager, Administrator, or Super Administrator. For example, try changing the exisng
Publisher account and assign the user to the Manager group. You can now log in with this
user's Username and Password to the backend of the site
(via />Download at Wow! eBook
WWW.WOWEBOOK.COM
Chapter 9
[ 235 ]
Aer logging in you'll be taken to the backend Control Panel where you can add and edit
content the same way you're used to in your role as site administrator. As the new user has
been assigned the Manager role, he has permissions to do most things with content that site
administrators can (that is, creang new secons, categories, and arcles).
Allowing visitors to register
In the previous secon, you've set up new user accounts manually in the backend using the
User Manager. Giving a team of content contributor's access to the site is a great way to
share responsibilies and to collaborate in maintaining the site and keeping its contents up
to date.
Another way to open up your site is to enable user self-registraon. That way, a user
community can develop and any amount of users can register themselves without the site
administrator having to do or approve anything (of course, the administrator is sll in charge
and has the ability to block or remove users).
Registered users usually don't have permissions to contribute content; they do have exclusive
access to parts of the site where the access level is set to—you guessed it—Registered. Let's
rst nd out how to create "members only" content and enable visitors to join through
self-registraon.
How do you enable users to create an account?
It may have skipped your aenon, but as soon as you've set up a Login Form (see Time for
acon - create a Login Form earlier in this chapter), you've enabled user self-registraon at
the same me. By default, the Login Module not only allows exisng users to log in, it also
contains a link inving visitors to create a new account:
Download at Wow! eBook
WWW.WOWEBOOK.COM
Opening Up the Site: Enabling Users to Contribute and Interact
[ 236 ]
Displaying a link to a Login Form
In the above example, we've added a Login Form that displays in the le-hand side column
of the home page. You may nd this too big or too conspicuous. If you'd rather show just an
small "Login" link poinng to a separate login page (a login form in the main content area),
that's possible too.
To add a Login link to the Main Menu, navigate to Menus | Main Menu, click on New, and in
the Select Menu Item Type secon select User | Login | Default Login Layout. Add a tle for
the link (for example, Login) and click on Save. Set the Login Form module to hide (navigate
to Extensions | Module Manager and set Enabled to No). Now the Login Form will only be
displayed aer the visitor has clicked on the Login link:
Time for action – register yourself and log in
Let's see what site visitors have to do to create an account. We'll create a dummy user
account ourselves.
1. On the frontend, click the Create an account link below the Login Form in the
le-hand side column (if you've created a menu link to a separate login page, as
described above, then click on this menu link and click on Register). This will take
you to the Registraon page. Enter your details and make sure to use a valid E-
mail address.
Download at Wow! eBook
WWW.WOWEBOOK.COM