Hướng dẫn tạo themes cho wordpress part 16 doc
Bạn đang xem bản rút gọn của tài liệu. Xem và tải ngay bản đầy đủ của tài liệu tại đây (1.3 MB, 10 trang )
8
Integrating Media
In this chapter, we will cover:
Aligning images properly within a post
Styling image galleries
Styling image captions
Creating a media template
Creating a media template for a specic media type
Displaying a related image for every post
Creating video posts by using the Viper's Video Quicktags plug-in
Introduction
They say a picture is worth a thousand words. If that is the case, then audio must be worth
a million, and video worth a billion. Luckily, WordPress provides users with great tools that
allow you to quickly and easily attach different types of media directly to posts and, if desired,
display that media in special ways directly in posts.
In this chapter, we're going to go over the different ways in which you can use media such
as images, music, and video les in your theme. We'll look both at how to correctly display
images for users based on WordPress conventions, and how to dig deeper and manipulate
the display of media without user input.
You should know that if you are using the default Kubrick theme that it is not designed well for
the display of videos or images within posts. We will be using the WordPress Classic theme,
which is available with all new Wordpress downloads from />download/
, for styling and displaying media in this chapter, but you can use any WordPress
2.8 or 2.9 compatible theme that you like, or apply these recipes to your own custom theme.
Integrating Media
156
Aligning images properly within a post
One of the most important things for your theme to get right when it comes to displaying
media is also one of the easiest. WordPress uses a certain set of markup to decorate images
displayed in posts, and this markup includes instructions on how to align the images within a
post. The class declarations shown below cover cases where images are inserted into a post
by using the WordPress tools. This is very important to theme users, and forgetting to properly
account for aligning images will give a very poor impression of your theme. Luckily,
it is one of the easiest things to account for.
Getting started
For this recipe, you need to have a basic theme created already. It should have a template le
that displays posts created by a user in their entirety.
How to do it
First, we need to open up the theme's style.css le and place our cursor just after the
introductory comment. Then, insert the following class declarations:
img.centered {
display: block;
margin-left: auto;
margin-right: auto;
padding: 4px;
}
img.alignright {
padding: 4px;
margin: 0 0 5px 5px;
display: inline;
}
img.alignleft {
padding: 4px;
margin: 0 5px 5px 0;
display: inline;
}
.alignright {
float: right;
}
.alignleft {
float: left;
}
Chapter 8
157
Be on the look-out for other similar tags. If you spot them, comment them out, beginning
with /* and ending with */. As an example, see how similar code was commented out in
the Sandbox style.css theme:
/* This is the standard layout Sandbox comes with
.alignright,img.alignright{
float:right;
border:none;
margin:1em 0 0 1em;
} */
Save your changes, and then upload the style.css le to the current theme folder on
your server. Upload three images into a post by using the media toolbar. Align each one
to a different direction, and click on the Insert into Post button.
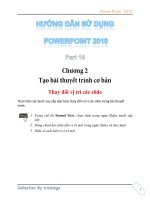
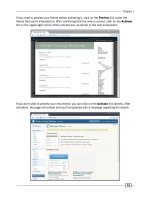
You can see an example of the image upload settings and button in the following screenshot:
In the previous example, Center alignment has been selected. Clicking on the Insert into Post
button inserts generated markup, similar to the following, into the post editor text area:
<img src="rockcity1.jpg" alt="rocks" title="rock formations"
width="300" height="225" class="aligncenter size-medium wp-image-1" />
Copy this markup twice, and change aligncenter to alignright and alignleft
respectively, to allow you to see each alignment in action. Your revised markup should look
like the following:
<a href="03/05-06-07_12142.jpg"><img class="alignleft size-medium
wp-image-39" title="05-06-07_1214" src="05-06-07_12142-300x225.jpg"
alt="a tight squeeze" width="300" height="225" /></a>
<a href="05-06-07_1328.jpg"><img src="05-06-07_1328.jpg" alt="real
rock formations in a Rock City cave?" title="Rock City Cave #1"
width="160" height="120" class="aligncenter size-full wp-image-27"
/></a>
<a href=" 05-06-07_1228.jpg "><img src=" 05-06-07_1228.jpg" alt="view
from the top of rock city" title="View from the top of Rock City"
width="160" height="120" class="alignright size-full wp-image-28" />
</a>
Integrating Media
158
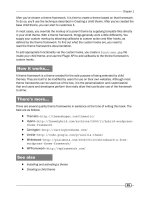
After publishing the post, view it in your theme and you should see something similar to the
following screenshot:
How it works
When you click on the Insert into Post button, the WordPress system runs a JavaScript
function that sends an HTML snippet to the post editor. This HTML snippet is formed in
the function get_image_tag, before being sent to the post editor.
In the get_image_tag, the alignment is combined with the word align in order to produce one
of four possible classes: alignnone, alignright, alignleft, and aligncenter. In the
previous CSS that we wrote for our theme, the alignright, alignleft, and aligncenter
classes are all accounted for, using the CSS float property and appropriate margin and
padding values to ensure that the images align themselves properly within post containers.
Chapter 8
159
Styling image galleries
Styling individual images is great when a user is uploading one or two images and manually
inserting them. However, WordPress' real image-displaying prowess comes in the form of its
gallery capabilities.
A WordPress gallery is output by using the gallery shortcode within a post. It collects all of
the images attached to a post via the media uploader, and then outputs them using standard
markup. Because the markup is consistent, styling it is easy.
Getting started
For this recipe, you need to have a basic theme created already. It should include a
page.php or single.php le that displays full post content. If you don't have one,
use the Default WordPress theme as a guide, or visit />Theme_Development
to learn more.
How to do it
First, we need to open up the theme's style.css le and place our cursor just after the
introductory comment. Then insert the following class declarations:
.gallery {
border: 1px solid #f88;
}
.gallery-item {
background: #000;
}
.gallery-icon {
border: 1px solid #fff;
}
.gallery-caption {
border: 1px solid #00f;
}
These style declarations will allow you to see where the different parts of the gallery markup
start and end, so you can further style them as you wish. To see the gallery styles in action,
you'll need to create a gallery. Go to the administrative interface, and create a new post. Click
on the Add an Image button in the media toolbar, and upload multiple images. Then click on
the Save all changes button.
Integrating Media
160
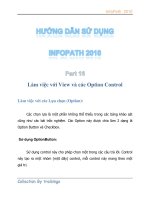
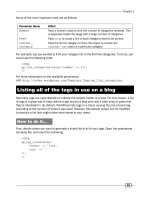
After clicking on the Save changes button, you'll be presented with the gallery settings, as
shown in the following screenshot:
Select your desired gallery settings, and then click on the Insert gallery button. Something
similar to the following markup will be sent to your post editor:
[gallery columns="2"]
After this has been inserted into the post editor, publish the post, and then view it in your
theme. You should see something similar to the following screenshot:
Chapter 8
161
How it works
To understand how to style a gallery appropriately, we rst have to understand how the gallery
markup is output in the rst place, and what exactly that markup looks like. Let's start with
how it is generated and output.
When WordPress sees the shortcode [gallery] inside of a post's content, it auto-expands
this, based on the images attached to that post. This expansion happens inside the
gallery_shortcode function found in wp-includes/media.php.
The
gallery_shortcode function does a few things when it is invoked. First, it determines
if the post that the gallery is being called for has any image attachments. If it does, then
the function starts to generate output. The output starts with a style tag that declares some
basic layout information about the gallery. These styles include margin, width, and border
declarations for the main elements of the gallery, and were dened in the style.css le
earlier in the example.
Then, the function iterates over each of the image attachments, and outputs an HTML tag for
it. The tag can be changed through the use of shortcode parameters, but the class attributes
used in the tags will always be the same. The pertinent classes to pay attention to are:
gallery
gallery-item
gallery-icon
gallery-caption
So, at the very least, you should style these elements. After all of the image attachments
have been iterated over, the gallery_shortcode function returns the HTML that has been
produced, and this HTML is inserted wherever the gallery_shortcode is present in the
post content.
For a simple four image, two-column gallery, the output would look something like this:
<style type='text/css'>
#gallery-1 {
margin: auto;
}
#gallery-1 .gallery-item {
float: left;
margin-top: 10px;
text-align: center;
width: 50%;
}
#gallery-1 img {
border: 2px solid #cfcfcf;
}
Integrating Media
162
#gallery-1 .gallery-caption {
margin-left: 0;
}
</style>
<! see gallery_shortcode() in wp-includes/media.php >
<div id='gallery-1' class='gallery galleryid-97'>
<dl class='gallery-item'>
<dt class='gallery-icon'>
<a href='' title='Hydrangeas'><img width="150" height="150"
src="" class="attachment-thumbnail" alt="" title="Hydrangeas" /></a>
</dt>
</dl>
<dl class='gallery-item'>
<dt class='gallery-icon'>
<a href='' title='Jellyfish'><img width="150" height="150"
src="" class="attachment-thumbnail" alt="" title="Jellyfish" /></a>
</dt>
</dl>
<br style="clear: both"/>
<dl class='gallery-item'>
<dt class='gallery-icon'>
<a href='' title='Koala'><img width="150" height="150" src=""
class="attachment-thumbnail" alt="" title="Koala" /></a>
</dt>
</dl>
<dl class='gallery-item'>
<dt class='gallery-icon'>
<a href='' title='Lighthouse'><img width="150" height="150"
src="" class="attachment-thumbnail" alt="" title="Lighthouse" /></a>
</dt>
</dl>
<br style="clear: both"/>
</div>
Please keep in mind that the previous sample uses the default tags for gallery items, captions,
and icons. These tags can be changed by changing the shortcode attributes. To learn more
about this and all the parameters that a user can change in their gallery shortcode, see
/>Styling image captions
Although some images are self-explanatory, many require a note about their contents in order
to be relevant to the surrounding article. Luckily, this functionality is baked into WordPress,
allowing users to enter a short caption when uploading an image.
These captions are marked up with a special format, and can be styled appropriately
quite easily.
Chapter 8
163
Getting started
For this recipe, you need to have a basic theme created already. This should include a
page.php or single.php le that displays full post content.
How to do it
First, we need to open the theme's style.css le and place our cursor just after the
introductory comment.
Then, insert the following class declarations:
.wp-caption {
border: 1px solid #ddd;
text-align: center;
background-color: #f3f3f3;
padding-top: 4px;
margin: 10px;
border-radius: 3px;
}
.wp-caption img {
margin: 0;
padding: 0;
border: 0 none;
}
.wp-caption p.wp-caption-text {
font-size: 11px;
line-height: 17px;
padding: 0 4px 5px;
margin: 0;
}
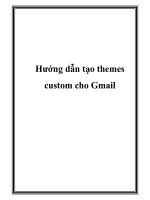
To see the captioning styles in action, you'll need to create a captioned image. Go to the
administrative interface, and create a new post. Click on the Add an Image button in the
media toolbar, and upload a single image.
Enter a short caption in the Caption eld, as shown in the following screenshot:
Then, click on the Insert into Post button, and publish your post.
Integrating Media
164
Viewing the post on the front-end, you should see something similar to the example shown in
the following screenshot:
How it works
The style declarations that were added to the style.css le will surround the image with
a light gray box and a gentle border that gives the image and caption a sense of unity. The
caption and image are centered in the caption container.
To understand how to appropriately style an image caption, it helps to understand how the
caption markup is output, and what exactly that markup looks like.
When WordPress sees the shortcode [caption] inside of a post's content, it auto-expands
this based on the parameters passed to the shortcode, and the image tag contained
within it. This expansion happens inside the img_caption_shortcode function found in
wp-includes/media.php.
The img_caption_shortcode function is really simple. It examines the parameters passed
to the shortcode, and uses those parameters to build a surrounding div for the image and
the caption, and appends a caption paragraph to the content within the shortcode. The
surrounding div includes a couple of classes and an inline style declaration. The caption
paragraph has the class wp-caption-text.
As such, the following shortcode:
[caption width="300" caption="Test Caption"]
<img src="al/wp-content/uploads/2009/10/Tulips2-300x225.
jpg" alt="Test Caption" title="Tulips" width="300" height="225"
class="size-medium wp-image-105" />
[/caption]