Hướng dẫn tạo themes cho wordpress part 14 pot
Bạn đang xem bản rút gọn của tài liệu. Xem và tải ngay bản đầy đủ của tài liệu tại đây (1.25 MB, 10 trang )
Chapter 7
135
wp_tag_cloud(array(
'number'=>3,
'unit'=>'',
'format'=>'list',
'orderby'=>'count',
'order'=>'DESC',
'taxonomy'=>$tax
));
}
?>
</div>
</div>
<?php get_sidebar(); ?>
<?php get_footer(); ?>
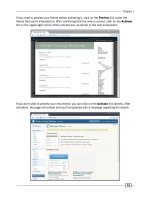
You can now use your Taxonomies page template. Go and create a new page in the WordPress
administrative area, and make sure that it uses the Taxonomies page template. If you need
more information on how to do this, see the recipe Creating a simple page template. Visit
your newly-created page. You should see output similar to the example shown in the
following screenshot:
Custom Page Templates
136
How it works
By this time, you should have a pretty good idea of the way in which custom page templates
work. If you need a refresher, see the How it works section of the Creating a simple page
template recipe.
Here you're taking advantage of the taxonomy system that has been built into WordPress
since Version 2.3, as well as the custom taxonomy capabilities built into WordPress since
Version 2.8. The taxonomy system essentially lets you classify objects in your system in ways
that makes sense for your particular content. If you're reviewing movies, it makes sense to
classify them in Genres. If you're looking at art, it makes sense to classify them by Periods.
After you've classied your content, you need to somehow let visitors navigate according to your
custom taxonomies. That is where this recipe comes into play. In this recipe, you use a couple
of new functions. First, you take advantage of the
get_object_taxonomies function. This
function takes a single parameter that indicates the type of object that you want to retrieve
taxonomies for, and returns an array of registered taxonomy names for that object type. Next,
you iterate over each taxonomy name, retrieve the appropriate taxonomy object, and then
display the taxonomy label, and a list of all items in that taxonomy that have been used to
classify objects.
The function that you use to display the items in taxonomy is
wp_tag_cloud. Most people
don't realize the full potential of this function, believing that it is only used for displaying
post tags. However, you can use wp_tag_cloud to display items from any taxonomy, by
passing a taxonomy name in as a parameter.
You pass other parameters as well, and it is important to know why you provide the values
that you do:
number—used to limit the number of taxonomy items present in the list output
unit—setting this parameter to an empty string ensures that all items are the
same size
format—setting this parameter to the value list causes the output to be an
unordered list
orderby—you can use different values here, but using count ensures that your
taxonomy items are sorted by the number of objects they are assigned to
order—setting this to DESC makes the taxonomy items order themselves from
high to low
taxonomy—the value here determines which object classication will be looked
at inside of the function
Internal to wp_tag_cloud is a complicated SQL query that looks at different taxonomy tables
and the posts table, applies the options that you pass, and generates the appropriate output.
An investigation into the internals of this function is beyond the scope of this book.
Chapter 7
137
See also
Creating an archives page template
Creating a simple page template
Displaying author avatars and descriptions
Multi-author blogs are gaining momentum in the professional and business blogging world. As
such, if you're producing a business theme for WordPress, you might want to take special care
to produce a page template that displays information about each of the authors on a blog.
In this recipe, you'll create such as page template. This will show the author's display name,
avatar, biography, and the number of posts that they've written for the site. It will also contain
a link to that author's posts.
Getting ready
To properly use the techniques in this recipe, you'll need to be working with a theme that you
previously acquired or developed. If you haven't started developing a custom theme yet, I
recommend using the Thematic theme. It can be freely downloaded from the WordPress.org
Theme Repository at />How to do it
First, follow the steps in the recipe Creating a simple page template until you reach the point
at which you start adding custom content. While following that recipe, modify the lename
from hello-world-page-template.php to authors-page-template.php, and
change the value of the Template Name: header from Hello World to Authors.
Now you're ready to start adding the appropriate content. After the page template comment
header, add the following markup to your page template, and then save the le:
<?php get_header(); ?>
<div id="container">
<div id="content">
<?php
$authors = get_users_of_blog();
foreach($authors as $author) {
$num_posts = get_usernumposts($author->ID);
if($num_posts>0) {
$id = $author->ID;
$author = new WP_User($id);
?>
Custom Page Templates
138
<div class="author" id="author-<?php echo $id; ?>">
<h2 class="author-name">
<?php
the_author_meta('display_name',$id);
?>
</h2>
<div class="author-gravatar">
<?php
echo get_avatar($id);
?>
</div>
<div class="author-description">
<?php
the_author_meta('description',$id);
?>
</div>
<div class="author-posts-link">
<a href="<?php
echo get_author_posts_url($id); ?>">
<?php
printf(
'%s has written %d posts. Check \'em out!',
get_the_author_meta('display_name'),
$num_posts
);
?>
</a>
</div>
</div>
<?php
}
}
?>
</div>
</div>
<?php get_sidebar(); ?>
<?php get_footer(); ?>
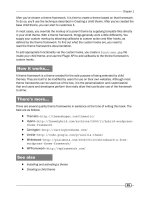
You can now use your Authors page template. Go and create a new page in the WordPress
administrative area, and make sure that it uses the Authors page template. If you need more
information on how to do this, see the recipe Creating a simple page template. Visit your
newly-created page. You should see output similar to the following, depending on the
authors that you have on your site:
Chapter 7
139
In the above screenshot, you see numerous authors with their name, description, avatar,
and a link to their posts. The information could be expanded upon, but this is a good
starting point.
How it works
By this point you should have a pretty good idea of the way that custom page templates
work. If you need a refresher, see the How it works section of the Creating a simple page
template recipe.
There are a few functions of note in this recipe, nearly all of them dealing with the retrieval
of author data. The code listing starts with the get_users_of_blog function. This function
returns an array of user objects, one for each user currently in the system. Next, you iterate
over the array of users, checking to see whether they have published any posts or not. If an
author has published at least one post, then you proceed with displaying various user data.
Custom Page Templates
140
Here, user data is displayed by using the the_author_meta function with different parameters
and the value of the user ID for the author currently being iterated over. In addition, the get_
avatar
function is used to display the appropriate image for each author. All of the data for
each author is wrapped in a nice set of HTML tags that provide proper formatting and display.
There's more
If you're going to display information for each author on a dedicated page, you should probably
redisplay that information on their individual author listings as well. You already have the proper
markup, so this will be a piece of cake.
First, separate out the display code for an author into its own le. You could call this le
something like author-expanded.php. It will contain the following code:
<div class="author" id="author-<?php echo $id; ?>">
<h2 class="author-name">
<?php
the_author_meta('display_name',$id);
?>
</h2>
<div class="author-gravatar">
<?php
echo get_avatar($id);
?>
</div>
<div class="author-description">
<?php
the_author_meta('description',$id);
?>
</div>
<div class="author-posts-link">
<a href="<?php echo get_author_posts_url($id); ?>">
<?php
printf(
'%s has written %d posts. Check \'em out!',
get_the_author_meta('display_name',$id),
$num_posts
);
?>
</a>
</div>
</div>
Chapter 7
141
Now go back to your authors-page-template.php, and change it to use the
newly-created le, leaving you with something like the following:
<div id="container">
<div id="content">
<?php
$authors = get_users_of_blog();
foreach($authors as $author) {
$num_posts = get_usernumposts($author->ID);
if($num_posts>0) {
$id = $author->ID;
$author = new WP_User($id);
include(STYLESHEETPATH.'/author-expanded.php');
}
}
?>
</div>
</div>
After that, open up your theme's author.php le (if you don't have one, just create one
and copy the contents of index.php into the new le). Immediately before the posts listing,
insert a call for the expanded author information. Your code should look something like the
following example:
<?php
global $wp_query;
$id = $wp_query->get_queried_object_id();
$author = new WP_User($id);
$num_posts = get_usernumposts($id);
include(STYLESHEETPATH.'/author-expanded.php');
if(have_posts()) { while(have_posts()) {
the_post();
Custom Page Templates
142
Call up an author's post page, and you'll see the expanded author information, followed by a
list of that user's posts:
See also
Creating a simple page template
Creating a table of contents page template
Let's say you're writing a book where you publish each chapter as it is nished. You're going to
use WordPress pages for your content organization, with a top-level page describing the book
and then a subpage for each of the chapters in your book.
On the top-level page, in addition to the book title and description, you want to display links to
each of the chapters, and a brief description of their content. This task would be difcult with
a lot of other content management systems, but not with WordPress.
Chapter 7
143
Getting ready
To properly use the techniques in this recipe, you'll need to be working with a theme that you
previously acquired or developed. If you haven't started developing a custom theme yet, I
recommend using the Thematic theme. It can be freely downloaded from the WordPress.org
Theme Repository, at />How to do it
First, follow the steps in the recipe Creating a simple page template until you reach the point
at which you start adding custom content. While following that recipe, modify the lename
from hello-world-page-template.php to toc-page-template.php and change the
value of the Template Name: header from Hello World to Table of Contents.
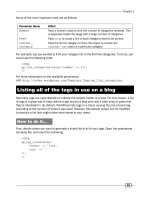
Now you need to create the appropriate content that will be displayed when using this page
template. Create a top-level page for your book with the work's title as the post title, and choose
the Table of Contents template from the Template drop-down menu in the Attributes meta box.
Then create several child pages, using the chapter's title as the post title. For each child page,
make sure that you choose your main book page from the Parent dropdown and the Table of
Contents option from the Template dropdown. When you're done, visit the Edit Pages interface,
and you should see something like the example shown in the following screenshot:
Custom Page Templates
144
Chapter order
When you're creating your book's chapters, make sure that you set the
Order property in the Attributes meta box (the same place that you change
the page template) to the number of the chapter. This ensures that your
chapters appear in the correct order.
Now you're ready to write the code to generate your table of contents. After the comment
header, add the following markup to your page template, and then save the le:
<?php get_header(); ?>
<div id="container">
<div id="content">
<?php
if(have_posts()) {
while(have_posts()) {
the_post();
?>
<h2 class="book-title"><?php the_title(); ?></h2>
<div class="book-description">
<?php the_content(); ?>
</div>
<h2>Chapters</h2>
<ol>
<?php
$chapters_query = new WP_Query(array(
'post_type'=>'page',
'post_parent'=>get_the_ID(),
'orderby'=>'menu_order',
'order'=>'ASC'
));
if($chapters_query->have_posts()) {
while($chapters_query->have_posts()) {
$chapters_query->the_post();
?>
<li class="chapter">
<h3 class="chapter-title">
<a href="<?php the_permalink(); ?>">
<?php the_title(); ?>
</a>
</h3>
<?php the_excerpt(); ?>
</li>
<?php