Hướng dẫn tạo themes cho wordpress part 12 pot
Bạn đang xem bản rút gọn của tài liệu. Xem và tải ngay bản đầy đủ của tài liệu tại đây (1.22 MB, 10 trang )
Chapter 6
115
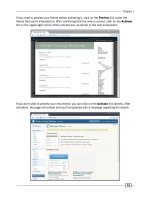
Log into your WordPress administration panel, and then click on Plugins. The Widget Logic
plugin should appear in the Manage Plugins list. Click on the Activate link for this plugin. A
message should appear at the top of the page verifying that the plugin is now activated. Now,
if you visit the Active area of your Manage Plugins screen, you should see it listed, as seen in
the next screenshot:
Next, go to Appearance | Widgets, in order to add an Archives widget that will only display
on single-post pages. Drag an Archives widget over to Sidebar 1, then enter the relevant
information in the widget. For example, for the Title, enter the text Recipes by Date, place a
checkmark in the Show post counts checkbox, and type the conditional statement is_single()
in the Widget logic text eld. Click on the Save button in the widget form.
The Archives widget should now look like the screenshot below:
Sidebars
116
When we view the blog, we should now see this Archives widget only on our single posts page,
as shown in the next screenshot:
How it works
Here you are using the various conditional tags supplied by WordPress to check for the context
of the current page. Then, depending on the context, a specied widget is displayed in the
dynamic sidebar, without you creating any additional sidebar les. Instead, the Widget Logic
plugin allows you to use existing sidebars and add conditional behaviours to the widgets that
you assign to them with the convenience of using the existing widgets panel.
This allows your theme's users to display widgets conditionally depending on their needs given
the different contexts. Erring on the side of giving your users more control is always a great
way to go.
Find the category ID (or a post ID, and so on) by hovering your mouse over
the Edit link of your category or other item. The category ID will appear in the
status bar of your browser.
Chapter 6
117
There's more
In this recipe, we focused on controlling the content that appeared in existing sidebars, by
using a plugin that accepted conditional tags. This is an area of WordPress that you can dive
into and customize the display of widgets in your sidebars as much as you like.
Getting more out of conditional tags
There is much more that you can do with both the Widget Logic plugin and conditional tags.
To learn more, visit:
/> />Specic sidebars for custom theme pages
An alternate method in cases where you want to explicitly use specic pages in your theme
pack and provide them to users (such as a gallery, table of contents, and so on) is to create a
unique sidebar page for each corresponding template page, and then call the sidebar in the
appropriate page. You may also want to assign default widgets to the different sidebars,
as well.
For example, create a sidebar page called sidebar-toc.php, adding a dynamic sidebar
function call:
<?php if ( function_exists ( dynamic_sidebar(1) ) ) : ?>
<div id="my-sidebar-div">
<ul id="my-sidebar-ulstyle">
<?php dynamic_sidebar (1);
?>
<li>
//table of contents conditional statements or other content here
</li>
</ul></div>
<?php endif;
?>
The 1 in dynamic_sidebar(1) is the number that WordPress uses to
identify the sidebar. It considers the default sidebar (sidebar.php) to
be sidebar(0). If you already have other sidebars before adding one, like in
this example, you will need to number it appropriately.
In functions.php, you register the sidebar by the name toc:
<?php if ( function_exists ('register_sidebar')) {
register_sidebar ('toc');
} ?>
Sidebars
118
Finally, open the table-contents.php (or whatever you name that page) and place a
get_sidebar tag:
<? get_sidebar('toc'); ?>
Save all les, and then upload them to your theme. Visit />Customizing_Your_Sidebar
to learn more.
Showing asides in the sidebar by using the
Miniposts plugin
Asides are a concept unique to blogging. When a blogger wants to say something, but there
isn't enough content to constitute an entire post, they can put it in a special "Aside" category
that is displayed in the sidebar, or use a plugin to assign posts as "asides".
Getting ready
You will need a theme that contains a sidebar.php le, or else you can create one using
earlier recipes in this book. We will be using a variation of the Classic WordPress theme in
this recipe.
How to do it
Download the Miniposts plugin from />miniposts/
, and unzip the folder. Look for the miniposts folder inside the wrapper folder,
and upload it to the plugins folder of your theme. Log into your WordPress administration
panel, and then click on Plugins. Click on the Activate link to activate the Miniposts plugin.
Next, go to Appearance | Widgets and drag the Miniposts widget to the main sidebar. There
is no additional default conguration for this widget.
Finally, go to the Posts panel and create a new post to be an aside. Place text in the main
post and the excerpt texteld. Place a check against any categories that you like. The most
important step at this point is to place a check in the Miniposts This is a mini post
checkbox.
Chapter 6
119
You can see an example post in the following screenshot:
Any posts that you create and mark as Miniposts will now appear in your sidebar. The next
screenshot shows an example of how an aside post will appear in a sidebar:
Sidebars
120
How it works
Miniposts singles out any post that you identify as a minipost from the regular posts on your
blog and causes them to be displayed in your sidebar. Read more about the Miniposts plugin
at />There's more…
You can also create your own custom asides.
Creating custom asides
Back in the dark ages of WordPress, before version 2.8, creating asides often meant hacking
into code. If you are interested in asides and want to customize them for your theme, you can
learn more about them at />Adding an interactive Facebook-style wall to
a sidebar by using jQuery
Visitors love interactive features on blogs. This recipe will help you create a Facebook-style
interactive wall so that you can communicate quickly, in a sidebar.
Getting ready
You will need a WordPress theme that uses a widgetized sidebar, meaning that you should be
able to manage your widgets under the Appearance panel of your administration area.
How to do it
Download WP Wall from />wp-wall
. Unzip the folder, and then upload the wp-wall folder (be careful to upload the
inner wp-wall folder and not the outside download wrapper folder, in which also named
wp-wall) to your /wp-content/plugins/ folder.
Log in to your administration panel and go to the Plugins page. Click on the Activate link for
the plugin to activate it. Add the widget to a sidebar, and then expand the widget to view the
Options link (you can also nd the options for WP Wall in your administration panel under
Settings | WP Wall). Click on it to view the options page.
Chapter 6
121
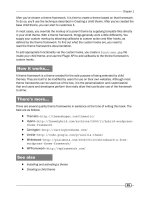
Next, we set the options. There is a long list of options for this plugin, so we will focus on
the most important ones. Under the General Options heading, set the Title for the widget
to Say What? and change the Leave a reply text to Say it. Next, enter 10 in the Number of
comments to show box. Finally, place a check in the following checkboxes: Show 'All' link,
Show email eld in the form, Show gravatar images, Show post comment box expanded by
default, and Reverse order of displayed comments. Select two checkboxes in the Comments
heading: Only registered users can post and Treat admin deleted comments as spam.
An example of how many of the settings for WP Wall should appear is shown in the
following screenshot:
Sidebars
122
Save your settings, and then go back to your widgets panel to verify that the widget has been
placed on your preferred sidebar and that the title is correct. Save the widget, and then view it
in your browser window. Add a comment or two (invite a few friends over to try it out as well),
and you should see something similar to the next screenshot:
How it works
The WP Wall creates a site-wide comments system for your blog. When you install and
activate the plugin, it creates additional hooks into the existing WordPress comments by
adding additional functions. Conguring a WP Wall widget allows you to leverage the security
features of WordPress comments and the exibility to add the wall to all of the pages of your
blog, or restrict it to specic sidebars or areas.
There's more
WP Wall allows you to create a simple wall to dene complex options and behaviours.
Doing more with WP Wall
Read up on the many additional options and discover more ways to use WP Wall with your blog
by visiting />7
Custom Page
Templates
In this chapter, we will cover:
Creating a simple page template
Creating an archives page template
Creating a taxonomy navigation template
Displaying author avatars and descriptions
Creating a table of contents page template
Showing your pictures from Flickr
Displaying a special template for a specic category
Introduction
One of the most important reasons for the proliferation of WordPress-based sites is the ease
with which the software allows web developers and designers to display different content in
a myriad of different ways. This starts in the core and extends to the theming system.
First, there is the concept of core template les. Out of the box, WordPress will attempt to load
predetermined template les for different types of content. For example, the author.php le,
if it exists, is used when a user visits an author's post listing page. Likewise, the home.php
le is used when a visitor happens upon the root of the site.
Custom Page Templates
124
On top of this base system, there is a whole additional level available to theme developers. The
developers can create specic page templates that display a variety of content in a very specic
way. The templates are created individually when the theme is being developed, and they may
or may not rely upon user-supplied content. These types of templates are activated, per page, by
the user, from the WordPress administrative area. These types of template les are particularly
useful for static page content or when you need to completely override the appearance of a
particular piece of content.
Creating a simple page template
The rst thing that we'll cover in this chapter is creating a simple page template. This recipe
shows the specic markup that you need to include in a PHP le in order to make sure that
WordPress recognizes it as a page template. In addition, we'll demonstrate how to choose a
page template when creating a page. When you get to the end of this recipe, you'll be fully
equipped to create and use new page templates with your custom themes.
Getting ready
To properly use the techniques in this recipe, you'll need to be working with a theme that you
previously acquired or developed. If you haven't started developing a custom theme yet, I
recommend using the Thematic theme. It can be freely downloaded from the WordPress.org
Theme Repository at />How to do it
To create a custom page template, you start by creating a single le. In general, the lename
should be descriptive of its content or purpose and should clearly delineate it as a page
template. Open your theme's directory and create a new le called hello-world-page-
template.php
.
Next, you need to add the appropriate markup that lets WordPress recognize the le as a
page template. Open the le that you just created (
hello-world-page-template.php)
for editing, and insert the following code at the very top of the le:
<?php
/*
Template Name: Hello World
*/
?>
If you've worked with PHP before, you'll immediately recognize this as a standard comment
block. Inside of the comment block is a specially-formatted string that tells WordPress that
this is a page template. We'll go over the details of how WordPress works with this le later,
but for now let's move on to displaying content.