Hướng dẫn tạo themes cho wordpress part 11 potx
Bạn đang xem bản rút gọn của tài liệu. Xem và tải ngay bản đầy đủ của tài liệu tại đây (1.1 MB, 10 trang )
Chapter 6
105
You can add your own placeholder content or default widgets by adding the relevant code just
below the dynamic_sidebar function in a sidebar.php le. In the following example,
the Archives widget has been added as a default widget, and will show the 15 most
recent posts:
<ul>
<?php if( !dynamic_sidebar(1) ); ?>
// Insert default content here
<li id="archives"><?php _e('Archives:'); ?>
<ul>
<?php wp_get_archives(type=postbypost&limit=15'); ?>
</ul> </li>
</ul
Learn more about parameters and options for sidebars at the WordPress codex
/>.
Setting the default widgets for a sidebar in
your theme
Your theme may have a particular purpose, or serve a certain niche group. You may bundle a
number of different widgets with your theme that provide the best possible experience when
using it. If so, you'll likely want to have these widgets inserted into your sidebars when the
theme is activated.
Getting ready
You need to have a theme with a sidebar.php template, and at least one of your main
theme les must use the get_sidebar function to include the sidebar. In addition, your
sidebar must be dynamic. Finally, you must know the unique IDs of your sidebars and of the
widgets that you wish to pre-set in those sidebars. To make your sidebar dynamic, see the
earlier recipes in this chapter. Back up your current theme, and be aware that using this
recipe will reset the widgets of the active theme.
Sidebars
106
How to do it
Open or create your theme's functions.php le. In this example, we will be inserting default
widgets for default search, pages, categories, and recent comments. Insert the following block
of code immediately before the closing ?> tag within the le:
$current_theme = get_option( 'template' );
$target_theme = 'Widgety_Theme';
if ( is_admin() &&
current_user_can( 'switch_themes' ) &&
isset( $_GET['activated'] ) &&
$current_theme == $target_theme
){
$preset_widgets = array ( 'sidebar-one' => array(
'widget-search-2', 'widget-pages-3' ),
'sidebar-two'=> array('widget-categories-4',
'widget-recent-comments-3'));
update_option( 'sidebars_widgets', $preset_widgets );}
You will need to substitute the correct values for the following variables before the code will
work with your theme:
$target_theme—replace Widgety_Theme with the name of the folder in which
your theme resides
$preset_widgets—replace the array with a multidimensional array in which each
of your sidebar IDs is a key to an array of widget IDs that you wish to have in the
sidebar, as shown in the example above
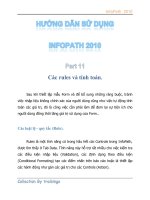
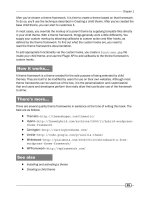
Save the functions.php le. Remember, this code only works when a theme is activated; so
deactivate this theme if it is your current theme, then upload the updated functions.php le
and reactivate your theme, or install it on a test site to see the changes to the sidebars in the
Widgets area of the admin panel as seen in the next screenshot:
Chapter 6
107
Now that you have the basic idea down, you can create your sets of default widgets for the
sidebars of your theme.
How it works
You accomplished a lot in this example! Let's take a closer look at what happened. First, the
name of the currently-active template is stored in a variable. Then, the name of the target
template (the name of the folder that your theme is stored in) is stored in another variable.
Following this, a comparison is made. A check is performed to conrm that an administrative
interface page is being displayed. Next, the code conrms that the currently logged-in
user has the ability to switch themes and manage widgets. Without these two checks,
any anonymous user would be able to reset all of your widgets.
The next two parts of the conditional are equally important. The third condition checks that a
new theme is being activated. Obviously, the widget reset should only happen when the theme
has been switched to. The nal condition checks that the currently-active theme is the same
as the target theme (your theme, in this case).
If all of these conditions hold true, then it is time for the real work of setting the predened
widgets. First, an associative array is dened. Looking at this in more detail may be helpful:
$preset_widgets =
array
( 'sidebar-one' => array( 'widget-search-2', 'widget-pages-3'
),'sidebar-two'=> array('widget-categories-4', 'widget-recent-
comments-3'));
In this example, the assumption is made that a sidebar with the ID sidebar-one exists in
your theme and that there are at least two widgets present, one with the ID search-2 and
one with the ID pages-3. This array basically says that the sidebar sidebar-one should
have the widget search-2 and pages-3 inside of it, and that the sidebar sidebar-two
should have the widgets categories-4 and recent-comments-3 without any further
conguration from the user.
The next line updates the sidebars_widgets option in the WordPress database, where
information regarding the content of dynamic sidebars is stored. After that is done, the
widgets will be set appropriately.
There's more
Widget IDs can be found in several ways. Read on for two options on how to discover the IDs
of your widgets.
Sidebars
108
Widget IDs
To nd the ID of a particular widget, you have a few options. The rst option is to look at
the code of the plugin that provides the widget (if it comes from a plugin) or examine the
WordPress source for plugins that come with the default distribution.
The second option may be easier. Install a test blog and use the WordPress Classic theme,
adding the widgets that you want to know the IDs for, to the only sidebar available. Then, view
the source of the front page of the blog and look for the sidebar HTML. Each widget's ID will
be displayed as the id attribute of a list item in the sidebar, as follows:
<li id="widget-id">
Make a note of the IDs of the widgets that you want to use and you're all set.
Positioning multiple sidebars in your theme
by using CSS
As you may have seen previously in this chapter, just because you add a second or third
sidebar to your theme does not mean that it will be placed where you want it in your layout.
We will adjust the layout of a two-column theme to a three-column theme with a sidebar on
each side, by using only CSS, in your style.css le.
Getting ready
We will be using a basic theme customized from the WordPress Classic theme. If you are
already using the Classic theme, the measurements should work precisely. You may have to
adjust the width, padding, or margins from the examples in this recipe to t your layout. We
will be spending most of our time in the style.css le of the theme, so if you are unfamiliar
with CSS, you may want to visit www.w3schools.com to learn more about it, as this recipe
assumes a basic knowledge of CSS and stylesheets.
How to do it
First, open up the sidebar-two.php le, or whatever le is your secondary sidebar le, in
your editor. It may already have a div tag wrapped around the sidebar code that looks like:
<div id="menu">. Rename the id to <div id="menu-left"> and make sure there is a
closing div tag </div> at the end of the le. Save the le.
Next, we will begin adding the positioning information to the styles.css le, so open that
le up. Find the #menu{} rule and copy it and all the others below it that have #menu. The
last one should be #menu ul ul ul.children {font-size: 142%;padding-left:
4px;}
. There are too many to list here, but you can refer to the styles.css le included in
the companion code of this book.
Chapter 6
109
Paste the #menu{} rules below the closing bracket of the last #menu ul ul ul.children{}
style. Add -left to each of the newly pasted #menu style rules so that they all begin with
#menu-left.
Now adjust the declarations within
#menu-left{} to add more padding, set the width and
height, and align sidebar-two to the left , so that your CSS looks like the following:
#menu-left {
position: absolute;
background: #fff;
border-left: 1px dotted #ccc;
border-right: 1px dotted #ccc;
border-top: 10px solid #e0e6e0;
padding: 20px 0 10px 10px;
color:#333;
left: 2px;
top: 0;
width: 12.5em;
height:75%;
}
We now need to adjust the height, padding, right alignment amount, and width of the #menu
rule that controls the positioning of the main (right) sidebar:
#menu {
position: absolute;
background: #fff;
border-left: 1px dotted #ccc;
border-top: 10px solid #e0e6e0;
padding: 20px 0 10px 30px;
margin:0;
right: 1px;
top: 0;
width: 12.5em;
height:75%
}
We do not need to adjust any of the other #menu or #menu-left style rules at this time. The
body, #header, and #content rules will need their declarations adjusted to make room for
the two sidebars. Scroll up to the body selector. Add the declaration width:100%; to the
bottom of the styles, just before the closing bracket so that the body style rule now looks like
the following code:
body {
background: #fff;
border: 2px solid #565;
Sidebars
110
border-bottom: 1px solid #565;
border-top: 3px solid #565;
color: #000;
font-family: 'Lucida Grande', 'Lucida Sans Unicode', Verdana, sans-
serif;
margin: 0;
padding: 0;
width:100%;
}
The #content styles now need their padding, margin, and width adjusted. Adjust the margins
and padding, and add a width declaration as shown in the next block of code:
#content {
margin: 5px 13em 0 13em;
background:transparent;
padding-right:30px;
padding-left:30px;
width:46em;
}
The #header styles are in the last section of the style sheet that needs adjusting, in order
to control the positioning of the sidebars. Add a width selector of 25.5em, change the
border-top to none and set the padding declaration to 20px 40px 20px 60px as
shown in the code example below:
#header {
background: #333;
font: italic normal 230% 'Times New Roman', Times, serif;
letter-spacing: 0.2em;
margin: 0 6em 0 5em;
padding: 20px 40px 20px 60px;
width:25.5em;
border-bottom: 3px double #aba;
border-left: 1px solid #9a9;
border-right: 1px solid #565;
border-top: none;
}
Chapter 6
111
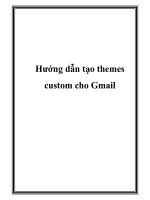
Save and then upload the secondary sidebar le (sidebar-two.php) and the style.css le.
When you view the result in your browser, the blog should now look like the next screenshot:
How it works
In a basic WordPress theme, the #menu or #sidebar styles control the positioning of the
sidebar on the screen. Adding a secondary div to control the secondary sidebar, and making
adjustments to the layout creates an area for the secondary sidebar, and gives the theme
user greater control over the layout. The style.css le controls the presentation and
positioning of the objects within the screen, including the posts, widgets, header, footer, and
sidebars. First, we added a new div style to the secondary sidebar in its sidebar le, assigning
that CSS style to the sidebar. Then, the new style rule was created in the style.css le
that told WordPress the height, width, and location of the sidebar within the layout. The
positioning for the other key elements, primary sidebar, header, and content area, also
had to be adjusted.
There's more
You can make room for additional sidebars, or have one sidebar be wider than the
other, depending on how you adjust the width, margins, and padding of the styles in your
styles.css le, and how you apply them in the other les of your theme. Also, check
the .feedback class and .story class in your stylesheet, as you may have to adjust
padding in those as well.
Sidebars
112
Position: absolute versus oat
We kept the sidebar styles set to absolute positioning in order to keep this recipe focused
on its core purpose: adjusting the layout of the sidebars. In most cases, you will want to
explore using the float property, as this gives you more options as a designer, and allows
your layout to be exible instead of xed.
Doing more with design and layout
If this recipe sparked your interest in doing more positioning actions through the use of CSS in
your theme, you will want to visit the Blog Design and Layout section of the WordPress codex,
at />Styling the appearance of sidebars in your
theme by using CSS
WordPress themes use the style.css le to control both the layout (positioning) of objects
as well as how they look (appearance). We will create a different appearance for each sidebar
of the theme, by using the color and background declarations of each sidebar selector.
Getting ready
We'll be using a variation of the Classic Wordpress theme in this example. You can use any
theme you like, but the names of the selectors (such as #sidebar instead of #menu) may
vary depending on the theme.
How to do it…
Open up your style.css le and nd the #menu{} style. Change the background color to
#ff9966, a peachy pink color. Next, change the border-top declaration to none, and the
border-left declaration to 5px dotted #ff3333;. The #ff3333 hexidecimal code is
a dark orange. Add the declaration color:#333; to the #menu style. Your style should now
look like the example shown below:
#menu {
position: absolute;
background: #FF9966;
border-left: 5px dotted #FF3333;
border-top: none;
padding: 20px 0 10px 30px;
margin:0;
right: 1px;
top: 0;
width: 12.5em;
height:100%;
color:#333; }
Chapter 6
113
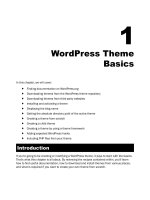
Upload the style.css le, and then view the change in your browser window. It should look
as shown in the following screenshot:
How it works…
WordPress relies heavily on the style.css le to control the appearance of widgets, pages,
and other objects in a theme. When a page or other object is loaded, Wordpress checks the
style.css le for any special instructions regarding text color, background color, borders,
and so on. Starting with the larger default tags such as body, WordPress then moves down
the stylesheet from larger to smaller elements.
For example, it will check the body statement rst for any background color declarations,
then moves on to custom style rules like #menu. If menu declares a different background
color, as it did in our recipe, then WordPress will display that color when the sidebar is called.
If there are no smaller elements such as custom widget style rules with specic background
color declarations, WordPress stops there and you now have a peachy colored default sidebar
instead of a white one.
Sidebars
114
There's more…
There is much more that you can do to change the appearance of your sidebars. Adding
background images and customizing list items with graphics or other list-style-types (circles,
squares, and so on) is just the beginning. Going more in-depth about the possibilities of CSS is
beyond the scope of this book, but in the paragraphs below you will nd additional resources
to take it further.
Design and Layouts: The WordPress codex
There is a wealth of information about WordPress theme design in the WordPress codex. Start
with to begin your
journey into altering the appearance of the sidebars in your theme.
Sandbox: The theme for maximum appearance options
The Sandbox theme comes with multiple layout options and examples, and is a very clean
theme to use when you want to focus on styling its appearance without touching anything
in the theme other than the stylesheet. It was also featured in "WordPress for Business
Bloggers", Paul Thewlis, Packt Publishing. You can download the theme from:
/>Displaying different widgets on different
pages by using the Widget Logic plugin and
conditional tags
Given the different contexts for different page displays, you may wish to display different
widgets in sidebars for places like the home page, category archive, or single-post display
pages. With dynamic sidebars and the Widget Logic plugin, this is easy to accomplish.
Getting ready
You need to have a theme that uses dynamic sidebars with a sidebar.php template,
and at least one of your main theme les must use the get_sidebar function to include
the sidebar.
How to do it
Download the Widget Logic plugin from />widget-logic/
. Upload the widget_logic.php le to the plugins directory of your
theme's folder.