Hướng dẫn tạo themes cho wordpress part 8 ppt
Bạn đang xem bản rút gọn của tài liệu. Xem và tải ngay bản đầy đủ của tài liệu tại đây (1.03 MB, 10 trang )
Chapter 4
75
How it works
The next_posts_link and previous_posts_link functions each print a link that
allows users to navigate through the archives of a site. Interestingly, previous_posts_link
navigates forward through posts chronologically, whereas next_posts_link navigates
backward through posts chronologically. While this is counterintuitive to many people,
it has yet to be changed, and probably won't be, due to concerns over legacy themes.
In addition, the lone parameter to these functions allows you to customize the text that is
displayed with the link. Simply change the parameter value to change the links' text in
your theme.
There's more
Archive navigation isn't just for big loops with multiple posts. Single pages can be navigated
through similarly, by using functions named almost exactly the same. In single.php or
page.php, insert the following wherever you want navigation links to appear:
<div class="navigation">
<div><?php previous_post_link('« %link') ?></div>
<div><?php next_post_link('%link »') ?></div>
</div>
Displaying an edit link for posts
After you publish a post, you'll often want to go back and update facts as more becomes
available on a developing story, or to correct spelling and grammar errors that you've noticed
after reading through it. Rather than force your theme's users to log in and search to nd the
post to edit, you can provide a link to the editing page directly in your theme.
How to do it
Open a template le where you are displaying posts in the The Loop. Decide where you want
the edit link to appear. It can appear anywhere inside The Loop. Place your cursor at that point
and insert the following code:
<?php edit_post_link('Edit this entry','','.'); ?>
How it works
The edit_post_link function detects the currently logged in user's role and capabilities.
If the user is logged in and he or she has the ability to modify the post that is currently being
displayed, then the Edit link appears.
Template Tags
76
Three parameters are used to format the link. The rst parameter allows for customization of
the text of the link. The second parameter is displayed before the link and the third parameter
is displayed after the link.
Use this function in your theme! Your users will thank you for it when they don't have to go
searching for an old post in the admin system.
Displaying custom eld content
As WordPress is used for an increasingly varied array of content, users often add extra meta
information to posts that should be displayed in a theme. This metadata includes things like
post thumbnail URLs, ratings, or even entirely new blocks of content like callouts or
something similar.
How to do it
First, you need to determine the name of the meta information that the user has entered via
the Write Post or Write Page interface. As a theme developer, you'll probably want to give some
instructions to your users on what custom meta keys are supported. The meta information
entry interface looks like the following example to WordPress users:
Chapter 4
77
You can see the meta key eld on the left and the Value eld on the right. The meta key is
generally more important to you as a theme developer, so instruct your users on what to
enter there. If they had previously used a meta key, it will appear in a drop-down list as
shown in the following:
After you've determined what meta key you want to display on the blog's frontend, it is simple
to make it appear. Open a theme le that contains The Loop and place your cursor where you
want to display the meta information. Insert the following code:
<?php
echo get_post_meta(get_the_ID(), 'meta_name', true);
?>
Replace the string meta_name in the above code sample with the name of the meta key eld
that you wish to display the value for.
How it works
WordPress stores meta information in the post meta table in the WordPress database. When
you call get_post_meta in your theme, it looks for metadata named by the string passed as
the second parameter to the function related to the post specied by the ID passed in the rst
parameter. The third parameter tells WordPress to return only one result, so that you can print
it immediately.
There's more
A user can enter multiple post meta values for a single key. In order to retrieve and fetch all of
these, use the following code:
<?php
global $post;
$post_meta = get_post_meta( $post->ID, 'meta_name' );
foreach( $post_meta as $meta_item ) {
echo $meta_item . '<br />';
}
Template Tags
78
Replace the string 'meta_name' in the above code sample with the name of the meta key eld
that you wish to display the value for.
Here the omission of the third parameter instructs WordPress to return all post meta with
the key meta_name as an array. After that, you iterate over each post meta item and print it,
followed by a line break.
Displaying a post author's avatar
Visitors are more likely to engage with your post authors if they can identify them quickly and
easily. One of the best ways to allow this is to build support for displaying avatars directly into
your theme.
This technique is best for multi-author blogs where authors for different posts vary. If your blog
expects only a single user to be writing, then this tip might not be for you.
How to do it
Open a theme le that contains The Loop. Place your cursor inside the loop where you want
the author's avatar to appear, and then insert the following code:
<?php
global $post;
echo get_avatar($post->post_author);
?>
This code will produce markup like the following:
<img
width="96"
height="96"
class="avatar avatar-96 photo"
src=" />252ed115afcb3c69546ed891b8eddddf?s=96&d=http%3A%2F%2Fwww.gravatar.
com%2Favatar%2Fad516503a11cd5ca435acc9bb6523536%3Fs%3D96&r=G"
alt=""/>
This markup will display as a small image like the following:
Chapter 4
79
How it works
When you pass a user ID to the get_avatar function, it recognizes the numeric value and
looks up the user in the WordPress database. It then assigns the e-mail to use for Gravatar
retrieval as the e-mail set for that user in the WordPress back-end. By default, the function
then contacts Gravatar to fetch the appropriate image for the user (although this functionality
can be overridden by plugins).
5
Comments
In this chapter, we will cover:
Displaying a comment form on a post
Displaying comments on a post
Displaying the latest comments on your blog
Highlighting the post author's comments
Alternating the style for comments
Displaying threaded comments properly
Introduction
Comments are one of the most important parts of blogging. In fact, some say that a blog isn't
really a blog without comments. As such, it is very important to pay attention to the way that
comments are styled and the way that they function in your theme.
This chapter starts with the basic tenets of comment display and formatting, and
later expands on some really interesting things that you can do with the WordPress
comment system.
Displaying a comment form on a post
Because comments are so important on a blog, it stands to reason that the best place to start
is with how to display an appropriate comment form on each post. The comment form allows
the appropriate visitors to leave comments with their name, e-mail address, and URL. The form
presented in this recipe is the standard comment form that the default WordPress theme uses.
Comments
82
How to do it
The rst thing you need to do here is to open your single content template, either
single.php or page.php, and insert the appropriate template tag. Scroll to the
end of your post display code, and insert the following function call:
<?php comments_template(); ?>
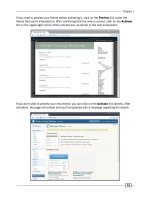
Open up your site and browse to a single post. Upon arriving there, you should see one of two
things. If you are logged in, you'll see a notice indicating your username and a Log out link, as
well as the comment input box. This is shown as follows:
Chapter 5
83
If you are not logged in, you'll see a Name, Mail, and Website eld, in addition to the
comment input box. You can see an example here:
How it works
The code above is quite simple. It consists of a single template tag, but produces a whole
boatload of content. Where does this content come from? Well, you haven't created a
comments template yet, so this output comes from the default theme, and is contained in
a le called comments.php. This comments.php contains all of the proper inputs, checks
for comment registration requirements, and ensures that comments are rendered in an
appropriately semantic and purposeful manner.
In addition to rendering the appropriate output, the comments_template function also does
some behind-the-scenes work that determines the comments to display, whether to display
comments and trackbacks separately, and gets the information for the current commenter.
This is the reason you use the comments_template function instead of including
comments.php directly.
Comments
84
There's more
The base comments.php le is great for most purposes, and very rarely needs to be
changed. If you do want to display your comments in a vastly different way, you can do so
quite easily. First, copy the comments.php le from the default WordPress theme to your
custom theme. Then make the modications that you need to the output in your local le.
WordPress will automatically use your new comments.php le instead of the default
theme's comments.php le.
Displaying comments on a post
After users leave comments on your posts, you'll obviously want to display them. The most
frequent use case for displaying comments is to list all of the comments on a single post, and
there is a template tag that does this quickly and easily. In this recipe, we'll take a look at
the template tags used to display comments and where you would use them.
How to do it
First, you'll need to decide where you want to display your comments. The most obvious place
to use comment template tags would be in a custom comments template. Alternatively, you
could just list comments directly on a post without concern for the other things that a
comments template provides (appropriate inputs and more).
Here we'll use the default
comments.php le as an example. Copy the comments.php
le from the default theme to your custom theme's directory. Scroll down to line 28 (as of
WordPress 2.9) of the le and see that the following code is present:
<ol class="commentlist">
<?php wp_list_comments(); ?>
</ol>
Here you're using the wp_list_comments function, which iterates over the comments on a
post and renders the appropriate output based on the comment display callback. A default
callback is used if you do not explicitly pass one.
How it works
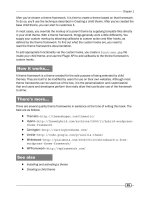
wp_list_comments is a special template tag that looks at the comments for the current post
and displays them by using a special callback function. Calling the template tag without any
parameters tells it to use the default options, which will generally produce markup compatible
with your theme. The output is, by default, a list of <li> elements containing various comment
metadata as well as the comment author's avatar. You can see an example of a few comments
in the following screenshot from the default theme: