Hướng dẫn tạo themes cho wordpress part 7 docx
Bạn đang xem bản rút gọn của tài liệu. Xem và tải ngay bản đầy đủ của tài liệu tại đây (1.47 MB, 10 trang )
Chapter 4
65
There's more
WordPress denes a wide variety of PHP functions that retrieve or print information about
the currently-active post. The following functions are the most frequently-used functions in
any template:
the_ID
the_title
the_title_attribute
the_content
the_excerpt
the_category
the_tags
next_post_link
next_posts_link
previous_post_link
previous_posts_link
The purpose of most of these functions is self-explanatory, but you should try each of them in
a template to see what kind of output you end up with. In addition, you can see the complete
list of template tags and the corresponding documentation, for posts and otherwise, at
/>See also
Creating a basic Loop
Automatically limiting the number of words
of content
In some instances, you may wish to display a specic number of words from a post's content,
perhaps in a compact loop for older posts or as part of an asides section in a blog's sidebar.
This recipe shows you how to go about it.
Template Tags
66
How to do it
First, open or create your functions.php le. This le resides in your theme's root directory.
You're going to create a custom template tag for your theme, and the functions.php le is
the proper place to do so. Inside of your functions.php le, place the following code:
<?php
function limited_the_content($number_words = 200) {
global $post;
$stripped_content = strip_tags($post->post_content);
$words = explode(' ', $stripped_content);
if( count($words) < $number_words ) {
echo $stripped_content;
} else {
$words = array_slice($words, 0, $number_words);
echo implode(' ', $words);
}
}
?>
You'll use this function in place of the_content to display your post's content. Open one of
your theme's template les (such as index.php) and insert the following code inside
The Loop:
<?php limited_the_content($number_words); ?>
Replace the $number_words variable in the above code snippet with whatever number
of words you wish to display. You can check the difference between the_content and
limited_the_content by using the following Loop:
<?php
if( have_posts() ) {
while( have_posts() ) {
the_post();
?>
<div class="post <?php echo $alt_post; ?>">
<h2><?php the_title(); ?></h2>
<h3>Content</h3>
<div><?php the_content(); ?></div>
<h3>Limited to 25 Words</h3>
<div><?php limited_the_content(25); ?></div>
</div>
<?php
}
}
?>
Chapter 4
67
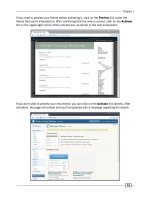
When viewing the output of the above snippet, you'll see something like the example shown in
the following screenshot:
How it works
The limited_the_content function accesses the currently-active post by globalizing the
$post variable. The global $post variable always contains the value of the post currently being
displayed in The Loop.
After that, the active post's contents are retrieved from the $post variable's post_content
property, and all HTML tags are removed. Finally, the modied post contents are split apart
into separate words by exploding the contents on the space character (this means that you
are assuming that every time there is a space, we should break off the previously-seen
characters as a new word). If the total number of words present in the post's content is less
than the maximum allowed, then the tag-less content is returned intact. Otherwise, the
number of words is pared down to the number allowed. The words are re-joined by
replacing the spaces removed earlier, and the newly-constructed string is returned.
As seen in this chapter, almost every single instance where you're modifying PHP output involves
concatenation and other string operations. If you're unfamiliar with these concepts, then you
should check out the ofcial PHP reference manual at />Template Tags
68
Again, it is important to note here that all HTML tags have been stripped out from the post's
content before doing this manipulation. This is to avoid a scenario where HTML tags become
mismatched, messing up the display of your carefully-constructed theme.
Determining if the user is on a specic page
There will come a time when your theme should do something special for a certain page.
Maybe your About page should display the author biographies or avatars, or perhaps you
want your Contact page to include your phone number and address at the top, in addition
to whatever other content appears.
How to do it
Decide on the page that you want to customize, and remember its name. Open your theme's
page.php le. This template le is used when displaying a single page. Place the cursor
in the template where you want your custom content to be displayed, and then insert the
following code:
<?php
if(is_page('Page Name')) {
// Put special content code here
}
?>
Replace Page Name with the name that you previously determined. Save the le and view the
special page in your browser. Whatever content you added specically for that page should
appear. However, if you navigate to a different page, then the special content will not appear.
How it works
The is_page function utilizes the global $wp_query variable and its data to verify that a
page is being viewed and that the page being viewed matches the conditions specied by
the function's parameter.
By default, the is_page function only checks to see if a page is currently being displayed.
However, by passing it a parameter, you can check to see if a specic page is being viewed.
The parameter could be the page name, page slug, or page ID, whichever is most convenient.
I recommend using the page slug or page name over the page ID, as the ID has little chance
of being the same on your development and production installations, whereas the name and
slug will almost certainly be identical between the two environments.
Chapter 4
69
Determining if the user is viewing a post in
a particular category
Many WordPress users utilize categories to differentiate between different types of content
or to show their intent with regard to a particular post. As a theme author, it is sometimes
useful to differentiate between categories by using an image or special text. To do so, you
must rst determine if the user is viewing a post in a special category. Then you can take
the appropriate action or render the appropriate output.
How to do it
First, decide on the category that you wish to display special content for, and remember its
name. Open a template le where you are displaying posts in a Loop and you wish to add
special content for posts in a certain category. Place your cursor where you want to display
special output, and then insert the following code:
<?php
if(in_category('Category Name')) {
// Output appropriate code here
}
?>
Replace Category Name with the name of the category that you wish to use.
How it works
Every post can be in many different categories. For example, a post might be about
programming and more specically about WordPress. Thus, you'd put that post into the
Programming category and the WordPress category.
In this recipe, you're checking to see if the currently-active post is in the Category Name
category. If it is, whatever output you render between the braces ({}) will be shown. If the
active post is not in that category, nothing will happen.
The parameter to in_category can be a category name, slug, or ID. In most cases, you'll
want to use a name or slug, as those items will likely match on your development and
production installations, whereas the category ID will not.
Template Tags
70
There's more
in_category can also check multiple categories. If you have Category 1 and Category
2
on your blog, you can check to see if a post is in either of these categories by using the
following code:
<?php
if(in_category(array('Category 1','Category 2'))) {
// Output appropriate code here
}
?>
If you need to check if a post is in both Category 1 and Category 2, then you would use
the following code:
<?php
if(in_category('Category 1') && in_category('Category 2')) {
// Output appropriate code here
}
?>
Displaying the post date for each post
Generally speaking, blogs run chronologically. One blog post follows another and they are
often sorted by date. Several similar-sounding template tags seem like they would show the
date for a post, but only one does it for each post.
How to do it
Open one of your theme's template les that contain The Loop. Inside The Loop, place
your cursor at the point where you want to output the time and date on which the post
was published. Insert the following code:
<?php the_time( 'F j, Y' ); ?>
How it works
Looking at the list of template tags, many theme developers believe that the_date will
output the date for each post. However, it will only display the date once for each unique date
in The Loop. That is, if you had multiple posts on a single day, the_date would only render
output for the rst one. To display the date for each post, use the_time with a date format
string that species that the month, day, and year should be displayed.
Chapter 4
71
You can modify the date and time components that are output from the_time by modifying
the date format parameter. Find out more about date format strings by visiting http://us2.
php.net/manual/en/function.date.php
.
Highlighting search terms in post content
If a user utilizes the WordPress search function to scour your site for something, then you
know that their query is probably pretty specic. You can make it easier on your visitors by
highlighting search terms in their search results. This way, they'll be able to immediately scan
to the appropriate places in your content.
How to do it
First, open or create your theme's functions.php le. You'll be creating a custom lter that
latches onto post content and excerpts, and the functions.php le is the correct place to
do so. Insert the following code in this le:
<?php
function highlight_search_terms($content) {
if( is_search() ) {
$search_term = get_query_var('s');
$content = preg_replace( "/\b($search_term)\b/i",
'<span class="search-result">$1</span>', $content );
}
return $content;
}
add_action( 'the_content', 'highlight_search_terms' );
add_action( 'the_excerpt', 'highlight_search_terms' );
?>
Open your theme's stylesheet (style.css) and insert the following style declarations:
.search-result {
background: #0000ff;
color: #ffffff;
padding: 0 3px;
}
Template Tags
72
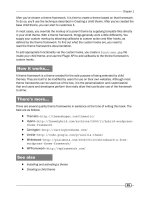
Finally, ensure that your theme le has a search eld on it somewhere. Search for a term
on your site and you should see that the term is highlighted in blue in the content that is
displayed. In the following example, I've searched for the string this:
How it works
You'll see that after you search every instance of your search term is wrapped in a new
<span> tag that is styled by the search-result declaration in your stylesheet. These
specially-styled tags will appear as long as the output is being rendered by using either
the_content or the_excerpt.
To start, you create a new function that accepts a string of content and performs an operation
on that content before returning it. In this instance, you use a conditional tag to check if a
search page is being displayed. If it is, the search term is fetched (it is stored in the WordPress
query variable s) and then the content is run through a simple regular expression.
Chapter 4
73
In this instance, the regular expression seeks out each instance of the search term that
appears in the $content string. When it nds one, it surrounds it in a <span> tag by doing a
match replacement. This regular expression usage is case insensitive, so a search for Test will
match both Test and test. Please note that this will only match whole words, so a search for
Test will not cause the rst part of Testing to be highlighted.
The style declaration here simply highlights the word by giving it a background of blue, making
the color of the text white, and spacing it out a bit from surrounding words. The possibilities
with this method are endless, however.
Displaying login/logout links
One of the most important actions that your theme's users will take is to log in and out of your
WordPress installation. Many installations limit certain content to logged-in users, so login
and logout links must be prominent and correct.
For security purposes, logout links must contain a specially-constructed nonce (basically, a
secure key), so it isn't good enough to point to the login page with a specic action argument.
Using the WordPress functions, you can display login and logout links with one simple
function call.
How to do it
Open a template le that you wish to insert the login/logout link into. Generally, you want
login/logout functionality to be available across your entire site, so a good place for this code
is in your header or sidebar. Place your cursor wherever you want the login/logout link to
appear, and then insert the following code:
<?php wp_loginout(); ?>
How it works
This super handy utility function does a few things. First, it checks to see if a user is currently
logged in. If the user is logged in, it prints a link containing a security nonce to the logout page
with the text Log out (localized as necessary). Conversely, if a user is not logged in, a link to
the login page is printed with the text Log in (again, localized as necessary).
Template Tags
74
There's more
You may wish to have different text for the login and logout links than the default that is
provided. Unfortunately, there is no parameter that lets you change the text directly through
the wp_loginout function. As such, you need to get slightly more creative, and replace the
above code with the following piece of code:
<?php
if ( ! is_user_logged_in() ) {
$link = '<a href="' . wp_login_url() . '">' . __('Log in text') .
'</a>';
} else {
$link = '<a href="' . wp_logout_url() . '">' . __('Log out text') .
'</a>';
}
print $link;
?>
From there, you can replace the Log in text and Log out text as appropriate
for your site.
Adding navigation through older/newer posts
If users are properly engaged, they'll want to navigate through your archives, reading old posts
that you published long before the ones on the front page of your site. Luckily, WordPress has
functions built in to allow you to easily print these navigation links.
How to do it
Open a template le that you wish to add post navigation to. The most likely candidates
for this are your index.php template le or any of the archive-based template les
(category.php, tag.php, author.php, and so on). Place your cursor where you
want the navigation links to appear, and then insert the following code:
<div class="navigation">
<div><?php
next_posts_link('« Older Entries')
?></div>
<div><?php
previous_posts_link('Newer Entries »')
?></div>
</div>