Học JavaScript qua ví dụ part 92 pot
Bạn đang xem bản rút gọn của tài liệu. Xem và tải ngay bản đầy đủ của tài liệu tại đây (1017.64 KB, 11 trang )
ptg
812 Chapter 18 • An Introduction to Ajax (with JSON)
18.4 Putting It All Together
The steps we have covered are summarized in the following Ajax examples to demon-
strate how to communicate with the server. The first example demonstrates how to use
Ajax to get the server’s time and respond to key events, the next two examples work with
a text file and an XML file, and demonstrate how to retrieve display the content of both
types of files, and the last example uses Ajax with forms using both the GET and POST
methods. All of the programs go through the following steps:
1. The user clicks a button or presses a key to initiate a function that will start the
process of Ajax communicating with the server.
2. Most important, JavaScript uses the XMLHttpRequest constructor method to
create a new object that will serve as the Ajax communication layer between the
browser and the server. (If not this, IFrames or cookies can be used, but will not
be covered in this text.)
3. Once the XMLHttpRequest object is created, it is initialized with the object’s
open() method to set up the type of HTTP request (GET or POST), the URL
(where the request is going), and whether the request will be asynchronous
(true and the default), or synchronous (false).
4. The request is then sent to the server with the object’s send() method.
5. The server processes the request and sends a response to the browser in either
XML or text format. It contains the data only of the page elements that need to
be changed. In most cases this data will include of just a fraction of the total
page markup.
6. JavaScript processes the server response, updates the relevant page content, or
performs another operation with the new data received from the server.
Connecting to a Server Program. If you are ready to start using PHP and Apache
to test these examples, go to and download
XAMPP. It is a very easy to install Apache Distribution for Linux, Solaris, Windows and
Mac OS X. The package includes the Apache Web server, MySQL, PHP, Perl, an FTP
server, and phpMyAdmin. Once you have installed XAMPP, you will be able to start up
the services with the XAMPP control panel by clicking on the XAMPP icon (see Figure
18.7) or going to the Start menu (Windows) or Application menu (MacOS). When you
get to the XAMPP control panel (see Figure 18.8), just click to start Apache to get your
Apache HTTP server running. PHP scripts will be stored in the same place as HTML
files, under the server’s root, and should be given a .php extension. There are many tuto-
rials and books on PHP. Of course we recommend PHP and MySQL by Example by Ellie
Quigley and Marko Gargenta (Prentice Hall, ISBN 0-13-187508-6).
Figure 18.7 XAMPP icon to open the control panel.
From the Library of WoweBook.Com
ptg
18.4 Putting It All Together 813
An Ajax Example with PHP. Example 18.2 demonstrates an asynchronous interac-
tion between the browser and server using Ajax. The PHP server-side script, executing
in the background, will be called every time the user types in a letter and releases the
key. When a key is released, a request is sent to the server, the PHP script is executed,
and the response is returned back from the server as text that can be inserted in an
HTML div container along with the current time as hour/minute/second. If the delete
key is pressed and released the letter will be removed in the text box as well as in the div
container. You can see how, with some more extensive programming on the PHP side,
you could make your “search suggest” application, by creating an array of search strings.
If the user typed a letter or letters in a search box on the browser, Ajax would send each
letter to the server. The server script would then match each letter against the strings in
its array, and if there was a match, return the response in a string to the browser. Because
this text cannot assume you are already savvy in PHP, it won’t be attempted here, but
there are many tutorials on the Web to demonstrate how this is done. For some good
examples, see:
or />Example 18.2 contains the Ajax code where communication between browser and server
takes place. The CSS style sheet for Example 18.2 is located in an external file (Example
18.3). Another file called ajaxCreateRequest.js (Example 18.4) contains the code for cross-
browser checking and most important creating a new a XMLHttpRequest object.
The Client Side script—“ajaxGetText.html”
Figure 18.8 Starting the Apache server with XAMPP.
EXAMPLE 18.2
<html>
<head><title>First Ajax Script</title>
1 <link rel="stylesheet" type="text/css" href="ajaxStyle.css" />
2 <script type="text/javascript"
src="ajaxCreateRequest.js"></script>
Continues
From the Library of WoweBook.Com
ptg
814 Chapter 18 • An Introduction to Ajax (with JSON)
<script type="text/javascript">
3 function goAjax(){
4 var ajaxRequest=createRequest();/* Cross-browser check;
Get a new XMLHttpRequest object */
if( ajaxRequest != false){ /* If we got back a request
object create callback function to check state of the
request*/
5 ajaxRequest.onreadystatechange = function(){
6 if(ajaxRequest.readyState == 4){
7 if(ajaxRequest.status==200){
8 document.getElementById("message").innerHTML=
ajaxRequest.responseText;
}
}
} // End callback function
9 yourname=document.getElementById("username").value;
10 ajaxRequest.open("GET",
"http://localhost/serverTime.php?name=" + yourname +
"&random=" + Math.random()
);
11 ajaxRequest.send(null);
} //End if
else{ alert("Browser problem was encountered!");}
} // End ajaxFunction()
</script>
</head>
<body>
<form name="myForm">
12 Your name: <input type="text" onKeyUp="goAjax();"
name="username" id="username" /> <br />
<p>
13 <div id="message" class="divStyle">
<! This is where the Ajax output will be displayed >
</div>
</p>
</form>
</body>
</html
EXPLANATION
1 The CSS style sheet is loaded from a file called “ajaxintro.css”. It defines the back-
ground color as aliceblue and the style of the <div> contents that will be displayed
in the browser, a dark green container with white letters. See Example 18.3.
2 A .js file is loaded here. It contains a JavaScript function that performs a cross-
browser check and creates and returns the XMLHttpRequest object. If the object
cannot be created, the function will return false. Example 18.4 contains the func-
tion found in an external file called “ajaxCreateRequest.js”.
EXAMPLE 18.2 (CONTINUED)
From the Library of WoweBook.Com
ptg
18.4 Putting It All Together 815
The CSS File—“ajaxStyle.css”
3 This function is where the Ajax communication between the browser and server
will happen. It is called when the onKeyUp event handler is triggered; that is,
when the user presses a key and releases it ( line 12).
4 This function will be called every time the user releases a key. It is responsible for
all the Ajax activity, once an XMLHttpRequest object has been created.
5 The callback function (also called inline function) monitors the state of the server.
When the onreadystate event handler sees that the server has changed state, the
callback function is executed.
6 If the readyState property is 4, the HTTP request has completed.
7 If the HTTP server status is 200 OK, then the server was successful and we are
ready to view the response.
8 The getElementById() method will return a reference to the div container name
message (line 13). The ajaxRequest.responseText property contains the ASCII text
that was returned. The value of the innerHTML property contains that returned
text that will be displayed in the <div> container.
9 The getElementById() method will get the name that the user typed in the text
field and assign it to a variable called yourname.
10 The request object’s open() method initializes the XMLHttpRequest object. The request
will be sent as an HTTP GET request to start a server-side PHP program on the localhost
(see Example 18.5). The parameters are two URL encoded key/value pairs: The first is
the name of the user (name=yourname) and the second is a random number value.
11 The send() method is responsible for sending the request to the server. When us-
ing the GET method, the argument is set to null.
12 The HTML form has one input device, a textbox. After the user types a character
in the box and releases the key, the onKeyUp event handler will be triggered and
call the goAjax() function.
13 When the server responds, it will send back text that will be displayed in this div
container. The div container will be styled by the class divStyle defined in the ex-
ternal .css file shown next.
EXAMPLE 18.3
body{background-color:aliceblue;}
.divStyle { /* class for the <div> container
background-color:aliceblue;
margin-left:20%
margin-right:20%
border-style:solid;
color:white;
font-size:150%
}
EXPLANATION ( CONTINUED)
From the Library of WoweBook.Com
ptg
816 Chapter 18 • An Introduction to Ajax (with JSON)
Creating the Request Object—“ajaxCreateRequest.js”
The Server-Side PHP Script—“serverTime.php”
EXAMPLE 18.4
/* Check browser type and create ajax request object
Put this function in an external .js file and use it for your
Ajax programs */
function CreateRequestObject(){
var ajaxRequest; // The variable that makes Ajax possible!
try{
// Opera 8.0+, Firefox, Safari
ajaxRequest = new XMLHttpRequest(); // Create the object
}
catch (e){
// Internet Explorer Browsers
try{
ajaxRequest = new ActiveXObject("Msxml2.XMLHTTP");
}
catch (e) {
try{
ajaxRequest = new ActiveXObject("Microsoft.XMLHTTP");
}
catch (e){
return false;
}
}
}
return ajaxRequest;
} //End function
EXAMPLE 18.5
1 <?php
//Server side script to handle request
2 extract($_REQUEST);
3 echo "Welcome, $name!";
4 echo "<br />Time now is ", date("h:i:s A "),".";
?>
EXPLANATION
1 The PHP server-side file, called serverTime.php is located in the server’s root di-
rectory (e.g., htdocs, www, etc.) and will be executed by the server. Its output will
be sent back to the browser and displayed in the div container defined in the
HTML document. To run this script, you must have an HTTP server and PHP in-
stalled. See XAMPP at for installing
the Apache and PHP.
From the Library of WoweBook.Com
ptg
18.4 Putting It All Together 817
2 This PHP function extracts the data from a global associative array called
$_REQUEST. It contains any name/value pairs of the HTML form sent with either
GET or POST requests; in this example, the array contains two elements: name
and “Ellie”. PHP’s extract() function creates a variable, $name, for the name and
assigns it the value “Ellie”. (This information was sent in the request object’s
open() method as “http://localhost/serverTime.php?name=”+yourname+“&ran-
dom=” + Math.random()).
3 The PHP echo statement returns the value of $name to the server where it is then
sent back to the Ajax program in the Ajax request object’s responseText property.
4 The PHP date() function returns the hour, minute, and second, AM or PM. This
data is updated in the Ajax program every time the server sends a response. Re-
sults of this process are shown in Figures 18.9 through 18.13.
Figure 18.9 The page as it is initially displayed.
Figure 18.10 Once the user starts typing, the div box appears with the letters and
time.
EXPLANATION ( CONTINUED)
From the Library of WoweBook.Com
ptg
818 Chapter 18 • An Introduction to Ajax (with JSON)
Figure 18.11 Each time a letter is typed, it is added to the name in the div box
while time is changing.
Figure 18.12 User types more letters, div box and server time are updated.
Figure 18.13 If the delete key is pressed the letters start disappearing in the div box
and time is updated.
From the Library of WoweBook.Com
ptg
18.4 Putting It All Together 819
18.4.1 Using Ajax to Retrieve Text From a File
In Example 18.6, we use Ajax to request and return ASCII text from a file and display
the response results in a div container. For a more sophisticated example of an Ajax pro-
gram using a text file, see
This Ajax ticker program adds the ability to periodically refetch the contents of an exter-
nal file. All source code is provided.
At you can find another
excellent tutorial on how to combine RSS, Ajax, and JavaScript to create a live RSS ticker.
Example 18.6 provides an Ajax program to get text from a file. The CSS file (Example
18.9) and the JavaScript file (Example 18.8) to create the request object are external file.
The text file is shown in Example 18.7.
The Ajax Program—“ajaxGetText.htm”
EXAMPLE 18.6
<html>
<head><title>Reading From a Text File with Ajax</title>
<link rel="stylesheet" type="text/css" href="ajaxTextFile.css" />
<script type="text/javascript" src="ajaxCreateRequest.js">
</script>
<script type="text/javascript">
function getText(url){
1 var ajaxRequest=createRequest();/* Cross-browser check;
Get a new XMLHttpRequest object */
if( ajaxRequest != false){ /* If we got back a request
object create callback function to check state of
the request*/
2 ajaxRequest.onreadystatechange = function() {
3 if (ajaxRequest.readyState == 4){
if (ajaxRequest.status == 200 ||
ajaxRequest.status==0){
4 document.getElementById('data').innerHTML=
ajaxRequest.responseText;
}
else {
alert('There was a problem with the request.');
}
}
} // End callback function
}
5 ajaxRequest.open('GET', url, true); // Initialize the
// object
ajaxRequest.setRequestHeader('If-Modified-Since',
'Sat, 03 Jan 2010 00:00:00GMT');
// Deal with the cache
6 ajaxRequest.send(null); // Send the request
Continues
From the Library of WoweBook.Com
ptg
820 Chapter 18 • An Introduction to Ajax (with JSON)
The Text File—“ajaxText.txt”
} //End getText() function
</script>
</head>
<body>
<span style="cursor: pointer; text-decoration: underline"
7 onclick="getText('ajaxtext.txt')">
Fetch text from a file
</span>
<p>
8 <div id=data class="divStyle">
</div>
</p>
</body>
</html>
EXPLANATION
1 A new XMLHttpRequest object, called ajaxRequest, is created (code is in “ajaxRe-
quest.js”, Example 18.8).
2 The callback function is defined and assigned to the onreadystatechange event
handler used to monitor the state of the server.
3 When the readyState of the server is 4, the request is complete. If the HTTP status
is OK (200), the program proceeds.
4 The getElementById() method will return a reference to the div container named
“data” on line 8. The ajaxRequest.responseText property contains the ASCII text
that was returned. The innerHTML property will put that text in the <div> con-
tainer.
5 The XMLHttpRequest object’s open() method initializes the object. The request will
be sent as an HTTP GET request to get data from a file called “ajaxtext.txt”.
(When using Internet Explorer the URL was http://localhost/ajaxtext.txt with
Firefox just the name of the file was given.)
6 The request is sent to the server.
7 When the user clicks the underlined text defined by the span tag, the getText()
function will be launched. Its argument is the name of the text file that will be pro-
cessed, shown in Example 18.7.
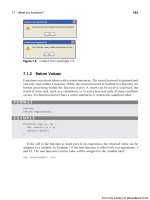
8 This is the <div> container where the results of the HTTP request will be dis-
played. See Figure 18.14.
EXAMPLE 18.7
Once upon a time there were
three little bears.
EXAMPLE 18.6 (CONTINUED)
From the Library of WoweBook.Com
ptg
18.4 Putting It All Together 821
The Ajax Request File—“AjaxRequest.js”
The CSS File—“ajaxTextFile.css”
EXAMPLE 18.8
/* Check browser type and create ajax request object
Put this function in an external .js file and use it for your
Ajax programs. Fully explained in Example 18.1. */
1 function CreateRequestObject(){
2 var ajaxRequest; // The variable that makes Ajax possible!
3 try{
// Opera 8.0+, Firefox, Safari
4 ajaxRequest = new XMLHttpRequest(); // Create the object
}
catch (e){
// Internet Explorer Browsers
try{
5 ajaxRequest = new ActiveXObject("Msxml2.XMLHTTP");
}
catch (e) {
try{
6 ajaxRequest = new ActiveXObject("Microsoft.XMLHTTP");
}
catch (e){
7 return false;
}
}
}
8 return ajaxRequest;
} //End function
EXAMPLE 18.9
body{background-color:aliceblue;}
.divStyle {
margin-left:5px;
margin-right:200px;
border-style:solid;
border-color:blue;
font-size:150%;
}
From the Library of WoweBook.Com
ptg
822 Chapter 18 • An Introduction to Ajax (with JSON)
18.4.2 Using Ajax to Retrieve XML from a File
XML is the Extensible Markup Language. Although similar in structure to HTML, XML
was designed to transport and store data, whereas HTML was designed to describe the lay-
out and looks of the data. With XML you create markup that defines the structure of a doc-
ument, but instead of having predefined tags as with HTML, you make your own. The
XML tree looks similar to the HTML upside-down document tree, starting with a root ele-
ment at the top and branching down to parents, attributes, children, and so on. XML has
rules, very XML-specific syntax rules on how to create a “well-formed” document. It is not
hard to learn, but if you are unfamiliar with XML, go to the W3C schools Web site where
you will find an excellent tutorial at />XML data is often stored in external files as plain text. The data in the XML files can be
easily exchanged between different programs, applications, and computers. In this chapter
we are using Ajax to exchange data between a client and server. In the previous example
the server returned a string of text from a simple text file. In this example we will use Ajax
to get data from an XML file as an object and use the XML DOM to parse and display the
data. And finally, at the end of this chapter, we will use an easier technology, called JSON,
to make exchanging and parsing data a little simpler. In fact JSON is said to be rapidly
replacing XML because of its easy lightweight data-interchange format.
The XML file for the following example, called “bookstore.xml”, is found in Example
18.10.
3
If you are not familiar with XML, this file is a good example of how the markup
is structured. The Ajax program (Example 18.11) makes a request to the server to get
the XML file. The server returns an XML object, and the rest of the program uses DOM
methods and properties to parse out the data from the XML object and to create the ele-
ments and text nodes that will be placed in an HTML div container.
Figure 18.14 A text file is retrieved and it contents displayed in a div container.
3. This example uses an XML file slightly modified from one found in the W3Schools XML tutorial.
From the Library of WoweBook.Com