ADOBE INDESIGN CS2 REVEALED- P17 pptx
Bạn đang xem bản rút gọn của tài liệu. Xem và tải ngay bản đầy đủ của tài liệu tại đây (917.7 KB, 15 trang )
LESSON 3
What You’ll Do
INDESIGN 6-18 Placing and Linking Graphics
Understanding Bitmap
Graphics
Bitmap graphics are created using a rec-
tangular grid of colored squares called
pixels. Because pixels (a contraction of
“picture elements”) can render subtle gra-
dations of tone, they are the most com-
mon medium for continuous tone
images—what you perceive as a photo-
graph on your computer.
All scanned images are composed of pix-
els. All “digital images” are composed of
pixels. Adobe Photoshop is the leading
graphics application for working with
digital “photos.” Figure 21 shows an
example of a bitmap image. The enlarged
section shows you the pixels that com-
pose the image.
The number of pixels in a given inch is
referred to as the image’s resolution. To
be effective, pixels must be small enough
to create an image with the illusion of
continuous tone.
The important thing to remember about
bitmap images is that any enlargement—
resizing the image to make it bigger—
essentially means that fewer pixels are
available per inch. Think about it—when
In this lesson, you will place bitmap
graphics in InDesign and explore issues
with resizing them.
▼
Choose your application wisely
Always keep in mind that InDesign’s primary role is as a layout application. Though
you can draw vector graphics in InDesign, its primary role is not that of a drawing
program. Adobe Illustrator is primarily a drawing program. Similarly, though you
can place bitmap graphics in InDesign, InDesign is not a photo manipulation applica-
tion. Adobe Photoshop is a photo manipulation application. What this means is, if
you want to create a complex drawing, create it in Illustrator. And if you want to
manipulate a bitmap graphic—especially if you want to enlarge a bitmap graphic—
do it in Adobe Photoshop, not in Adobe InDesign.
PLACE BITMAP
GRAPHICS
Lesson 3 Place Bitmap Graphics INDESIGN 6-19
you enlarge an image, the same number of
pixels are spread out over a larger area,
thus fewer pixels per inch. This decrease in
resolution will have a negative impact on
the quality of an image when it is printed.
The greater the enlargement, the greater
the negative impact.
QUICKTIP
Vector graphics have no pixels, thus they have no resolution.
Graphics professionals refer to vector graphics as being
resolution independent.
Understanding Bitmap
Graphics in Relation to
InDesign
As a layout application, InDesign is used
most often to produce documents that will
be printed—on anything from a desktop
printer to a high-speed state of the art off-
set printing press. InDesign layouts can
also be used for Web pages on the Internet,
or for display pages in an onscreen presen-
tation delivered on DVD or CD-ROM.
Bitmap graphics can be placed in InDesign
for all types of output.
Resolution is always an issue whenever
bitmap graphics are involved in a layout.
Correct resolution is determined by the
output medium—how the image is going
to be used. For example, if you were creat-
ing a layout for a CD-ROM, bitmap images
in CD-ROMs are usually saved at a resolu-
tion of 72 PPI (pixels per inch). Bitmap
graphics used in Web sites are also usually
saved at a resolution of 72 PPI. If you were
creating a layout for offset printing, the
resolution of the bitmap image must be
twice the line screen that the document
will be printed at. Line screen is a meas-
urement of the number of ink dots per inch
that make up the printed image. Typical
line screens for color offset printing are
133 LPI and 150 LPI (lines per inch).
Therefore, the bitmap image would need to
be 266 PPI or 300 PPI, respectively.
QUICKTIP
How do you know the line screen for a piece that will be
printed using offset printing? If you are the designer, you may
choose the line screen yourself or ask a representative at your
printing facility for advice.
FIGURE 21
Bitmap graphic
Using Photoshop layers in InDesign
With InDesign CS2, Adobe has further expanded InDesign's powerful interface with
Photoshop. In addition to being able to load a Photoshop file's clipping paths and
alpha channels in InDesign—a much-lauded feature in InDesign CS—InDesign CS2
now allows you to interface with a placed Photoshop file's layers and layer comps.
When you place a Photoshop file into an InDesign layout, you can now manipulate
the layer visibility of the top-level layers in the Photoshop file. Also, if the Photoshop
file was saved with Layer Comps, you can activate and view different layer comps—in
the InDesign file! These options are available to you in the Place dialog box when you
place the graphic; after it's placed, you can use the Object Layer Options dialog box.
Viewing modifications that you make in InDesign will not affect the Photoshop file.
Enlarged view of
eye shows pixels
INDESIGN 6-20 Placing and Linking Graphics
Understanding Resolution
Issues in Relation to InDesign
Resolution issues relate to InDesign in one
very important way. Once you place a
bitmap graphic in InDesign, you have the
option to scale the graphic—make it larger
or smaller. However, as discussed above,
enlarging a graphic in InDesign is not a
good idea, because it effectively reduces the
resolution of the bitmap graphic.
In a nutshell, you should try your best to
create all bitmap graphics in Adobe
Photoshop at both the size and resolution
that they will be used at the final output
stage. You would then import the graphic
into InDesign and leave its size alone. If
you find that you need to enlarge the
graphic substantially (more than 10%),
remember that all resizing of bitmap
graphics should be done in Photoshop, not
in InDesign. Adobe Photoshop offers much
more sophisticated methods for enlarging a
bitmap graphic—methods that maintain
the resolution. Use InDesign simply to
place the graphics in a layout, create text
wraps, etc.
Is there any leeway here? Yes. If you need
to reduce the size of a placed bitmap
graphic in InDesign, you can do so without
worrying about it too much. Reducing a
bitmap graphic in InDesign is not a prob-
lem, because you effectively increase the
resolution of the bitmap graphic (the same
number of pixels in a smaller area means
more pixels per inch). If you need to
enlarge a graphic slightly in InDesign, you
can feel comfortable enlarging it up to
110%. For anything larger, enlarge it in
Photoshop.
QUICKTIP
Remember, nothing in this discussion applies to
vector graphics. Vector graphics are resolution inde-
pendent. You can feel free to enlarge and reduce
placed vector graphics in InDesign to your heart’s
content.
Understanding the
Relationship of InDesign with
Other Adobe Products
Adobe makes a number of software prod-
ucts. InDesign is a layout application.
Illustrator is a drawing application.
Photoshop is a photo manipulation
application. Because they are all Adobe
products, they have been engineered to
work together, in most cases seamlessly.
This is a good thing. Also, because they are
all Adobe products, many of their functions
overlap. You can draw complex graphics in
InDesign, for example, and you can manip-
ulate a bitmap graphic in InDesign too.
This overlapping of functions is a good
thing. It allows you to do things to placed
graphics in InDesign, for example, without
having to go back to either Illustrator or
Photoshop. However, this overlapping can
also blur the distinctions between the
applications. So it’s important that
you keep clear in your head what those
distinctions are—what you can and cannot
do to a placed graphic in InDesign, and
what you should and should not do to a
placed graphic in InDesign. For example,
though it is possible to enlarge a placed
bitmap graphic 800% in InDesign, you
must educate yourself to understand the
ramifications of doing so, and why it might
not be something you should do, even
though it’s something that you can do.
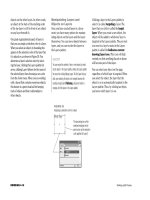
Removing a White Background
from a Placed Graphic
In many cases, bitmap graphics that you
place in InDesign will have a white back-
ground. One very useful overlap between
InDesign and Photoshop is the ability to
use InDesign to remove a white background
from a placed graphic. Using the Detect
Edges function in the Clipping Path dialog
box, as shown in Figure 22, InDesign
identifies pixels in the graphic based on
their values—from light to dark—and
makes specific pixels transparent.
The Threshold value determines the pixel
values that will be made transparent. For
example, if the Threshold value is set to 10,
the ten lightest pixel values (out of a total
of 256 values from light to dark) would be
made transparent. Your best method for
using this feature is to start with a
Threshold value of 0—no pixels will be
transparent. To make only the white pixels
transparent, use a Threshold value of 1 and
use the Preview function to see how that
Lesson 3 Place Bitmap Graphics INDESIGN 6-21
setting affects the image. If some unwanted
almost-white pixels remain, increase the
Threshold value until you are happy with
the preview.
The Tolerance value determines how
smooth the edge of the image will be once
pixels are made transparent. A Tolerance
value of 1 or 2 is usually acceptable.
Figure 23 shows a placed graphic, first
with a white background, then with the
white background removed using the
Detect Edges section of the Clipping Path
dialog box.
The Detect Edges feature works most effec-
tively with non-white foreground images
against a white background. One drawback
to using the Detect Edges feature is that it
affects all white pixels, whether they are in
the background or foreground. In other
words, if you have an image of a man wear-
ing a white hat against a white back-
ground, there’s no way to make the white
background transparent without making
the white hat transparent as well.
QUICKTIP
Detect Edges is a great feature of InDesign. If you
are working with many images with white back-
grounds, using this feature could potentially save you
lots of time. However, it will not work perfectly for you
every time. You may need to use other methods for
removing white pixels in Photoshop.
FIGURE 22
Detect Edges function in the Clipping Path dialog box
FIGURE 23
A placed graphic with a white background and with the white background made transparent
White background
made transparent
White background
INDESIGN 6-22 Placing and Linking Graphics
Loading Alpha Channels in
InDesign
Many times, when working with bitmap
graphics, you’ll find that you want to select
only a specific area of the graphic. For
example, you may want to isolate an image
of a person from its background. Using
selection tools in Photoshop, you can
do just that. The selection, known as
a silhouette, can be saved with the
Photoshop file for use in another
Photoshop document or in another pro-
gram, such as InDesign. Alpha channels
are selections made in Photoshop that have
been saved with a descriptive name.
InDesign has the ability to load alpha chan-
nels that have been saved with a Photoshop
file. This is another very useful overlapping
between InDesign and Photoshop. Alpha
channels are rendered in terms of black and
white, with the white areas representing the
selected pixels and the black areas repre-
senting the non-selected areas. Figure 24
shows a graphic in Photoshop and an alpha
channel that was saved with the graphic.
When you place the Photoshop graphic in
InDesign, the alpha channel saved with it is
not automatically loaded. The graphic will
be placed by default as a square-up—the
entire image including the background.
You can then use the Clipping Path com-
mand to load the alpha channel, thereby
creating a silhouette in your layout.
QUICKTIP
If you have saved multiple alpha channels with a
Photoshop file, they will be available to choose from
in the Clipping Path dialog box by clicking the
Alpha list arrow after clicking Alpha Channel from
the Type list.
FIGURE 24
A Photoshop file and an alpha channel
Black areas can be
made transparent
in InDesign
White represents
selected areas of image
Lesson 3 Place Bitmap Graphics INDESIGN 6-23
Loading Clipping Paths in
InDesign
Like alpha channels, paths are another
type of selection you can create in
Photoshop. Paths are created with the Pen
Tool, a very sophisticated selection tool in
Photoshop that allows you to make very
specific selections. Once created, one or
more paths can be saved with a Photoshop
file. You can also choose a path to be
exported with the file.
What’s the difference between saving a path
with a Photoshop file and exporting a path
with a Photoshop file? It’s a difference of
intended usage. If a path is exported with
the Photoshop file, the path will be loaded
automatically when you place the graphic
in InDesign. If you create a path for a
Photoshop graphic and you know you want
to use it to silhouette the graphic in your
InDesign layout, you might as well export
the path with the Photoshop file so you
won’t have to load it in InDesign.
Paths that have been saved (but not
exported) with a Photoshop file don’t auto-
matically load when you bring them into
InDesign, but you can use the Clipping
Path command in InDesign to load them.
Sometimes, you’ll only want to save a path
with a Photoshop document and not export
the path, thereby leaving yourself the
option to use the entire graphic or a sil-
houette in InDesign.
Placing a Graphic with a
Feathered Edge Against a
Colored Background in
InDesign
Look at Figure 25. It shows a graphic
with a soft edge. Designers refer to this
type of graphic as having a feathered edge.
Feathered edges are created in Photoshop.
Notice how the soft edge of the Photoshop
graphic gradates smoothly to the red-filled
frame in InDesign. While it may look easy
FIGURE 25
Graphic with a feathered edge placed in an InDesign frame with a red background
Soft (feathered) edge
INDESIGN 6-24 Placing and Linking Graphics
enough to achieve, think about the chal-
lenge at hand: you are trying to make a
graphic from one application—
Photoshop—transition smoothly to a col-
ored background created in a different
application—InDesign. This is actually one
of the trickier challenges when placing a
graphic from Photoshop into InDesign.
Placing a Photoshop graphic with a feath-
ered edge against a white background in
InDesign is standard—you simply save the
Photoshop graphic against a white back-
ground. But what if the graphics frame in
InDesign has a colored background—what
if it is red, as shown in Figure 25? What
would you do to achieve this effect?
Your first guess would most likely be to save
the Photoshop file against the same red
background in Photoshop. Good answer.
Theoretically, that would work. However,
printers cannot guarantee a perfect transi-
tion when trying to match a process color
from Photoshop to one from InDesign. It
can be done, but there’s a better way.
You might also think that using the
Clipping Path command in InDesign to
load a clipping path saved with the
Photoshop file would work, but this
method will not produce the smooth tran-
sition that you desire. You could save the
Photoshop file with a clipping path, but
paths cannot create soft edges when loaded
in InDesign. Figure 26 shows what the
image would look like in InDesign if a path
were loaded.
Finally, it would seem as though you could
save the selection and load an alpha channel
in InDesign. Figure 27 shows the alpha
channel saved from the selection. Note the
soft edge as the selection transitions from
white to black. Loading this alpha channel
in InDesign should achieve the goal, but it
doesn’t. InDesign does not recognize grada-
tions in alpha channels. In other words, it’s
all black or white. Figure 28 shows what
the image would look like in InDesign if the
alpha channel were loaded.
So what’s the solution? Read on.
FIGURE 26
Graphic with a path loaded
FIGURE 27
Alpha channel for the soft edge
Hard edge
Lesson 3 Place Bitmap Graphics INDESIGN 6-25
Placing a Graphic with a
Transparent Background in
InDesign
When placing a graphic with a feathered
edge against a colored background in
InDesign, the best solution is to save the
graphic against a transparent background
in Photoshop. You do this by making the
selection with a feathered edge, then copy-
ing the selection to a new layer. You then
make the original layer invisible. This solu-
tion is shown in Figure 29. Note that the
graphic now appears against a transparent
background (identified in Photoshop as a
checkerboard). If you save the graphic in
Photoshop with this configuration in the
Photoshop Layers palette, when you place
the graphic in InDesign, only the visible
layer—the graphic with the feathered
edge—appears.
Remember this solution. Remember also
the scenario—what the challenge is. (“How
do you place a Photoshop graphic with a
feathered edge against a colored back-
ground in InDesign?”) Some day, in some
situation, you can be certain that you will
encounter this scenario—probably at work
in a design department or production facil-
ity. Then, you can be the hero who has the
answer!
FIGURE 28
Graphic with an alpha channel loaded
FIGURE 29
Layers palette in Photoshop and a graphic against a transparent background
Background layer
is not visible
Checkerboard represents
transparent areas
Soft edge is lost when
alpha channel is loaded
INDESIGN 6-26 Placing and Linking Graphics
Remove a white background
from a placed graphic
1. Go to page 1, click the center of the page to
select the graphics frame, then place the
graphic named Black on White.psd.
TIP Fit the page in the window, if
necessary.
2. Click the Direct Selection Tool , then
click the graphic.
3. Click Object on the menu bar, then click
Clipping Path.
4. Click the Type list arrow, then click
Detect Edges.
5. Click the Preview check box to add a check
mark (if necessary).
As shown in Figure 30, at the default threshold
and tolerance settings, the white background is
made transparent, but so is part of the man’s
thumb, which is unacceptable.
6. Drag the Threshold and Tolerance sliders to 0.
At a 0 threshold, the white background is not
transparent.
7. Drag the Threshold slider to 1, click OK,
then deselect all.
As shown in Figure 31, when the threshold set-
ting is set to 1, the white pixels of the image—
and only the white pixels—become transparent.
Using the Detect Edges feature in the Clipping Path
dialog box, you were successful in making a white
background from a placed graphic transparent.
FIGURE 30
Viewing the transparency at the default threshold and tolerance settings
FIGURE 31
Viewing the transparency with a threshold of 1
Parts of thumb
are transparent
Thumb is not
affected
Lesson 3 Place Bitmap Graphics INDESIGN 6-27
Load alpha channels in
InDesign
1. Press [W] to return to Normal view.
2. Go to page 7, click the Selection Tool , click
the center of the page to select the graphics frame,
then fit the page in the window (if necessary).
3. Looking at Figures 32, 33, and 34, notice that
Figure 32 shows a Photoshop file that has been
saved with two alpha channels. Figures 33 and 34
show the two alpha channels in detail.
4. Click File on the menu bar, click Place, navigate to
the drive and folder where your Data Files are stored,
then place Red Silo with Alpha Channels.psd.
5. Click Object on the menu bar, point to
Fitting, then click Fit Content Proportionally.
TIP InDesign CS2 features a new Fitting com-
mand. Fill Content Proportionally assures that
no white space will be visible in the frame
when the graphic is resized. The Fit Content
Proportionally Command will leave white space
if the graphic and the frame have two different
aspect ratios. The Fill Content Proportionally
will resize the graphic to the minimum size
necessary to fill the entire frame.
6. Click Object on the menu bar, click Clipping
Path, then verify that the Preview check box
is checked in the Clipping Path dialog box.
7. Click the Type list arrow, click Alpha Channel,
click the Alpha list arrow, click Head Only, click
OK, then compare your page to Figure 35.
8. Click Object on the menu bar, click Clipping Path,
click the Alpha list arrow, then click Whole Body.
9. Press [W] to switch to Preview click OK, dese-
lect all, then compare your page to Figure 36.
You placed a file with two alpha channels. You
loaded each of the alpha channels, and previewed
the results in the graphics frame.
FIGURE 32
Photoshop file saved with two alpha channels
FIGURE 33
Whole Body alpha channel
FIGURE 34
Head Only alpha channel
FIGURE 35
Placed graphic with Head Only alpha channel loaded
FIGURE 36
Placed graphic with Whole Body alpha channel loaded
Alpha channels
Alpha channel is named
Whole Body
Alpha channel is
named Head Only
INDESIGN 6-28 Placing and Linking Graphics
Load clipping paths in
InDesign
1. Go to page 1, click the Direct Selection
Tool , select the graphic, then delete it.
2. Click the Selection Tool , select the empty
graphics frame, then place Puppies.psd.
Puppies.psd is a Photoshop file saved with
three paths.
3. Click Object on the menu bar, point to
Fitting, then click Fill Frame Proportionally.
4. Click Object on the menu bar, click Clipping
Path, then verify that the Preview check box
is checked.
TIP You may need to move the Clipping
Path dialog box out of the way to see the
results of your choices made in the dialog box.
5. Click the Type list arrow, click Photoshop
Path, click the Path list arrow, click Blake
Alone, then click OK.
Your page should resemble Figure 37.
6. Click Object on the menu bar, click Clipping
Path, click the Path list arrow, then click
Rex Alone.
7. Click the Path list arrow, click Blake and
Rex, then click OK.
8. Deselect all, then compare your page to
Figure 38.
You imported a file that was saved with three clip-
ping paths. In the Clipping Path dialog box, you
loaded each of the paths, and previewed the
results in the graphics frame.
FIGURE 37
Placed graphic with the Blake Alone path loaded
FIGURE 38
Placed graphic with the Blake and Rex path loaded
Lesson 3 Place Bitmap Graphics INDESIGN 6-29
Place a graphic saved with a
transparent background in
InDesign
1. Go to page 7, click the Direct Selection Tool
, click the image of the dog to select it,
then press [Delete] (Win) or [delete] (Mac).
2. Click the Selection Tool , click the mid-
dle of the page to select the graphics frame,
click Object on the menu bar, then click
Unlock Position.
3. Drag the top-middle handle of the graphics
frame straight up to the top edge of the
page.
4. Place Dog Layer.psd from the drive and
folder where your Data Files are stored.
As shown in Figure 39, Dog Layer.psd is
a Photoshop file containing two layers.
Layer 1 contains a selection of the dog with
a feathered edge against a transparent back-
ground, and the Background layer, which is
hidden, is white.
5. Click Object on the menu bar, point to
Fitting, then click Center Content.
6. Deselect all, then compare your document to
Figure 40.
The bitmap graphic is placed in InDesign
exactly the way it was saved in Photoshop,
with a transparent background.
7. Save your work.
You placed a graphic in InDesign that was saved in
Photoshop with a transparent background.
FIGURE 40
Viewing the result of importing the graphic
FIGURE 39
Photoshop file with graphic on a transparent layer
Checkboard represents
transparent areas
Background layer
is not visible
Soft edge maintained
against colored
background
LESSON 4
What You’ll Do
INDESIGN 6-30 Placing and Linking Graphics
Working with Libraries
Libraries (also called Object Libraries)
are files that you create that appear as a
palette in your InDesign document. You
can use this “library palette” to organize
and store graphics that you use most
often. You can also store other page ele-
ments, such as text, ruler guides, and
grids. Figure 41 shows a library containing
two graphics.
Library files exist as named files on your
computer’s hard drive, just like any other
files. When you create a library file, you
specify where it will be stored. You can
open and close a library file just as you
would any other file. Libraries exist inde-
pendently of whatever InDesign document
is open.
For an example of the usefulness of
libraries, imagine that you are an art
director for an advertising agency. A major
banking chain is your client. You design
hundreds of ads for them throughout a
given year. The bank has three divisions,
each with a slightly different logo. Rather
than having to place a logo every time you
want to use it (and having to remember
which filename refers to which version of
the logo), you could simply create a library
and load all three of the bank’s logos into
that library. You could keep that library
open whenever InDesign is launched. That
way, you have access to all three versions
of the logo at all times.
In this lesson, you will create a library to
store the graphics you’ve placed in the
document, then use them in another
document.
▼
USE
LIBRARIES
Lesson 4 Use Libraries INDESIGN 6-31
When you use a file from a library in a doc-
ument, you can edit the file any way you
like. The edits that you make to the file in
the document do not affect the original file
in the library in any way. For example, if
you scale the file in the document, the file
in the library is not scaled. You can delete
the file from the document, but it won’t be
deleted from the library. Nothing you do to
a graphic in the document affects any
object in a library.
Adding All Page Objects to a
Library as Objects
InDesign CS2 has a great new command
that allows you to add all the objects on a
page as single objects into a library.
As shown in Figure 42, the command is
located in the Library palette menu.
You don’t need to select all or select any
objects on the page. Simply click the Add
Items on Page as Separate Objects command,
and it does exactly what it says. As shown in
Figure 43, all of the objects on the page have
been added to the library as separate objects.
FIGURE 41
Sample library
FIGURE 43
FIGURE 42
New menu
command in
InDesign CS2
INDESIGN 6-32 Placing and Linking Graphics
Create a library and add
items to it
1. Click File on the menu bar, point to New,
then click Library.
2. Name the library Min-Pin Library, then
click Save.
A library palette named Min-Pin Library
appears in the document.
3. Click the Selection Tool , then drag the
Dog Layer.psd graphic from page 7 into the
Min-Pin Library palette.
As shown in Figure 44, a thumbnail of
the image appears in the palette and the
file’s name appears beneath the thumbnail.
4. Go to page 3, then drag the Red Ghost.psd
graphic into the Min-Pin Library palette.
5. Close Min-Pin Links, saving your changes.
The Min-Pin Library does not close with the
document.
You created a new library, then dragged two
images from the document into the library.
FIGURE 44
Min-Pin Library
Graphics file moved
into library
Using About Bridge
Adobe’s Creative Suite 2 includes a new, stand-alone software package called Adobe
Bridge. Its name is apt because Bridge is designed to be the hub of the Creative Suite,
spanning the four main applications: Photoshop CS2, Illustrator CS2, InDesign CS2,
and Go Live CS2. Bridge is a sophisticated file browser, similar to but more powerful
than the File Browser feature in Photoshop CS (which Bridge replaces in Photoshop
CS2). Bridge is unique because it is tightly integrated with the four CS2 applications.
The main role of Bridge—in any of the four CS2 applications—is to help you locate,
browse, and organize files, called “assets,” more easily. In InDesign, you can use
Bridge to browse files that you might want to use as placed graphics. When you find
one, you can simply drag and drop the file from Bridge into your InDesign docu-
ment. You can think of Bridge as keeping all your potential support files right there
at your fingertips, ready to be browsed and selected.
But that’s not all. As you browse assets, you can choose numerous views, such as
thumbnails, details, and filmstrip. Here’s a great example of the power of Bridge: If
you have ten 24-page InDesign documents and you know that one of them contains
a placed graphic that you want to use again, but you don’t know which one. You can
use Bridge to view each document literally page by page, without opening it.
The power of Adobe Bridge rests in part on built-in XMP metadata support, a tech-
nology that allows you to append a broad range of informational data to an asset—
data that you can then use to search, sort, and categorize assets. For example, you
can browse assets based on their creation date, or on their copyright information.
You can search for assets with common metadata attributes, such as files that call for
a certain font or a specific Pantone color. You can even embed additional metadata
into an asset in Bridge—without opening the asset file itself. Adobe Bridge will help
you integrate your workflow among the four Adobe applications.