ADOBE INDESIGN CS2 REVEALED- P16 pptx
Bạn đang xem bản rút gọn của tài liệu. Xem và tải ngay bản đầy đủ của tài liệu tại đây (839.05 KB, 15 trang )
6-3
Tools You’ll Use
LESSON 1
What You’ll Do
INDESIGN 6-4 Placing and Linking Graphics
Understanding Preview Files
It is important that you understand that
when you place a graphic file, the image
that you see in the graphics frame in
InDesign is a preview file; it is not the
graphic itself. Why does InDesign work this
way? Because of file size considerations.
Remember that many graphics files—
especially those of scanned photos or other
digital images—have very large file sizes.
Some of them are enormous. For example,
if you had an 8" x 10" scanned photo that
you wanted to use in a layout for a maga-
zine, that graphic would be approximately
21 megabytes—at minimum! If you placed
that graphic in your InDesign layout, your
InDesign file size would increase dramati-
cally. Now imagine placing 10 of those
graphics!
The preview is a low-resolution version of
the placed graphic file. As such, its file size
is substantially smaller than the average
graphics file. The role of the preview file in
the layout is very ingenious. As a proxy for
the actual graphic, it allows you to see a
representation of the graphic in your
layout without having to carry the burden
of the graphic’s full file size.
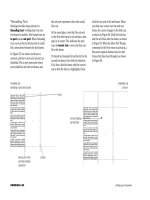
Using the Links palette
You can think of the Links palette, shown
in Figure 1, as command central for man-
aging the links to placed graphics (or text
files). The Links palette lists all of the files
that you place into an InDesign docu-
ment—both graphics files and text files.
Next to each listing is the page number on
which that placed file is located. The Links
palette menu offers options for sorting this
list. For example, you can sort the list so
that the files are listed in order according
to page number.
You can use the Links palette to locate a
placed file in your document quickly. If
you select a file in the Links palette and
then click the Go To Link button on the
palette, InDesign will go to the page where
the placed file is located and will automati-
cally select its frame. Conversely, when
you select a placed file in the document,
the file’s listing is automatically high-
lighted in the Links palette.
In this lesson, you will use the Links
palette to manage links to imported
graphics.
▼
USE THE
LINKS PALETTE
Lesson 1 Use the Links Palette INDESIGN 6-5
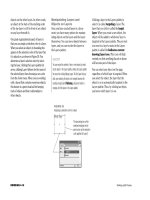
Using the Link Information
Dialog Box
Double-clicking a filename in the Links
palette opens the Link Information dialog
box for that placed file. As shown in
Figure 2, the Link Information dialog
box displays important information about
the placed file, including its file size, the
date it was last modified, and the applica-
tion in which it was created. It’s always
good to know which application a placed
graphic was created in so that you can
know which application to use if you want
to edit the original. The Links palette helps
in this case too. Simply click the Edit
Original button on the palette and the
placed graphic will open in its original appli-
cation (that is, of course, if you have that
application installed on your computer).
Managing Links to Placed
Graphics
When you place a graphic or text file,
InDesign establishes a link between the
graphics (or text) frame and the placed file.
That link is based on the location of the
file. When you first place the graphic, you
must navigate through the folder structure
on your computer to the location of the
file. You may navigate to a folder on your
computer’s hard drive, or you may navigate
to a location on removable media, such as a
CD or another type of disk. In either case,
InDesign remembers that navigation path
as the method for establishing the location
of the placed file.
A placed file can have one of three types of
status in the Links palette: Linked File is
Missing, Linked File is Modified, and Up to
Date. A placed file’s status is noted as Linked
File is Missing when the established link no
longer points to the file—in other words, if
you move the file to a different folder, after
you place it in InDesign. The Linked File is
Missing icon appears as a white question
FIGURE 1
Links palette
FIGURE 2
Link Information dialog box
Placed
files
Relink
button
Go To Link
button
Page numbers
of placed files
Edit Original
button
INDESIGN 6-6 Placing and Linking Graphics
mark inside a red circle, as shown in
Figure 3. The Linked File is Modified icon
appears as a black exclamation point within a
yellow triangle. A placed file’s status is noted
as Linked File is Modified when the original
file has been edited and saved after being
placed in InDesign. For example, if you place
a Photoshop graphic in InDesign, then open
the graphic in Photoshop, edit it, and save
changes, the graphic you placed in InDesign
is no longer the most up-to-date version of
the graphic. InDesign does not automatically
update the placed graphic with the changes.
Instead, the Links palette displays the Linked
File is Modified icon beside the file. Three
files in Figure 3 have the status of Linked
File is Modified.
The third type of status does not have an
icon. It is simply an Up to Date status,
meaning that the established link still
points to the location of the placed graphic,
and the graphic itself has not been modi-
fied since being placed.
Updating Missing and
Modified Files
When the Links palette displays modified
and missing icons, those links need to be
updated, meaning you need to reestablish
the connection between the preview file
and the graphic file that has been moved or
edited.
It is very easy to update modified files in
the Links palette. To do so, you click the
filename in the Links palette, then click
the Update Link button, as shown in
Figure 4. The link will update to the newest
saved version of the file, and the status of
the file will change to Up to Date.
Files that have the Linked File is Missing
status need to be relinked to the graphic.
To do so, you click the filename in the
Links palette, click the Relink button, as
shown in Figure 5, then navigate to the
new location of the graphic file. Once the
link is reestablished, the status of the file
changes to Up to Date.
FIGURE 3
Identifying the status of placed graphics
FIGURE 4
Updating a link to a modified file
Update Link button
Linked File is
Missing icon
No icon indicates
file is up to date
Linked File is
Modified icons
Lesson 1 Use the Links Palette INDESIGN 6-7
Once the link is reestablished, all the for-
matting that you did to the graphic when
you placed it the first time is maintained. If,
for example, you scaled a placed graphic to
35% and centered it proportionally in the
graphics frame, when you relink the graphic
those modifications will still be in place.
Managing Links to Placed
Text Files
Like graphics, placed text files are listed in
the Links palette.
QUICKTIP
InDesign lets you choose whether or not text is linked. If
you want all your placed text to be linked to the original
document, click Edit/Preferences/Type; in the Links section,
make sure the Create Links When Placing Text and
Spreadsheet Files check box is checked.
However, you should note one important
issue when working with placed text files.
Once text is placed in InDesign, you
should avoid making edits to it using the
original software program it was created
in. If this happens, the text file in
InDesign is considered modified and
will need to be updated in InDesign.
Updating modified text replaces the
placed text file with the newest version of
the text, but it also eliminates any for-
matting and editing that you applied to
the text in InDesign. Fortunately,
InDesign gives you a warning dialog box
when you update a modified text file,
reminding you that your edits will
be lost.
The situation described above is not very
typical. Once you’ve imported text, you
usually format and edit it using InDesign’s
formatting tools, such as the Character
palette. In most cases, there’s no need to
go back to the original text document.
However, in some production situations,
such as magazine and newspaper publish-
ing, editors work only in word processing
programs. Therefore, if they need to make
changes, they will supply you with a new
word processing document. You may
have no choice but to update an edited
text file—and thereby lose the additional
formatting or editing performed in
InDesign.
This scenario stresses the importance
of working with style sheets. If you
lose your text formatting, you can
reformat it quickly by reapplying style
sheets to it.
FIGURE 5
Relinking a file to its new location
Relink button
INDESIGN 6-8 Placing and Linking Graphics
Red 2.psd
This file is missing
The order of your
files may differ
You may or may not see
Linked File is Modified
icons
Go To Link button
Use the Links palette to
update and identify placed
graphics
1. Open ID 6-1.indd.
A dialog box may open informing you that
the document contains links to missing or
modified files.
2. Click Don’t Fix if necessary, then save the
file as Min-Pin Links.
3. Double-click the page 2 icon in the Pages
palette, click View on the menu bar, then click
Hide Frame Edges.
4. Click View on the menu bar, then click Fit
Spread in Window to fit both pages 2 and 3
in the document window, if necessary.
5. Click Window on the menu bar, then click
Links to display the Links palette (if necessary).
6. Click the Links palette list arrow, then click
Sort by Page.
7. Compare your Links palette to Figure 6,and
note the nine files listed in the Links palette
as placed files.
All of the placed files in this document are located
in the same folder as the ID 6-1.indd data file. If
your links palette shows them as modified, that is
only because they have been relocated to your
computer; they're not really modified.
8. If necessary, select each graphic file that
shows the Linked File Is Modified icon, then
click the Update Link button
.
Don't update the text documents that have a
.doc file extension.
(continued)
FIGURE 6
Links palette
FIGURE 7
Using the Links palette to find a graphic in the document
Lesson 1 Use the Links Palette INDESIGN 6-9
9. Click the Selection Tool , then click the
dog’s head on page 2.
Dog Silo.psd is highlighted in the Links palette.
10.Click Red 2.psd in the Links palette, then click
the Go To Link button , shown in Figure 7.
The Red 2.psd graphic on page 4 is auto-
matically selected and displayed in the docu-
ment window.
You sorted the items in the Links palette and updated
the graphics links as necessary. You selected a
graphic in the document, then identified it in the
Links palette. You selected a graphic in the Links
palette, then identified the graphic in the document.
Use the Link Information
dialog box and edit a linked
graphic
1. Double-click Black 2.psd in the Links palette.
As shown in Figure 8, the Link Information
dialog box opens and displays a variety of
information about the graphic file.
2. Note that the File Type for Black 2.psd is
Photoshop, then click Done.
3. If you have Adobe Photoshop installed on
your computer, verify that Black 2.psd is still
selected in the Links palette, then click the
Edit Original button .
Black 2.psd opens in Photoshop, as shown
in Figure 9, where it can be edited.
TIP The Edit Original button is not
available if you do not have Photoshop
installed on your computer.
4. Click File (Win) or Photoshop CS2 (Mac), on
the menu bar, then click Exit (Win) or Quit
(continued)
Black 2.psd is a
Photoshop file
Link has been
updated
FIGURE 9
Viewing Black 2.psd in Photoshop
FIGURE 8
Link Information dialog box
INDESIGN 6-10 Placing and Linking Graphics
Photoshop (Mac) to close Photoshop (if
necessary), then save your work.
You double-clicked a graphic file in the Links
palette to open the Link Information dialog box.
You then clicked the Edit Original button in the
Links palette to open the graphic in Photoshop.
Relink missing files
1. Click the Show Desktop icon on the
Windows taskbar, then navigate to and open the
folder where your Chapter 6 Data Files are stored.
Your Data Files folder opens. Note that
ID 6-1.indd and all the placed graphics are
located in the same folder.
2. Click File on the menu bar, point to New,
then click Folder.
3. Type Missing Graphic, then press [Enter].
4. Drag Red 1.psd into the Missing Graphics folder.
Your Data Files folder contents should
resemble Figure 10.
5. Click the Adobe InDesign CS2 button on the
taskbar to return to InDesign.
6. Click Red 1.psd in the Links palette.
The graphic is listed as missing.
7. Click the Go to Link button
As shown in Figure 11, even though the
Link palette lists the graphic as missing, the
preview of the missing graphic still appears
in the graphics frame.
8. Click the Relink button , navigate to the
drive and folder where your data files are stored,
locate and double-click the Missing Graphics
folder, click Red 1.psd, then click Open.
(continued)
FIGURE 10
File listing after moving Red1.psd
Using XML as part of your workflow
XML is a versatile language that describes content—text, graphics, design elements—in
a way that allows that content to be output in a variety of ways. Like HTML, XML uses
coded information—tags—that identify and organize content. Unlike HTML, XML does
not describe how the information will appear or how it will be laid out on a page. Instead,
XML creates an identity for the content. XML can distinguish and identify such elements
as chapter titles, headlines, body copy, an author’s name, or numbered steps. Here’s the
hook: That XML information is not specific to any one kind of output—you can use that
same information to create different types of documents, just as you can use the English
alphabet to speak and write other languages. XML is something like the alphabet—a code
that can be interpreted to produce a variety of output. For example, many designers
work in XML to generate catalogs, books, magazines, or newspapers—all from the same
XML content.
The really good news is that, with InDesign CS2, Adobe has truly embraced XML, allow-
ing you to set up a smooth workflow for importing, working with, and exporting XML.
The Tags palette and the Structure Pane—two XML utilities in InDesign—interface
smoothly with XML code and allow you to organize content and list it in a hierarchical
order, which is essential to XML. Adobe’s commitment to XML opens up a new world for
the designer and the layout artist. If that’s you, roll up your sleeves and use InDesign to
investigate XML—it can lead you in many exciting directions.
Lesson 1 Use the Links Palette INDESIGN 6-11
Replacement figure now listed
in Links palette
35% scale is maintained when
new figure replaces old figure
When you click the Relink button, the graphic
may update immediately, without your having
to navigate to the Missing Graphic folder. This
means that InDesign has gone to the Missing
Graphics folder on its own to locate Red
1.psd. In either case, the link to Red 1.psd is
restablished. The status of Red 1.psd in the
Links palette changes to Up to Date.
9. Click the Links palette list arrow, then click
Sort by Name.
The links are now listed, from top to bottom
in alphabetical order.
You relinked a missing file using the Relink button,
then sorted the list of links alphabetically by name.
Relinking to a different
source file
1. Click Black 1.psd in the Links palette, then
click the Go To Link button
You want to use a graphic with a different
color background.
2. Click the Relink button , navigate to
the drive and folder where your Data Files
are stored, click Black on Blue.psd, then
click Open.
Black on Blue.psd replaces Black 1 psd. The
Links palette is updated to reflect the newly
placed graphic, as shown in Figure 12.
3. Fit the spread in the window, then save your
work.
You relinked a graphic to a different source file
containing a different color background.
FIGURE 11
Displaying the missing graphic in preview
FIGURE 12
Relinking a graphics frame to a different graphic
Creating and Using Snippets
In the same way that libraries let you store page elements for reuse, snippets, new in
InDesign CS2, let you export any elements from a document for reuse in other docu-
ments or in an Object library. A snippet is an XML file with an .inds file extension
that contains complete representation of document elements, including all format-
ting tags and document structure. To create a snippet, use the selection tool to select
the frames you want to reuse, click File on the menu bar, click Save As Type (Win) or
Format (Mac), then click InDesign Snippet. Name the file, then click Save. An even
easier method is to simply drag selected items onto the desktop, into Adobe Bridge,
into the Library palette, or into an e-mail message, each of which automatically cre-
ates a snippet file. To use a snippet in another file, you can use the File/Place com-
mand, or just drag the snippet from the desktop into an InDesign document.
LESSON 2
What You’ll Do
INDESIGN 6-12 Placing and Linking Graphics
Understanding Vector
Graphics
Computer graphics fall into two main cat-
egories—vector graphics and bitmap
graphics. To work effectively, you will need
to understand the difference between the
two. In this lesson you will work with vec-
tor graphics.
Graphics that you create in computer
drawing programs, such as Adobe
Illustrator, are called vector graphics.
Vector graphics consist of anchor points
and line segments, together referred to as
paths. Paths can be curved or straight;
they are defined by geometrical character-
istics called vectors.
For example, if you use Adobe Illustrator
to render a person’s face, the software will
identify the iris of the eye using the geo-
metrical definition of a circle with a spe-
cific radius and a specific location in
respect to the other graphics that compose
the face. It will then fill that circle with a
color you have specified. Figure 13 shows
an example of vector graphics used to
draw a cartoon boy. The graphic on the left
is filled with colors, and the graphic on the
right shows the vector shapes used to cre-
ate the graphic.
As geometric objects, vector graphics can
be scaled to any size with no loss in qual-
ity. This means that a graphic that you
create in an application like Adobe
Illustrator can be output to fit on a
postage stamp or on a billboard!
Computer graphics rely on vectors to ren-
der bold graphics that must retain clean,
crisp lines when scaled to various sizes.
Vectors are often used to create logos or
“line art,” and they are often the best
choice for typographical illustrations.
Placing Vector Graphics in
InDesign
When you place vector graphics in InDesign,
you can enlarge or reduce them to any size.
By definition, scaling a vector graphic does
not have any impact on its visual quality.
When you place a vector graphic from
Illustrator, only the objects that compose
In this lesson, you will place vector graph-
ics in InDesign, resize them, then choose
display performance settings.
▼
PLACE VECTOR
GRAPHICS
Lesson 2 Place Vector Graphics INDESIGN 6-13
the graphic are placed. If you draw a 2"
square on an 8" artboard in Illustrator then
place the file in InDesign, the 2" square
will be placed, not the entire 8" artboard.
Similarly, if you draw a circle in Illustrator
and place it in InDesign, if you apply a text
wrap, the text will wrap around the circle.
This is an important fact to note because, as
shown in Figure 14, you can create inter-
esting text wraps around a complex
Illustrator graphic.
Choosing the Default Display
Performance
When you place a graphic file in InDesign,
a low-resolution preview file appears in the
graphics frame. The appearance of the
preview file—the quality at which it is
displayed—is determined by default in
the Display Performance section of the
Preferences dialog box.
The quality at which a preview file is dis-
played can affect InDesign’s performance.
A preview displayed at high quality requires
more system memory than a preview dis-
played at standard or low quality.
You can choose between Fast, Typical,
or High Quality views of placed graphics.
■ The Fast view shows no preview file.
Instead, it shows a gray box within
the graphics frame. Most up-to-date
computers have enough memory that
you won’t need to resort to this option.
■ The Typical view displays a low resolu-
tion preview. This is an adequate dis-
play for identifying and positioning an
image within the layout.
■ The High Quality view displays the pre-
view file at high resolution. This option
provides the highest quality, but
requires the most memory. Therefore,
InDesign may be slow when presenting
pages with High Quality previews. You
may want to use High Quality display
to get a “final view” of a completed lay-
out or to present the layout onscreen
to a client.
FIGURE 13
Example of vector graphics
FIGURE 14
Placed Illustrator graphic
INDESIGN 6-14 Placing and Linking Graphics
The Display Performance section of the
Preferences dialog box is shown in Figure 15.
Figure 16 shows a graphic placed with three
display performance settings.
QUICKTIP
In InDesign CS, the lowest-quality setting was named
Optimized. In CS2, Adobe changed the name to Fast. This
was a smart move. The word Optimized suggests “opti-
mal”—the best choice. Not a great name for the lowest-
quality setting, wouldn’t you agree?
The setting that you choose in the Display
Performance section of the Preferences
dialog box will determine the default
display for every graphic that you place
in InDesign. If, while you are working,
you want to change the display of all the
placed graphics, you can do so using the
display performance commands on the
View menu.
QUICKTIP
If you want to change the display performance for one
graphic without changing the default display performance
preference setting, select the graphic in the document
window, click Object on the menu bar, point to Display
Performance, then choose your desired setting.
FIGURE 15
Display Performance Preferences dialog box
FIGURE 16
Placed graphic with three different display settings
Fast display
Typical display
High Quality display
Three view settings:
The lowest-quality
setting is referred to
in CS2 as Fast
This check
box should
not have a
check mark
Display
Performance
category
Lesson 2 Place Vector Graphics INDESIGN 6-15
Place vector graphics in
InDesign
1. Click Type on the menu bar, then click Hide
Hidden Characters.
TIP If you see Show Hidden Characters
on the Type menu, the hidden characters are
already hidden and you can skip this step.
2. Go to page 6, click View on the menu bar,
click Fit Page in Window, then click Show
Frame Edges.
3. Click the Selection Tool , then click the
large graphics frame in the bottom-right
corner of the page.
4. Click File on the menu bar, click Place, navigate
to the drive and folder where your Data Files are
stored, click Montag.ai, then click Open.
5. Click Object on the menu bar, point to
Fitting, then click Fit Content
Proportionally.
6. Go to page 5, fit the spread in the document
window, then click between the text frames
to select the large graphics frame.
The graphics frame is behind the text frames
in the stacking order.
7. Click File on the menu bar, click Place, navi-
gate to the drive and folder where your Data
Files are stored, click Orange Dogs.ai, then
click Open.
8. Click Object on the menu bar, point to
Fitting, then click Fit Content
Proportionally.
The graphic is enlarged to fit the frame, as
shown in Figure 17. Don’t be concerned if
your text wraps differently.
(continued)
Using the Hyperlinks palette
Hyperlinks make it possible for users of your document to jump to other locations in
the same document, to Web sites, or to other documents. Hyperlinks are created in
InDesign using the Hyperlinks palette. Each hyperlink requires a source and a destina-
tion. The source—the actual link that a user will click—can be a text selection, a text
frame or a graphics frame. The destination is the place the source jumps to. The des-
tination can be another page in the InDesign document, another InDesign document,
or a Web site. Hyperlinks become active when you export InDesign documents as
Adobe PDFs. There are many options for creating hyperlinks. In the New Hyperlink dia-
log box, you can create a descriptive name for your source, choose your destination and
also choose the appearance for your hyperlink. Once created, hyperlinks appear in the
Hyperlinks palette. They can be edited and deleted using the appropriate buttons in the
Hyperlinks palette.
Your choice between Typical and High
Quality default display performance is based
largely on your computer, how much mem-
ory it has, and how it performs. You can
start by setting the preference to High
Quality. If you are working on a document
with lots of placed graphics and your com-
puter’s performance becomes slow, switch
to Typical display.
Options for Placing Illustrator
Graphics
When you want to place an Illustrator
graphic in InDesign, decide if you want to
simply place it or if you want to be able to
view different layers or edit its objects,
paths, or text. If you won’t need to modify it
in InDesign, just save it in the native
Illustrator format (.ai). If you do want to
manipulate its layers in InDesign, save the
illustration in layered PDF format. To edit
its objects, paths, or text, copy it from
Illustrator and paste it in InDesign.
INDESIGN 6-16 Placing and Linking Graphics
9. Click the No text wrap button in the
Text Wrap palette.
10.Click the Direct Selection Tool , click
between the first two text frames to select
the graphic, then, keeping your pointer
between the text frames, drag the graphic
straight down until the large dog’s paw is
aligned with the bottom edge of the middle
text frame, as shown in Figure 18.
TIP If you click the paw to drag it, you
will probably select the middle text box.
Undo your last step, then drag the graphic
by placing your cursor between the first and
second text frames.
You placed two vector graphics into graphics
frames in InDesign. You fit one of the two graphics
proportionally to fill its graphics frame, then
removed the text wrap from it.
FIGURE 18
Removing the text wrap from the illustration
With no text wrap, text
flows over illustration
The amount of text in
your columns may
differ
FIGURE 17
Positioning Orange Dogs.ai
Paw aligned with bottom
edge of text frame
Lesson 2 Place Vector Graphics INDESIGN 6-17
Change display performance
for selected objects
1. Verify that Orange Dogs.ai is selected.
2. Press [W] to switch to Preview.
3. Click Object on the menu bar, point to
Display Performance, click High Quality
Display, then deselect all.
As shown in Figure 19, the graphics preview
now appears at full resolution—with smooth
and clean lines.
4. Go to page 6, then note the appearance of
Montag.ai.
5. Click the Zoom Tool , then drag a selection
box around Montag.ai so that it appears as
large as possible on your monitor.
6. Click the Selection Tool , click
Montag.ai, click Object on the menu bar,
point to Display Performance, then click
High Quality Display, if necessary.
Figure 20 shows Montag.ai at both Typical
and High Quality Display settings.
7. Save your work.
You selected two graphics and changed their dis-
play performance to high quality.
FIGURE 19
Orange Dogs.ai at High Quality Display
FIGURE 20
Montag.ai at Typical Display and High Quality Display
Typical Display High Quality Display