ADOBE INDESIGN CS2 REVEALED- P11 doc
Bạn đang xem bản rút gọn của tài liệu. Xem và tải ngay bản đầy đủ của tài liệu tại đây (831.34 KB, 15 trang )
INDESIGN 4-16 Working with Frames
objects on the other layers. In other words,
an object at the back of the stacking order
of the top layer is still in front of any object
on any layer beneath it.
One great organizational aspect of layers is
that you can assign a selection color to a layer.
When you select an object, its bounding box
appears in the selection color of the layer that
it is placed on, as shown in Figure 29. You
determine a layer’s selection color by select-
ing the layer, clicking the Layers palette list
arrow, clicking Layer Options for the name of
the selected layer, then choosing a new color
from the Color menu. When you are working
with a layout that contains numerous objects,
this feature is a great visual aid for keeping
track of objects and their relationships to
other objects.
Manipulating Layers and
Objects on Layers
Once you have created layers in a docu-
ment, you have many options for manipu-
lating objects on the layers and the layers
themselves. You can move objects between
layers, and you can reorder the layers in
the Layers palette.
QUICKTIP
You can merge the contents of two or more layers by select-
ing the layers in the Layers palette, clicking the Layers palette
list arrow, then clicking Merge Layers. The first layer that you
click upon selecting the layers to be merged becomes the
resulting merged layer. Flattening a document refers to
merging all of the layers in the Layers palette.
Clicking a layer in the Layers palette to
select it is called targeting a layer. The
layer that you click is called the target
layer. When you create a new object, the
object will be added to whichever layer is
targeted in the Layers palette. The pen tool
icon next to a layer’s name in the Layers
palette is called the Indicates current
drawing layer icon. This icon will help
remind you that anything placed or drawn
will become part of that layer.
You can select any object on the page,
regardless of which layer is targeted. When
you select the object, the layer that the
object is on is automatically targeted in the
Layers palette. Thus, by clicking an object,
you know which layer it is on.
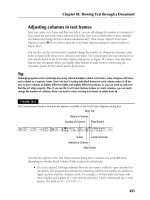
FIGURE 29
Assigning a selection color to a layer
The bounding box of the
selected rectangle is the
same color as the selection
color applied to Layer 2
Lesson 2 Stack and Layer Objects INDESIGN 4-17
When an object is selected, a small button
appears to the right of the name of the
layer, as shown in Figure 30. That small
button, identified as the Indicates
selected items button, represents the
selected object (or objects). You can click
and drag the Indicates selected items but-
ton and move it to another layer. When you
do so, the selected object(s) moves to that
layer. Therefore, you should never feel con-
strained by which layer you choose for an
object; it’s easy to move objects from one
layer to another.
You can also change the order of layers in
the Layers palette by dragging a layer up or
down in the palette. As you drag, a heavy
black line indicates the new position for
the layer when you release the mouse
button. In Figure 31, the Graphics
Elements layer is being repositioned under
the Text Elements layer.
Selecting Artwork on Layers
Let’s say you have three layers in your doc-
ument, each with six objects. That means
your document has a total of 18 objects. If
you apply the Select All command on the
Edit menu, all 18 objects will be selected,
regardless of which layer is targeted in the
Layers palette.
If you want to select only the objects on a
single layer, you must use a keyboard
shortcut. Press and hold [Alt] (Win) or
[option] (Mac), and then click the layer in
the Layers palette. Pressing and holding
[Alt] (Win) or [option] (Mac) when clicking
a layer selects all the objects on that layer.
Selecting Objects Behind
Other Objects
When you have multiple overlapping
objects on a page, objects behind other
objects can sometimes be difficult to select.
Pressing and holding [Ctrl] (Win) or
(Mac) allows you to "click through the
stacking order" to select objects behind
other objects. Simply click the top object,
press and hold [Ctrl] (Win) (Mac), then
click the top object again, which will select
the object immediately behind it. Click the
top object again and the next object down
in the stacking order will be selected.
FIGURE 30
Viewing the Indicates selected items button
FIGURE 31
Changing the order of two layers in the Layers palette
Indicates selected items button
Graphics Elements layer
being repositioned under the
Text Elements layer
INDESIGN 4-18 Working with Frames
Use the Arrange commands
to change the stacking order
of objects
1. Open ID 4-3.indd, then save it as Stack and Layer.
2. Press [V] to access the Selection Tool, then
click the yellow rectangle.
3. Click Object on the menu bar, point to
Arrange, then click Bring Forward.
The yellow rectangle moves forward one
level in the stacking order.
4. Click the red square, click Object on the menu
bar, point to Arrange, then click Bring to Front.
5. Select both the yellow rectangle and the blue
circle, click Object on the menu bar, point to
Arrange, then click Bring to Front.
Both objects move in front of the red square,
as shown in Figure 32.
6. Click the green circle, click Object on the menu
bar, point to Arrange, then click Bring to Front.
7. Select all, then click the Align horizontal
centers button in the Align palette.
8. Click the document window to deselect all, click
the green circle, click Object on the menu bar,
point to Arrange, then click Send Backward.
As shown in Figure 33, the green circle
moves backward one level in the stacking
order, behind the blue circle.
9. Deselect all, select the blue circle, press and hold
[Ctrl] (win) or (Mac), then click the blue cir-
cle again to select the green circle behind it.
10. Still pressing and holding [Ctrl] (Win) or
(Mac), click the blue circle again to select the yel-
low rectangle, then click the blue circle once
more to select the red square.
(continued)
FIGURE 32
Using the Bring to Front command with two objects selected
FIGURE 33
Sending the green circle backward one level in the stacking order
Lesson 2 Stack and Layer Objects INDESIGN 4-19
TIP Commit this technique to memory, as it is
very useful for selecting overlapping objects.
You used the Arrange commands to manipulate
the stacking order of four objects.
Create new layers in the
Layers palette
1. Deselect all, click Window on the menu bar,
then click Layers.
As shown in Figure 34, the Layers palette
has one default layer named Layer 1.
TIP The default location for the Layers
palette is to the right of the document win-
dow with the Layers, Pages, and Info tabs
vertically aligned on the left of the palette.
2. Double-click Layer 1 in the Layers palette.
The Layer Options dialog box opens, which
allows you to change settings for Layer 1,
such as its name and selection color.
3. Type Background in the Name text box, then
click OK.
4. Click the Create new layer button in the
Layers palette, then double-click Layer 2.
5. Type Circles in the Name text box, click the
Color list arrow, click Orange, then click OK.
6. Click the Layers palette list arrow, then
click New Layer.
7. Type Rectangles in the Name text box,
click the Color list arrow, click Purple, then
click OK.
Your Layers palette should resemble
Figure 35.
You renamed Layer 1, then created two new layers
in the Layers palette.
FIGURE 34
Layers palette with Layer 1
FIGURE 35
Layers palette with three layers
Toggles lock button
Toggles visibility button
Indicates current drawing
layer icon (Targeted layer)
Create new layer button
Two new layers
Default Layer 1 is
renamed Background
INDESIGN 4-20 Working with Frames
Position objects on layers
1. Press [V] to access the Selection Tool (if
necessary), then click the green circle.
As shown in Figure 36, the Background layer
on the Layers palette is highlighted and the
Indicates selected items button appears next to
the Indicates current drawing layer icon.
2. Click and drag the Indicates selected items
button up to the Circles layer.
The green circle is moved to the Circles
layer. The frame around the circle now
appears orange, the selection color assigned
to the Circles layer.
3. Select both the red square and the yellow
rectangle, then drag the Indicates selected
items button from the Background layer
up to the Rectangles layer.
4. Click the Toggles visibility button on
the Rectangles layer to hide that layer, then
click on the Circles layer to hide
that layer.
5. Click the blue circle, then drag the Indicates
selected items button from the
Background layer up to the Circles layer.
As shown in Figure 37, you cannot move
the circle to the Circles layer because it
is hidden.
6. Press and hold [Ctrl] (Win) or (Mac),
then drag the Indicates selected items
button from the Background layer up to
the Circles layer.
The blue circle disappears because it is
moved to the Circles layer, which is hidden.
(continued)
FIGURE 36
Identifying the Background layer as the targeted layer
FIGURE 37
Trying to move an object onto a hidden layer
Layer not visible
The selected object cannot be placed
on a layer that is hidden
Indicates current
drawing layer icon
Indicates selected
items button
Lesson 2 Stack and Layer Objects INDESIGN 4-21
TIP Pressing and holding [Ctrl] (Win) or
(Mac) while you drag the Indicates
selected items button allows you to place an
object on a hidden or locked layer.
7. Click the Background layer, if necessary, click
the Rectangle Tool , then draw a rectan-
gle that is exactly the same size as the page.
Because the Background layer was targeted
in the Layers palette, the new object is posi-
tioned on the Background layer.
8. Click the Fill button in the Toolbox, click
Light Blue in the Swatches palette, then
remove any stroke if necessary
9. Click View on the menu bar, then click Fit
Page in Window.
10.Open ID 4-4.indd, select all the objects on the
page, click Edit on the menu bar, click Copy,
then close ID 4-4.indd.
11.Verify that the Background layer is still tar-
geted in the Layers palette, click Edit on the
menu bar, then click Paste.
The objects are pasted onto the Background
layer.
12.Click the Toggles visibility button on
the Circles layer so that your Layers palette
and page resemble Figure 38.
You used the Layers palette to move selected
objects from one layer to another. You targeted a
layer, and then created a new object, which was
added to that layer. You then pasted objects into a
targeted layer.
FIGURE 38
Viewing a layered document
Circles pasted on
Background layer
INDESIGN 4-22 Working with Frames
Change the order of layers in
the Layers palette
1. Deselect all, click the Rectangles layer, then
click the Toggles visibility button in its
off state in order to make the layer visible.
2. Using Figure 39 as an example, drag the
Rectangles layer down until you see a
heavy black line below the Circles layer, then
release the mouse button.
As shown in Figure 40, because the
Rectangles layer is now below the Circles layer,
all the objects on the Rectangles layer are now
beneath the objects on the Circles layer.
3. Click the Selection Tool if necessary,
then click any of the light blue circles.
The light blue circles are grouped, so when
you click one, you select them all.
4. Click and drag the Indicates selected items
button from the Background layer up to
the Circles layer.
Because it is the newest object on the
Circles layer, the blue circles group is at the
top of the stacking order on that layer.
5. Click Object on the menu bar, point to
Arrange, then click Send to Back.
As shown in Figure 41, the blue circles
group is sent to the back of the stacking
order on the Circles layer. However, it is in
front of the two rectangles, because their
layer is beneath the Circles layer.
(continued)
FIGURE 39
Changing the order of layers
FIGURE 40
Viewing the document after reordering layers
Lesson 2 Stack and Layer Objects INDESIGN 4-23
6. Click and drag the Rectangles layer down to
the Create new layer button in the
Layers palette.
A duplicate layer named Rectangles copy is
created above the original Rectangles layer.
7. Press and hold [Alt] (Win) or [option]
(Mac), then click the Rectangles copy layer.
TIP Press and hold [Alt] (Win) or [option]
(Mac) when clicking a layer in the Layers
palette to select all the objects on the layer.
8. Click the center reference point on the
proxy in the Transform palette, type 90 in
the Rotation Angle text box in the
Transform palette, then press [Enter]
(Win) or [return] (Mac).
9. Deselect all, press [W] to switch to Preview,
press [V] to access the Selection Tool, click
the red square, click Object on the menu
bar, point to Arrange, click Bring to Front,
then deselect all so that your page resem-
bles Figure 42.
10.Save your work, then close Stack and Layer.
You changed the order of layers, noting the effect
on the objects on the page. You also changed the
stacking order of objects within layers. You dupli-
cated a layer, and you learned a keyboard shortcut
for selecting all the objects on a single layer.
FIGURE 41
Sending the circles to the back of the Circles layer
FIGURE 42
Viewing the finished document
LESSON 3
What You’ll Do
INDESIGN 4-24 Working with Frames
Placing Graphics in a
Document
The term graphic is pretty broad. In its
most basic definition, a graphic is an ele-
ment on the page that is not text. A simple
square with a fill could be called a graphic.
However, when you are talking about plac-
ing graphics in an InDesign document, the
term graphic usually is referring to bitmap
images or vector graphics. Bitmap
images are images that consist of pixels
created in a program, such as Adobe
Photoshop. They can also be digital pho-
tos. Anything that has been scanned is a
bitmap image. Vector graphics are usually
illustrations created in and imported from
drawing programs like Adobe Illustrator.
There are two essential methods for plac-
ing a graphic in a document. You can cre-
ate a graphic placeholder frame using any
of the three shape frame tools, shown in
Figure 43. Once you have created the
frame and it is selected on the page, you
use the Place command on the File menu
to select the graphic you want to import
into the document. The graphic will
appear in the selected graphics frame.
You can also place a graphic without first
creating a graphics frame. If you click the
Place command and then select the graphic
you want to import, you will see the loaded
graphics icon when you float the pointer
over the page. Click the loaded graphics
icon on the page to place the graphic. The
graphic will be placed on the page in a
graphics frame whose top-left corner will be
positioned at the location where you clicked
the loaded graphics icon.
Which is the better method? It depends on
what you want to do with the graphic. If
the size and location of the graphics frame
is important, it’s probably better to create
and position the frame first, then import
the graphic and make it fit into the frame.
If the size and location of the frame are
negotiable, you might want to place the
graphic anywhere in the layout and then
modify its size and location.
In this lesson, you will create graphics
frames, resize them, and manipulate
graphics that you import into them.
▼
WORK WITH
GRAPHICS FRAMES
Lesson 3 Work with Graphics Frames INDESIGN 4-25
Understanding the Difference
Between the Graphics Frame
and the Graphic
It is important that you understand that the
graphics frame contains the graphic. Think
of the graphics frame as a window through
which you see the placed graphic. This
understanding is important in cases where
the graphics frame is smaller than the
graphic that it contains. In this case, you
can see only the areas of the graphic that
can fit in the frame. The other areas of the
graphic are still there, you just can’t see
them because they are outside of the frame.
Understanding the Difference
Between the Selection Tool
and the Direct Selection Tool
The discussion above is a clear signal that
you must differentiate the graphics frame
from the graphic itself. This differentiation
is reflected in the Toolbox by the Selection
Tool and the Direct Selection Tool.
Specifically, the Selection Tool addresses
the graphics frame while the Direct
Selection Tool addresses the contents of the
frame. Anything you want to do to the
frame, you do with the Selection Tool
selected. Anything you want to do to the
contents—to the graphic itself—you do
with the Direct Selection Tool selected.
This concept is the key to manipulating
graphics within a graphics frame.
Figure 44 shows a selected graphics frame
which contains a placed graphic. Note that
the frame was selected with the Selection
Tool. The Transform palette shows the X
and Y locations of the frame and the width
and height of the frame.
Figure 45 shows the same object, but this
time it has been selected with the Direct
Selection Tool, which is selected in the
Toolbox. Note that the information in the
Transform palette now refers to the graphic
FIGURE 43
Three shape tools for creating graphics frames
Graphics frame tools
FIGURE 44
Selecting a graphics frame with the Selection Tool
Graphics frame
is selected
Transform palette values
refer to selected
graphics frame
Selection Tool
INDESIGN 4-26 Working with Frames
itself, not the frame that contains it. Note
too that the selection itself appears differ-
ently. The bright blue frame that is selected
is called the bounding box. The bounding
box—always rectangular—is the frame that
defines the horizontal and vertical dimen-
sions of the graphic. Finally note that even
though you can see the entire bounding
box, there are parts of the graphic that you
can’t see. That’s because the graphic is
being cropped by the graphics frame.
Hang on. There’s a lot of information com-
ing at you all at once here. Let’s summarize
the terminology and concepts. The graphics
frame contains the graphic. The graphics
frame determines how the graphic is
cropped. When you click a graphic with the
Selection Tool, the graphics frame is selected
and the Transform palette displays the physi-
cal characteristics of the graphics frame.
When you click a graphic with the Direct
Selection Tool, the graphic itself is
selected. This selection is indicated by
showing you the graphic’s bounding box.
The bounding box and the graphics frame
are completely independent of one another.
They can be, and often are, different sizes.
When you click the graphic with the Direct
Selection Tool, the Transform palette
describes the physical characteristics of the
graphic itself.
QUICKTIP
When you click a graphic with the Direct Selection Tool, a
small plus sign appears beside the X and Y values in the
Transform palette, indicating that the X and Y locations refer
to the graphic
within
the graphics frame.
FIGURE 45
Selecting a graphic with the Direct Selection Tool
Direct Selection Tool
Bounding box of graphic
Not all of graphic is visible because it is
cropped by the size of the graphics frame
X+ and Y+ fields in the
Transform palette refer to
the position of the selected
graphic
Lesson 3 Work with Graphics Frames INDESIGN 4-27
Moving a Graphic Within a
Graphics Frame
Once you understand that the Direct
Selection Tool selects the graphic itself, it
is easy to move a graphic within the graph-
ics frame. When you click the graphic with
the Direct Selection Tool, a hand icon
appears, as shown in Figure 46. If you drag
the hand icon, you move the graphic
within the frame. But wait there’s a bet-
ter way to do it. Press and hold the hand
icon until it turns into a black arrow, then
drag the black arrow to move the graphic.
When you do so, you see a ghosted image
of the areas of the graphic that are
outside the graphics frame, as shown in
Figure 47. The ghosted image is referred to
as a dynamic preview.
Once you release the mouse button, the
graphic will be repositioned within the
frame. Remember, though, that regardless
of where you move the graphic within the
frame, the frame crops the graphic.
Resizing a Graphic
When you select a graphic with the Direct
Selection Tool, you can then resize the
graphic within the frame. Changes that you
make to the size of the graphic do not
affect the size of the graphics frame.
One easy way to scale, or resize a graphic is
to use the Transform palette. With the
graphic selected, change the Scale X
Percentage and the Scale Y Percentage val-
ues in the Transform palette, as shown in
Figure 48, to reduce or enlarge the graphic.
You can also use the Transform/Scale com-
mand on the Object menu to scale the
graphic. Remember, when the graphic is
selected with the Direct Selection Tool,
only the graphic will be scaled when you
use this command.
QUICKTIP
You can resize a graphics frame and the graphic simultaneously
by pressing and holding [Ctrl][Shift] (Win) or [Shift] (Mac)
while dragging the graphics frame bounding box handle.
QUICKTIP
When you select a graphics frame with the Selection Tool
then resize the graphics frame using the Width and Height
text boxes in the Transform palette, the graphic is resized
with the frame.
FIGURE 46
Moving the graphic within the graphics frame
FIGURE 47
Viewing the dynamic preview
FIGURE 48
Scaling a graphic using the Transform palette
Hand icon changes
to black arrow
Non-visible parts of
graphic made visible
Hand icon
Graphic is
reduced 50%
horizontally
and 50%
vertically
Scale X Percentage value
Scale Y Percentage value
INDESIGN 4-28 Working with Frames
FIGURE 49
Using the Fit Content to Frame command can distort a graphic
FIGURE 50
Wrapping text around a graphic
FIGURE 51
A Photoshop image with a clipping path
Using the Fitting Commands
“There must be an easier way to resize a
graphic,” you are thinking. You’re right!
While it’s not difficult to select a graphic
with the Direct Selection Tool and then
scale it in the Transform palette, there are
a lot of steps in the process.
For the quick solution, you can use the
Fitting commands, located on the Object
menu. The Fitting commands refer to the
graphic as the content. The Fit Content to
Frame command scales the content to fit
the frame, and the Fit Frame to Content
command scales the frame to fit the con-
tent. The Center Content command cen-
ters the graphic within the frame.
When you click the Fit Content to Frame
command, the content is often distorted to
fit the frame. For example, let’s say that
your content is a two inch square, and it’s
within a rectangular graphics frame.
Applying the Fit Content to Frame com-
mand will distort the square’s width to fit
the full width of the rectangular frame, as
shown in Figure 49. You can easily restore
the graphic to its normal proportions by
clicking the Fit Content Proportionally com-
mand, which is the fourth Fitting command
on the Object menu.
QUICKTIP
InDesign CS2 has a new command in the Fitting submenu: Fill
Frame Proportionally resizes the placed graphic to a size that is
guaranteed to fit the frame, with no white space around it.
Wrapping Text Around an
Imported Photoshop Graphic
Saved with a Named
Clipping Path
In Chapter 3, you learned how to use the
Text Wrap palette to wrap text around a
bounding box using the Wrap around
bounding box button. You can also wrap
text around a graphic inside a graphics
frame, as shown in Figure 50.
The Text Wrap palette offers a number of
methods for doing so. In this chapter, you
will focus on wrapping text around an
image that was saved with a named clip-
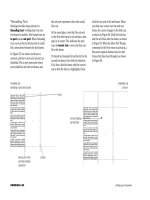
ping path in Photoshop. Figure 51 shows
a Photoshop image with a clipping path
drawn around a man. A clipping path is a
graphic that you draw in Photoshop that
outlines the areas of the image that you
want to show when the file is placed in a
layout program like InDesign. When you
save the Photoshop file, you can name the
clipping path and save it with the file.
The text is able to enter the graphics frame to
wrap around the picture
Clipping path created in Photoshop
Lesson 3 Work with Graphics Frames INDESIGN 4-29
When you place a graphic that has a named
clipping path saved with it into your lay-
out, InDesign is able to recognize the clip-
ping path. With the graphic selected, click
the Wrap around object shape button in
the Text Wrap palette, click the Type list
arrow in the Contour Options section of
the palette, and then choose Photoshop
Path, as shown in Figure 52. When you do
so, the Path menu will list all the paths
that were saved with the graphic file (usu-
ally, you will save only one path with a file).
Choose the path that you want to use for
the text wrap.
Remember, in every case, you can always
manually adjust the resulting text wrap
boundary. Though the clipping path is cre-
ated in Photoshop, the text wrap itself is
created in InDesign—and it is editable. As
shown in Figure 53, you can relocate the
path’s anchor points using the Direct
Selection Tool. You can also use the Add
Anchor Point and Delete Anchor Point
Tools to add or delete points to the path as
you find necessary. Click the Add Anchor
Point Tool anywhere on the path to add a
new point, which gives you further control
for manipulating the path. Click any
anchor point with the Delete Anchor Point
Tool to remove it. Changing the shape of
the path changes how text wraps around
the path.
FIGURE 52
Choosing the Wrap around object shape button
FIGURE 53
Manipulating the text wrap path
Wrap around
object shape
button
Top Offset value
(applies to
entire path)
Click Type list
arrow to choose
Photoshop Path
Click Path list arrow to choose
which of the named paths that were
saved with the Photoshop file that
you want to use
Use Add Anchor
Point and Delete
Anchor Point Tools
to add and delete
points from the text
wrap path in
InDesign
Relocated point
and path
Original
clipping path
Path created in InDesign
INDESIGN 4-30 Working with Frames
Place graphics in a document
1. Open ID 4-5.indd, click Fix Links
Automatically, click No in the next warning
dialog box, then save it as Flowers.
2. In the Layers palette, click the Toggles lock
button on the Text layer to lock the Text
layer, as shown in Figure 54.
TIP When a layer is locked, the contents of
the layer cannot be modified; this is a smart
way to protect the contents of the layer from
unwanted changes.
3. Click the Background layer to target it, click
the Rectangle Frame Tool , then draw a
graphics frame in the center of the page that is
approximately the size shown in Figure 55.
The bounding box of the graphics frame is
orange because orange is the selection color
applied to the Background layer.
4. Click File on the menu bar, click Place, navi-
gate to the drive and folder where your Data
Files are stored, then double-click Windmills
Ghost.psd.
Because the frame was selected, the graphic
is placed automatically into the frame, as
shown in Figure 56.
5. Click the Selection Tool , click anywhere
to deselect the frame, click the Toggles
visibility button on the Background
layer to hide it, then click the Images layer
to target it in the Layers palette.
6. Click File on the menu bar, click Place, navi-
gate to the drive and folder where your Data
Files are stored, click Windmills Color.psd,
then click Open.
TIP You can also access the Place
command by pressing [Ctrl][D] (Win) or
[D] (Mac).
(continued)
FIGURE 54
Locking the Text layer
FIGURE 55
Drawing a graphics frame
Toggles lock button