ADOBE INDESIGN CS2 REVEALED- P9 doc
Bạn đang xem bản rút gọn của tài liệu. Xem và tải ngay bản đầy đủ của tài liệu tại đây (1.4 MB, 15 trang )
INDESIGN 3-38 Setting up a Document
FIGURE 56
Link icon
FIGURE 55
Identifying in ports and out ports
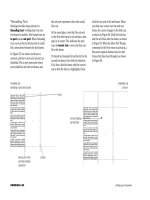
Threading Text
InDesign provides many options for
threading text—linking text from one
text frame to another. Text frames have an
in port and an out port. When threading
text, you use the text frame ports to estab-
lish connections between the text frames.
In Figure 55, the center text frame is
selected, and the in port and out port are
identified. The in port represents where
text would flow into the text frame, and
the out port represents where text would
flow out.
In the same figure, note that the out port
on the first text frame is red and has a plus
sign in its center. This indicates the pres-
ence of overset text—more text than can
fit in the frame.
To thread text manually from the first to the
second text frame, first click the Selection
Tool, then click the frame with the overset
text so that the frame is highlighted. Next,
click the out port of the text frame. When
you float your cursor over the next text
frame, the cursor changes to the link icon,
as shown in Figure 56. Click the link icon
and the text flows into the frame, as shown
in Figure 57. When the Show Text Threads
command on the View menu is activated, a
blue arrow appears between any two text
frames that have been threaded, as shown
in Figure 58.
Red out port of first
text frame indicates
overset text
Out port
In port
Link icon floating
over text frame
Lesson 4 Place Text and Thread Text INDESIGN 3-39
FIGURE 57
Threading text between frames
FIGURE 58
Showing text threads
Text thread
between frames
INDESIGN 3-40 Setting up a Document
Place text on document pages
1. Double-click the page 2 icon in the Pages
palette.
Because the left text frame on page 2 is a
master page object, it cannot be selected as
usual—however, you can place text into the
frame without selecting the frame.
2. Click File on the menu bar, click Place,
navigate to the drive and folder where your
Chapter 3 Data Files are stored, then double-
click Chapter 1 text.
3. Point to the left text frame.
The loaded text icon appears in parentheses,
signaling you that you can insert the loaded
text into the text frame.
4. Click anywhere in the left text frame, then
compare your work to Figure 59.
The red out port with the plus sign indicates
that there is overset text—more text than
can fit in the text frame.
You used the Place command to load text into a
text frame on a document page.
FIGURE 59
Placing text in a text frame
Red out port of first text
frame indicates overset text
Placed text
Controlling how text is placed
When you place Word or RTF text in InDesign you have a number of options to choose from
regarding how text is imported. For a Word document, for example, you can choose to
include or not include footnotes, endnotes, table of contents text and index text. You can also
choose to remove any previous styles applied to text and any table formatting. Conversely you
can opt to retain styles and table formatting applied to incoming text. For an RTF document,
you can specify to remove extra carriage returns, replace multiple spaces with tabs, and sev-
eral other options. After you click Place on the File menu and find the Word or RTF docu-
ment that you want to place, click the Show Import Options check box, then click Open. The
Import Options dialog box opens. Make your selections in this dialog box, then click OK. The
text will be placed with or without the options that you chose.
Lesson 4 Place Text and Thread Text INDESIGN 3-41
Thread text
1. Click View on the menu bar, then click Show
Text Threads.
With the Show Text Threads command
activated, blue arrows will appear between
threaded text frames when they are selected.
2. Click the Selection Tool , click the left
text frame to select it, then click the out port
of the left text frame.
3. Position the pointer on top of the right text
frame so that you see the link icon.
4. Click anywhere in the right text frame.
As shown in Figure 60, a blue text thread
appears and the text is threaded from the left
to the right text frames.
TIP A threaded text frame must be selected
for the text threads to be visible.
5. Using the same process, thread text from the
second text frame to the third text frame on
the spread, then thread text from the third
text frame to the fourth text frame, so that
your two-page spread resembles Figure 61.
6. Click the out port on the fourth text frame,
then double-click the page 4 icon in the
Pages palette.
7. Click anywhere in the first text frame on
page 4.
8. Click the out port of the first text frame on
page 4, then click anywhere in the second
text frame.
Your page 4 should resemble Figure 62.
You threaded text manually on document pages.
FIGURE 60
Threading text
FIGURE 61
Viewing threaded text through four text frames
FIGURE 62
Viewing threaded text on page 4
Out port
Blue line represents
text thread
In port
Out port indicates
overset text
Text threads specified to show
the flow of text from the first text
frame to the fourth text frame
Text thread from
previous page
Text thread from
first text frame to
second text frame
on page 4
LESSON 5
What You’ll Do
INDESIGN 3-42 Setting up a Document
Modifying Master Page Items
on Document Pages
Master pages are designed to allow you to
lay out the basic elements for a page that
will be used repeatedly throughout a docu-
ment. In most cases, however, you will want
to make modifications to the document
page once it is created—you will even want
to modify some objects on the document
page that were created on the master page.
When you apply a master page to a docu-
ment page, you may be surprised to find
that you can’t select the objects that were
created on the master page.
Once a master page is applied to a document
page, you can select the master page items
on the document page by pressing and hold-
ing [Shift][Ctrl] (Win) or [Shift] (Mac).
Once selected, you can modify those objects
any way that you desire.
Making changes to a document page is often
referred to as making a local change. Once
you modify an object on a document page,
that change will remain in effect, regardless
of what you do on the master page.
Modifying Master Pages
When you modify an element of a master
page, that modification, in theory, will be
reflected on all the document pages that
are based on that master page. This can be
a very powerful option. Let’s say that you
have created a layout for a 36-page book,
and you decide that you want to change
the typeface of all the headlines. If they
were created on master pages, you could
simply reformat the headline in the text
frame placeholders on the master pages,
and those modifications would be updated
on every document page in the book based
on those master pages.
As a rule of thumb, remember that modifi-
cations you make to a master page will be
reflected only if you haven’t modified
those elements on a document page; it
won’t overwrite your local changes. That’s
good, but it also means that the more
changes you make locally, the fewer
options you have for modifying master
pages to make global changes throughout
the document.
In this lesson, you will make modifications
to both master pages and document pages
and explore how each affects the other.
▼
MODIFY MASTER PAGES AND
DOCUMENT PAGES
Modify master page items on
a document page
1. Double-click the page 1 icon in the Pages
palette, click the Selection Tool , press
and hold [Shift][Ctrl] (Win) or [Shift]
(Mac), then click the Chapter X text frame.
2. Click the Type Tool , select all the text in
the box, type Preface, then click the paste-
board to deselect.
3. Press and hold [Shift][Ctrl] (Win) or
[Shift] (Mac), click the horizontal text
frame, click the text four times to select all of
it, type Introducing the Miniature Pinscher,
then click the pasteboard to deselect so that
your page resembles Figure 63.
4. Click the Selection Tool , then click the
“Preface” text frame.
Since this is the second time you are select-
ing the placeholder text frame, it can now be
selected the normal way.
5. Double-click the page 5 icon in the Pages
palette, press and hold [Shift][Ctrl] (Win)
or [Shift] (Mac), click the Chapter X
text frame, click the Type Tool , then
change the letter X to 1.
6. Change the title on page 5 to read Feeding
the Miniature Pinscher.
TIP Use a soft return so that “Miniature
Pinscher” is on one line.
Your document window should resemble
Figure 64.
You modified document pages by editing the text
within text frames that were created from place-
holders on master pages.
Lesson 5 Modify Master Pages and Document Pages INDESIGN 3-43
FIGURE 63
Modifying master page items on a document page
FIGURE 64
Viewing changes made to page 5
Modified chapter
placeholder text
Modified chapter
title text
INDESIGN 3-44 Setting up a Document
Modify master pages
1. Click View on the menu bar, point to Grids &
Guides, click Show Guides, then double-
click A-Chapter Right Page in the Pages
palette.
2. Click the Selection Tool (if necessary),
then click the Chapter X placeholder frame.
3. Click the center reference point on the
proxy in the Transform palette, double-click
the Rotation Angle text box, type 90, then
press [Enter](Win) or [return](Mac).
4. Double-click the X Location text box in the
Transform palette, type 1.75, then press
[Enter] (Win) or [return] (Mac).
5. Double-click the page 1 icon in the Pages
palette, then note how the changes made to
the A-Chapter Right Page master are
reflected on the document page.
As shown in Figure 65, both the rotation and
the relocation of the text frame on the
A-Chapter Right Page master are reflected
on the document page.
6. View pages 5 and 9 to see the same changes.
7. Double-click A-Chapter Right Page in the
Pages palette, click the Chapter X text
frame, click the Align left button in
the Paragraph palette, click the horizontal
title text frame, then click the Align center
button so that your master page resem-
bles Figure 66.
(continued)
FIGURE 65
Viewing changes to page 1
FIGURE 66
Viewing text alignment changes to the A-Chapter Right Page master
Lesson 5 Modify Master Pages and Document Pages INDESIGN 3-45
8. View pages 1 and 5.
Because you have modified the chapter text
and the title text on pages 1 and 5, formatting
changes to the master have not affected the
local formatting.
9. View page 9.
As shown in Figure 67, because you did not
modify any text formatting on page 9, the
formatting changes you made to the master
are reflected on page 9.
10.Double-click B-Body Copy with Pics in the
Pages palette, then change the typeface for
the automatic page numbering text place-
holders on both the left and right page to
Garamond or a similar font.
TIP Footer is a term given to information at
the bottom of every document page, such as
the page number or the date.
11.Double-click C-Copy No Pics in the Pages
palette.
The footers on both the left and right pages
of the C-Copy No Pics master are Garamond
because C-Copy No Pics is based on B-Body
Copy with Pics.
You modified elements on a master page, then
noted which modifications affected corresponding
elements on document pages. Next, you modified
text on the B-Body Copy with Pics master, and
then noted that the C-Copy No Pics master was
automatically updated with the modification.
FIGURE 67
Viewing changes to page 9
Changes updated
from master to
document page
LESSON 6
What You’ll Do
INDESIGN 3-46 Setting up a Document
Creating Sections in a
Document
Sections are pages in a document where
page numbering changes. For example,
sometimes in the front pages of a book, in
the introduction or the preface, the pages
will be numbered with lowercase Roman
numerals, then normal page numbering
will begin with the first chapter.
You can create as many sections in a docu-
ment as you wish. You determine the page
on which the new section will start by click-
ing that page icon in the Pages palette.
Choose the Numbering & Section Options
command in the Pages palette menu,
which opens the New Section dialog box,
as shown in Figure 68. In this example, we
clicked page 8 in the Pages palette, then
opened the New Section dialog box. We
then specified that the new section begin
with a page numbered 1.
QUICKTIP
The first time you choose a type of page numbering for a
document, the Numbering & Section Options dialog box
opens instead of the New Section dialog box.
In this lesson, you will create two different
numbering sections and create two text
wraps around graphics frames.
▼
FIGURE 68
New Section dialog box
New section will begin by listing this
number—in the style specified below—as
the page number on the document page
Style
CREATE NEW SECTIONS AND
WRAP TEXT
Lesson 6 Create New Sections and Wrap Text INDESIGN 3-47
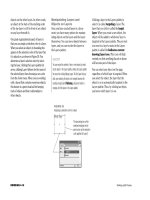
Wrapping Text Around a Frame
When you position a text frame or a graph-
ics frame near another frame that contains
text, you can apply a text wrap to the over-
lapping frame in order to force the underly-
ing text to wrap around it. InDesign offers
many options for wrapping text around a
frame. One quick method is to click the
Wrap around bounding box button in the
Text Wrap palette, as shown in Figure 69.
Figure 70 shows a rectangular frame using
the No text wrap option in the Text Wrap
palette. Figure 71 shows that same frame
using the Wrap around bounding box
option in the Text Wrap palette.
When you choose the Wrap around bound-
ing box option, you can control the
offset—the distance that text is repelled by
the frame—by entering values in the Top,
Bottom, Left, and Right Offset text boxes in
the palette. Figure 72 shows the frame with
a .125-inch offset applied to all four sides of
the frame.
FIGURE 69
Text Wrap palette
FIGURE 70
A frame using the no text wrap option
FIGURE 71
A frame using the wrap around bounding box option
FIGURE 72
A frame with a .125" offset applied to all sides
No text wrap button
Wrap around
bounding box
button
Wrap around object
shape button
Jump object
button
Jump to next
column button
Selected
frame
Wrap around
bounding
box button
Selected frame
with .125" offset
on four sides
Offset section of
Text Wrap palette
No text wrap button
Selected frame
INDESIGN 3-48 Setting up a Document
Create sections in a document
1. Double-click the page 1 icon in the Pages
palette, click the Pages palette list arrow,
then click Numbering & Section Options.
2. Click the Style list arrow, then click the lower-case
Roman numeral style, as shown in Figure 73.
3. Click OK, then view the pages in the docu-
ment, noting the new style of the page num-
bering on the pages and in the Pages palette.
4. Double-click the page v icon in the Pages palette
(page 5), click the Pages palette list arrow, then
click Numbering & Section Options.
5. Click the Start Page Numbering at option
button, verify that 1 is in the text box, click
the Style list arrow, then click the ordinary
numerals style, as shown in Figure 74.
The fifth page in the document will be desig-
nated as page 1. However, the fifth page will
not have a page number on it because it’s
based on the A-Master Page, which isn’t
formatted for automatic page numbering.
6. Click OK, then view the pages in the document,
noting the new style of page numbering begin-
ning on page 6.
Since page 5 is based on the A-Chapter Right
Page master, it does not display a page num-
ber, even though it begins the new section.
7. Double-click the page ii icon in the Pages
palette, click the Selection Tool , press
and hold [Shift][Ctrl] (Win) or [Shift]
(Mac), then select the footer text frame.
8. Click the Type Tool , double-click the
word Title, type Preface, then click the
pasteboard to deselect.
(continued)
FIGURE 73
Choosing lower-case Roman numerals
FIGURE 74
Starting a new section
Style list arrow
New section will begin
by listing this number—
in the style specified
below—as the page
number on the
document page
Style
Lesson 6 Create New Sections and Wrap Text INDESIGN 3-49
9. Replace the word Title with the word
Preface on pages iii and iv, then deselect all.
You used the New Section dialog box to change
the style of the page numbering in the Preface sec-
tion of the book, and then again to start numerical
page numbering with Chapter 1.
Wrap text around a frame
1. Double-click the page ii icon in the Pages
palette, click the Selection Tool , press
and hold [Shift][Ctrl] (Win) or [Shift]
(Mac), then click the ellipse frame.
TIP Clicking the center point of the ellipse
frame is the easiest way to select it.
2. Click Window on the menu bar, then click
Text Wrap.
3. Click the Wrap around object shape
button .
The text wraps around the ellipse, as shown
in Figure 75.
4. Double-click the page iii icon in the Pages
palette, select the empty rectangular frame,
then click the Wrap around bounding box
button in the Text Wrap palette.
5. Double-click the Top Offset text box in the
Text Wrap palette, type .125, press [Tab],
type .125 in the Left Offset text box, then
press [Enter] (Win) or [return] (Mac).
6. Click View on the menu bar, click Fit Spread
in Window, then click anywhere to deselect
any selected items.
7. Click the Preview Mode button in the
Toolbox, press [Tab], then deselect all.
Your spread should resemble Figure 76.
8. Save your work, then close Setup.
You used the Text Wrap palette to flow text around
two graphics frames.
FIGURE 75
Choosing the Wrap around object shape button
FIGURE 76
Viewing the spread
Text wraps
around ellipse
CHAPTER SUMMARY
CHAPTER SUMMARY
In this chapter, you learned how to create
a new document and make key decisions
about its size, layout, margins, and
columns. You used time-saving tools such
as master pages with guides, and changed
the colors for guides, margins, and
columns. You learned how to apply mas-
ter pages to documents. You created
placeholders to hold text, graphics, and
page numbers. You imported text and
made it thread from one page to another.
Finally, you created new sections and
controlled how text wraps around frames.
What You Have Learned
• How to create a new document
• How to create a document using facing
pages
• How to set document margins and number
of columns
• How to set up master pages with place-
holder frames
• How to add guides to a master page and
assign them colors
• How to use the Transform and Control
palettes to modify objects
• How to number pages
• How to insert white space, en dashes, and
em dashes between characters
• How to create a master page based on
another master page
• How to apply master pages to document
pages
• How to place text in text frames
• How to thread text from one text frame to
another
• How to create new sections in a document
• How to wrap text around a frame
Key Terms
Facing pages A document with left
and right pages that face each other in a
spread, as in a magazine.
Gutter The space between columns on
a page.
Master Pages Templates for page lay-
out; they can contain columns and place-
holders.
Guides Horizontal or vertical lines on
a page that are used to help align objects.
Transform To change an object using
scaling, moving, skewing, or rotating
en space A space the width of a small
letter “n” in the font in use.
em space A space the width of a small
letter “m” in the font in use.
Overset text In threading text in
blocks, text that still remains to be
placed.
Sections In a document, pages where
the page numbering changes.
INDESIGN 3-50 Setting up a Document