ADOBE INDESIGN CS2 REVEALED- P7 pps
Bạn đang xem bản rút gọn của tài liệu. Xem và tải ngay bản đầy đủ của tài liệu tại đây (659.06 KB, 15 trang )
INDESIGN 3-8 Setting up a Document
the nine points available on a selected item’s
bounding box. Clicking a reference point on
the proxy tells InDesign that you wish to see
the horizontal and vertical locations of that
point of the selected object.
When an object is selected, the X value is
the horizontal location—how far it is
across the page—and the Y value is the
vertical location—how far it is down the
page. The selected object in Figure 6 has
an X location of 1 inch and a Y location of
1 inch. This means that its top left point is
1 inch across the page and 1 inch down.
Why the top left point? Because that is
what has been clicked in the proxy, also
shown in Figure 6.
QUICKTIP
X and Y location values for circles are determined by the
reference points of the bounding box that is placed around
circles when they are selected.
Be sure to note that the text boxes in the
Transform palette are interactive. For
example, if you select an object and find
that its X coordinate is 2, you can enter
3 in the X Location text box, press [Enter]
(Win) or [return] (Mac), and the object
will be relocated to the new location on
the page. You can also change the width
or height of a selected object by changing
the value in the Width or Height text
boxes.
QUICKTIP
You can perform calculations in the text boxes in the
Transform palette. For example, you could select an object
whose width is three inches. By typing 3 - .625 in the
W text box, you can reduce the object’s width to 2.375
inches. What a powerful feature!
Using the Control Palette
The Control palette, docked at the top of the
document window by default, is similar to
the Transform palette. It offers the same set-
tings and ability to modify a selected object.
For example, you can change the width and
height of a frame using the Control palette,
just as you can with the Transform palette.
Unlike the Transform palette, the Control
palette offers additional options for frames
including changing the frame’s stroke
weight and stroke style. The options in the
Control palette change based on the type
of object selected. For example, if a block
of text is selected, the Control palette
changes to show all of the type-related
options for modifying text, such as
changing the font or font size. In
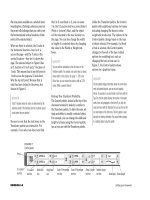
Figure 7, the Control palette shows
options for a graphics frame.
QUICKTIP
The Info palette displays information about the current docu-
ment and selected objects, such as text and graphics
frames. For example, if you click inside a text frame with the
Type Tool, the Info palette displays the number of characters,
words, lines, and paragraphs in the frame. If you click the
same text frame with the Selection Tool, you can find out the
size and location of the text frame. The Info palette is avail-
able only for viewing information. You cannot make changes
to a selected object using this palette.
FIGURE 7
Control palette
Proxy
X Location
text box
Y Location
text box
Height text
box
Width text
box
Stroke weight
Scale Y Percentage
text box
Scale X Percentage
text box
Shear X Angle
text box
Rotation Angle
text box
Stroke type
Lesson 1 Create a New Document INDESIGN 3-9
Using the Transform Palette to
Transform Objects
Transform is a term used to describe the
act of moving an object, scaling it, skewing
it, or rotating it. You can do all of the above
in the Transform or Control palettes.
Figure 8 shows a rectangular frame posi-
tioned between two guides. In Figure 9,
the same frame has been rotated 90 degrees—
note the 90° value in the Rotation Angle
text box in the Transform palette. Note also
that the object was rotated at its center
point. This is because the center reference
point has been selected in the proxy as the
point of origin for the transformation.
Think of the point of origin as the point
from where the transformation happens.
Whichever reference point is selected on
the proxy determines the point of origin for
the transformation of the selected object.
Figure 10 shows the frame from Figure 8
rotated 90 degrees. However, this time, the
point of origin for the rotation was set at
the lower-left corner of the object.
Note how differently the rotation affected
the object.
Don’t trouble yourself trying to guess
ahead of time how the choice of a point of
origin in conjunction with a transforma-
tion will affect an object. Sometimes it will
be easy to foresee how the object will be
transformed; sometimes you’ll need to use
trial and error. The important thing for you
to remember is that the point of origin
determines the point where the transfor-
mation takes place.
FIGURE 8
Rectangle with its center point identified
FIGURE 9
Rectangle rotated 90 degrees at its center point
FIGURE 10
Rectangle rotated 90 degrees at its lower-left corner point
X location
Center reference
point selected
Y location
Rectangle
rotated
90 degrees
Object rotated
90 degrees at
lower-left point
Rotation Angle
text box
X and Y location values
remain the same when
object is rotated at the
center point
Lower-left reference
point selected
Rotation angle
INDESIGN 3-10 Setting up a Document
Create a new document
1. Start InDesign, click Edit (Win) or InDesign
(Mac) on the menu bar, point to
Preferences, then click Units & Increments.
2. Click the Horizontal list arrow, click Inches,
click the Vertical list arrow, click Inches,
then click OK.
3. Click File on the menu bar, point to New, then
click Document.
4. Type 12 in the Number of Pages text box,
then verify that the Facing Pages check box
is checked.
5. Type 8 in the Width text box, press [Tab],
type 7 in the Height text box, then click the
Landscape orientation button.
TIP Press [Tab] to move your cursor for-
ward from text box to text box in InDesign
dialog boxes. Press [Shift][Tab] to move
backward from text box to text box.
6. Type 5 in the Number text box in the Columns
section, then type .25 in the Gutter text box.
7. Type .375 in the Top, Bottom, Inside, and
Outside Margin text boxes so that your New
Document dialog box resembles Figure 11.
8. Click OK, then look at the first page of the doc-
ument, which should resemble Figure 12.
9. Save the document as Setup.
You set the Units & Increments preferences to
specify that you will be working with inches for
horizontal and vertical measurements. You then
created a new document using the New Document
dialog box. You specified the number of pages in
the document, the page size for each page, and the
number of columns on each page.
FIGURE 11
Entering values in the New Document dialog box
FIGURE 12
Identifying basic elements on a page
Columns
Gutters between
columns
Landscape
Orientation button
Lesson 1 Create a New Document INDESIGN 3-11
Rename and modify the
default master page
1. Close all open palettes except for the Toolbox
and the Pages palette.
2. Looking at the Pages palette, as shown in
Figure 13, note that the document contains
the 12 pages that you specified in the New
Document dialog box and that the default
master page is named A-Master.
TIP You may need to resize the Pages
palette to see all of the page icons.
3. Click A-Master once to select it, click the
Pages palette list arrow, then click Master
Options for “A-Master”.
4. Type Chapter Right Page in the Name text
box of the Master Options dialog box, then
type 1 in the Number of Pages text box so
that the dialog box resembles Figure 14.
In this layout design, the chapter title page
will always occur on a right-hand page.
Therefore, this master needs to be only
one page.
5. Click OK, then note the changes in the Pages
palette.
The default master page is now listed as a
single page with its new title.
You renamed the A-Master master page and rede-
fined it as a single page.
FIGURE 13
Identifying icons in the Pages palette
FIGURE 14
Master Options dialog box
12 page icons
Default A-Master
master page
INDESIGN 3-12 Setting up a Document
Add guides to a master page
1. Double-click A-Chapter Right Page in the
Pages palette, then note that the page menu
at the lower-left corner of the document win-
dow lists A-Chapter Right Page.
A-Chapter Right Page is now the active page.
2. Click Window on the menu bar, point to
Object & Layout, then click Transform.
3. If rulers are not visible at the top and left of
the document window, click View on the
menu bar, then click Show Rulers.
4. Click the Selection Tool , position the
pointer over the horizontal ruler, then click
and drag a guide down from the ruler about
1.5 inches down the page, as shown in
Figure 15.
TIP As you drag the new guide onto the
page, the value in the Y Location text box in
the Transform palette continually changes to
show the guide’s current location.
5. Release the mouse button to position the guide
at approximately 1.5 inches down the page.
6. Type 1.9 in the Y Location text box in the
Transform palette, then press [Enter] (Win)
or [return] (Mac).
The guide jumps to the specific vertical loca-
tion you entered.
7. Drag a second guide down from the horizon-
tal ruler, then release the mouse button when
the Y Location text box in the Transform
palette reads approximately 5.9 in.
(continued)
FIGURE 15
Creating a horizontal guide
Click in ruler and
drag downward
Cursor becomes
double-sided
arrow when
creating a guide
Y location of guide
Using the Transform Again commands
InDesign CS2 has incorporated one of the great and classic features of Illustrator: the
Transform Again command. Now, in InDesign when you execute a transformation
once, you can then use the Transform Again command to repeat it. This is an
extremely useful command, and it's one you should learn how to use. The
Object/Transform Again submenu features four commands that let you repeat trans-
formations. Be sure to check out the Transform Sequence Again command. This
command goes one step beyond Transform Again—it repeats entire sequences. So if
you make a series of transformations to a selected object, as long as you don't change
the selection, the Transform Sequence Again will repeat the entire series of transfor-
mations. Experiment with these very important—and fun—commands.
Lesson 1 Create a New Document INDESIGN 3-13
8. Drag a guide from the vertical ruler on the
left side of the document window, then
release your mouse when the X Location text
box in the Transform palette reads approxi-
mately 2 in.
9. Click the first horizontal guide you posi-
tioned at 1.9 inches to select it, double-click
the Y Location text box in the Transform
palette, type 2, then press [Enter] (Win) or
[return] (Mac).
The guide is moved and positioned exactly
two inches from the top of the document.
TIP Selected guides appear darker blue
in color.
10.Change the location of the horizontal guide
positioned approximately at 5.9 inches to
6 inches, then change the location of the
vertical guide to 2.5 inches.
As shown in Figure 16, the vertical guide is
still selected.
You positioned guides on the master page by
dragging them from the horizontal and vertical
rulers. You used the Transform palette to position
them at precise locations.
FIGURE 16
Viewing the master page with three guides
Guides
Selected
guide
Working with Frame-Based Grids
A baseline grid represents the leading for body text in a document. Now, with
InDesign CS2, every text frame can have its own baseline grid, independent of the
document's baseline grid. To specify the baseline grid for a text frame, select the
text frame, click Object on the menu bar, click Text Frame Options, and then
click the Baseline Options tab. Here you can customize the baseline grid for the
selected text frame. You can even apply specific colors for the grid, which will
apply to that text frame only. In order to see a document's baseline grid or any
grids within text frames, click View on the menu bar, point to Grids and Guides,
and then click Show Baseline Grid command.
INDESIGN 3-14 Setting up a Document
Create placeholder
text frames
1. Click the Type Tool , position the cursor
approximately where the vertical guide inter-
sects the top horizontal guide, then click and
drag a text frame to the right margin.
Your screen should resemble Figure 17. The
text box should be approximately 1.25" in
height. Your text frame may differ slightly
from the figure; you can adjust it later.
2. Type Chapter X in the text frame, then select
the text.
3. Display the Character palette, set the font to
Garamond or a similar font, set the font size
to 80 pt, then set the leading to 96 pt (if
necessary).
4. Position the Type Tool cursor where the vertical
guide intersects the bottom horizontal guide,
click and drag toward the upper-right corner to
create a text frame, then click the Selection
Tool .
As shown in Figure 18, the second text
frame is selected.
5. Click the Type Tool , click inside the
second text frame, type Chapter title must
be two lines in the text frame, then select
the text.
6. Set the font to Trebuchet MS or a similar font, set
the font size to 32 pt, then set the leading to 33 pt.
7. Click the page to deselect the text so that
your page resembles Figure 19.
You created two text frames which will be used as
placeholders for chapter numbers and chapter
titles in the document.
FIGURE 17
Drawing a text frame
FIGURE 18
Viewing the second text frame
FIGURE 19
Viewing the page with two placeholder text frames
Top and left sides of
text frame hidden
behind guides
Bottom edge
of text frame
Second text frame
Lesson 1 Create a New Document INDESIGN 3-15
Change the color of guides,
margins, and columns
1. Click Edit (Win) or InDesign (Mac) on the
menu bar, point to Preferences, then click
Guides & Pasteboard.
2. Click the Guides in Back check box to select
it, then click OK.
As shown in Figure 20, the text frame bor-
ders are in front of the guides.
3. Click Edit (Win) or InDesign (Mac) on the
menu bar, point to Preferences, then click
Guides & Pasteboard.
4. In the Color section, click the Margins list
arrow, then click Peach.
5. Click the Columns list arrow, click Peach,
then click OK.
6. Click the Selection Tool , click the cyan
vertical guide to select it, press and hold
[Shift], click the top horizontal guide, then
click the lower horizontal guide.
All three cyan guides are selected and appear
dark blue.
7. Click Layout on the menu bar, then click
Ruler Guides.
8. Click the Color list arrow, click Grass Green,
then click OK.
9. Click the pasteboard to deselect the guides,
then compare your page to Figure 21.
You changed the color of margins, columns, and
guides to improve your ability to distinguish text
frames from page guides.
FIGURE 20
Viewing the page with guides in back
FIGURE 21
Changing the colors of guides to better distinguish elements on the page
Text frame borders
are in front of guides
Margins and
column guides
in peach
Guides in
grass green
INDESIGN 3-16 Setting up a Document
Use the Transform palette to
transform text frames
1. Click the Selection Tool (if necessary),
click anywhere in the lower text frame to
select it, click Object on the menu bar, then
click Text Frame Options.
2. In the Vertical Justification section, click the
Align list arrow, click Bottom, then click OK.
3. Using Figure 22 as a guide, drag the top
middle handle of the text frame down to the
top of the text.
4. With the text frame still selected, click the
middle-left reference point on the proxy in the
Transform palette, as shown in Figure 23.
TIP The selected reference point specifies
the point of origin for the transformation.
5. Double-click the Width (W) text box in the
Transform palette, type 3.875, then press
[Enter] (Win) or [return] (Mac).
The width of the selected text frame is
reduced to 3.875 inches. Since the point of
origin for the transformation was specified as
the left edge, only the right side of the text
frame moves when the new width is applied.
(continued)
FIGURE 22
Resizing the height of a text frame
FIGURE 23
Selecting a reference point on the proxy
Drag top middle
point to resize
text frame
Middle-left reference
point selected
Lesson 1 Create a New Document INDESIGN 3-17
6. Click the “Chapter X” text frame, then click
the center reference point on the proxy in
the Transform palette.
7. Click the Transform palette list arrow, then
click Rotate 90° CW.
The text frame is rotated at its center point.
8. Drag the rotated Chapter X text frame to the
same location shown in Figure 24, then
adjust the frame size if necessary.
9. Display the Paragraph palette, then click the
Align right button .
10.Click Edit on the menu bar, click Deselect
All, click the Preview Mode button in
the Toolbox, then press [Tab] to hide all
palettes.
Your page should resemble Figure 25.
You used the Transform palette to change the
width of one text frame and to rotate the other.
FIGURE 24
Repositioning the text frame
FIGURE 25
Viewing the page in preview mode
LESSON 2
What You’ll Do
INDESIGN 3-18 Setting up a Document
Creating a New Master Page
When you create a new document, a default
master page, called A-Master, appears in the
top section of the Pages palette. You can
use this default master as your first master
for the document, and you can also create
as many new master pages as you need for
the document. You create new master pages
by clicking the New Master command on
the Pages palette menu.
When you create a new master page, you
have the option of giving the master page
a title. This is often very useful for distin-
guishing one master page from another.
For example, you might want to use the
title “Body Copy” for master pages that
In this lesson, you will create two new
master pages, create placeholder text
frames for body copy, create automatic
page numbering, and create placeholder
frames for graphics.
▼
CREATE
MASTER PAGES
Lesson 2 Create Master Pages INDESIGN 3-19
will be used for body copy and then use the
title “Chapter Start” for master pages that
will be used as a layout for a chapter title
page. Figure 26 shows three titled master
pages in the Pages palette.
When you create a new master page, you
have the option of changing the values for
the margins and for the number of
columns on the new master page.
Creating Automatic Page
Numbering
When you create a document with multiple
pages, chances are you’ll want to have page
numbers on each page. You could create a
text frame on every page, then manually
type the page number on every page, but
think of what a nightmare that could turn
out to be! You would have to create a text
frame of the same size and in the same
location on every page. Imagine what
would happen if you were to remove a page
from or add a page to the middle of the
document. You’d need to go back and
renumber your pages!
Fortunately, InDesign offers a solution for
this. You can create placeholders for page
numbers on your master pages. Each newly
created page will have an automatic page
number on it, assuming the page is based
on a master page with a page number place-
holder. Simply create a text frame on the
master page (if you are working with facing
pages, create a text frame on both the left
and right pages of the spread). Click inside
the text frame, click Type on the menu bar,
point to Insert Special Character, then click
Auto Page Number. A letter (that of the
master page) will appear in the text frame,
as shown in Figure 27.
That letter represents the page number.
You can format it using any font, size, and
FIGURE 26
Three master pages in the Pages palette
FIGURE 27
A text frame on a master page containing an auto page number character
Master pages
with titles
Auto page number
character represents
that of the master page
FIGURE 28
Identifying an em space
INDESIGN 3-20 Setting up a Document
alignment that you desire. On the docu-
ment pages based on that master, the letter
in the text frame will appear as the number
of the page. The page numbering is auto-
matic. This means that the page number is
automatically updated when pages are
added to or removed from the document.
When you work with multiple master
pages, you position the text frame with the
auto page numbering character on all the
master pages that you want to show page
numbers in the document. Just be sure
that the text frame is in the same location
on all masters and that the text for the
number is formatted in the same way. This
will make the appearance of page numbers
consistent from page to page, regardless of
which master a given document page is
based on.
Inserting White Space
Between Text Characters
In Chapter 2, you learned that you should
not press the spacebar more than once to
create extra spacing between characters.
However, sometimes a single space does
not provide enough space between words
or characters. You may want to insert addi-
tional space to achieve a certain look. In
this case, you insert white space.
The Type menu contains commands for
inserting white space between words or
characters. The two most-used white
spaces are em space and en space. The
width of an em space is equivalent to that
of the lowercase letter m in the current
typeface at that type size. The width of an
en space is narrower—that of the lower-
case letter n in that typeface at that type
size. Use these commands—not multiple
spaces—to insert white space. To insert an
em space or an en space, click Type on the
menu bar, point to Insert White Space,
then click either Em Space or En Space.
Figure 28 shows an em space between an
auto page number character and a word.
Inserting Em Dashes and
En Dashes
Sometimes you’ll want to put a dash
between words or characters and you’ll find
that the dash created by pressing the dash
Em space
Lesson 2 Create Master Pages INDESIGN 3-21
key is not wide enough. That’s because
there is no dash key on a keyboard. What
you think of as a dash is actually a hyphen,
and hyphens are shorter than dashes.
InDesign offers two types of dashes—the
em dash and the en dash—that you can
insert between words or characters. The
width of an em dash is equivalent to that of
the lowercase letter m in the current type-
face at that type size. The width of an en
dash is narrower—that of the lowercase let-
ter n in that typeface at that type size. To
insert an em dash or an en dash, click Type
on the menu bar, point to Insert Special
Character, then click either Em Dash or En
Dash. Figure 29 shows an example of an
en dash.
Creating a New Master Page
Based on Another Master Page
Imagine that you’ve created a master page
for a page in a magazine layout. The master
contains placeholder text frames for the
headline, for the body copy, and for the page
number. It also contains placeholder graph-
ics frames for pictures that will appear on
the page. Now imagine that you need to cre-
ate another master page that will be identi-
cal to this master page, with the one
exception, that this new master will not
contain frames for graphics. You wouldn’t
want to duplicate all of the work you did to
create the first master, would you?
You can create a new master page based on
another master page. You do this to avoid
repeating efforts and for consistency
between masters. In the above example,
you would create the new master based on
the first master. The new master would
appear identical to the first master. You
would then modify only the elements that
you want to change on the new master,
keeping all of the elements that you don’t
want to change perfectly consistent with
the previous master.
Basing a new master on another master is
not the same thing as duplicating a master.
When one master is based on another, any
changes you make to the first master will
be updated on the master based on it.
Think of how powerful this is. Let’s say that
your editor tells you to change the type size
of the page numbers. If you make that
change to the first master, the change will
automatically be updated on the master(s)
based on it. This offers you a substantial
savings in time and effort and provides you
with the certainty that the page numbers
will be consistent from master to master.
When you base a new master on another
master, you will find that you cannot select
the objects on the new master that were
created on the first master. Or, it should be
said, that you cannot select those objects in
the usual way. You must press and hold
[Shift][Ctrl] (Win) or [Shift] (Mac) to
select those objects on the new master.
InDesign does this so that you don’t acci-
dentally move or delete objects from the
previous master.
FIGURE 29
Identifying an en dash
En dash
INDESIGN 3-22 Setting up a Document
Create a new master page
1. Press [Tab] to show the palettes again, then
click the Normal View Mode button on
the Toolbox.
2. Click the Pages palette list arrow, then click
New Master.
3. Type Body Copy with Pics in the Name text
box, then type 2 in the Number of Pages text
box (if necessary) so that your New Master
dialog box resembles Figure 30.
You need two pages for this master since it
will be used for both left and right pages.
4. Click OK, note the new master page listing in
the Pages palette, click View on the menu
bar, then click Fit Spread in Window (if
necessary).
5. Click Layout on the menu bar, then click
Margins and Columns.
6. Double-click the Inside text box to select it,
type .5, then click OK.
The inner margins on both the left and right
pages are increased—only on the B-Body
Copy with Pics master page.
7. Press and hold [Ctrl] (Win) or (Mac),
then drag a horizontal guide onto the
spread, positioning it one inch from the top
of the page.
(continued)
FIGURE 30
New Master dialog box
Master page name
