The CSS Anthology: 101 Essential Tips, Tricks & Hacks- P16 ppsx
Bạn đang xem bản rút gọn của tài liệu. Xem và tải ngay bản đầy đủ của tài liệu tại đây (1.35 MB, 20 trang )
277Accessibility and Alternative Devices
color: #FFFFFF;
background-color: transparent;
}
#content h2 {
font: 120% Georgia, "Times New Roman", Times, serif;
padding-bottom: 3px;
border-bottom: 1px dotted #CCCCCC;
}
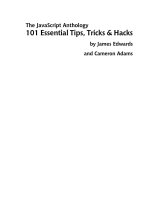
In Figure 8.6, you can see how the page displays when the user selects the alternative
style sheet from Firefox’s View menu.
Figure 8.6. Switching to the High Contrast style sheet in Firefox
Discussion
Utilizing this browser functionality is easy, and allows you to add valuable features
for users with a minimum of effort. Typically, it takes very little time to create a
style sheet that tweaks the color scheme. Simply save your existing style sheet and
tweak the fonts, colors, and layout as required.
Unfortunately, browser support for this feature is still limited—and absent in Internet
Explorer. However, users who find this functionality beneficial may choose a browser
specifically because it gives them access to these features.
Download at WoweBook.Com
The CSS Anthology278
Look How Thoughtful I Am!
As very few sites utilize this feature at present, it would be a good idea to let your
users know that you offer alternative style sheets. Perhaps include the information
on a separate page that explains how to use the site, which is linked clearly from
the home page.
Zoom Layouts
A step on from simply creating a large-print style sheet is the concept of the zoom
layout. Popularized by Joe Clark, the zoom layout uses CSS to refactor the page into
a single-column layout with high-contrast colors.
11
This is most useful for visitors
who use the zoom feature in modern browsers (as it increases the size of the whole
layout rather than just the text), or use software that magnifies the screen to make
reading easier. When a design is magnified in this way, the sidebars often move off
the side of the viewport, resulting in a page that contains only essential content.
Zoom layouts can make it easier for visually impaired users by enlarging the font
size and displaying the text in a light color on a dark background—a combination
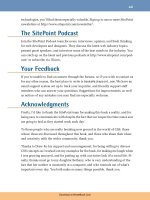
that’s easier for many users to read. A style sheet that creates a zoom layout for the
design we’ve been working on throughout this chapter might contain the following
rules, and display in the browser as shown in Figure 8.7:
chapter08/zoom.css
body, html {
margin: 1em 2em 2em 2em;
padding: 0;
font-size: 140%;
background-color: #333;
color: #FFFFFF;
}
#navigation ul {
list-style: none;
margin: 0;
padding: 0;
border: none;
}
11
Download at WoweBook.Com
279Accessibility and Alternative Devices
#navigation li {
float:left;
width: 20%;
}
#navigation li a:link, #navigation li a:visited {
color: #FFFF00;
}
#navigation li a:hover {
text-decoration:none;
}
#content {
padding: 1em 0 0 0;
clear:left;
}
#content p, #content li {
line-height: 1.6em;
}
#content h1, #content h2 {
font: 140% Georgia, "Times New Roman", Times, serif;
color: #FFFFFF;
background-color: transparent;
}
#content h2 {
font: 120% Georgia, "Times New Roman", Times, serif;
}
Download at WoweBook.Com
The CSS Anthology280
Figure 8.7. A zoom layout style sheet
Should I add font-size widgets or other
style sheet switchers to my site?
You may come across sites that have added a widget to increase or decrease font
size by switching the style sheet. In this chapter we’ve already covered how to create
alternate style sheets; should we provide these style switcher links?
Solution
Font-size widgets—often seen as a series of the letter “A” in varying sizes—are really
redundant if you have built your site well, using font-sizing methods that allow the
text to be increased in all browsers. It’s seen as more helpful to let your users know
how to increase the font size using browser controls, as this will give them the
ability to increase the text on most sites, rather than just the ones that offer a widget
to do so.
Download at WoweBook.Com
281 Accessibility and Alternative Devices
With zoom layouts or other alternate layouts, the guidance is less clear. Modern
browsers do allow users to zoom rather than just increase text size and, in an ideal
world, all designs would zoom well and there’d be no need to provide alternate
style sheets for users wanting to zoom. However, where fixed-width designs are
concerned, zooming often results in parts of the design disappearing off screen. I
personally think that in this situation, having a different design tailored to the needs
of these users is a good thing. You could simply create an alternate style sheet as
above and, on a page detailing the accessibility of your site, explain to users which
browsers will enable use of alternate style sheets and how to switch to the zoom
version, or you could implement a switcher using JavaScript or server-side code.
You should, however, only include this functionality if you really need to. Take
care to resist the trap of thinking you have to have style switchers, or that they allow
you to disregard accessibility in your default design.
How do I use alternative style sheets
without duplicating code?
In the examples we’ve seen so far in this chapter, we created our alternative style
sheet by changing very few properties within the main style sheet. Do we actually
need to create a whole new version of the style sheet as an alternative, or is it possible
to alter only those styles that need to be changed?
Solution
The answer to this question is to create multiple style sheets: a base style sheet for
the properties that never change, a default style sheet that contains the properties
that will change, and a style sheet that includes the alternative versions of those
properties:
alternate-stylesheets2.html (excerpt)
<link rel="stylesheet" type="text/css" href="main2.css" />
<link rel="stylesheet" type="text/css" href="defaultcolors.css"
title="Default" />
<link rel="stylesheet" type="text/css" href="print.css"
Download at WoweBook.Com
The CSS Anthology282
media="print" />
<link rel="alternative stylesheet" type="text/css"
href="highcontrast2.css" title="High Contrast" />
chapter08/main2.css
body, html {
margin: 0;
padding: 0;
}
#navigation {
font: 90% Arial, Helvetica, sans-serif;
position: absolute;
left: 0;
top: 41px;
}
#navigation ul {
list-style: none;
margin: 0;
padding: 0;
border: none;
}
#navigation li {
border-bottom: 1px solid #ED9F9F;
margin: 0;
}
#navigation li a:link, #navigation li a:visited {
display: block;
padding: 5px 5px 5px 0.5em;
border-left: 12px solid #711515;
border-right: 1px solid #711515;
background-color: #B51032;
color: #FFFFFF;
text-decoration: none;
}
#navigation li a:hover {
background-color: #711515;
color: #FFFFFF;
}
#banner {
background-color: #711515;
border-bottom: 1px solid #ED9F9F;
text-align: right;
padding-right: 20px;
Download at WoweBook.Com
283Accessibility and Alternative Devices
margin-top: 0;
}
#banner ul {
margin: 0;
}
#banner li {
display: inline;
}
#banner a:link, #banner a:visited {
font: 80% Arial, Helvetica, sans-serif;
color: #FFFFFF
background-color: transparent;
}
#content p, #content li {
font: 80%/1.6em Arial, Helvetica, sans-serif;
}
#content p {
margin-left: 1.5em;
}
#content h1, #content h2 {
font: 140% Georgia, "Times New Roman", Times, serif;
color: #B51032;
background-color: transparent;
}
#content h2 {
font: 120% Georgia, "Times New Roman", Times, serif;
padding-bottom: 3px;
border-bottom: 1px dotted #ED9F9F;
}
chapter08/defaultcolors.css
body, html {
background-color: #FFFFFF;
color: #000000;
}
#content h1, #content h2 {
color: #B51032;
background-color: transparent;
}
Download at WoweBook.Com
The CSS Anthology284
#content h2 {
border-bottom: 1px dotted #ED9F9F;
}
chapter08/highcontrast2.css
body, html {
background-color: #000000;
color: #FFFFFF;
}
#content h1, #content h2 {
color: #FFFFFF;
background-color: transparent;
}
#content h2 {
border-bottom: 1px dotted #CCCCCC;
}
Discussion
To create the highcontrast.css file that I used in “How do I add alternative style sheets
to my site?” I changed very few of the properties that were in the original style sheet.
I changed the base color and background color:
chapter08/main.css (excerpt)
body, html {
margin: 0;
padding: 0;
background-color: #FFFFFF;
color: #000000;
}
chapter08/highcontrast.css (excerpt)
body, html {
margin: 0;
padding: 0;
Download at WoweBook.Com
285Accessibility and Alternative Devices
background-color: #000000;
color: #FFFFFF;
}
I also adjusted the color of the level 1 and 2 headings:
chapter08/main.css (excerpt)
#content h1, #content h2 {
font: 140% Georgia, "Times New Roman", Times, serif;
color: #B51032;
background-color: transparent;
}
#content h2 {
font: 120% Georgia, "Times New Roman", Times, serif;
padding-bottom: 3px;
border-bottom: 1px dotted #ED9F9F;
}
chapter08/highcontrast.css (excerpt)
#content h1, #content h2 {
font: 140% Georgia, "Times New Roman", Times, serif;
color: #FFFFFF;
background-color: transparent;
}
#content h2 {
font: 120% Georgia, "Times New Roman", Times, serif;
padding-bottom: 3px;
border-bottom: 1px dotted #CCCCCC;
}
To avoid making a copy of the entire style sheet in order to create the highcontrast.css
file, we can remove from the main style sheet those properties that we know we’ll
need to swap. We’ll place them in a new style sheet that determines the default
color scheme; our high-contrast style sheet need contain only the altered version
of those properties. This way, you avoid having to maintain several different versions
of what is, essentially, the same style sheet.
Download at WoweBook.Com
The CSS Anthology286
Summary
In this chapter, we’ve covered some of the ways in which the use of style sheets
can make your site more accessible to a wider range of users. By starting out with
an accessible document structure, we’re already assisting those who need to use a
screen reader to read out the content of the site, and by providing alternative style
sheets we can help users with other accessibility needs to customize their experience,
making the site easier to use.
Download at WoweBook.Com
Chapter
9
CSS Positioning and Layout
Browser bugs aside, the fundamentals of CSS layout are relatively easy to understand.
Once you know the basics, anything more complex is really just repeating the same
techniques on various sections of your page.
This chapter will introduce the basics of CSS layout, and explore useful tricks and
techniques that you can use to create unique and beautiful sites. These are the es-
sential building blocks—commencement points for your creativity. If you work
through the chapter from beginning to end, you’ll start to grasp the fundamentals
necessary to create workable CSS layouts. The chapter then progresses to more de-
tailed layout examples—so if you’re already comfortable with the basics, simply
dip into these solutions to find the specific technique you need.
How do I decide when to use a class and
when to use an ID?
At first glance, classes and IDs seem to be used in much the same way: you can assign
CSS properties to both classes and IDs, and apply them to change the way (X)HTML
Download at WoweBook.Com
The CSS Anthology288
elements look. But, in which circumstances are classes best applied? And what
about IDs?
Solution
The most important rule, where classes and IDs are concerned, is that an ID must
be only used once in a document—as it uniquely identifies the element to which
it’ s applied. Once you’ve assigned an ID to an element, you cannot use that ID again
within that document.
Classes, on the other hand, may be used as many times as you like within the same
document. Therefore, if there’s a feature on a page that you wish to repeat, a class
is the ideal choice.
You can apply both a class and an ID to any given element. For example, you might
apply a class to all text input fields on a page; if you want to be able to address those
fields using JavaScript, each field will need a separate ID, too. However, no styles
need be assigned to that ID.
I tend to use IDs for the main, structural, positioned elements of the page, so I often
end up with IDs such as header, content, nav, and footer. Here’s an example:
<!DOCTYPE html PUBLIC "-//W3C//DTD XHTML 1.0 Strict//EN"
"
<html xmlns=" lang="en-US">
<head>
<title>Absolute positioning</title>
<meta http-equiv="content-type"
content="text/html; charset=utf-8" />
<link rel="stylesheet" type="text/css" href="position2.css" />
</head>
<body>
<div id="header"
> … </div>
<div id="content">
⋮ Main page content here
…
</div>
<div id="nav"
> … </div>
</body>
</html>
Download at WoweBook.Com
289CSS Positioning and Layout
Can I make an inline element display as if
it were block-level, and vice-versa?
Sometimes, we need to make the browser treat HTML elements differently than it
would treat them by default.
Solution
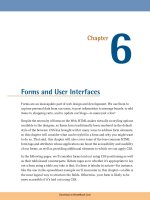
In Figure 9.1, you can see that we’ve forced a div element to display as an inline
element, and a link to display as a block.
Figure 9.1. Displaying the block-level element inline, while the inline element displays as a block
Here’s the markup that achieves this effect:
chapter09/inline-block.html
<!DOCTYPE html PUBLIC "-//W3C//DTD XHTML 1.0 Strict//EN"
"
<html xmlns=" lang="en-US">
<head>
<title>Inline and block level elements</title>
<meta http-equiv="content-type"
content="text/html; charset=utf-8" />
<style type="text/css">
#one {
background-color: #CFEAFA;
border: 2px solid #6CB5DF;
padding: 2px 6px 2px 6px;
}
Download at WoweBook.Com
The CSS Anthology290
#two {
background-color: #CFEAFA;
border: 2px solid #6CB5DF;
padding: 2px 6px 2px 6px;
display: inline;
}
a {
background-color: #6CB5DF;
color: #FFFFFF;
text-decoration: none;
padding: 1px 2px 1px 2px;
}
a.block {
display: block;
}
</style>
</head>
<body>
<div id="one">A div is a block level element.</div>
<p>It is possible to display a div or any other block level
element as an inline element. </p>
<div id="two"
>This div is displaying as an inline element.
</div>
<p>This paragraph contains a
<a href=" that
displays as an inline element.</p>
<p>This paragraph contains a
<a class="block"
href="
that displays as a block element.</p>
</body>
</html>
Discussion
Block-level elements are distinguished from inline elements in that they may contain
inline elements as well as other block-level elements. They’re also formatted differ-
ently than inline elements: block-level elements occupy a rectangular area of the
page, spanning the entire width of the page by default, whereas inline elements
flow along lines of text, and wrap to fit inside the blocks that contain them. HTML
elements that are treated as block-level by default include headings (h1, h2, h3, …),
paragraphs (p), lists (ul, ol), and various containers (div, blockquote).
Download at WoweBook.Com
291 CSS Positioning and Layout
In the example above, we see a div that displays as normal. As it’s a block-level
element, it takes up the full width of the parent element, which, in this case, is the
body. If it were contained within another div, or a table cell, it would stretch only
to the width of that element.
If we want the div to behave differently, we can set it to display inline by applying
this CSS property:
display: inline;
We can cause an inline element to display as if it were a block-level element in the
same way. In the above example, note that the a element displays as an inline ele-
ment by default. We often want it to display as a block—for example, when we’re
creating a navigation bar using CSS. To achieve this, we set the display property
of the element to block. In the example above, this causes the gray box that contains
the linked text to expand to the full width of the screen.
How do margins and padding work in CSS?
What’ s the difference between the margin and padding properties, and how do they
affect elements?
Solution
The margin properties add space to the outside of an element. You can set margins
individually:
margin-top: 1em;
margin-right: 2em;
margin-bottom: 0.5em;
margin-left: 3em;
You can also set margins using a shorthand property:
margin: 1em 2em 0.5em 3em;
If all the margins are to be equal, simply use a rule like this:
Download at WoweBook.Com
The CSS Anthology292
margin: 1em;
This rule applies a 1 em margin to all sides of the element.
Figure 9.2 shows what a block-level element looks like when we add margins to it.
The code for this page is as follows:
chapter09/margin.html
<!DOCTYPE html PUBLIC "-//W3C//DTD XHTML 1.0 Strict//EN"
"
<html xmlns=" lang="en-US">
<head>
<title>Margins</title>
<meta http-equiv="content-type"
content="text/html; charset=utf-8" />
<style type="text/css">
p {
background-color: #CFEAFA;
border: 2px solid #6CB5DF;
}
p.margintest {
margin: 40px;
}
</style>
</head>
<body>
<p>This paragraph should be displayed in the default …
</p>
<p>This is another paragraph that has the default …</p>
<p class="margintest">This paragraph has a 40-pixel …</p>
</body>
</html>
Download at WoweBook.Com
293CSS Positioning and Layout
Figure 9.2. Applying margins to an element with CSS
The padding properties add space inside the element—between its borders and its
content. You can set padding individually for the top, right, bottom, and left sides
of an element:
padding-top: 1em;
padding-right: 1.5em;
padding-bottom: 0.5em;
padding-left: 2em;
You can also apply padding using this shorthand property:
padding: 1em 1.5em 0.5em 2em;
As with margins, if the padding is to be equal all the way around an element, you
can simply use a rule like this:
padding: 1em;
Figure 9.3, which results from the following code, shows what a block looks like
with padding applied. Compare it to Figure 9.2 to see the differences between
margins and padding:
Download at WoweBook.Com
The CSS Anthology294
chapter09/padding.html
<!DOCTYPE html PUBLIC "-//W3C//DTD XHTML 1.0 Strict//EN"
"
<html xmlns=" lang="en-US">
<head>
<title>Padding</title>
<meta http-equiv="content-type"
content="text/html; charset=utf-8" />
<style type="text/css">
p {
border: 2px solid #AAAAAA;
background-color: #EEEEEE;
}
p.paddingtest {
padding: 40px;
}
</style>
</head>
<body>
<p>This paragraph should be displayed in the default …
</p>
<p>This is another paragraph that has the default …</p>
<p class="paddingtest">This paragraph has 40 pixels …</p>
</body>
</html>
Discussion
The above solution demonstrates the basics of margins and padding. As we’ve seen,
the margin properties create space between the element to which they’re applied
and the surrounding elements, while padding creates space inside the element to
which it’s applied. Figure 9.4 illustrates this point.
Download at WoweBook.Com
295CSS Positioning and Layout
Figure 9.3. Applying padding to an element in CSS
Figure 9.4. Applying margins, padding, and borders
If you’re applying margins and padding to a fixed-width element, they’ll be added
to the specified width to produce the total width for that element. So, if your element
has a width of 400 pixels, and you add 40 pixels’ worth of padding on all sides,
you’ll make the element take up 480 pixels of total width (400 pixels wide plus 40
pixels on each side). Add 20 pixels of margins to that, and the element will occupy
a width of 520 pixels (a visible width of 480 pixels with 20 pixels of spacing on
either side). If you have a very precise layout, remember to calculate your element
sizes carefully, including any added margins and padding.
Download at WoweBook.Com
The CSS Anthology296
Quirks Mode May Confuse
In very old versions of Internet Explorer, namely 5 and 5.5, padding (and borders)
are interpreted as being included within the specified width of the element; in
these browsers, the element just described would remain 400 pixels in width with
the padding included and adding margins would reduce the visible width of the
element. One workaround for this peculiarity is to apply padding to a parent ele-
ment, rather than adding a margin to the element in question. Ensuring compatib-
ility with IE5 is of little concern to most designers these days, so the only time
this might be an issue is if you’ve managed to end up with IE6 in Quirks Mode,
as described in Chapter 7.
How do I wrap text around an image?
With HTML, it’s possible to wrap text around an image using the align attribute.
This attribute was deprecated, but there is a CSS equivalent!
Solution
Use the CSS float property to float an image to the left or right, as shown in Fig-
ure 9.5.
Figure 9.5. Floating an image to the left using the float property
Download at WoweBook.Com