Mysql your visual blueprint for creating open source databases- P10 doc
Bạn đang xem bản rút gọn của tài liệu. Xem và tải ngay bản đầy đủ của tài liệu tại đây (715.73 KB, 20 trang )
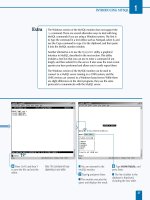
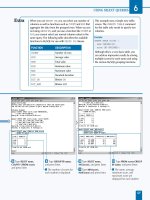
Á From the Export Text
Wizard, select the Delimited
option.
‡ Click Next to continue. ° Select Tab as the
delimiting character.
· Select none as the Text
Qualifier option.
‚ Click Next.
— Click Finish to save the
file.
■ You can now import the
resulting text file into MySQL.
IMPORT AND EXPORT DATA
8
167
You can also import a text file you created with the SELECT
INTO OUTFILE option in MySQL into Microsoft Access. To
import a text file, select Get External Data, and then Import from
the File menu. From the file selection dialog box, select Text Files
as the file type. Select the text file to import and click OK.
Access now starts the Import Text Wizard to prompt you for
information about the text file. In the first dialog box, choose
between Delimited and Fixed width fields. Choose Delimited for
most MySQL export files. You can also choose a starting row for
the import.
Click Next to display the next dialog box. Choose the character
that delimits the fields, typically Tab for MySQL files. You can also
choose Text Qualifier if your text file encloses fields in quotation
marks. Click Next to continue.
In the next dialog box, choose whether to add the data to a new
table or an existing table in the current database. Click Next to
display another dialog box, which prompts you for the name and
data type of each field. The next dialog box lets you choose a
field to act as primary key. Finally, enter a table name and click
Finish to complete the import.
516922 Ch08.F 9/26/02 11:37 AM Page 167
Note: This example uses the testdb
database and the mail and address
tables.
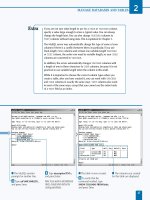
⁄ From the command line,
type
mysqldump testdb mail
and press Enter.
■ This dumps the contents of
the mail table to the screen.
Note: You may need to specify the
username and password with the
-u
and
-p
options.
Note: Under Windows, you may
need to specify the full path to
the command, for example,
c:\mysql\bin\mysqldump.
¤ Type mysqldump testdb
mail address >tables.txt and
press Enter.
■ This backs up both tables
to the tables.txt file.
‹ Type mysqldump testdb
>db.txt and press Enter.
■ This backs up the entire
database to the db.txt file.
Note: You may need to specify the
username and password with the
-u
and
-p
options.
168
BACK UP DATA FROM A TABLE
W
hile you can export data to a text file using
SELECT and the INTO OUTFILE option, this
process creates a simple text file. MySQL includes
a separate utility, mysqldump, that you can use from the
command line to back up a database to a text file. The
output file includes SQL statements and can be used to
rebuild the database or tables.
To use mysqldump, specify a database name and one or
more table names. The following example dumps the mail
and address tables from the testdb database:
mysqldump testdb mail address
If you do not specify table names, mysqldump will dump
the entire database. You can also back up more than one
database by specifying the -B option and a list of databases.
In this case, you cannot specify particular table names. The
following example backs up the db1 and db2 databases:
mysqldump -B db1 db2
The mysqldump utility always includes all of the columns
of each table. You can specify the format of the text output
using several options: fields-terminated-by,
fields-enclosed-by, fields escaped by,
and lines-terminated-by. These are the same as the
options for the LOAD DATA command, described earlier in
this chapter.
This utility supports the same -u and -p options as the
mysql command. You will usually need to use these
options to specify a username with access to the tables you
are dumping and the correct password.
The mysqldump utility does not create a text file by itself —
it normally dumps the text to the standard output at the
shell prompt. You can use the > operator from the
command line to save the output to a file instead.
BACK UP DATA FROM A TABLE
MySQL
516922 Ch08.F 9/26/02 11:37 AM Page 168
Note: This example requires the
tables.txt file created in the previous
section. You will delete the existing
tables and restore them from the file.
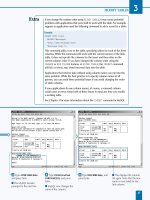
⁄ From the MySQL monitor,
type
USE testdb; and press
Enter.
■ The database is now
selected.
¤ Type DROP TABLE address;
and press Enter.
‹ Type DROP TABLE mail;
and press Enter.
■ Both tables are now
deleted.
› Type SOURCE tables.txt;
and press Enter.
■ The database is re-created
using the instructions in the
text file.
ˇ Type SELECT name,
address FROM address;
and press Enter.
■ This displays the contents
of the restored table.
169
W
hen you have created a backup text file using
mysqldump, you can use it to re-create the
database or tables that were backed up. The text
file includes SQL statements, such as CREATE TABLE and
INSERT, to rebuild the backed up databases or tables. To
use the file, you can simply route it through the mysql
command to process the SQL statements.
The following example uses the mysql command to restore
the database backed up in the db.txt file:
mysql testdb <db.txt
You can also use the SOURCE command within the MySQL
monitor. This command reads SQL commands from a text
file you specify.
As with the standard mysql command, you can use the -u
option to specify a username and the -p option to specify a
password. The username you specify must have permission
to create the database or table you are restoring. You may
also need to use the -h option to specify a host name.
If you are restoring a database or table that has been
corrupted or updated incorrectly, you should first use the
DROP TABLE or DROP DATABASE commands to delete any
existing data.
The file created by mysqldump is a standard text file. If
you need to modify the SQL statements in the file before
importing, you can use any text editor. If you have a backup
file for an entire database and need to restore a single
table, you can use a text editor to move the statements for
that table to a different file.
Along with restoring a database that has been lost or
corrupted, you can use the backup file to import the
database and tables onto a different MySQL server. This
is an efficient way to move data between servers.
RESTORE A BACKUP FILE
RESTORE A BACKUP FILE
IMPORT AND EXPORT DATA
8
516922 Ch08.F 9/26/02 11:37 AM Page 169
Note: This example uses the testdb
database. You will need access to
the
crontab
command.
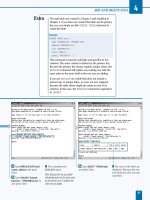
⁄ From the UNIX command
prompt, type
crontab -e to
edit the cron table.
■ This launches a text editor
and loads the existing table, if
any, into the editor.
Note: This example is for UNIX
systems. For Windows, see the Extra
section.
¤ Type 30 3 * * * mysqldump
and add -u and -p options
specifying the username and
password for the MySQL
database, if necessary.
‹ Type the name of the
database to back up.
› Type > followed by the
filename for the backup file.
Note: You may need to specify a path
to the file.
Y
ou can use the mysqldump utility to create a backup
of a table, a database, or multiple databases. You can
use a scheduling utility, such as cron, under UNIX
platforms to schedule regular backups using this utility.
To schedule backups, first test the mysqldump command
you will use to back up the data. For example, the following
command backs up the entire testdb database to the
backup.txt file:
mysqldump -uuser -ppassword testdb
>backup.txt
Replace user and password with the username and
password. After you have the correct mysqldump
command, you can schedule backups. To use cron, type
crontab -e to edit the crontab file. Each line in this file
includes five options for scheduling the command and the
command itself.
The first five options in the entry specify the minute, hour,
day of month, month, and day of week to execute the
command. You can use a number in each of these fields, or
* to include all of the possible values. Separate the fields
with spaces or tabs. For example, the following cron entry
executes the mysqldump command every day at 3:30 AM:
30 3 * * * mysqldump -uuser -ppassword
testdb >backup.txt
If you are using a shared system, you may need to contact
the system administrator to gain access to cron features.
Each username has a separate cron table. The username
you use to set up the scheduled backup should have access
to the mysqldump command and permission to create a file.
When this command executes daily, it will usually override
the existing file. You may need to rename files regularly or
set up a more complex arrangement of cron events to use
different filenames each day.
MANAGE AUTOMATED BACKUPS
MySQL
170
MANAGE AUTOMATED BACKUPS
516922 Ch08.F 9/26/02 11:37 AM Page 170
ˇ Press Enter to complete
the cron table entry.
Á Press Ctrl-X and then Y to
save the file and exit the
editor.
Note: These keystrokes are for pico,
an editor available on most systems.
Use the correct keystrokes for your
particular editor.
‡ Type crontab -l and press
Enter.
■ This displays the cron
table. Verify that your new
entry is included.
IMPORT AND EXPORT DATA
8
You can also use mysqldump to make backups on a Windows-based
MySQL server. Under Windows, the utility is mysqldump.exe in the
c:\mysql\bin directory. Its options are the same as the UNIX version,
and the Windows command prompt also supports the > operator to
redirect the output of a command to a file.
To automate backups, you can use the at command from the command
line under Windows NT, Windows 2000, or Windows XP. Type at /? at
the command line to display a list of options for this program.
You can also use the Task Scheduler included with most versions of
Windows to schedule a backup. To use Task Scheduler, select Scheduled
Tasks from the Control Panel. Double-click the Add Scheduled Task
entry to add a new task. A wizard prompts you for information about
the program that should be run and the schedule it should follow.
As an alternative, you can use any standard Windows backup program
to back up the MySQL data to tape or to a disk archive. The data is
stored in the c:\mysql\data directory. Each database has a subdirectory
under data where its data is stored. One backup utility, ntbackup.exe,
is included with Windows NT and Windows 2000.
171
516922 Ch08.F 9/26/02 11:37 AM Page 171
Note: This example uses the address
table in the testdb database.
⁄ From the command
prompt, type
mysqldump.
■ If necessary, type -uuser
–ppassword, replacing user
and password with the correct
options for your server.
Note: In Windows, you may need to
specify the full path, for example,
c:\mysql\bin\mysqldump.
¤ Type -d testdb address
>address.txt and press Enter.
■ The structure of the table
is saved to the file you
specified.
‹ Type cat address.txt and
press Enter.
■ This displays the contents
of the file you have created.
Note: Under Windows systems, use
the command
more
instead of
cat
.
172
BACK UP TABLE STRUCTURE
T
he mysqldump utility includes an option, -d or
no-create-db, that dumps the structure of
the table but not the data. You can use this option
to create an empty table with the same structure as the
existing table. This is useful if you need to store similar
data in a different table. You can also use the resulting
SQL statements as a starting point to create a different
table.
For example, the following mysqldump command dumps
only the structure of the address table in the testdb
database to the table.txt file:
mysqldump -uuser -ppassword -d testdb
address >address.txt
After you have dumped the structure of the table to a file,
you can edit the file in a text editor to change the name of
the table and any other options within the CREATE TABLE
statements. You can then import the file using the mysql
command. For example, the following command imports the
table structure saved to address.txt in the testdb database:
mysql -uuser -ppassword testdb <address.txt
You can also use the source command within the MySQL
monitor to import the saved table structure. If you attempt
to import the file without changing the name of the table
first, MySQL will display an error message because the table
already exists.
Conversely, you can use the -t option with mysqldump to
dump the data from the table, but not its structure — the
resulting file will include the INSERT statements for the
data of the table, but not the CREATE TABLE statement.
This option is useful if you want to merge the data in the
table into a different table rather than creating a new table.
BACK UP TABLE STRUCTURE
MySQL
516922 Ch08.F 9/26/02 11:37 AM Page 172
Note: This example uses the address
table in the testdb database.
⁄ From the MySQL monitor,
type
USE testdb; and press
Enter.
¤ Type DESCRIBE address;
and press Enter.
■ The structure of the table is
displayed.
‹ Type CREATE TABLE
address2 ( and press Enter.
› Type name VARCHAR(100),
address VARCHAR(120), city
VARCHAR(50), and press
Enter.
ˇ Type state CHAR(2),
updatetime TIMESTAMP ); and
press Enter.
■ The new table is created.
Á Type INSERT INTO
address2 SELECT * FROM
address; and press Enter.
■ The data is now copied to
the second table.
173
I
f you need to copy a table's structure or data to a
different table, you can use several different methods.
One simple way to copy a table is to first create the
new table with the same structure, and then use an INSERT
query with the SELECT option to copy the data from one
table to the other.
For example, to copy the address table, you would first type
DESCRIBE address; to view the structure of the table.
Next, use a CREATE TABLE query using the same column
types and other information to create the new table. After
the table is created, you can use a single INSERT query to
copy all of the rows of the table to the new table. The
following query copies all of the data in the address table
to the address2 table:
INSERT INTO address2 SELECT * FROM address;
This form of the INSERT command uses a standard SELECT
statement to select the data to copy. You can optionally
specify a list of columns to copy, and include a WHERE clause
to select only certain rows to be copied into the new table.
An alternate method of copying the table may be easier for
complex tables. Use mysqldump -d to create a backup of
the table's structure, as described in the previous section.
Next, edit the resulting file and change the table name in the
CREATE TABLE command to the name of the new table.
Use mysql to read the file and create the new table, and
then use an INSERT query like the above to copy the data.
CREATE A COPY OF A TABLE
CREATE A COPY OF A TABLE
IMPORT AND EXPORT DATA
8
516922 Ch08.F 9/26/02 11:37 AM Page 173
A
fter you have installed a MySQL server, it runs
continuously and requires little intervention.
However, you may need to start and stop the server
and perform other administrative tasks from time to time.
MySQL includes a variety of tools for this purpose.
MYSQL ADMINISTRATION TOOLS
MySQL
174
The mysqladmin Utility
The mysqladmin utility runs from a client machine and
is installed with the MySQL client software. This utility
supports a number of different commands for managing
the MySQL server. To use this utility, type mysqladmin
followed by the command name. You may also need to
specify the -u and -p options with a valid username
and password. The table below shows some of the most
useful mysqladmin commands.
COMMAND DESCRIPTION
create Create a database
drop Drop a database
ping Check whether the server is running
status Display basic status information
extended-status Display a detailed status report
processlist Show a list of the current MySQL
server processes
kill Stop one or more server processes
variables List MySQL variables and their
values
version Display the MySQL server version
number
shutdown Shut down the MySQL server
password Change the password for the
current MySQL user
Examples:
mysqladmin create newdatabase
mysqladmin ping
mysqladmin shutdown
Start and Stop MySQL (UNIX)
On a UNIX system, you typically start the MySQL server
with the mysqld or safe_mysqld programs. mysqld
is the server program itself, and safe_mysqld is a
wrapper that determines the correct settings and starts
mysqld. These programs are stored in the MySQL
binaries directory, typically /usr/local/mysql/bin.
To stop the MySQL server, you can use the
mysqladmin shutdown command. This sends a signal
to the server to shut it down.
Start and Stop MySQL (Windows)
On a Windows system, you can also use mysqld to
start the server and mysqladmin shutdown to shut it
down. These commands are typically located in the
C:\mysql\bin directory and can be run from the
command prompt.
On Windows NT, 2000, and XP systems, you can also
use the operating system's service management
features to start and stop the server. MySQL is listed on
the Services control panel, and you can start or stop it
or configure it to start automatically when the system
starts. You can also use the NET START and NET STOP
commands to start and stop the server.
Example:
NET START mysql
NET STOP mysql
BASIC MYSQL ADMINISTRATION
All installations of the MySQL server and client include
some basic command-line administration tools. The
mysqladmin utility handles many of the administration
tasks.
516922 Ch09.F 9/26/02 12:00 PM Page 174
MANAGE THE MYSQL SERVER
9
Environment
The Environment tab displays the host name, user
name, operating system, IP address, and the amount of
RAM available on the server machine. If you click the
Extended Server Status button, detailed statistics for the
server are displayed. These are the same values shown
in the mysqladmin status command.
Start Check
WinMySQLadmin performs a basic check when it starts
to determine whether the server is running correctly.
The Start Check tab displays the results of this check
and any error messages that were reported.
Server
The Server tab displays a list of MySQL server status
variables and their values. These provide a detailed
snapshot of the server's current performance. These
values are the same as those listed by the mysqladmin
extended-status command and are described in
Chapter 11.
my.ini Setup
The Windows version of MySQL uses a file called my.ini
to determine various settings for the server. The my.ini
Setup tab in WinMySQLadmin displays the current
contents of the my.ini file and allows you to edit the
options and save any changes you have made. Be sure
not to change values in this file unless you are sure
what they will affect. The settings available in this file
are described in Chapter 11.
Err File
The MySQL server maintains a log file that includes any
errors encountered by the server as well as basic status
messages created when the server starts up or shuts
down. The Err File tab displays the contents of this log file.
Variables
The Variables tab displays a list of MySQL variables and
their values. These are the same settings available in the
my.ini file. Rather than show the contents of this file,
this tab displays the server's current variable settings.
This is the same information shown in the mysqladmin
variables command.
Process
The Process tab displays a list of currently running
threads, or processes, on the MySQL server. Each entry
includes a process ID number, the username and host,
the database in use, the command the thread is
running, the thread's current status, and the amount of
time it has spent processing. This list is the same
produced by the mysqladmin processlist
command.
You can right-click a process and select Kill to stop the
process. This feature is also available from the
mysqladmin kill command.
Databases
The Databases tab displays a current list of databases
on the server. If you select a database from the list, the
list of tables in the database is displayed. If you select a
table from the list, detailed information about its
available columns and indexes is displayed. The right-
click menu allows you to create and drop databases.
Report
The Report tab creates and displays a detailed report of
the MySQL server's configuration and status, including
the information in several of the prior tabs. You can
print the report or save it to a file.
THE WINMYSQLADMIN UTILITY
175
The Windows installation of MySQL includes a utility
called WinMySQLadmin. This utility allows you to display
information about the server and perform many of the
same functions as the mysqladmin utility. To
run WinMySQLadmin, start the c:\mysql\bin\
winmysqladmin.exe program.
When you start WinMySQLadmin, it briefly displays its
window and then hides itself. It adds an icon resembling
a traffic light to the system tray. To show the
WinMySQLadmin window, right-click the tray icon and
select the Show Me option. The right-click menu also
includes an option to start or stop the MySQL server.
Although this utility provides a graphical interface
to many MySQL settings, you can also use the command-
line mysqladmin utility under Windows.
The WinMySQLadmin window is divided into a number of
tabbed sections. Select each tab to display the associated
page. The pages available are described below.
516922 Ch09.F 9/26/02 12:00 PM Page 175
MySQL
⁄ From the command line,
type
mysqladmin ping and
press Enter.
Note: You may need to specify the
-u
and
-p
options with the correct
username and password values for
your server.
■ The message indicates
whether the server is
responding.
Note: Under Windows, you may
need to include the path with
the command, for example,
c:\mysql\bin\
mysqladmin.exe
.
¤ Type mysqladmin status
and press Enter.
Note: You may need to specify a
username and password.
■ A more detailed status
report is displayed.
176
CHECK SERVER STATUS
I
f you or other users of the system are having trouble
accessing the MySQL server, the first step is to
determine whether the MySQL server is running at
all. One simple way to check this is with the mysqladmin
utility. This utility includes a variety of different options for
working with the MySQL server and is installed as part of
the MySQL client package.
To test the server, first try the ping option within
mysqladmin. This option communicates with the server
and displays a simple message indicating whether it is
responding. The following is a simple example:
mysqladmin ping -uuser -ppassword
This command tests the default server on the local host.
It displays the message "mysqld is alive" if the server
responds. If there is no response from the server, it displays
an error message that may help you resolve the problem.
As with other mysql client commands, you can specify the
-h (host) option if necessary to refer to a different MySQL
server. For a complete list of mysqladmin options, type
mysqladmin with no options.
Sometimes, although the MySQL server is running, it may
not be responding quickly or correctly. You can find out a
bit more about the server's condition with the mysqladmin
status command. This displays the amount of time the
server has been running, the number of active threads, the
number of queries since the server started, and other
information.
You can use the information displayed by the status
option, and the more detailed extended-status option
from mysqladmin, to determine the server's current
performance and learn how performance can be improved.
See Chapter 10 for details about optimizing the MySQL
server.
CHECK SERVER STATUS
516922 Ch09.F 9/26/02 12:00 PM Page 176
CHECK THE MYSQL SERVER VERSION
⁄ From the command
prompt, type
mysqladmin
version and press Enter.
Note: You may need to specify the
-u
and
-p
options with the correct
username and password values for
your server.
■ The server's version
information is displayed.
Note: Under Windows, you may
need to specify the path with
the command, for example,
c:\mysql\bin\
mysqladmin.exe
.
¤ Type mysql to start the
MySQL monitor.
Note: You may need to specify a
username and password.
■ Notice the version
information displayed before
the prompt.
‹ Type exit and press Enter.
■ This exits the MySQL
monitor.
177
T
he mysqladmin utility also includes an option to
display version information for the MySQL server. You
can use this option to determine whether your server
supports certain features or requires an upgrade. To check
the server version, use the version command with
mysqladmin, as shown in this example:
mysqladmin version -uuser -ppassword
This command displays the server version number, the
protocol in use, and the amount of time the server has been
running. It also displays information about threads, queries,
and other statistics, similar to the output of the status
command. The following is an example of how the server
version information appears. This may vary depending on
your specific system.
Server version 3.23.46
Protocol version 10
Connection Localhost via UNIX socket
UNIX socket /tmp/mysql.sock
Uptime: 17 min 24 sec
As with other mysqladmin commands, you must specify a
correct username and password with the -u and -p
options. You can also specify a hostname with the -h
option and a socket file with the -S option, if necessary.
At this writing, the latest version of MySQL 3 is version 3.23.
MySQL 4.0 is also available, although it is currently in alpha
testing. Visit www.mysql.com to find out information about
the current version and to download files for a new version
if necessary.
When you start the MySQL monitor with the mysql
command, a brief message is displayed indicating the
version number of the server and the current connection.
MANAGE THE MYSQL SERVER
9
CHECK THE MYSQL SERVER VERSION
516922 Ch09.F 9/26/02 12:00 PM Page 177
⁄ From the UNIX command
prompt, type
cd followed by
the directory where the
MySQL server is installed,
typically /usr/local/mysql.
¤ Type bin/safe_mysqld &
and press Enter.
■ This starts the MySQL
server.
‹ Type mysqladmin ping and
press Enter.
■ This indicates that the
server is now running.
Note: If necessary, add the
-u
and
-p
options with the correct
username and password.
I
f the MySQL server is not currently running, you can
restart it. You may also need to stop and restart the
server if you have changed its configuration, or if it is
not responding. On UNIX systems, you can start the MySQL
server using the safe_mysqld command, which starts the
mysqld server program.
The mysqld and safe_mysqld programs are located in
the bin directory under the MySQL installation directory.
On most systems, this directory is /usr/local/mysql/bin or
/usr/local/bin. The exact directory depends on how the
MySQL server was installed. The following example starts
the MySQL server:
/usr/local/bin/safe_mysqld &
The & character indicates that the program should run in
the background on most systems. After you have started the
server, you can use mysqladmin ping or mysqladmin
status to verify that it is running.
To shut down the MySQL server, use the mysqladmin
shutdown command. The following command shuts down
the MySQL server on the local host:
mysqladmin shutdown -uuser -ppassword
To use the shutdown command, the username you specify
must have the correct permissions to shut down the server.
On a default installation, only the root user can do this. See
Chapter 11 for information on configuring MySQL users
and passwords.
When you use the shutdown command, the server is
immediately shut down. It does not complete any pending
queries. While the server is down, clients who attempt to
connect to it will receive an error message.
See Chapter 1 for information about setting up the MySQL
server to start automatically when the system boots under
UNIX and Windows systems.
START AND STOP THE MYSQL
SERVER UNDER UNIX
MySQL
178
START THE MYSQL SERVER
516922 Ch09.F 9/26/02 12:00 PM Page 178
STOP THE MYSQL SERVER
⁄ From the UNIX command
prompt, type
mysqladmin
shutdown and press Enter.
■ This immediately shuts
down the MySQL server.
Note: If necessary, add the
-u
and
-p
options with the correct
username and password.
¤ Type mysqladmin ping and
press Enter. Add your
username and password if
needed.
■ This indicates that the
server is no longer running.
Note: If other users require the
MySQL server, be sure to restart
it after you are finished.
MANAGE THE MYSQL SERVER
9
If you encounter an error when starting the MySQL server, there are
a number of potential causes. The first item to check is whether the
MySQL server is currently running — you cannot run two copies of
the MySQL server at the same time unless you have customized the
port and socket settings. Type mysqladmin ping to check whether
the server is already running. You can also type ps on a UNIX system
to list running processes and check whether mysqld is included.
If the server fails to start, you may find some useful information about
the error that occurred in the MySQL log files. These files are located
in the MySQL data directory, typically /usr/local/var or /usr/local/
mysql/data on UNIX systems. The files are hostname.log and
hostname.err, with your server host name in place of hostname.
If an error message is displayed indicating that the TCP/IP port or
socket is already in use, either MySQL is already running, or some
other service is using the port you have selected for MySQL.
You need to have the correct permissions to start the MySQL server. If
it did not start correctly, log in as root and attempt to start the MySQL
server again.
179
516922 Ch09.F 9/26/02 12:00 PM Page 179
⁄ From the command
prompt, type
NET START
mysql and press Enter.
■ This starts the MySQL
server.
Note: Under Windows 95, 98,
and Me, type the path to
mysqld.exe
instead.
¤ Type NET STOP mysql and
press Enter.
■ This shuts down the
MySQL server.
Note: Under Windows 95, 98, and
Me, type
mysqladmin shutdown
instead.
I
f you are running the MySQL server on a Windows
system, you can start and stop the server in a number of
different ways. Under Windows 95, 98, and Me, you can
use the mysqld command from the command prompt to
start the server. This is typically located in the C:\mysql\bin
directory. The following command starts the MySQL server
on a typical system:
C:\mysql\bin\mysqld
You can shut down the MySQL server from the command
prompt using the mysqladmin utility, located at C:\
mysql\bin\mysqladmin.exe. The following example
shuts down the MySQL server on the local machine:
C:\mysql\bin\mysqladmin shutdown –u root –p
password
On Windows NT, 2000, and XP systems, MySQL is usually
set up to run as a service, and you can use the standard
Windows methods to control it. The first of these is the
Services control panel, located under Administrative Tools
in Windows 2000. Find MySQL in the list of services and use
the toolbar buttons to start or stop the service. You can also
use the Services control panel to set up MySQL to run
automatically when the system starts.
An alternative way to control the MySQL service on
Windows NT, 2000, and XP is to use the NET command
from the command prompt. To start the MySQL server, use
the NET START command. The following command starts
the server:
NET START mysql
To shut down the MySQL server, use the NET STOP
command at the command prompt. The following
command shuts down the MySQL server:
NET STOP mysql
You can also use the mysqladmin utility to shut down
MySQL when it is run as a service. Choose the most
convenient method for your particular system.
START AND STOP THE MYSQL
SERVER UNDER WINDOWS
MySQL
180
START AND STOP MYSQL FROM THE COMMAND PROMPT
516922 Ch09.F 9/26/02 12:00 PM Page 180
START AND STOP MYSQL FROM THE SERVICES CONTROL PANEL
Note: These instructions are for
Windows NT, 2000, and XP.
⁄ Start the Services control
panel from the Control Panel
or Administrative Tools
window.
■ The display indicates the
MySQL server's current
status.
¤ Double-click the MySQL
entry.
■ The MySql Properties
dialog box is displayed.
‹ To start or stop the
MySQL server, use the
Start
and
Stop buttons.
› You can set the Startup
type option to Automatic,
Manual, or Disabled. Use
Automatic to start MySQL
when the computer starts.
MySql Started Manual LocalSystem
MANAGE THE MYSQL SERVER
9
If you are unable to start the MySQL server under Windows, be sure your
system has the necessary components installed. In particular, MySQL
requires the TCP/IP protocol, which you can install using the Network
control panel. MySQL also requires that your system support the
Winsock 2 standard. This is included in Windows 98 and later; you may
need to install an update from Microsoft for Windows 95 systems.
On Windows NT, 2000, and XP systems, most users do not have
permission to start and stop services by default. If you are unable to
start MySQL, log on as Administrator and try again. Although Windows
uses the Administrator account, the default administrative user under
MySQL is root, as on UNIX systems.
You cannot shut down the MySQL server using the Task Manager. If you
attempt to shut down the MySQL server in this way, it may lock up your
system or fail to shut down. Use the mysqladmin utility or one of the
service control methods described in this section instead.
If the MySQL server does not start correctly, check the error log for
information. This log is stored at c:\mysql\data using the filename
mysql.err by default. The WinMySQLadmin utility, described in the
section "Using WinMySQLadmin," later in this chapter, also includes
an option to view the log file.
181
516922 Ch09.F 9/26/02 12:00 PM Page 181
VIEW RUNNING PROCESSES
Note: This example assumes that the
MySQL server is currently running
on the local machine.
⁄ From the command
prompt, type
mysqladmin
processlist and press Enter.
Note: You may need to add
-u
and
-p
options to specify a valid
username and password.
■ The list of processes is
displayed.
Y
ou can use the mysqladmin utility with the
processlist command to display a list of the
processes currently running on the MySQL server.
This list includes all of the queries currently running for
clients as well as commands entered from the MySQL
monitor. The following is an example of the processlist
command:
mysqladmin processlist -uuser -ppassword
For each process currently running, this command lists its
process ID number, the MySQL user ID that started it, the
host the client connected from, the database used by the
query, the command issued to the server, the amount of
time the query has been in progress, the current status of
the process, and the query or command that started the
process.
Occasionally, a database query will take an excessive
amount of time, slowing down the server, or an error will
cause a process to lock up and stop responding. When this
happens, you can use mysqladmin processlist to
display the list of processes and find the problematic one.
You can then stop the process.
To stop a process, use the kill command with mysqladmin.
To use this command, specify one or more process ID
numbers. They will be immediately stopped, not
completing their queries. The MySQL server will continue
to run and process other requests. For example, the
following command kills a process with the ID number
3037:
mysqladmin kill 3037
If you stop a process that is currently writing data to a table,
it may leave partial or corrupt data in the table. Because of
this, you should use the kill command only when you are
certain the process will not complete on its own.
VIEW AND MANAGE RUNNING PROCESSES
MySQL
182
VIEW AND MANAGE RUNNING PROCESSES
516922 Ch09.F 9/26/02 12:00 PM Page 182
KILL A PROCESS
⁄ From the command
prompt, type
mysqladmin
processlist and press Enter.
■ The list of processes is
displayed.
¤ Type mysqladmin kill
followed by the number of
the process to kill.
■ The process is immediately
stopped.
‹ Type mysqladmin
processlist and press Enter.
■ The list of processes is
displayed again. Note that
the killed process is no longer
listed.
MANAGE THE MYSQL SERVER
9
The MySQL server can have a number of processes, also known
as threads, running concurrently. The number of threads that can
run at the same time depends on the operating system and on the
configuration of the MySQL server. Chapter 10 explains how you can
configure the server for a maximum number of concurrent threads.
The status of threads in the process list may indicate Query if a query
is in process or Sleep if the thread is currently inactive. The server
keeps a number of threads in an inactive state so that it can use them
for queries rather than starting a new thread each time.
You can use the ps command in most UNIX systems to display a list of
processes currently running on the server and their ID numbers. While
this will show all of the MySQL threads currently in use, the process
numbers used by MySQL are not the same as the system's ID
numbers.
You can also kill MySQL threads using the operating system's commands.
However, using the mysqladmin utility to kill threads has less chance
of corrupting data, and is easier because you can use the processlist
command to determine the correct thread to kill.
183
516922 Ch09.F 9/26/02 12:01 PM Page 183
Note: Type
c:\mysql\bin\
winmysqladmin
from the command
prompt to start the utility. Right-click
the tray icon and select Show Me to
display the utility.
⁄ From WinMySQLadmin's
Environment tab, click the
Extended Server Status button.
■ This displays a detailed set
of statistics for the MySQL
server.
¤ Click the my.ini Setup
tab at the top of the
WinMySQLadmin
dialog box.
■ This displays the contents
of the initialization file,
which you can edit if needed.
C:/mysql
T
he Windows version of the MySQL server includes
the WinMySQLadmin utility. This is a graphical utility
that allows you to manage settings and display
statistics for the MySQL server from within Windows. To
run this tool, start the winmysqladmin.exe program in
the C:\mysql\bin directory.
When WinMySQLadmin is first run, it shows briefly and
then hides itself. It remains resident, and an icon appears in
the system tray. Right-click the icon and select the Show Me
option to view the utility.
The WinMySQLadmin display is divided into a number
of tabbed sections. The first, Environment, includes
information about the computer MySQL is running on
and a number of statistics for the server. These are the same
values available from the mysqladmin status command.
The Start Check tab runs some tests to verify that the server
is running correctly. The Server tab displays a list of statistics
for the MySQL server. The my.ini Setup tab allows you to
edit the my.ini file, which stores default settings for the
server. The Err File tab displays the server error log. The
Variables tab displays a list of MySQL variables and their
current settings; these are explained in detail in Chapter 11.
The Process tab in WinMySQLadmin shows a list of
processes and their ID numbers, similar to the output of the
mysqladmin processlist command. You can right-click
an entry in the list and select Kill Process to stop a process.
The Databases tab allows you to view information about
the databases stored on the server, the tables within a
database, and the columns of each table. This is similar to
the SHOW DATABASES and SHOW TABLES commands from
the MySQL monitor. The right-click menu includes options
to create or drop databases and to refresh the current list.
USING WINMYSQLADMIN
MySQL
184
USING WINMYSQLADMIN
516922 Ch09.F 9/26/02 12:01 PM Page 184
‹ Click the Process tab at
the top of the dialog box.
■ This displays a current
process list for the server.
› Click the Databases tab at
the top of the dialog box.
■ The list of databases on the
server is displayed.
ˇ Select a database and a
table by clicking their names.
■ The columns and index
information for the table are
displayed.
address
address
name
MANAGE THE MYSQL SERVER
9
The final tab of the WinMySQLadmin utility, Report, allows
you to display a detailed report about the MySQL server.
After you select the Report tab, click the Create the Report
button to create the report.
The report includes information about the current installation
of MySQL, how it was compiled, and the system it is running
on. It also lists the contents of the my.ini file, the current
status of the server as displayed in the Server tab, the list of
variables as shown in the Variables tab, and the error log as
listed in the Err File tab.
The report is displayed in a text window within the
WinMySQLadmin interface. You can use the Print button to
print a copy of the report or use the Save As button to save it
as a text file. This tab also includes Cut, Copy, Paste, Delete,
and Select All buttons that you can use to edit the report or
copy it to another program.
All of the information in the WinMySQLadmin utility is also
available from the command line using the MySQL monitor
and the mysqladmin utility. You can use whichever tools you
are most comfortable with to manage the server.
185
516922 Ch09.F 9/26/02 12:01 PM Page 185
Note: See Chapter 1 for information
on installing and starting
MySQLGUI
.
⁄ From the MySQLGUI
menu, click Commands,
Administration, and then
Administrator Panel.
■ The administration panel is
displayed.
¤ Click the Show variables
button to display the variable
list.
T
he MySQLGUI utility provides another interface to
the MySQL server, and includes a variety of useful
administration functions. While most of these are also
available from command-line utilities, MySQLGUI provides a
user-friendly graphic interface. This utility provides some of
the same features as WinMySQLadmin, described in the
previous section, but is also available for non-Windows
operating systems. See Chapter 1 for information on
obtaining and installing MySQLGUI.
To manage the MySQL server using MySQLGUI, select
Commands, Tables, and then Administration from the
menu. The Administrator Panel option provides a central
method of accessing various management functions. Some
of these functions are also available directly from the
Administration menu.
The Administrator Panel displays a summary of the server's
status, similar to the output of the mysqladmin status
command, and displays the current time from the MySQL
server. The panel also includes buttons for administrative
functions. These include Ping to check on the server,
Refresh to refresh the status display, and Shutdown to
shut down the server.
The Show variables button displays MySQL's current
variable settings. The Display status button displays a
complete status report, similar to the output of the
mysqladmin extended-status command. The Show
processes button displays a list of current MySQL threads,
similar to the mysqladmin processlist command.
The Flush tables button closes all open tables. The Flush
hosts button clears the host cache. The Flush logs button
closes and re-opens the log files. See Chapter 10 for more
information about log files. The Flush status command
clears the status variables.
In addition to these options, MySQLGUIs administration
panel includes options to create and drop databases, and
to change passwords and grant privileges to users. See
Chapter 11 for more information about securing MySQL
by setting up users and passwords.
MANAGE MYSQL WITH MYSQLGUI
MySQL
186
MANAGE MYSQL WITH MYSQLGUI
516922 Ch09.F 9/26/02 12:01 PM Page 186