Photoshop cs5 by steve Johnson part 77 pot
Bạn đang xem bản rút gọn của tài liệu. Xem và tải ngay bản đầy đủ của tài liệu tại đây (674.88 KB, 6 trang )
ptg
490 Chapter 20
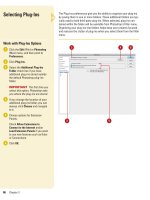
Working with the 3D preferences (New!) gives you control over how
the Photoshop 3D engine works with 3D objects. Working with 3D mod-
els can take its toll on your computer’s hardware, so you need to use
software—either OpenGL or Adobe Ray Tracer (ART)—and/or hardware
(a video card with memory, known as VRAM) to help process the ren-
dering (display) of 3D models in Photoshop. In 3D Preferences, you set
VRAM usage amounts and which rendering 3D engine to use, as well as
other options for display elements and fine-tune the 3D model. If
OpenGL (GL stands for Graphics Library) options are not available, you
need to select the Enable OpenGL Drawing check box in Performance
Preferences and/or upgrade your video hardware.
4
3
Setting 3D Preferences
Enable OpenGL Drawing
Click the Edit (Win) or Photoshop
(Mac) menu, and then point to
Preferences.
Click Performance.
If you have a video card installed
with a GPU (Graphics Processing
Unit), the name of your video card
appears under Detected Video
Card.
Select the Enable OpenGL
Drawing check box to use the
enhanced speed and smoothness
of graphic/3D rendering and
navigation.
Click OK.
4
3
2
1
Installed video card name
2
From the Library of Wow! eBook
ptg
Chapter 20 Extending Photoshop 491
Set 3D Options
Click the Edit (Win) or Photoshop
(Mac) menu, and then point to
Preferences.
Click 3D (New!).
Select options from the following:
◆ Available VRAM for 3D. Specify
the amount of video memory
(VRAM) you want Photoshop to
use for 3D operations.
◆ Interactive Rendering. For
interacting with 3D objects,
select the OpenGL option to use
hardware-acceleration
(requires a video card), or the
Ray Tracer option to use Adobe
Ray Tracer (ART), and then
select the related options.
◆ 3D Overlays. Specify colors for
guides for highlighting 3D
scene components.
◆ Ground Plane. Specify a plane
side, grid spacing size, and
color for the ground plane. The
ground plane is a grid that
reflects the position of the
ground relative to the 3D model.
◆ Ray Tracer. Specify a quality
amount for ray traced
rendering.
◆ 3D File Loading. Specify the
initial limit for active lights, and
set the maximum number of
diffuse textures to generate
when they are absent.
Click OK.
4
3
2
1
3
4
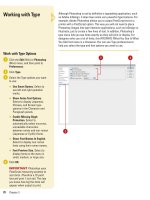
Showing and Hiding 3D Elements
When you’re working with 3D objects, you can show or hide screen
elements—such as the 3D axis, ground plane (New!), lights
(New!), or selection (New!)—to make it easier to create the 3D
artwork you want. To show or hide a 3D screen element, click the
View menu, point to Show, and then select a 3D option: 3D Axis, 3D
Ground Plane, 3D Lights, or 3D Selection.
For Your Information
2
From the Library of Wow! eBook
ptg
492 Chapter 20
Photoshop Extended provides vast improvements to the way you work
with 3D files. There is a 3D menu with an assortment of commands and
there are two slots on the toolbox dedicated to 3D, for a total of 10 easy-
to-reach tools, as well as what’s on the 3D panel. Artists can paint
directly on 3D objects without having to render them in another program.
Photoshop includes support for three-dimensional files (U3D, 3DS, OBJ,
KMZ, and DAE file formats) created by programs like Adobe Acrobat 3D
Version 8, 3D Studio Max, Alias, Maya, and Google Earth. You can start
from a text layer, a selection, or a layer mask in a document to convert it
to a 3D model or open an existing 3D file. When you open a 3D file,
Photoshop places the 3D model on a separate 3D layer. You can add mul-
tiple 3D layers to an image. If your Photoshop document contains one or
more 2D layers (typical images), you can combine any one of them with a
3D layer, or convert a 3D layer to a 2D layer. You can create a 3D model
by using the 3D panel (New!) or commands on the 3D menu.
Creating 3D Models
Create a 3D Model from a 2D
Image with the 3D Panel
Open a 2D image.
Select the layer or object on the
canvas you want to convert into a
3D model.
Select the 3D panel.
Click the Source list arrow, and
then select a source option:
Selected Layer(s), Work Path, or
Current Selection.
Select from the available options:
◆ 3D Postcard. Creates a plane
with 3D properties.
◆ 3D Shape From Preset. Creates
a 3D shape from a preset, such
as cone, cube, donut, or hat.
◆ 3D Repoussé Object. Creates a
3D model using repoussé.
◆ 3D Mesh From Grayscale.
Converts a grayscale image
into a 3D model depth map
using mesh options.
◆ 3D Volume. Creates a 3D
volume model from a multi-
frame file, such as a DICOM.
Click the Create button.
6
5
4
3
2
1
3
4
5
6
From the Library of Wow! eBook
ptg
Chapter 20 Extending Photoshop 493
Insert a 3D Model from a File
Open a document.
Click the 3D menu, and then click
New Layer from 3D File.
◆ You can also select File from
the Source list arrow in the 3D
panel, and then click Create.
Navigate to the location where the
3D file is located, and then select
the 3D file.
Click Open.
A new 3D layer appears in the
document.
To add a 3D la yer to a n im age,
drag the 3D layer from one layer in
the Layers panel to another layer.
Select the 3D layer in the new
location.
Use the 3D tools on the toolbox or
on the 3D panel to view, position,
or scale the 3D model.
◆ Change 3D position and scale.
Use the following 3D tools: 3D
Rotate Tool, 3D Roll Tool, 3D
Pan Tool, 3D Slide Tool, or 3D
Scale Tool.
◆ Change 3D view. Use the
following 3D tools: 3D Orbit
Tool, 3D Roll View Tool, 3D Pan
View Tool, 3D Walk View Tool,
and 3D Zoom Tool.
7
6
5
4
3
2
1
7
6
3D model
Did You Know?
You can convert a 3D layer to a 2D
layer.
Select the 3D layer in the Layers
panel, click the 3D menu, and then
click Rasterize.
From the Library of Wow! eBook
ptg
Repoussé is an ancient metalworking technique for embossing artwork
on the surface of metals, such as gold, silver, copper, tin, and bronze. In
Photoshop, you can use Adobe Repoussé (New!) to convert 2D art-
work, including rasterized text, into 3D models. With the Create New 3D
Object section on the 3D panel, you can start from a text layer, a selec-
tion, or a layer mask to convert it to a 3D model. After you create the 3D
model, you can use the Repousse dialog box to manipulate object prop-
erties, such as depth, scale, bend, shear, or twist. In addition, you can
inflate the front or back of the object like a balloon as well as apply a
custom bevel.
494 Chapter 20
Creating 3D Models
Using Repoussé
Create a 3D Model from a 2D
Image with Repoussé
Open a 2D image.
Select the layer or object on the
canvas you want to convert into a
repoussé 3D object.
Select the 3D panel.
Click the Source list arrow, and
then select a source option:
Selected Layer(s), Work Path, or
Current Selection.
Click the 3D Repoussé Object
option.
Click the Create button.
6
5
4
3
2
1
3
2
4
5
6
Did You Know?
You can export a 3D layer to a 3D file.
The supported 3D formats are Collada
DAE, Wavefront/OBJ, U3D, and Google
Earth. Select the 3D layer in the Layers
panel, click the 3D menu, click Export
3D Layer, select a 3D file format, and
then click OK.
You can save a 3D file.
If you want to
preserve 3D model position, lighting,
render mode, and cross sections, save
files with 3D layers in PSD, PSB, TIFF,
or PDF using the Save As command on
the File menu.
From the Library of Wow! eBook
ptg
Chapter 20 Extending Photoshop 495
Specify any of the following 3D
options:
◆ Presets. Choose from the
available shape presets, and
save your own presets.
◆ Materials. Select a material for
the different areas of the 3D
model.
◆ Extrude. Select individual
attributes for the 3D object,
including depth, scale, twist,
and texture. You can also set
shear and bend options to
transform the 3D model.
◆ Inflate. Specify options to
inflate the 3D model like a
balloon.
◆ Bevel. Specify options to apply
a bevel, including slides, height,
width, and contour.
◆ Scene Settings. Specify scene
settings for lights, view,
rendering, and mesh quality.
◆ Internal Constrains. Use the
buttons and other options to
position, rotate, roll, pan, slide,
and scale the 3D model or
adjust a selection.
Click OK.
Use the 3D tools on the toolbox or
on the 3D panel or use the Axis
Widget to view, position, or scale
the 3D model.
◆ Axis Widget. The three colored
areas represent the three axes
(x, y, z) of the object.
9
8
7
7
8
3D object
Did You Know?
You can edit repoussé settings.
Select
the 3D layer in the Layers panel, click
the 3D menu, point to Repoussé, and
then click Edit In Repoussé (New!).
9
Axis widget
From the Library of Wow! eBook