SAS/ETS 9.22 User''''s Guide 275 pps
Bạn đang xem bản rút gọn của tài liệu. Xem và tải ngay bản đầy đủ của tài liệu tại đây (657.4 KB, 10 trang )
2732 ✦ Chapter 42: Choosing the Best Forecasting Model
Now bring up the Model Selection Criterion window again and select
Akaike Information
Criterion
. This statistic puts a lesser penalty on number of parameters, and the Airline Model
comes out as the better fitting model.
Sorting and Selecting Models
Select
Sort Models
on the
Tools
menu or from the toolbar. This sorts the current list of fitted
models by the current selection criterion. Although some selection criteria assign larger values to
better fitting models (for example, R-square) while others assign smaller values to better fitting
models,
Sort Models
always orders models with the best fitting model—in this case, the Airline
Model—at the top of the list.
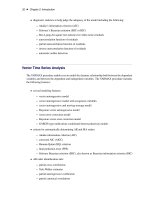
When you select a model in the table, its name and criterion value become highlighted, and actions
that apply to that model become available. If your system supports a right mouse button, you can
click it to invoke a pop-up menu, as shown in Figure 42.13.
Figure 42.13 Right Mouse Button Pop-up Menu
Comparing Models ✦ 2733
Whether or not you have a right mouse button, the same choices are available under
Edit
and
View
from the menu bar. If the model viewer has been invoked, it is automatically updated to show the
selected model, unless you have unlinked the viewer by using the Link/Unlink toolbar button.
Select the highlighted model in the table again. Notice that it is no longer highlighted. When no
models are highlighted, the right mouse button pop-up menu changes, and items on the menu bar that
apply to a selected model become unavailable. For example, you can choose
Edit
from the menu
bar, but you can’t choose the
Edit Model
or
Delete Model
selections unless you have highlighted
a model in the table.
When you select the check box in the
Forecast Model
column of the table, the model in that
row becomes the forecasting model. This is the model that will be used the next time forecasts
are generated by choosing
View Forecasts
or by using the
Produce Forecasts
window. Note
that this forecasting model flag is automatically set when you use
Fit Automatic Model
or when
you fit an individual model that fits better, using the current selection criterion, than the current
forecasting model.
Comparing Models
Select
Tools
and
Compare Models
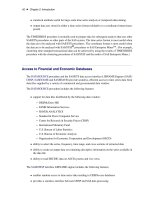
from the menu bar. This displays the
Model Fit Comparison
table, as shown in Figure 42.14.
2734 ✦ Chapter 42: Choosing the Best Forecasting Model
Figure 42.14 Model Comparison Window
The two models you have fit are shown as
Model 1
and
Model 2.
When there are more than two
models, you can bring any two of them into the table by selecting the up and down arrows. In this
way, it is easy to do pairwise comparisons on any number of models, looking at as many statistics of
fit as you like. Since you previously chose to display all statistics of fit, all of them are shown in the
comparison table. Use the vertical scroll bar to move through the list.
After you have examined the model comparison table, select the
Close
button to return to the
Develop Models window.
Controlling the Period of Evaluation and Fit
Notice the three time ranges shown on the Develop Models window (Figure 42.9). The data range
shows the beginning and ending dates of the MASONRY time series. The period of fit shows
the beginning and ending dates of data used to fit the models. The period of evaluation shows
the beginning and ending dates of data used to compute statistics of fit. By default, the fit and
evaluate ranges are the same as the data range. To change these ranges, select the
Set Ranges
Controlling the Period of Evaluation and Fit ✦ 2735
button, or select
Options
and
Time Ranges
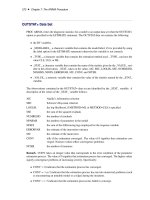
from the menu bar. This brings up the
Time Ranges
Specification window, as shown in Figure 42.15.
Figure 42.15 Time Ranges Specification Window
For this example, suppose the early data in the series is unreliable, and you want to use the range June
1978 to the latest available for both model fitting and model evaluation. You can either type JUN1978
in the
From
column for
Period of Fit
and
Period of Evaluation
, or you can advance these
dates by clicking the right pointing arrows. The outer arrow advances the date by a large amount (in
this case, by a year), and the inner arrow advances it by a single period (in this case, by a month).
Once you have changed the
Period of Fit
and the
Period of Evaluation
to JUN1978 in the
From
column, select the
OK
button to return to the
Develop Models
window. Notice that these time
ranges are updated at the top of the window, but the models already fit have not been affected. Your
changes to the time ranges affect subsequently fit models.
2736 ✦ Chapter 42: Choosing the Best Forecasting Model
Refitting and Reevaluating Models
If you fit the ARIMA(0,1,0)(0,1,0)s and Airline models again in the same way as before, they will
be added to the model list, with the same names but with different values of the model selection
criterion. Parameter estimates will be different, due to the new fit range, and statistics of fit will be
different, due to the new evaluation range.
For this exercise, instead of specifying the models again, refit the existing models by selecting
Edit
from the menu bar and then selecting
Refit Models
and
All Models.
After the models have
been refit, you should see the same two models listed in the table but with slightly different values
for the selection criterion. The ARIMA (0,1,0)(0,1,0)s and Airline models have now been fit to the
MASONRY series by using data from June 1978 to July 1982, since this is the period of fit you
specified. The statistics of fit have been computed for the period of evaluation, which was the same
as the period of fit. If you had specified a period of evaluation different from the period of fit, the
statistics would have been computed accordingly.
In practice, another common reason for refitting models is the availability of new data. For example,
when data for a new month become available for a monthly series, you might add them to the input
data set, then invoke the forecasting system, open the project containing models fit previously, and
refit the models prior to generating new forecasts. Unless you specify the period of fit and period of
evaluation in the
Time Ranges Specification
window, they default to the full data range of the
series found in the input data set at the time of refitting.
If you prefer to apply previously fit models to revised data without refitting, use
Reevaluate Models
instead of
Refit Models
. This recomputes the statistics of fit by using the current evaluation range,
but does not re-estimate the model parameters.
Using Hold-out Samples
One important application of model fitting where the period of fit is different from the period of
evaluation is the use of hold-out samples. With this technique of model evaluation, the period of
fit ends at a time point before the end of the data series, and the remainder of the data are held out
as a nonoverlapping period of evaluation. With respect to the period of fit, the hold-out sample is a
period in the future, used to compare the forecasting accuracy of models fit to past data.
For this exercise, use a hold-out sample of 12 months. Bring up the
Time Ranges Specification
window again by selecting the
Set Ranges
button. Set
Hold-out Sample
to 12 using the combo
box, as shown in Figure 42.16. You can also type in a value. To specify a hold-out sample period in
different units, you can use the
Periods
combo box. In this case, it allows you to select years as the
unit, instead of periods.
Using Hold-out Samples ✦ 2737
Figure 42.16 Specifying the Hold-out Sample Size
Notice that setting the hold-out sample to 12 automatically sets the fit range to JUN1978–JUL1981
and the evaluation range to AUG1981–JUL1982. If you had set the period of fit and period of
evaluation to these ranges, the hold-out sample would have been automatically set to 12 periods.
Select the
OK
button to return to the
Develop Models
window. Now refit the models again. Select
Tools
and
Compare Models
to compare the models now that they have been fit to the period June
1978 through July 1981 and evaluated for the hold-out sample period August 1981 through July
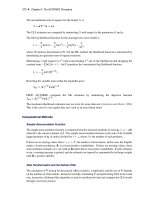
1982. Note that the fit statistics for the hold-out sample are based on one-step-ahead forecasts. (See
Statistics of Fit in Chapter 46, “Forecasting Process Details.”)
As shown in Figure 42.17, the ARIMA (0,1,0)(0,1,0)s model now seems to provide a better fit to
the data than does the Airline model. It should be noted that the results can be quite different if you
choose a different size hold-out sample.
2738 ✦ Chapter 42: Choosing the Best Forecasting Model
Figure 42.17 Using 12 Month Hold-out Sample
Chapter 43
Using Predictor Variables
Contents
Linear Trend . . . . . . . . . . . . . . . . . . . . . . . . . . . . . . . . . . . . . 2742
Time Trend Curves . . . . . . . . . . . . . . . . . . . . . . . . . . . . . . . . . . 2743
Regressors . . . . . . . . . . . . . . . . . . . . . . . . . . . . . . . . . . . . . . . 2747
Adjustments . . . . . . . . . . . . . . . . . . . . . . . . . . . . . . . . . . . . . . 2750
Dynamic Regressor . . . . . . . . . . . . . . . . . . . . . . . . . . . . . . . . . . . 2751
Interventions . . . . . . . . . . . . . . . . . . . . . . . . . . . . . . . . . . . . . 2755
The Intervention Specification Window . . . . . . . . . . . . . . . . . . . . 2756
Specifying a Trend Change Intervention . . . . . . . . . . . . . . . . . . . . 2758
Specifying a Level Change Intervention . . . . . . . . . . . . . . . . . . . . 2760
Modeling Complex Intervention Effects . . . . . . . . . . . . . . . . . . . . . 2761
Fitting the Intervention Model . . . . . . . . . . . . . . . . . . . . . . . . . 2763
Limitations of Intervention Predictors . . . . . . . . . . . . . . . . . . . . . . 2767
Seasonal Dummies . . . . . . . . . . . . . . . . . . . . . . . . . . . . . . . . . . . 2767
References . . . . . . . . . . . . . . . . . . . . . . . . . . . . . . . . . . . . . . . 2771
Forecasting models predict the future values of a series by using two sources of information: the past
values of the series and the values of other time series variables. Other variables used to predict a
series are called predictor variables.
Predictor variables that are used to predict the dependent series can be variables in the input data set,
such as regressors and adjustment variables, or they can be special variables computed by the system
as functions of time, such as trend curves, intervention variables, and seasonal dummies.
You can specify seven different types of predictors in forecasting models by using the ARIMA Model
or Custom Model Specification windows. You cannot specify predictor variables with the Smoothing
Model Specification window.
Figure 43.1 shows the menu of options for adding predictors to an ARIMA model that is opened by
clicking the Add button. The Add menu for the Custom Model Specification menu is similar.
2740 ✦ Chapter 43: Using Predictor Variables
Figure 43.1 Add Predictors Menu
These types of predictors are as follows.
Linear Trend
adds a variable that indexes time as a predictor series. A straight line time
trend is fit to the series by regression when you specify a linear trend.
Trend Curve
provides a menu of various functions of time that you can add to the model
to fit nonlinear time trends. The Linear Trend option is a special case of the
Trend Curve option for which the trend curve is a straight line.
Regressors
allows you to predict the series by regressing it on other variables in the data
set.
Adjustments
allows you to specify other variables in the data set that supply adjustments to
the forecast.
Dynamic Regressor
allows you to select a predictor variable from the input data set and specify a
complex model for the way that the predictor variable affects the dependent
series.
Interventions
allows you to model the effect of special events that “intervene” to change the
pattern of the dependent series. Examples of intervention effects are strikes,
tax increases, and special sales promotions.
Using Predictor Variables ✦ 2741
Seasonal Dummies
adds seasonal indicator or “dummy” variables as regressors to model seasonal
effects.
You can add any number of predictors to a forecasting model, and you can combine predictor
variables with other model options.
The following sections explain these seven kinds of predictors in greater detail and provide examples
of their use. The examples illustrate these different kinds of predictors by using series in the
SASHELP.USECON data set.
Select the
Develop Models
button from the main window. Select the data set SASHELP.USECON
and select the series PETROL. Then select the
View Series Graphically
button from the De-
velop Models window. The plot of the example series PETROL appears as shown in Figure 43.2.
Figure 43.2 Sales of Petroleum and Coal