SAS/ETS 9.22 User''''s Guide 272 ppsx
Bạn đang xem bản rút gọn của tài liệu. Xem và tải ngay bản đầy đủ của tài liệu tại đây (785.45 KB, 10 trang )
2702 ✦ Chapter 41: Specifying Forecasting Models
To illustrate how to use the Custom Model Specification window, the following example specifies
the same model you fit by using the ARIMA Model Specification window.
First, specify the data transformation to use. Select “Log” using the Transformation combo box.
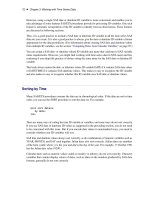
Second, specify how to model the trend in the series. Select
First Difference
in the
Trend
Model combo box, as shown in Figure 41.20.
Figure 41.20 Trend Model Options
Next, specify how to model the seasonal pattern in the series. Select “Seasonal ARIMA” in the
Seasonal Model combo box, as shown in Figure 41.21.
Custom Model Specification Window ✦ 2703
Figure 41.21 Seasonal Model Options
This opens the Seasonal ARIMA Model Options window, as shown in Figure 41.22.
2704 ✦ Chapter 41: Specifying Forecasting Models
Figure 41.22 Seasonal ARIMA Model Options
Specify a first-order seasonal moving-average term by typing
1
or by selecting “1” from the Moving
Average: Q= combo box pop-up menu, and then select the OK button.
Finally, specify how to model the autocorrelation pattern in the model prediction errors. Select the
Set button to the right of the Error Model field. This opens the Error Model Options window, as
shown in Figure 41.23. This window allows you to specify an ARMA error process. Set the Moving
Average order q to 2, and then select the OK button.
Custom Model Specification Window ✦ 2705
Figure 41.23 Error Model Options
The Custom Model Specification window should now appear as shown in Figure 41.24.
The model label at the top of the Custom Model Specification window should now read
Log ARIMA(0,1,2)(0,0,1)s NOINT
, just as it did when you used the ARIMA Model Speci-
fication window.
2706 ✦ Chapter 41: Specifying Forecasting Models
Figure 41.24 Log ARIMA(0,1,2)(0,0,1)s Specified
Now that you have seen how the Custom Model Specification window works, select “Cancel” to exit
the window without fitting the model. This should return you to the Develop Models window.
Editing the Model Selection List
Now that you know how to specify new models that are not included in the system default model
selection list, you can edit the model selection list to add models that you expect to use in the future
or to delete models that you do not expect to use. When you save the forecasting project to a SAS
catalog, the edited model selection list is saved with the project file, and the list is restored when you
load the project.
There are two reasons why you would add a model to the model selection list. First, by adding
the model to the list, you can fit the model to different time series by selecting it through the
Fit
Models from List action. You do not need to specify the model again every time you use it.
Editing the Model Selection List ✦ 2707
Second, once the model is added to the model selection list, it is available to the automatic model
selection process. The model is then considered automatically whenever you use the automatic
model selection feature for any series.
To edit the model selection list, select “Model Selection List” from the Options menu as shown in
Figure 41.25, or select the Edit Model List toolbar icon.
Figure 41.25 Model Selection List Option
This selection brings up the Model Selection List editor window, as shown in Figure 41.26. This
window consists of the model selection list and an “Auto Fit” column, which controls for each model
whether the model is included in the list of models used by the automatic model selection process.
2708 ✦ Chapter 41: Specifying Forecasting Models
Figure 41.26 Model Selection List Window
To add a model to the list, select “Add Model” from the Edit menu and then select “Smoothing
Model,” “ARIMA Model,” “Factored ARIMA Model,” or “Custom Model” from the submenu.
Alternatively, click the corresponding icon on the toolbar.
As an example, select “Smoothing Model.” This brings up the Smoothing Model Specification
window. Note that the series name is “-Null ” This means that you are not specifying a model to be
fit to a particular series, but are specifying a model to be added to the selection list for later reference.
Specify a smoothing model. For example, select “Simple Smoothing” and then select the Square
Root transformation. The window appears as shown in Figure 41.27.
Editing the Model Selection List ✦ 2709
Figure 41.27 Adding a Model Specification
Select the OK button to add the model to the end of the model selection list and return you to the
Model Selection List window, as shown in Figure 41.28. You can now select the Fit Models from
List model-fitting option to use the edited selection list.
Figure 41.28 Model Added to Selection List
If you want to delete one or more models from the list, select the model labels to highlight them
in the list. Click a second time to clear a selected model. Then select “Delete” from the Edit pull-
down menu, or the corresponding toolbar icon. As an example, delete the
Square Root Simple
Exponential Smoothing model that you just added.
2710 ✦ Chapter 41: Specifying Forecasting Models
The Model Selection List editor window gives you a lot of flexibility for managing multiple model
lists, as explained in the section “Model Selection List Editor Window” on page 2839. For example,
you can create your own model lists from scratch or modify or combine previously saved model lists
and those provided with the software, and you can save them and designate one as the default for
future projects.
Now select “Close” from the File menu (or the Close icon) to close the Model Selection List editor
window.
Forecast Combination Model Specification Window
Once you have fit several forecasting models to a series, you face the question of which model to
use to produce the final forecasts. One possible answer is to combine or average the forecasts from
several models. Combining the predictions from several different forecasting methods is a popular
approach to forecasting.
The way that you produce forecast combinations with the Time Series Forecasting System is to
use the Forecast Combination Model Specification window to specify a new forecasting model that
performs the averaging of forecasts from the models you want to combine. This new model is added
to the list of fitted models just like other models. You can then use the Model Viewer window features
and Model Fit Comparison window features to examine the fit of the combined model.
To specify a forecast combination model, select “Combine Forecasts” from the pop-up menu or
toolbar, or select “Edit” and “Fit Model” from the menu bar. This brings up the Forecast Combination
Model Specification window, as shown in Figure 41.29.
Forecast Combination Model Specification Window ✦ 2711
Figure 41.29 Forecast Combination Window
At the top of the Forecast Combination window is the name and label of the series and the label of
the model you are specifying. The model label is filled in with an automatically generated label as
you specify options. You can type over the automatic label with your own label for the model. To
restore the automatic label, enter a blank label.
The middle part of the Forecast Combination window consists of the list of models that you have
fit to the series. This table shows the label and goodness-of-fit measure for each model and the
combining weight assigned to the model.
The
Weight
column controls how much weight is given to each model in the combined forecasts.
A missing weight means that the model is not used. Initially, all the models have missing weight
values.
You can enter the weight values you want to use in the
Weight
column. Alternatively, you can select
models from the Model Description column, and weight values for the models you select are set
automatically. To remove a model from the combination, select it again. This resets its weight value
to missing.
At the bottom of the Forecast Combination window are two buttons:
Normalize Weights
and
Fit
Regression Weights.
The Normalize Weights button adjusts the nonmissing weight values so
that they sum to one. The Fit Regression Weights button uses linear regression to compute the weight
values that produce the combination of model predictions with the best fit to the series.