Photoshop cs5 cho nhiếp ảnh gia part 33 ppsx
Bạn đang xem bản rút gọn của tài liệu. Xem và tải ngay bản đầy đủ của tài liệu tại đây (740.39 KB, 9 trang )
196
c h a p t e r 5: WORKFLOWS AND FIRST STEPS ■
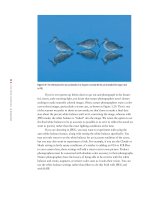
Now imagine you have a print with a great sunset, and you have another print
with a silhouette of a group of birds flying by. If you took the print with the silhou-
ette of the birds flying and placed it on top of the sunset picture, you’d see only the
silhouette picture. But you could cut the birds out of that print and lay them on top
of the print below. Now you’d see the sunset with the silhouetted birds flying through
it. In Photoshop this is akin to having a pixel layer that is partially transparent (the
part that you removed from the print is the transparent part) and partially filled with
pixels (the silhouetted birds) resting on top of the original pixel layer—the sunset. The
sunset is the background layer, and the layer with the birds is only partially filled with
pixels. In other words, pixel layers can be partially transparent and partially filled
with pixels.
This is enough theory for now about layers, but we’ll be talking more about
them later in this book. Take the time to reread this section again slowly if you’re feel-
ing a little shaky about layers.
Flexible and Traditional Workows
The goal of all the adjustments in ACR is to create the best possible file from the data
collected on the camera sensor when you took the picture. Although by now the image
may look pretty good, there are some things you can’t do within ACR, such as apply
filters, create composites, resize specific items, and sharpen output. And it’s possible
you’ll want to tweak some of the exposure or color settings in parts of the image.
We perform these tasks in a routine order to make the best final image possible.
We’ll describe how to do the various modifications in Photoshop in detail beginning
here and continuing through the next few chapters, but first we need to consider our
workflow.
Digital workflows are works in progress that evolve as technology and soft-
ware change. With each new version of Photoshop, new features cause us to make
major modifications to our workflow. For example, our workflow habits changed
when adjustment layers became part of Photoshop (yes, there was a time when Photo-
shop had no adjustment layers), they changed when it became easy to use adjustment
layers on 16-bit files, and they changed yet again when converting raw files became
easy, just to mention a few.
With the arrival of CS3 we established a flexible workflow as our recommended
workflow when optimizing an image in Photoshop for future use, particularly printing.
The flexible workflow takes advantage of Smart Objects and Smart Filters to maintain
the most editability along with the most nondestructive workflow possible. Ultimately
this leads to the highest-quality files possible.
However, there are times when you may have a specific output in mind and/
or need to make fewer changes and prefer to follow a more traditional workflow.
We’ll describe both our flexible and traditional workflows in detail so you can choose
what’s right for you. You’ll see that both these workflows are actually quite similar.
607343c05.indd 196 4/13/10 2:44:05 PM
197
■ FLEXIBLE AND TRADITIONAL WORKFLOWS
But first we’ll explain Smart Objects and Smart Filters so you can better understand
their roles in changing our workflows.
Note: If you are using a version of Photoshop prior to CS3 or Elements, then you’ll need to follow
our traditional workflow since early versions do not support Smart Objects or Smart Filters.
Smart Objects
Smart Objects were introduced in CS2, but they were of limited use for nature pho-
tographers, so we didn’t readily incorporate them into our workflow. With the addi-
tion of Smart Filters and a vastly more robust ACR beginning in CS3, we started to
make use of Smart Objects. Now they’re a regular part of our workflow, and you’ll
soon understand why.
Smart Objects are actually containers that you create within a file that can store
(among other things) your original image file, including a raw file. By using a Smart
Object, you embed your original raw file inside the master file you create while doing
any remaining image optimization.
The Smart Object raw file will then retain all its original characteristics and
be fully editable. In other words, you can modify the settings used in ACR for your
image at any time, even while in the midst of working on the file in Photoshop, and
those changes will appear in the current file.
If you don’t use a Smart Object, then once you choose your settings in ACR,
those settings are fixed into place when you open the file in Photoshop. If you later
decide that you wish you had used different settings in the conversion, you will have
to start all over in ACR and then in Photoshop. But if you begin with the raw file
opened as a Smart Object, double-clicking the Background layer of your file will open
the ACR dialog so that you can modify the settings.
You can edit a Smart Object over and over again with no loss of image quality
because the Smart Object always refers back to the original image data. This means
you can repeatedly change any of the raw settings with no loss of image quality. Smart
Objects also make it possible to repeatedly resize the image within Photoshop, making
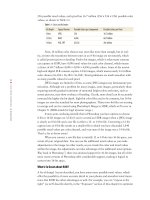
it larger or smaller with no loss of quality. For example, look at the 100% magnifi-
cation sections of water drops on a flower in Figure 5.2. The Smart Object file was
opened, reduced to a less than 1″
× 1″ file, then resized to a nearly 8″ × 8″ file. Then
this process was repeated. The water droplets are still tack-sharp. The version of the
file that was opened as a regular file was resized to the same nearly 1″
× 1″ size and
then resized to nearly 8″
× 8″ just once, and you can easily see the tremendous loss of
image quality. Being able to resize your master file with no loss of image quality offers
a lot of convenience, as you’ll see later. Opening your raw file as a Smart Object lends
valuable flexibility to your image-optimization workflow.
607343c05.indd 197 4/13/10 2:44:05 PM
198
c h a p t e r 5: WORKFLOWS AND FIRST STEPS ■
Figure 5.2 Compare the image quality in the resized Smart Object at the top versus the resized regular image on the bottom.
607343c05.indd 198 4/13/10 2:44:06 PM
199
■ FLEXIBLE AND TRADITIONAL WORKFLOWS
To open a raw file (or any other file format) as a Smart Object from ACR, check
the Open in Photoshop as Smart Objects option in Workflow Options, and then choose
Open Object (or in Photoshop choose File
> Open as Smart Object). See Chapter 3,
“Adobe Camera Raw,” for more details. When the file opens, you’ll see that the back-
ground layer is marked as a Smart Object, as shown in Figure 5.3.
Figure 5.3 The small icon placed
over the thumbnail in the Layers panel
identies that the layer is a Smart Object.
Note: A Smart Object can contain either raster or vector data from other Photoshop files or even
files from other programs, such as Adobe Illustrator. You can also create a Smart Object from one or
more layers of an image by selecting those layers and choosing Layer > Convert to Smart Object. You
won’t be able to access ACR by double-clicking those layers because in this case the Smart Object is
referencing whatever was on those layers of your file rather than the raw file itself.
Smart Filters
Smart Filters are editable filters. Prior to CS3 you applied a filter to a pixel layer, and
once you clicked OK in the filter dialog, you had no way to modify the settings. The
only exception was the Edit
> Fade command, available only immediately after apply-
ing the filter, which could reduce the strength of the effect or apply it using a different
blending mode. There was no way to access the filter dialog and modify your settings.
Smart Filters changed that—with them your filter settings are forever editable, similar
to adjustment layers.
The only “catch” to using Smart Filters is that they can be used only on a Smart
Object layer. However, it’s easy to change any pixel layer into a Smart Object by choos-
ing Filter
> Convert for Smart Filters. Photoshop will automatically change the layer so
that it can receive a Smart Filter.
Any Adobe filter that can be applied as a regular filter can be applied as a Smart
Filter, and a bonus is that the Shadow/Highlight adjustment can also be applied as a
Smart Filter. Once you change the active layer to a Smart Object, when you select a
filter, it will automatically be applied as a Smart Filter. (Pretty smart, yes?)
Note: Photographers have wanted to be able to apply a Shadow/Highlight adjustment as an adjust-
ment layer rather than directly on a pixel layer since the arrival of the Shadow/Highlight adjustment feature.
Because of behind-the-scenes technical issues, it could not readily be made available as an adjustment layer.
Instead, the Adobe engineers made it possible to apply the Shadow/Highlight adjustment as a Smart Filter.
607343c05.indd 199 4/13/10 2:44:06 PM
200
c h a p t e r 5: WORKFLOWS AND FIRST STEPS ■
An Example of Smart Filters in Action
Let’s take a look at Smart Filters in action. You can follow along with the image
SmartFilter available from this book’s companion website,
www.sybex.com/go/
photoshopnature
.
1. Begin by opening the image SmartFilter. We’ll pretend that for whatever reason
we did not initially open the file as a Smart Object. (If you did open the image
as a Smart Object, skip Step 2.)
2. Choose Filter > Convert to Smart Filters. A warning dialog will appear (Fig-
ure 5.4). We recommend checking the option to not have this warning reappear.
Figure 5.4 The Smart Filter warning
3. Choose Image > Adjustments > Shadow/Highlight, and adjust the settings as
desired. Click OK.
Note: For more details about using the Shadow/Highlight feature, see Chapter 6, “Exposure
Adjustments.”
4. Notice that the adjustment appears as a Smart Filter on the Background layer
(Figure 5.5).
Figure 5.5 A Smart
Filter in the Layers panel
There’s a layer mask you can use to control which parts of the image are affected
by the Smart Filters. We’ll cover using layer masks in detail in Chapter 6 and in
Chapter 7, “Color Adjustments.”
The Smart Filter icon
leads to a new dialog, as shown in Figure 5.6, in which
you can specify the opacity of the effect as well as a different blending mode.
We’ll talk more about these features in Chapter 9, “Creative Effects.”
To modify the settings you used in the Shadow/Highlight dialog, double-click
directly on the words Shadow/Highlight in the Smart Filter layer, and make the
desired changes.
607343c05.indd 200 4/13/10 2:44:07 PM
201
■ FLEXIBLE AND TRADITIONAL WORKFLOWS
Figure 5.6 The Smart Filter Options dialog box
lets you choose dierent blending modes and
opacities for each lter.
5. If you want to add an additional filter, open the Filters menu and choose the
desired filter. It will appear beneath the other Smart Filters in the Layers panel
as shown in Figure 5.7.
Figure 5.7 You can add additional
lters, and they appear as sublayers
under the Smart Object layer.
6. Unfortunately, all Smart Filters are governed by the same filter mask, so if you
need to apply two or more filters to different areas—for example, if you wanted to
apply noise reduction to part of the image—you are forced to use a workaround.
a. Begin the workaround by copying the initial Smart Object layer after you’ve
applied the first filter or Shadow/Highlight adjustment. To do so, drag the
original Smart Object layer to the Create New Layer icon
in the Layers
panel. A copy of the layer is created, complete with any Smart Filters you used.
b. Choose Layer > Smart Objects > Rasterize to change the copy layer into a
regular layer containing the effects of the previous Smart Object layer.
c. Choose Layer > New Smart Object, or Filter > Convert for Smart Filters,
to turn this composite layer into a Smart Object so that you can apply an
additional Smart Filter, and use the associated layer mask to apply the
effect to a different part of the image. Note that this Smart Object layer
contains the rasterized version of the first layer, which means that if you
make further changes to the first layer, they will not update in the second
layer. Instead you’ll have to re-create the second layer. This is a pitfall of
the current design of Smart Objects.
As you can see, using Smart Objects and Smart Filters creates the potential
for unparalleled flexibility in your workflow, with editability combined with no loss
of image quality. Therefore, despite some awkwardness caused by the Smart Object
mask limitations, we recommend the following to you as the backbone of your flexible
workflow. Ultimately, you should modify our workflow to suit your specific needs.
An Example of Smart Filters in Action
Let’s take a look at Smart Filters in action. You can follow along with the image
SmartFilter available from this book’s companion website,
www.sybex.com/go/
photoshopnature
.
1. Begin by opening the image SmartFilter. We’ll pretend that for whatever reason
we did not initially open the file as a Smart Object. (If you did open the image
as a Smart Object, skip Step 2.)
2. Choose Filter > Convert to Smart Filters. A warning dialog will appear (Fig-
ure 5.4). We recommend checking the option to not have this warning reappear.
Figure 5.4 The Smart Filter warning
3. Choose Image > Adjustments > Shadow/Highlight, and adjust the settings as
desired. Click OK.
4. Notice that the adjustment appears as a Smart Filter on the Background layer
(Figure 5.5).
There’s a layer mask you can use to control which parts of the image are affected
by the Smart Filters. We’ll cover using layer masks in detail in Chapter 6 and in
Chapter 7, “Color Adjustments.”
The Smart Filter icon leads to a new dialog, as shown in Figure 5.6, in which
you can specify the opacity of the effect as well as a different blending mode.
We’ll talk more about these features in Chapter 9, “Creative Effects.”
To modify the settings you used in the Shadow/Highlight dialog, double-click
directly on the words Shadow/Highlight in the Smart Filter layer, and make the
desired changes.
607343c05.indd 201 4/13/10 2:44:07 PM
202
c h a p t e r 5: WORKFLOWS AND FIRST STEPS ■
The Flexible Workow
Your image-optimization workflow begins when you initially choose an image in
Bridge for further work. We find that by following a consistent series of steps, we
work more efficiently. The order of the steps remains the same, although depending
on the needs of each image, we may omit one or more steps. In fact, we might only be
doing some image cleanup, final sizing, and/or output sharpening in Photoshop. The
flexible workflow is of particular benefit when working with raw files, although it can
be used with JPEGs or TIFFs as well. Figure 5.8 lays out this particular plan of work.
Save Master file
Apply filters as Smart Filters, including
noise reduction and sharpening
color adjustments
tonal adjustments
Remaining
Remaining
Remaining
cleanup
Apply Shadow/Highlight as a Smart Filter
Open image in Photoshop as Smart Object
Optimize in ACR,including cropping
and all tonal and color adjustments
Select image and establish game plan
Flexible Workflow
Figure 5.8 Following the exible workow, and customizing it
according to the needs of individual pictures, will enable you to
use a single le as both the master le and the output le.
Note: To take advantage of the flexible workflow, we open raw files as well as JPEGs and TIFFs in
the ACR converter, as explained in Chapter 3. If you’re using a version of Photoshop prior to CS3, then
you can only open raw files in ACR; JPEGs and TIFFs will open directly in Photoshop. In that case, you’ll
need to follow our traditional workflow and make all your modifications in Photoshop.
1. To begin, take a good hard look at the image in ACR. Don’t skip this step!
Think about what you like about the image and what aspects you want to
emphasize, and decide what elements you need to modify. It’s important to
have an overall game plan in your head when optimizing images to keep you on
track. Otherwise, it’s easy not to know what to do next and even not to know
when you’re done! It sounds silly until it happens to you—suddenly you real-
ize you’ve been working on an image for a long time and can’t decide whether
you’re done. Having a game plan in mind makes it easier to know where you’re
going and when you’ve arrived! So, the first step is to look at the image and the
histogram and decide what you want to do.
607343c05.indd 202 4/13/10 2:44:07 PM
203
■ FLEXIBLE AND TRADITIONAL WORKFLOWS
2. The next step is to use ACR to make most of the global tonal and color adjust-
ments, in addition to cropping, straightening, and cleaning up dust. (See Chapter
3 for details.) It’s important to do as much work as possible in the raw converter
so that you’re starting with the best image possible. Remember that with raw
files almost all the settings we specify in ACR are actually changes to the algo-
rithms used to convert the information captured by the photo sites on the sen-
sors into a visible image, rather than changes to the pixels. Although we work as
nondestructively as possible in Photoshop, ultimately all the changes we make in
Photoshop modify the pixels. The greater the changes we make there, the greater
the potential for some image degradation. Changes made in the raw converter do
not generally result in image degradation—except when clipping is introduced or
areas are cloned or cropped out. However, the changes made in ACR to JPEGs
and TIFFs are changes to the actual pixels—which is one of the reasons why we
recommend shooting in RAW for most nature photographers.
3. When you finish in ACR, open the image as a Smart Object. At this point your
image may be done except for sizing, sharpening, and/or noise reduction, or
you may need to work on it further. We consider making the following adjust-
ments in this order. Keep in mind that on most of your images you won’t need
to perform all these steps.
a. If you think your image could benefit from a Shadow/Highlight adjustment
because it allows finer control than the similar Fill and Recovery tools in
ACR, or because you want to apply it to only a certain part of your image,
begin by making a Shadow/Highlight Smart Filter. (We’ll go into detail
about this in Chapter 6.) Most images will not need this step.
b. If you need to straighten and crop your image in a way that will result in
needing to create some additional background, do that next. (Otherwise,
you can crop in ACR.) We’ll talk more about this later in this chapter.
c. If you need to do any further cloning/healing, it should be the next step.
That way, changes to additional adjustment layers will change the work you
do on this layer as well.
d. If you want to make further tonal adjustments to a particular part of your
image, follow the procedures described in Chapter 6 for making targeted
tonal adjustments using layer masks.
e. If you want to make further color adjustments such as a Selective color
adjustment or a Color Balance adjustment taking advantage of the controls
in Photoshop, or to adjust the color in a particular part of your image, fol-
low the procedures described in Chapter 7.
f. If you want to apply any creative filters and/or noise reduction, do that
next. Although some people recommend applying noise reduction earlier in
the workflow, we save it for later in the process because noise is sometimes
not apparent until after you make all your tonal adjustments.
g. Finally, follow the recommendations for output workflow that we cover in
Chapter 10, “Output,” for resizing and sharpening your images.
607343c05.indd 203 4/13/10 2:44:07 PM
204
c h a p t e r 5: WORKFLOWS AND FIRST STEPS ■
4. Note that by using a Smart Object as your Background layer you can do your
resizing and sharpening on your master image. However, some people may feel
more comfortable saving their master images without resizing and sharpening
and instead create a duplicate copy, the way we recommend in our traditional
workflow. The choice is yours.
No matter what workflow you follow, make it a habit to save and save often!
When you first open your image after using ACR, you will need to save your image.
You can opt to use PSD or TIFF formats. PSDs tend to be slightly larger, but both
formats can retain the integrity of your layers. As a matter of habit, we tend to use the
PSD format for layered files and TIFFs for flattened files, but you could just as easily do
the opposite. By using one format for layered files and one for flattened files, it’s easy
to recognize which file is which. The important point is to save the image after every
step that has been at all time-consuming. You never know when a computer is going to
decide to crash…and in our experience, it’s usually when you have been struggling and
working for a long period of time and haven’t saved what you’re working on!
The Traditional Workow
There are times when even those who often use the flexible workflow will choose to use
the traditional workflow. If you have images that you converted using another program,
you may want to use the traditional workflow—illustrated in Figure 5.9— particularly if
you have only a few adjustments to make.
Sharpen image
Change color space if necessary
Resize for output
Open duplicate imageSave Master file
Final artistic crop
Apply filters, including noise reduction
Color adjustments:global,then localized
Tonal adjustments:global,then localized
Remaining image cleanup
Gross crop and rotate
Apply Shadow/Highlight as a Smart Filter
Open image in Photoshop
Optimize in ACR (set sliders conservatively
and gross crop only)
Select image and establish game plan
Traditional Workflow
Figure 5.9 Following the traditional workow,
and customizing it according to the needs of
individual pictures, will enable you to optimize
your images eciently.
607343c05.indd 204 4/13/10 2:44:07 PM