Photoshop cs5 cho nhiếp ảnh gia part 9 pps
Bạn đang xem bản rút gọn của tài liệu. Xem và tải ngay bản đầy đủ của tài liệu tại đây (1.13 MB, 10 trang )
41
■ BRIDGE
2
Bridge
After you’re done photographing, you need
an easy way to get your images from the
memory cards onto your computer and to
see how the pictures look. Although you
may be eager to start optimizing them right
away, first you need to sort through them
and decide which files to keep and which
to delete. Adobe Bridge, a stand-alone
application that comes with Photoshop and
Elements, and Organizer in the PC version
of Elements, have a lot of features to help
with this task. We’ll show you how to take
advantage of these features to make this part
of your workflow as efficient as possible.
Chapter Contents
Customizing Bridge
Downloading Images
Bridge Views and Workspaces
Sorting and Editing
Additional Features
MiniBridge
Organizer
607343c02.indd 41 4/11/10 11:03:07 PM
42
c hap t e r 2: BR I DGE ■
Customizing Bridge
Bridge is a program designed to be customized for each user’s individual needs. It’s
used not only by photographers, but also by graphic artists and others using any of the
programs packaged in the Adobe Creative Suite series. Bridge’s interface is designed to
make its features very discoverable. However, the default views and behaviors may not
match your workflow needs, so it’s worth spending a little time learning to set it up in
the most convenient way for you. We’ll take you through the program step by step and
make recommendations about what works best for us. That way, you can customize
your version according to your needs.
Note: Bridge is aptly named because it is the “connector,” or “bridge,” between the various
applications that make up Creative Suite 5, such as Adobe InDesign, Illustrator, GoLive, Version Cue, and
so on, as well as Photoshop. It enables files created in one application to be viewed and opened in one
or more of the other applications.
For Photoshop Elements Users: Bridge and Organizer
Mac Elements users can follow along with the Bridge descriptions for Photoshop, as the Mac
version of Elements includes the full, but older, version of Bridge from Photoshop CS4. For PC
Elements users, there’s a separate sidebar devoted to Organizer at the end of the chapter.
Setting Bridge Preferences
Bridge includes a Preferences dialog box where you can set a wide variety of options to
adjust the behavior of Bridge to your liking. Access the dialog box by selecting Edit
>
Preferences (Bridge
> Preferences on Macs) from the menu in Bridge. Because there are
so many settings and many of them are a matter of personal preference, we’ll simply
highlight the major settings:
General This section (see Figure 2.1) contains general settings related to the appear-
ance and behavior of Bridge. Use the sliders in the Appearance section to control the
background of the user interface as well as the backdrop for your images. The Accent
Color drop-down menu enables you to choose a color and style for the highlight in the
user interface. We find that the default settings work well, but this is largely a matter
of personal preference.
The Behavior section includes three options. The first automatically launches Adobe
Photo Downloader. Unless you are specifically using another program, such as
Aperture or Lightroom, for your image importing (which we’ll discuss later in this
chapter), check the option to launch Adobe Photo Downloader when a camera is con-
nected. This will launch the downloader when a memory card is connected and will
save you time.
For Photoshop Elements Users: Bridge and Organizer
Mac Elements users can follow along with the Bridge descriptions for Photoshop, as the Mac
version of Elements includes the full, but older, version of Bridge from Photoshop CS4. For PC
Elements users, there’s a separate sidebar devoted to Organizer at the end of the chapter.
607343c02.indd 42 4/11/10 11:03:07 PM
43
■ CUSTOMIZING BRIDGE
Figure 2.1 The General section of the Bridge Preferences contains settings related to the
display of images within Bridge.
Note: If you opt to experiment with the Appearance sliders, be aware that there is no way to
automatically return to the default settings.
We recommend checking the option Double-Click Edits Camera Raw Settings in
Bridge. When this check box is cleared, raw files open into ACR hosted by Photoshop.
When you check the box, the ACR dialog box opens without launching Photoshop.
This may seem like a subtle distinction, but it may enable you to adjust settings more
rapidly than you otherwise could; for example, you could be working in Photoshop
while Bridge processes a large number of raw files in the background. In addition, it
may allow you to process a larger volume of images at once.
The option Control+click/F+click Opens the Loupe When Previewing or Reviewing is
a personal preference. If you’re annoyed that you’re accidentally eliciting the loupe by
clicking while navigating around the interface, then check this option. By doing so, a
single click will no longer call forth the loupe; instead you’ll have to add the modifier
key (Ctrl or F) as well. We prefer to keep this checked.
The Favorite Items section allows you to choose the image sources to be included on
the Favorites tab. The Reset button at the bottom of this section allows you to reset the
warning dialog boxes so that all are shown, even if you have previously checked the box
to not show a particular message.
607343c02.indd 43 4/11/10 11:03:07 PM
44
c hap t e r 2: BR I DGE ■
For Photoshop Elements Users: Elements, Bridge, and Camera RAW
Using ACR with the version of Bridge that ships with Elements is a little confusing because
Bridge actually contains two versions of ACR: the limited Elements version and a stand-alone
copy of the full-featured CS4 version. If you right-click on an image (RAW, JPEG, or TIF) and
choose Open with Camera Raw, you will see the full version of ACR, but it lacks an Open button.
Instead you can Save the image or click Done. Similarly, if you check the Double-Click Edits Cam-
era Raw Settings in Bridge option, you will get the full-featured version of ACR but it also lacks
a Done button.
If you leave the Double-Click Edits Camera Raw Settings in Bridge option unchecked and instead
double-click an image or right-click on an image and choose Open with
> Photoshop Elements 8,
you will see the limited version of ACR. In that case there’s an Open button so that you can open
the image in Elements. The limited version of ACR will read all the adjustments you made to a
RAW file in the full version of ACR, and it will show them in Elements. However, if you modify a
TIF file using the full version of ACR and want to open that TIF in Elements, you need to save a
copy of the TIF with your adjustments (by clicking the Save button) from the full version of ACR
before opening the result in Elements.
Thumbnails The Thumbnails section (Figure 2.2) includes options for the appearance of
the associated metadata as well as for file handling.
First is the Do Not Process Files Larger Than option, which determines the size, in
megabytes, above which Bridge will not generate a thumbnail for the image. It can be
useful to create such a limit (the default is now 1000MB), because building thumb-
nails for such large images can be time-consuming, resulting in reduced system per-
formance. However, for photographers who frequently produce extremely large files,
such as panoramas, setting such a limit can be a source of frustration, because they
aren’t able to see thumbnails for many of their images. Consider this setting based on
the relative advantages of placing a limit on the building of thumbnails for large files.
Four check boxes with drop-down menus allow you to specify additional information
about the image to be displayed below the thumbnail. Again, it’s a matter of personal
preference and what information you want to have at your fingertips about each file.
As shown in Figure 2.2, we opt to show the date created, dimensions, depth, and
document (file) type. With that information we can easily identify at a glance which
version of an image we want.
The Show Tooltips check box determines whether information about the image is
displayed as a pop-up tooltip when you hold the mouse over a thumbnail. We gener-
ally leave this off because we find it distracting, but you could opt to use this feature
rather than display the additional lines of thumbnail metadata information.
For Photoshop Elements Users: Elements, Bridge, and Camera RAW
Using ACR with the version of Bridge that ships with Elements is a little confusing because
Bridge actually contains two versions of ACR: the limited Elements version and a stand-alone
copy of the full-featured CS4 version. If you right-click on an image (RAW, JPEG, or TIF) and
choose Open with Camera Raw, you will see the full version of ACR, but it lacks an Open button.
Instead you can Save the image or click Done. Similarly, if you check the Double-Click Edits Cam
-
era Raw Settings in Bridge option, you will get the full-featured version of ACR but it also lacks
a Done button.
If you leave the Double-Click Edits Camera Raw Settings in Bridge option unchecked and instead
double-click an image or right-click on an image and choose Open with
>
Photoshop Elements 8,
you will see the limited version of ACR. In that case there’s an Open button so that you can open
the image in Elements. The limited version of ACR will read all the adjustments you made to a
RAW file in the full version of ACR, and it will show them in Elements. However, if you modify a
TIF file using the full version of ACR and want to open that TIF in Elements, you need to save a
copy of the TIF with your adjustments (by clicking the Save button) from the full version of ACR
before opening the result in Elements.
607343c02.indd 44 4/11/10 11:03:08 PM
45
■ CUSTOMIZING BRIDGE
Figure 2.2 The Thumbnails section
of Preferences contains settings to
control what metadata is displayed
with the thumbnails.
Note: In CS5 the preferences for quality of thumbnails are accessible from the icon located
on the Path Bar. (If the Path Bar is not visible, toggle it on by going to Window > Path Bar.) We recom-
mend High Quality on Demand, which limits the high-quality previews to those images you’re viewing
and those immediately following them. Alternatively, you may prefer Always High Quality, but that
takes longer initially and there’s a delay before you can view your images.
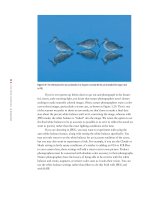
Playback With video becoming more and more popular in digital cameras, the Playback
preferences (Figure 2.3) have become more important. However we leave these options
at their default settings.
Figure 2.3 Playback Preferences
are important now that more nature
photographers are taking videos with
their cameras.
607343c02.indd 45 4/11/10 11:03:08 PM
46
c h a p t e r 2: BRIDGE ■
Metadata This section (shown in Figure 2.4) allows you to specify which fields are dis-
played in the Metadata panel for each image. This extensive list includes a variety of
metadata formats and fields that are not necessarily supported by all image formats.
This section can be used both to include fields you’re most interested in to maximize
the amount of information displayed, as well as to remove those items you’re not inter-
ested in to keep the display more manageable. For example, most users don’t need the
GPS data (and only a few cameras, such as some Nikons, even support it), but it’s a
good idea to include the IPTC Core information that contains your contact and copy-
right information (if you added it during import or later) as well as some of the Cam-
era Data (EXIF) and ACR information.
Figure 2.4 The Metadata section of Bridge Preferences allows you to specify which
metadata elds should be displayed on the Metadata panel.
Keywords These options control what happens when you click on a keyword to apply
it, as well as Bridge’s ability to read hierarchical keywords. When you check the first
option, applying a subkeyword (such as Egret) automatically applies the parent key-
word category (such as Birds). This can be a time-saver, so we select it. We also want
Bridge to be able to read keywords that input in a hierarchy. (See Figure 2.5.)
Labels This section (see Figure 2.6) allows you to set preferences related to the labels
you can use to rate and flag images. The check box at the top determines whether the
Ctrl/F key must be held to apply a rating or label to an image. We recommend you
clear this check box so that you can simply press the appropriate number key rather
than holding the Ctrl/F key while pressing that key. The section below the check box
allows you to change the description of the colored labels by clicking on the text and
typing. We opt to leave these descriptors blank because if you change them after you’ve
applied labels to a group of images, when you view the images that were labeled with
the old descriptors, their labels turn white rather than remain colored. We consider this
607343c02.indd 46 4/11/10 11:03:09 PM
47
■ CUSTOMIZING BRIDGE
to be a major flaw. Therefore we recommend either you leave the words that are there
by default, delete the words that are there and leave the fields blank, or fill in the words
once with whatever descriptors you choose and then leave them that way.
Figure 2.5 Use the keyword preferences to control whether parent keywords are applied
automatically when a subordinate keyword is chosen.
Figure 2.6 The Labels section of Bridge Preferences allows you to adjust the names of the
colored labels and determine how keyboard shortcuts for rating and labels behave.
File Type Associations This section is a long list (see Figure 2.7) of the file types supported
by Bridge. By default, most image formats are opened by Photoshop automatically.
However, you can change the association so that files open in a different application.
607343c02.indd 47 4/11/10 11:03:09 PM
48
c h a p t e r 2: BRIDGE ■
For example, you might choose to have Nikon NEF files open in Capture NX. Similarly,
you can set different associations for specific file types within Bridge, if you prefer, using
the drop-down menu to the right of a given file format to choose an application or to
browse for the executable for the preferred application.
Figure 2.7 The File Type Associations section in Bridge Preferences allows you to specify
which application should be used to open each supported le type.
Note: If you find you are unable to open a file in Photoshop, check the File Type Associations
options. Sometimes loading a new application or an upgrade will change the settings and cause files to
open in another program.
Cache The Cache options (Figure 2.8) control how quickly you’ll see a preview of
your image. The cache stores information about the file so that it can display it with
any changes you’ve made, including ratings, rotations, and so forth. We recommend
checking the option Keep 100% Previews in Cache because it makes it faster to load
files. Of course, enabling this option does take up more room.
In the past we recommended checking the option Automatically Export Cache to Fold-
ers When Possible; however, the way CS5 is utilizing the cache makes this less useful
and takes up more memory. But if you frequently export folders of images to DVDs or
elsewhere, you may want to check this option rather than having to remember to do it
manually at the time of export (via Tools
> Cache > Build and Export Cache).
The larger the cache size, the more disk space it consumes but the less often you’ll be
faced with a full cache. We leave this near its default setting, but if you are processing
large quantities of images, you may want to increase it.
607343c02.indd 48 4/11/10 11:03:09 PM
49
■ CUSTOMIZING BRIDGE
Figure 2.8 Remembering to use the Cache options will help your computer operate
more eciently.
If Bridge’s performance has become erratic or slowed way down, you may want to use
the Compact Cache option, and if that fails to improve the problem, use the Purge
Cache option.
Startup Scripts This section enables you to select which scripts run automatically when
you launch Bridge. We recommend turning off those you don’t need since doing so
may help Bridge run faster. As shown in Figure 2.9, check Adobe Bridge, Adobe Out-
put Module, Adobe Photoshop CS5, and Auto Collection CS5.
Figure 2.9 Select only those scripts that you need in order to improve Bridge’s performance.
607343c02.indd 49 4/11/10 11:03:10 PM
50
c h a p t e r 2: BRIDGE ■
Advanced This section (shown in Figure 2.10) contains several settings. These are mat-
ters of personal preference and we leave them unchecked.
Figure 2.10 The Advanced section of the Bridge Preferences contains a number of
additional settings.
Software rendering can be helpful for those with older computers and/or lesser graph-
ics cards whose hardware can’t take advantage of some of the features in Bridge. For
those with better graphics cards and newer computers, it’s better to use the hardware
acceleration. If you’re not sure, you can easily try checking this option to see which
way Bridge works better for you.
If you want to use previews that match the resolution of your monitor to more easily
assess critical sharpness in your images, check the option Generate Monitor-Size Pre-
views. If you always want Bridge to launch when you log in, check that option.
Output We leave the Output Preferences options set at their default values.
Downloading Images
We’re sure that you are anxious to look at your images immediately after returning
from a photo shoot. Of course, you need to download the images from your memory
cards before you can get started. CS5 includes an excellent downloader that makes
this task easier than ever.
Start by inserting your digital media into the card reader. In Bridge, click the
camera icon near the top left of the interface
. Choose File > Get Photos from
Camera. A dialog box appears for the Photo Downloader. Click the Advanced Dialog
button in the lower-left corner to access the interface shown in Figure 2.11.
607343c02.indd 50 4/11/10 11:03:10 PM