Photoshop cs5 cho nhiếp ảnh gia part 7 ppsx
Bạn đang xem bản rút gọn của tài liệu. Xem và tải ngay bản đầy đủ của tài liệu tại đây (495.03 KB, 7 trang )
31
■ PHOTOGRAPHING IMAGES TO COMPOSITE LATER
Photographing Images to Composite Later
How many times have you looked up and commented on the great clouds or beautiful
sunset but not taken the picture because foreground elements were missing? Or the
opposite—you found a great subject, perhaps a bird posing wonderfully or a gorgeous
scene, but the sky or background was completely blah? Or you could tell there was
just too much contrast to be able to capture the picture in a single shot? When you
are in the field with your camera, it’s important to remember that Photoshop enables
you to combine images in a seemingly infinite variety of ways. You have to adjust your
thinking to include seeing the potential for an image.
Expanding Camera Capabilities
Sometimes you see a situation and know that you can’t capture it in a single shot
because of the technical limitations of your equipment. Photoshop provides ways to
combine shots to create images close to what you can see but that are not possible to
capture with a single exposure.
Your eyes can see a much greater range of tonalities than can your camera,
where the dynamic range is limited to five to six stops of lights for digital captures and
slide film. This means although your eyes may be able to see detail in both the high-
lights and the shadows in a scene, today’s cameras may not be able to do so within a
single exposure. The solution is to take a series of exposures, making sure you capture
detail in all parts of the pictures. This could mean two or more exposures varying at
least one stop each.
Dynamic Range and HDR Images
It’s helpful to understand exactly what “dynamic range” means and what constitutes an HDR
image.
Dynamic Range The range between the brightest and darkest points of an image.
High Dynamic Range (HDR) Images An HDR image contains a far wider dynamic range than can
be displayed on a screen or printed on a printer. HDR images are often created from multiple
exposures of one scene and are stored in special file formats. They are of interest to photogra-
phers because you can convert them back to 8-bit or 16-bit images and compress the dynamic
range, allowing you to create images with detail in both shadow and highlight areas of an
image, more like what your eye saw when looking at the scene or possibly even with more detail
than you’re usually aware of seeing.
If you’re dealing with a static subject and shooting from a stable platform, you
can take a series of exposures to later combine using Merge to HDR to create a 32-bit
file. This file is called a high dynamic range (HDR) file, and we’ll discuss it more
in Chapter 8. In addition, there are several other ways to combine 16-bit exposures
607343c01.indd 31 4/11/10 11:02:49 PM
32
c h a p t e r 1: THINKING DIGITALLY ■
within Photoshop to extend the latitude. So even if your subject matter is not com-
pletely static, take two or three exposures: one that captures all the detail in the shad-
ows, one that captures all the highlight detail, and possibly one for the midtones. Be
certain to keep your camera in precisely the same spot, and don’t change the focus or
aperture between the exposures; vary only the shutter speed. Chapter 8 will explain
several techniques to put these pictures together to create a picture with at least as
much detail as your eyes are accustomed to seeing.
Photographing Parts of the Scene Individually
Another limitation of your camera sometimes arises when you need more depth of field
and shutter speed than what the amount of light will allow. This happened to Ellen in
Bosque del Apache, New Mexico, when she saw the beautiful mountains and sunset in
the distance with the cranes flying fairly close to her. Although she could see it, there
was no way to capture the entire scene with adequate depth of field to have the cranes
in focus as well as the mountains and have enough shutter speed to freeze the motion
of the birds. Her solution was to photograph the birds in one frame and the back-
ground in another. Then she combined the two in Photoshop, as shown in Figure 1.22.
In reality, the moon was behind her while taking those shots, but in the end she decided
to add it to the picture because she wasn’t trying to create a documentary image but,
rather, one that captured how it felt to be there. Photoshop made that possible.
Figure 1.22 There was no way to capture the birds and the mountains in a single shot because of the low light levels. Instead,
individual shots were combined in Photoshop.
Ph oto by EllEn An on
Image Components
Some nature photographers prefer to create only images that literally convey what
they saw, which is fine. However, others are looking to create artistic renditions of
what they saw and may want to add elements to their images. A number of situations
lend themselves to photographing parts of a picture that you will later combine in
Photoshop. You can create libraries of these image elements to use at some later time.
607343c01.indd 32 4/11/10 11:02:50 PM
33
■ PHOTOGRAPHING IMAGES TO COMPOSITE LATER
Perhaps the most obvious elements to store are skies and moons. Whenever you see
a dramatic sky, photograph it! Place the images in a special folder labeled “skies,”
and keyword them with the word “sky.” You’ll need more than one replacement sky,
because one of the keys to creating believable composites is to match the direction and
quality of the lighting. Sunsets are great to photograph, as are clouds—the blue-sky-
with-puffy-white-cloud types as well as the impending-storm types. When you start
paying attention to clouds, you’ll soon see that different types of clouds tend to occur
more in certain seasons. By having a collection of skies, when you find a great subject
(perhaps that leopard in the tree while in Africa) or a beautiful scenic landscape, you’ll
be able to remove the distracting white sky and make it appear that luck was with you
in the field.
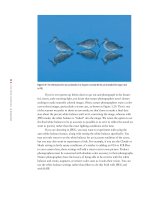
Figure 1.23 shows a picture that could have occurred but didn’t. Capturing
all these landing cranes in one shot was wonderful, but unfortunately the sky behind
them was boring. A few minutes earlier, the sky in the very same spot had been dra-
matic, but there were no birds. This image is a combination of the birds with the sky
that had been there a few minutes earlier.
Figure 1.23 Sometimes nature doesn’t cooperate and gives you a great subject but a boring sky, or vice versa. In Photoshop
you can combine them to have the best of both worlds.
Ph oto by EllEn An on
Don’t limit yourself to just skies and clouds, though. You can add all sorts of
elements to pictures to add impact or create a sense of your own style. It can be help-
ful, for example, to keep a folder of moons to use as accent elements in pictures. You
can shoot full moons, crescent moons, moons against black skies, and moons in day-
light skies. You’d be amazed at the variety of color casts in the moons. Then when you
think a picture needs a little extra pop, you can put one in. (We’ll explain how to do
that in Chapter 8.) Sometimes you might make them a realistic size, and sometimes
within Photoshop to extend the latitude. So even if your subject matter is not com-
pletely static, take two or three exposures: one that captures all the detail in the shad-
ows, one that captures all the highlight detail, and possibly one for the midtones. Be
certain to keep your camera in precisely the same spot, and don’t change the focus or
aperture between the exposures; vary only the shutter speed. Chapter 8 will explain
several techniques to put these pictures together to create a picture with at least as
much detail as your eyes are accustomed to seeing.
Photographing Parts of the Scene Individually
Another limitation of your camera sometimes arises when you need more depth of field
and shutter speed than what the amount of light will allow. This happened to Ellen in
Bosque del Apache, New Mexico, when she saw the beautiful mountains and sunset in
the distance with the cranes flying fairly close to her. Although she could see it, there
was no way to capture the entire scene with adequate depth of field to have the cranes
in focus as well as the mountains and have enough shutter speed to freeze the motion
of the birds. Her solution was to photograph the birds in one frame and the back-
ground in another. Then she combined the two in Photoshop, as shown in Figure 1.22.
In reality, the moon was behind her while taking those shots, but in the end she decided
to add it to the picture because she wasn’t trying to create a documentary image but,
rather, one that captured how it felt to be there. Photoshop made that possible.
Figure 1.22 There was no way to capture the birds and the mountains in a single shot because of the low light levels. Instead,
individual shots were combined in Photoshop.
Image Components
Some nature photographers prefer to create only images that literally convey what
they saw, which is fine. However, others are looking to create artistic renditions of
what they saw and may want to add elements to their images. A number of situations
lend themselves to photographing parts of a picture that you will later combine in
Photoshop. You can create libraries of these image elements to use at some later time.
607343c01.indd 33 4/11/10 11:02:51 PM
34
c h a p t e r 1: THINKING DIGITALLY ■
you might enlarge them. A photographer we know adds boat docks, and so he has a
collection of docks to add to scenic water pictures. You’re the artist, and the choice is
yours. Use your imagination, and keep your eyes open for other elements to collect to
add to your images.
When photographing something that you’re likely to want to later extract from
the picture and use elsewhere, try to design your photograph to make it easier to
remove the desired object. For example, it will often be easier to remove an item from
a blurred background than from a cluttered one, so consider using a wide aperture.
You may need to take a step or two left or right or perhaps get down a little closer to
the ground to help separate intricate background objects from your subject. A little
care in the field can make your work in Photoshop much easier!
Be sure to store these photo elements in a consistent place that’s easy for you to
find. You don’t want to have to look through all your pictures to find them. Of course,
adding keywords to them will also make it easy to locate them when you need them.
Ethical Considerations
Is the image manipulated? It sounds like such a straightforward question. But answer-
ing honestly may be more difficult than it appears, especially when responding to
people not well versed in digital photography.
If you shoot in RAW, you essentially have a negative that needs to be processed
during conversion. The settings you apply determine the appearance of the image,
but these really aren’t manipulating the image any more than chemicals do in a dark-
room. Similar adjustments done in Photoshop, as opposed to in the raw converter, are
considered by some to be manipulations. Many accept that it is necessary to clone out
dust and to perform some sharpening since there is some slight softening of digital
images by their very nature. A few people are bothered by basic exposure and color
modifications, but most accept this as part of the processing, as long as the overall
intent of the capture remains the same. Modifying the colors or tonalities within only
a section of the image is more troublesome for some, and such changes are prohibited
by some contests. If you enter your image in a contest, be sure to follow their rules for
what changes are and are not permitted.
Although cloning out dust is usually acceptable, there is debate about how much
of an object one can clone out before the image is considered manipulated. Sometimes
it’s more environmentally responsible to clone out an object rather than remove it in
reality (see the sidebar “Removing Objects in the Field or Later in Photoshop” for more
on this). Sometimes it’s impossible to remove it in reality. Unfortunately, for some this
crosses the line into a manipulated image. Maybe it’s an area that needs to be thought
through more carefully.
Many gray areas exist. For example, it’s common practice when photograph-
ing hummingbirds at feeders to put up a man-made background so that the birds are
photographed against a pleasing, nondistracting background rather than clutter. This
is acceptable. But if you took the image photographed with the cluttered background
and, in Photoshop, replaced the background with a simpler one, many would insist the
image is manipulated.
607343c01.indd 34 4/11/10 11:02:51 PM
35
■ APERTURE AND LIGHTROOM
Our feeling is that when we composite elements within an image, the image is
manipulated, and we’re careful to indicate this whenever reasonable. When asked, we
respond honestly, and label images accurately. The bottom line for us is that photog-
raphy is an art form, and our goal is to create images that express what we feel. For
those who are more inclined toward scientific documentary types of nature photo-
graphs, the lines may be different. You have to decide what’s right for you!
Removing Objects in the Field or Later in Photoshop
There’s an old adage that reminds us to “Take only pictures and leave only footprints, and barely
those if possible.” But as nature photographers, we know that sometimes there are distracting
elements that interfere with our pictures. There may be an ill-placed stick, a wayward branch,
or maybe a rock that’s too light and bright. It seems harmless enough to move it and create a
cleaner photo. Many times doing so may be fine. But have you considered that perhaps that rock
or branch was serving a purpose to one of the many critters in our world? Perhaps the branch
provided some protection against the wind or shielded visibility from a predator; maybe the
rock provided a safe resting spot while looking for food. We know and see the world through
our human perspective, and what seems inconsequential to us may have a significant impact on
a variety of wildlife.
Does that mean you should never move anything in the environment? That would be an extreme
and unrealistic position, but the reality is you may want to consider whether it would be smarter
to remove the offending item later in Photoshop. Although it may create more work for you, you
will be creating less stress on the nature around you. You have to use common sense in making
this choice. (We’ll cover how to remove objects in Photoshop in Chapter 5.)
Aperture and Lightroom
A few years ago the software choices for digital photography were fairly limited;
Photoshop and Photoshop Elements dominated the market for quite a while. Many
photographers, amateur as well as professional, have based their workflows entirely
on using Photoshop or Elements for years. In fact, both offer good workflows (which
are what we’re teaching you throughout this book), but they’re not perfect. Photoshop
was developed not only for photographers, but also for graphic artists. The result is
that it has numerous features that photographers don’t need. And there are some fea-
tures that photographers need but that Photoshop doesn’t do quite as well as we wish.
For example, Photoshop is not an image-management device; it doesn’t help you keep
track of where you’ve stored the images. (Eventually, if you shoot enough, you can’t
keep all your images on your computer’s internal hard drive—you must export them
to external hard drives or gold DVDs, and so on.) Further, because Bridge is a sepa-
rate program from Photoshop, you actually encounter three different user interfaces—
Bridge, Camera Raw, and Photoshop. This can be confusing for some and is a little
607343c01.indd 35 4/11/10 11:02:51 PM
36
c h a p t e r 1: THINKING DIGITALLY ■
time-consuming as you go back and forth among them. Additionally, you can’t email
images directly from Photoshop.
Apple introduced Aperture in late 2005, and this release was followed shortly
by Adobe’s announcement of a beta version of software called Lightroom. These
newer programs are designed from the ground up to meet the needs of photographers.
In addition, they make working with raw files virtually indistinguishable from work-
ing with JPEGs or TIFFs. No separate converter software or interface is needed.
Now that these programs have advanced, you can do many of the things that used
to require Photoshop or Elements, but you still can’t composite images in those pro-
grams (an exception is that there are plug-ins for Aperture that enable you to create
HDR images without Photoshop).
Aperture and Lightroom are designed to make your workflow easy and efficient
from the moment you download images from your camera through locating your
best images and showcasing them to others. When you connect your camera or card
reader, an import window appears and nearly instantaneously so do low-res previews
of your images. You choose where to store these images and how to name them. In
addition, you can quickly add any metadata you choose, such as basic contact infor-
mation and keywords. After importing the images you can easily edit them, using a
magnifying loupe to check for sharpness and details—and comparing similar images
side by side.
In Aperture, most of the adjustments you’re likely to need to make can be present
in the same user interface you use to sort through your images, whereas in Lightroom
you proceed through different modules. This is why many people find Aperture slightly
more efficient to use. You can save commonly made adjustments as presets, or you can
adjust the sliders to tweak all aspects of the exposure and colors. These adjustments
are stored as instructions while the master file remains untouched. The adjustments go
beyond those typically available currently in most raw converters and include all the
expected features as well as an outstanding Highlight/Shadow tool, individual color
controls, sophisticated Retouch tools (in Aperture), toning, and more.
If you opt to use Aperture or Lightroom, you’re likely to find that you will not
need to use Photoshop for all your images. You’ll still need Photoshop when you have
more complicated cloning to do, when you want to create composites, or when you
want to use any of the filters available in Photoshop. When using Aperture or Light-
room, if you want to open an image in Photoshop, it’s just a keystroke away. The
image will open in Photoshop, and you can make the desired changes. When you’re
done, you click Save, and Aperture or Lightroom will automatically update the image
preview to reflect the changes you made in Photoshop. You can save all your layers
when you work in Photoshop, and although the individual layers are not accessible
from within Aperture, if you reopen that same file in Photoshop all the layers will still
be there.
Aperture provides equally efficient methods for creating slide shows, sending
emails, creating books, creating websites, sharing images, uploading images to your
mobile phone, and making prints. We’ve adopted Aperture as our primary work-
flow tool. Lightroom provides many similar functions, although it is not quite as
607343c01.indd 36 4/11/10 11:02:51 PM
37
■ STORAGE CONSIDERATIONS
streamlined in some cases (such as emailing photos). Lightroom has the advantage,
though, of being available for both PC and Mac, whereas Aperture is a Mac-only
application. One of the main disadvantages of Lightroom, in our opinion, is the need
to change modules depending on what task you’re doing. That makes the initial edit
through your images slower.
If you opt to adopt Aperture or Lightroom as the basis of your workflow, you’ll
find that you make many or all the global exposure and color changes we discuss in
this book in those programs. You’ll still find it advantageous to work in Photoshop
for some tasks. For example, if you use Lightroom, it’s likely that you’ll still use Pho-
toshop for most of your cloning. We also use Photoshop at times when we want to
make a change to part of the image and not have it affect the rest of the image—which
means when we’d like to use a layer mask. In earlier versions of Photoshop, we used
layer masks a lot. With the latest raw converters offering localized controls, we don’t
use layer masks quite as often as we did in the past, but we most assuredly still use
them. The ability to make a change and have it affect only the targeted area gives you
precise control over the final appearance of your images. We also use Photoshop when
we want to use any of its filters as well as for all types of creative ventures, including
creating composites of all types. Even if you use Aperture or Lightroom, it’s worth-
while having a solid understanding of Photoshop. That way, if you encounter a diffi-
cult image, you’ll have more tools available to you to work with it.
Storage Considerations
A comprehensive discussion of storage media is beyond the scope of this book. We’ll
cover only a few aspects here, which are especially pertinent for nature photographers.
Many nature photographers often do at least some of their photography away
from home. We know one photographer who buys enough memory cards so that he
can use a new one when needed rather than having to download and/or edit images
while on the road. Although the cost of compact flash cards has come down consid-
erably in the past few years, for most photographers, this is not a practical solution.
Even if you can justify it monetarily, it’s impractical because it means you will have
all your editing to do when you get home, and that can be overwhelming. In addition,
it eliminates one of the major advantages of digital shooting—the ability to review
the shots you took during the day and to learn from what went right and what went
wrong so you can adjust your shooting the next day accordingly. Being able to view
your images, preferably reasonably large, allows you to fine-tune your shooting skills
and experiment with new techniques while still on location. That way, you can return
to a location if necessary or build upon a creative approach you tried.
When we’re on a photographic trip, we prefer to take a laptop along and make
certain that it has plenty of space on its hard drive. That way, we can download our
images and view them at a reasonable size. (In addition, having the computer enables
us to have email access while on the road.) Also, we take small external portable hard
drives along. These drives are the size of a deck of cards. We back up all the images
we store on our computer on this hard drive. That way if something happens to the
computer, we still have a copy of all the files. If we’re on a long trip that will involve a
607343c01.indd 37 4/11/10 11:02:51 PM