Sử dụng photoshop cs5 part 63 potx
Bạn đang xem bản rút gọn của tài liệu. Xem và tải ngay bản đầy đủ của tài liệu tại đây (757.39 KB, 6 trang )
ptg
GRADIENTS
IN THIS CHAPTER
Creating a Gradient fi ll layer . . . . . . .367
Using the Gradient tool . . . . . . . . . .369
Creating and editing gradient
presets . . . . . . . . . . . . . . . . . . .370
22
A gradient is a soft blend between
two or more opaque or semitranspar-
ent colors.
Gradients can be used to enhance the
background behind imagery or type or to add color to
objects. In this short but fun chapter, you will learn
how to apply gradients via a Gradient ll layer and the
Gradient tool, and how to create and modify gradients
via the Gradient Editor.
Creating a Gradient fill layer
A gradient that you apply via a Gradient ll layer
appears in its own layer, complete with a layer mask
that can be used to control how much of the gradient
is visible. Like an adjustment layer, this type of
gradient is editable, restackable, and removable —
unlike a gradient that you apply directly to a layer.
A good use for a Gradient ll layer is to add color
behind silhouetted imagery or type.
To apply a gradient via a fill layer:
1. If you want the gradient ll to display behind sil-
houetted imagery or type, click the layer directly
below the image layer or type layer.
A
2.
Optional: To conne the gradient to an area of the
layer, create a selection.
3.
From the New Fill/Adjustment Layer menu
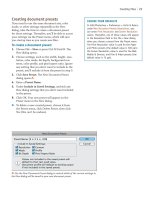
on the Layers panel, choose Gradient. e Gradient
Fill dialog opens.
Continued on the following page
A
e o r i g i n a l i m a g e c o n t a i n s a s i l h o u e t t e d i m a g e l a y e r a n d
a separate white Background. We clicked the Background.
ptg
368 Chapter 22
4. Click the Gradient picker arrowhead at the top of
the dialog, click a gradient preset on the picker,
A
then click back in the dialog and keep it open.
➤ To load in more gradients, open the preset
picker menu, choose a library name from
the assortment at the bottom, then click
Append in the alert dialog (see also page 401).
5.
Choose a gradient Style of Linear, Radial,
Angular, Reected, or Diamond.
B
6. Do any of the following optional steps:
Change the Angle for the gradient by moving the
dial or by entering a value.
Use the Scale slider to scale the gradient relative
to the layer. e greater the scale percentage, the
more gradual the transition between colors in
the gradient.
Drag in the document window (with the dialog
still open) to reposition the gradient.
Check/uncheck Reverse to swap the order of
colors in the gradient.
EDITING THE GRADIENT FILL LAYER MASK
If you create a selection before creating a Gradient fi ll
layer, the selection will be represented as a white area
within the layer mask thumbnail for the Gradient fi ll
layer on the Layers panel. To reshape the mask, click
the layer mask thumbnail, then with the Brush tool,
paint with white to enlarge the white area or with
black to enlarge the black area. Via the Masks panel,
you can adjust the density of the black area in the
mask or feather its edge.
B
After clicking the Background and opening the
Gradient Fill dialog, we chose the “Light Purple” preset
(in the Simple library) and the settings shown above.
C
We reduced the opacity of the Gradient ll layer to 80%.
A
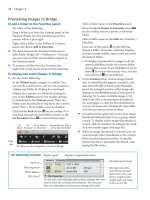
In the Gradient Fill dialog, click the Gradient picker,
then click a preset in the picker.
Check Dither to minimize banding (stripes) in
the gradient on print output.
If you created a selection in step 2, check Align
with Layer to t the complete gradient within
the selection, or uncheck this option to have the
gradient stretch across the whole layer. With this
option unchecked, only part of the gradient will
display within the selection area.
7.
Click OK.
C
Note: If the Gradient ll layer is now
obscuring all the layers below it, do any of the
following: lower the opacity of the the ll layer,
restack it below the layers you want to keep
visible, or lower the opacity of some of its color
stops (see page 370).
➤ To edit the settings for the Gradient ll layer,
double-click the Gradient ll layer thumbnail.
e Gradient Fill dialog reopens.
➤ To apply a gradient as an editable Gradient
Overlay layer eect, see pages 362–363.
ptg
Gradients 369
Using the Gradient tool
With the Gradient tool, you create a gradient by
dragging in the document window. Each time you
drag, an additional gradient is applied. Although
you can’t edit the results in the same way that
you would edit a Gradient ll layer, if you use the
tool on a separate layer, at least you will be able to
change the layer blending mode or opacity.
To apply a gradient with the Gradient tool:
1. Create a new, blank layer for the gradient.
Optional: To conne the gradient to an area of
the layer, create a selection.
2.
Choose the Gradient tool (G or Shift-G).
3.
On the Options bar, do all of the following:
Click the Gradient picker arrowhead, then click
a preset on the picker.
Click a Style button: Linear, Radial, Angle,
Reected, or Diamond.
Choose Mode: Normal and Opacity 100%.
4.
Do any of the following on the Options bar
(optional):
Check Reverse to swap the order of colors in
the gradient.
Check Dither to minimize banding (stripes) in
the gradient on print output.
Check Transparency to enable any transparency
that was edited into the gradient, or turn this
option o to apply a fully opaque gradient.
5.
For a Linear gradient, drag from one side or
corner of the image or selection to the other.
For any other gradient style, drag from a center
point outward (Shift-drag to constrain the
angle to a multiple of 45°).
A–C
Drag a long
distance to produce subtle transitions between
colors or a short distance to produce abrupt
transitions; this has the same eect as chang-
ing the Scale value in the Gradient Fill dialog.
6.
Change the gradient layer mode or opacity.
➤ To delete the last results of the Gradient tool,
click the prior state on the History panel.
➤ For a gradual transition between the masked
and unmasked areas, click the mask thumbnail
for an image, editable type, adjustment, or ll
layer, or for a Smart Filter, then drag in the
document with the Gradient tool. See pages
244–245 and 350.
B
i s i s t h e L a y e r s p a n e l f o r t h e i m a g e s h o w n b e l o w .
C
i s i s t h e n a l i m a g e .
A
With the Gradient
tool (Diamond style
chosen), we dragged
diagonally from the
middle to the lower
right on a new, blank
layer.
ptg
370 Chapter 22
You can create a variation of any gradient preset in
the picker or create new, custom presets. When you
edit a preset, Photoshop forces you to work on a
copy automatically so the one in the library is pre-
served. We’ll show you how to add and change the
colors in a gradient, adjust the color transitions, and
make individual colors semi- or fully transparent.
To create or edit a gradient preset:
1. Open the Swatches and/or Color panels (they
can be collapsed to icons).
2.
To open the Gradient Editor, do either of the
following:
Choose the Gradient tool (G or Shift-G),
then click the Gradient thumbnail on the
Options bar.
A
Double-click the thumbnail for an existing
Gradient Fill layer, then click the gradient
thumbnail at the top of the Gradient Fill dialog.
3. Click the preset swatch that you want to create
a variation of. (When you begin editing the
gradient, the Name will change to Custom.)
Keep the Gradient Type as Solid and the
Smoothness setting at 100%.
If you want to create a gradient that uses
whichever Foreground and Background colors
are in eect when the gradient is applied, click
the Foreground to Background preset.*
4.
For any gradient except Foreground to
Background, click the starting (left) or ending
(right) color stop under the gradient bar, then
do either of the following:
Click a color on the Swatches panel, or on the
color ramp at the bottom of the Color panel,
or in any open document window (the pointer
becomes a temporary Eyedropper tool).
Click the Color swatch at the bottom of the
Gradient Editor, choose a color from the color
picker, then click OK (you can also open the
picker by double-clicking a color stop).
5. Do any of these optional steps:
To add an intermediate color to the gradient,
click below the gradient bar to produce a stop,
then choose a color for that stop, as described
in the preceding step.
To control the abruptness of a transition
between colors, click a color or opacity stop,
then drag the midpoint diamond (located on
either side of the stop) to the left or right (
A
,
next page). e diamond marks the point at
which two adjacent colors are evenly mixed.
To add an opacity stop, click above the gradi-
ent bar, then use the scrubby slider to change
the Opacity percentage. You can also click any
existing opacity stop and change its Opacity
percentage (
B–C
, next page). Transparency is
represented by a checkerboard pattern.
To change the location of a color or opacity
stop in the gradient, drag it to the left or right.
To delete an unwanted opacity or color stop,
drag it upward or downward o the bar.
➤ Use Ctrl-Z/Cmd-Z if you need to undo the
last edit (some edits can’t be undone).
6. Don’t click OK yet! To create a preset of your
custom gradient, type a name in the Name
eld, then click New (
D
, next page).
Note: Your new presets will be deleted from
the picker if you allow them to be replaced by
another gradient library or if the Photoshop
Preferences le is deleted or damaged. To save
all the presets currently on the picker as a per-
manent library, click Save, enter a name, keep
the default location, then click Save again. See
also page 401.
7.
Click OK to exit the Gradient Editor (
E
, next
page), and then the Gradient Fill dialog. e
gradient displays on the Gradient picker.
➤ To delete a gradient preset from the picker,
Alt-click/Option-click the preset thumbnail.
➤ To rename a gradient preset, double-click the
swatch in the Gradient Editor; the Gradient
Name dialog opens.
Creating and editing gradient presets
A
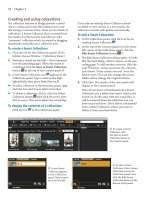
We are opening the Gradient Editor by clicking the
Gradient thumbnail on the Options bar.
*Foreground to Background is the rst preset in the default gradient library. To reload that library, choose Reset Gradients from the
Gradient picker menu, then click Append or OK.
ptg
Gradients 371
E
We applied our custom gradient via a
Gradient ll layer (above an image layer). e
dialog settings we chose are shown above. Note
that we chose the Reected style.
D
We lowered the opacity of the rst and last opacity stops. Finally, we
named our custom gradient, clicked New, then exited both dialogs.
C
We added two more color stops.
B
We clicked above the bar to add a couple of intermediate opacity stops
(note the checkerboard pattern in the bar). We also lowered the opacity
of the second stop.
A
In the Gradient Editor dialog,
we clicked below the gradient bar
to add an intermediate (third)
color to our two-color gradient,
chose a color for that stop, then
moved the midpoint diamond to
make the transition between the
middle and end colors more abrupt.
A color stop
An opacity stop
An added stop
ptg
372 Chapter 22
USING BLENDING MODES TO ENHANCE A GRADIENT
B
Color Burn blending mode
C
Luminosity blending mode
D
Linear Light blending mode
E
Dierence blending mode
F
Pin Light blending mode
G
Multiply blending mode
A
In all the images on this
page, the gradient is supplied
by a Gradient ll layer below
a silhouetted image layer. A
dierent blending mode is
chosen for the image layer in
Figures
B
through
G
.


