Sử dụng photoshop cs5 part 33 ppt
Bạn đang xem bản rút gọn của tài liệu. Xem và tải ngay bản đầy đủ của tài liệu tại đây (564.76 KB, 5 trang )
ptg
Adjustment Layer Basics 201
Merging and deleting adjustment
layers
When you merge an adjustment layer downward, the
adjustments are applied permanently to the under-
lying image layer. If you change your mind, either
choose Edit > Undo (right away!) or click the prior
state on the History panel.
To merge an adjustment layer:
Do either of the following:
Click the adjustment layer to be merged
downward,
A
then press Ctrl-E/Cmd-E.
B
Right-click on or near the adjustment layer name
and choose Merge Down.
Note: Adjustment layers don’t contain pixels,
so you can’t merge them with one another.
However, you can merge multiple adjustment
layers into an image layer (or layers) by using the
Merge Visible command (see page 145) or the
Flatten Image command (see page 146).
Adjustment layers are as easy to delete as they are
to create.
To delete an adjustment layer:
Do either of the following:
Click the icon for an adjustment layer on the
Layers panel, then click the Delete Layer
button
on the same panel or the Delete
Adjustment Layer button on the Adjustments
panel. Click Yes if an alert appears. Optional:
Click Don’t Show Again to prevent the alert from
reappearing.
Click the icon or layer mask thumbnail for an
adjustment layer on the Layers panel, then press
Backspace/Delete. (See also the sidebar at right.)
A
Click the adjustment layer to be merged downward.
B
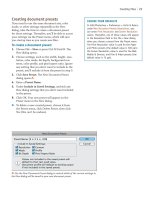
e M e r g e D o w n c o m m a n d a p p l i e d t h e L e v e l s v a l u e s
from the adjustment layer to the underlying image layer,
which in this case is the Background.
BYPASSING THE AUTO-SELECT PARAMETER
OPTION ★
The new Auto-Select Parameter option (on the
Adjustments panel menu) causes the fi rst entry fi eld
on the panel to become highlighted automatically
when you create an adjustment layer or when you
double-click the icon for an existing adjustment
layer on the Layers panel. Although this option
enables you to quickly enter or change values, it
can be an annoyance because it prevents some
shortcuts from working (e.g., selecting a tool via
its letter shortcut or deleting a layer by pressing
Backspace/Delete). If this option is on and you
want to shift the focus from the Adjustments panel
to the Layers panel, click either the icon or the
layer mask thumbnail for the adjustment layer.
ptg
202 Chapter 12
Editing the adjustment layer mask
By default, every adjustment layer has a blank white
layer mask. To limit which area of the image the
adjustment aects, you can add black areas to the
mask, either by lling a selection or by applying
brush strokes, as we show you in the steps below.
To edit the adjustment layer mask:
1. Click the mask thumbnail on an adjustment layer.
2.
Press D to choose the default colors, then press
X to switch to black as the Foreground color.
3.
To partially mask the adjustment layer eect,
do either or both of the following:
Create a selection with any selection tool (e.g.,
Rectangular Marquee or Lasso), choose Edit >
Fill (Shift-Backspace/Shift-Delete), choose Use:
Foreground Color, click OK, then deselect.
Choose the Brush tool (B or Shift-B). On
the Options bar, choose a Soft Round brush,
Mode: Normal, and an Opacity of 100% (or a
lower opacity to create a partial mask), adjust
the brush diameter by pressing [ or ], then apply
brush strokes to the image.
A–C
4. Optional: To reverse the eect of the mask in
specic areas, press X to switch colors (make the
Foreground color white), then with the Brush
tool, apply strokes to remove the mask.
➤ To remove all black areas from the mask, deselect,
click the adjustment layer mask, choose Edit>
Fill, then choose Use: White in the dialog.
➤ To conne the eect of an adjustment layer to
a small area, start with a fully black mask (click
Invert on the Masks panel or apply Edit > Fill,
Use: Black), then apply strokes with white.
➤ To create a gradual mask by applying a gradient,
see pages 244–245. To rene the edge or density
of the mask, see pages 170–171.
SHORTCUTS FOR LAYER MASKS
View the mask by
itself in the docu-
ment window
Alt/Option click the layer
mask thumbnail (repeat to
restore the normal view)
View the mask
over the image as
a Quick Mask (the
default color is red)
Alt-Shift/Option-Shift click
the layer mask thumbnail
(repeat to restore the normal
view)
Deactivate or
activate the mask
Shift-click the layer mask
thumbnail (Layers panel)
or click the Disable/Enable
button (Masks panel)
Convert the
unmasked area into
a selection
Ctrl/Cmd click the layer mask
thumbnail (Layers panel) or
click the Load Selection from
Mask button (Masks panel)
B
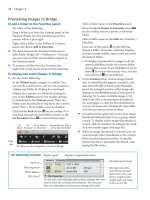
We used Curves to correct the color, then with the
mask for that adjustment layer selected, we applied
brush strokes to the top part of the image. Now the
adjustment is visible in only the bottom half of the photo.
A
i s o r i g i n a l p h o t o l o o k s t o o p i n k .
C
Our brush
strokes are rep-
resented by black
areas in the
adjustment layer
mask thumbnail.
ptg
Adjustment Layer Basics 203
Using the Histogram panel
e Histogram panel displays a graph of the
current tonal (light and dark) values in an image,
which updates dynamically as the document is
edited. e panel is always accessible, even while the
Adjustments panel is being used or an adjustment
dialog is open. You can better judge how adjustment
edits are aecting your document if you monitor the
changes in its histogram.
After opening a photo into Photoshop — but
before you begin editing it — study the histogram to
evaluate the existing distribution of tonal values in
the image. e horizontal axis on the graph repre-
sents the grayscale or color levels between 0 and 255,
the vertical bars represent the number of pixels at
specic color or tonal levels, and the contour of the
graph represents the overall tonal range.
To choose a view for the Histogram panel:
From the Histogram panel menu, choose one
of the following: Compact View (just the
histogram),
A
Expanded View (the histogram
plus data and access to individual channels),
B
or
All Channels View (all the features of Expanded
View, plus separate histograms for each channel).
To display document data in the latter two views,
check Show Statistics.
For Expanded or All Channels view, choose an
option from the Channel menu: RGB,
C
a specic
channel, Luminosity, or Colors. To display
the individual channels in color, check Show
Channels in Color on the panel menu.
While a large le is being edited, Photoshop main-
tains the redraw speed of the Histogram panel by
reading the data from the histogram cache — not
from the actual image. When this is occurring, a
Cached Data Warning icon appears on the panel.
Remember to keep updating the panel, as we instruct
you here (even while editing the settings for an
adjustment layer), so it will continue to reect the
current tonal values of the image.
To update the Histogram panel:
Do one of the following:
Double-click anywhere on the histogram.
Click the Cached Data Warning icon.
Click the Uncached Refresh button.
➤ To specify a Cache Levels value in the Preferences
dialog, see page 391.
C
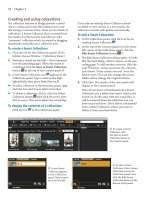
With RGB chosen on the Channel menu, the current
tonal values in the image are represented by black areas
on the graph.
B
Here the panel is in Expanded View. By default, the
Channel menu is set to Colors.
A
i s H i s t o g r a m p a n e l i s i n C o m p a c t V i e w .
ptg
204 Chapter 12
Interpreting the Histogram panel
To focus on tonal values when using the Histogram
panel, choose Expanded View from the panel menu
and choose RGB from the Channel menu. Pixels are
represented by vertical bars in the graph, with shad-
ows on the left, midtones in the middle, and high-
lights on the right. For a dark, low-key image (such
as a night scene), the bars will be clustered primarily
on the left side of the graph; for an average-key image
with more balanced lights and darks, the bars will
be more uniformly distributed across the graph; and
for a very light, high-key image containing few or no
shadow areas, the bars will be clustered primarily on
the right side.
If an image has a wide tonal range, the bars will
be more uniformly distributed in all the tonal zones,
and will stretch fully from one end of the graph to
the other. Also, the graph will be mostly solid and will
have a relatively smooth contour rather than a spiky
one.
A
If an image lacks detail in a particular tonal
range, on the other hand, the graph will contain gaps
and spikes, like teeth on a comb. e following are
some graph proles that you might encounter:
➤ For an average-key but underexposed image that
lacks details in the highlights, pixels will be clus-
tered primarily on the left side of the histogram.
B
➤ For an overexposed image that lacks details in the
shadows, pixels will be clustered mostly on the
right side of the histogram.
C
➤ For an image in which pixels were clipped (details
discarded) from the extreme shadow or highlight
areas, a line or cluster of pixels will rise sharply
at the left or right edge, respectively, of the
histogram.
D
➤ If an image has lost details as a result of editing
(such as from lters or adjustments), the histo-
gram will have gaps and spikes.
E
e gaps indicate
a loss of specic tonal or color levels, whereas the
spikes indicate that pixels from dierent levels
have been averaged together and assigned the
same value (the bar becomes taller at that level).
A few gaps and spikes are an acceptable result of
editing, whereas large gaps signify that posteriza-
tion has occurred and too many continuous tonal
values have been discarded. On the other hand,
a lousy-looking histogram doesn’t always signify
failure — the graph can be thrown o by some-
thing as simple as adding a white border. If you
like the way the image looks, ignore the histogram!
A
e t o n a l r a n g e s i n t h i s i m a g e a r e w e l l b a l a n c e d .
B
e h i s t o g r a m s h o w s t h i s i m a g e i s u n d e r e x p o s e d .
C
i s i m a g e i s o v e r e x p o s e d .
D
i s g r a p h s h o w s t h a t s h a d o w p i x e l s a r e c l i p p e d .
E
i s g r a p h c o n t a i n s g a p s a n d s p i k e s .
ptg
adjustments in depth
IN THIS CHAPTER
Correcting tonal values using a
Levels adjustment layer . . . . . . . .206
Applying a Brightness/Contrast
adjustment . . . . . . . . . . . . . . . .208
Applying a Photo Filter adjustment . .209
A quick and dirty method for
correcting under- or overexposure .210
Dodging and burning small areas . . .211
Converting layers to grayscale via
a Black & White adjustment . . . . .212
Applying a Vibrance adjustment . . . .214
Applying a Color Balance adjustment .217
Applying a Hue/Saturation
adjustment . . . . . . . . . . . . . . . .219
Applying an Auto Color Correction . . .220
Correcting the color using Curves . . .222
Applying the Shadows/Highlights
command . . . . . . . . . . . . . . . . .227
Applying a tint via a Solid Color
fi l l l a y e r . . . . . . . . . . . . . . . . . . 2 3 1
Screening back a layer using Levels . .232
13
Upon opening a photograph into
Photoshop, take a few minutes to
study it and see if it has any tonal
or color defects. Is it over- or under-
exposed? Does it have a color cast
(does it look ghostly blue or sickly
green)? To some extent, the subject matter of the
photo will dictate what kind of adjustments it needs.
For instance, we might rebalance the skin tones in
a portrait to make it look more natural, but apply a
tint or photo lter to a photo of an abstract texture
or to an extreme closeup for an artistic eect.
If you capture your photo as raw les or in the
JPEG or TIFF format, you will be able to rectify
many of their defects in Camera Raw. If you can’t
use Camera Raw for your les or they need further
correction, not to worry: Photoshop oers a smor-
gasbord of adjustment controls. Each adjustment
type has a specialized function (see the icons below).
Some are easy to get the hang of, and others may
take longer to master but oer more power or more
nuanced controls.
In the preceding chapter, we stepped you through
the mechanics of creating and working with adjust-
ment layers. In this chapter, we delve into their
specic features. e good news is that by the end of
this chapter, you will have mastered most of the key
Photoshop commands!
BUTTONS ON THE ADJUSTMENT PANEL
Invert
Posterize Gradient Map
Selective
Color
r e s h o l d
Vibrance
Hue/
Saturation Black & White
Channel
Mixer
Photo FilterColor
Balance
Brightness/
Contrast Levels Curves Exposure
Continued on the following page


