Sử dụng photoshop cs5 part 29 doc
Bạn đang xem bản rút gọn của tài liệu. Xem và tải ngay bản đầy đủ của tài liệu tại đây (659.6 KB, 6 trang )
ptg
History 179
Using snapshots
States are deleted from the History panel if any of
the following occur: the specied maximum number
of history states is exceeded; you clear or purge the
panel; or the panel is in linear mode, you click an
earlier state, and then resume editing the document.
A snapshot, which is created from a history state,
remains on the panel even if any of the above occur.
When you click a snapshot, the document is restored
to the state it represents. Both snapshots and history
states are deleted when you close your document.
In these instructions, you’ll choose snapshot
options, which aect all Photoshop les; on the
next page, you’ll learn how to create snapshots for
a specic document.
To choose snapshot options:
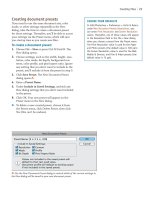
1. Choose History Options from the History panel
menu. e History Options dialog opens.
A
2. Check or uncheck any of the following options
that pertain to snapshots:
Automatically Create First Snapshot to have
Photoshop create a snapshot every time a le is
opened (this option is checked by default and we
keep it on).
Auto matically Create New Snapshot When
Saving to have Photoshop create a snapshot
every time a le is saved. e snapshot will be
named by the time of day it was created.
Show New Snapshot Dialog by Default to have
the New Snapshot dialog appear whenever you
click the New Snapshot button, enabling you to
choose options.
3.
Click OK.
A
e H i s t o r y O p t i o n s d i a l o g c o n t a i n s t h r e e s n a p s h o t o p t i o n s .
ptg
180 Chapter 10
If the Automatically Create New Snapshot When
Saving option is turned o for your History panel,
you should get in the habit of creating snapshots
periodically as you work and before running any
actions on your document. If you use the New
Snapshot dialog (the second method below), you’ll
be able to choose whether the snapshot is made from
all the layers in the document, from all the layers at
a particular state, or from just the current layer.
To create a snapshot of a state:
Method 1 (without choosing options)
1.
Edit your document so it contains the changes
that you want to capture as a snapshot.
2.
If the Show New Snapshot Dialog by Default
option is o in the History Options dialog, click
the New Snapshot button. If that option is
on, Alt-click/Option-click the New Snapshot
button. A new snapshot thumbnail appears
below the last one, in the upper section of the
panel.
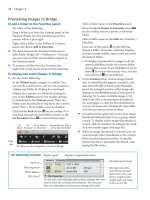
Method 2 (choosing options)
1.
On the History panel, right-click the state that
you want to create a snapshot of and choose
New Snapshot.
A
e layer associated with that
history state becomes selected and the New
Snapshot dialog opens.
B
2. Type a Name for the snapshot.
3.
Choose an option from the From menu:
Full Document to include in the snapshot all
the layers the document contained at the chosen
state.
Merged Layers to merge into the Background all
the layers that were visible at the chosen state.
Current Layer to create a snapshot of the layer
that became selected when you right-clicked a
history state.
4.
Click OK.
C
➤ To rename a snapshot, double-click the existing
name.
A
Right-click a state and choose New Snapshot from
the context menu.
B
In the New Snapshot dialog, enter a name and choose
which part of the image you want the snapshot to be created
from.
C
A thumbnail for the new snapshot appears on the
History panel.
ptg
History 181
Having snapshots on your History panel not only
adds exibility to your workow by letting you keep
document stages in reserve — it can save the day if,
say, a state that you were hoping to revert a docu-
ment to becomes deleted from the History panel.
To make a snapshot become the current
state:
Do either of the following:
Click a snapshot name or thumbnail. If the
History panel is in linear mode (as we recom-
mend), the document will revert to the snap-
shot stage of editing, and all the states will be
dimmed. If you now resume editing, all the
dimmed states will be deleted.
Alt-click/Option-click a snapshot name or
thumbnail to keep earlier states available and
have that snapshot become the latest state. Use
this approach if you need to preserve access to
prior edits.
➤ To delete a snapshot, drag it to the Delete
Current State button. Remember that all snap-
shots disappear from the panel when a document
is closed anyway.
Creating documents from states
By using the New Document command, you can spin
o versions of your current document (and the state
of the Layers panel) from any state or snapshot.
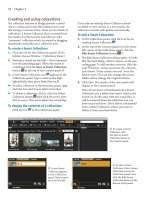
To create a new document from a history
state or snapshot:
Do either of the following:
Right-click a snapshot or a state, then choose
New Document from the context menu.
A
Click a snapshot or a state, then click the New
Document from Current State button.
A new document appears onscreen, bearing the
title of the snapshot or state from which it was
created. e starting state for the new document
will be named “Duplicate State.”
B
Save the new
document.
A
Right-click a snapshot or state and choose New
Document.
B
i s i s t h e H i s t o r y p a n e l f o r t h e n e w d o c u m e n t .
ptg
182 Chapter 10
Using the History Brush tool
When you apply strokes to a document with the
History Brush tool, pixels below the pointer are
restored from whichever state or snapshot you have
designated as the history source.
Note: e History Brush tool can’t be used if
certain kinds of edits were made after the docu-
ment was opened, such as cropping, changing the
document color mode or canvas size, or adding or
deleting layers. Furthermore, the tool can’t restore
deleted or modied layer eects, vector data (type or
shapes), pixels from a deleted layer, or the eects of
an adjustment layer. Moral: Keep the layers in your
document for as long as possible!
To use the History Brush tool:
1. Open an image, and make some edits. (For the
image shown at right, we duplicated an image
layer via Ctrl-J/Cmd-J, renamed the duplicate,
and applied a lter to it.)
A–C
2. Choose the History Brush tool (Y or Shift-Y).
3. On the Options bar:
Click the Brush Preset picker arrowhead, then
click a brush on the picker.
Choose a blending Mode, Opacity percentage,
and Flow percentage.
4. On the History panel, click in the leftmost
column for a state or for a snapshot that was
created with the Full Document option, to desig-
nate it as the source for the History Brush tool.
e history source icon
moves to that slot.
D
5. On the Layers panel, click the layer that you
want to restore pixels to, and make sure the
Lock Transparent Pixels button is deactivated.
A
i s i s t h e o r i g i n a l i m a g e .
C
i s i s h o w t h e i m a g e l o o k s a f t e r w e a p p l i e d t h e
Charcoal lter to a duplicate image layer.
D
Next, to set the history source icon, we clicked in the
leftmost column for a state prior to “Filter Gallery,” but
after the layer addition (in this case, at a state called
“Layer Via Copy”).
B
We duplicated the image layer, then applied the
Charcoal lter to the duplicate layer.
ptg
History 183
6.
Apply strokes to the image. Pixel data from the
prior state of that layer will replace the current
data where you apply strokes.
A–C
➤ Say you apply some brush strokes to a layer (and
your History panel is in linear mode), then decide
a few editing steps later that you want to remove
them. If you click the state above the one labeled
“Brush Tool” and then resume editing, the states
that you want to keep will be deleted from the
panel. Instead, set the source for the History
Brush tool to the state above “Brush Tool,” click
the layer on the Layers panel that you applied the
brush strokes to, then with the History Brush
tool, paint out the strokes from the document.
(is will make more sense when you actually
do it.)
C
Some of the original color is visible in this nal image.
A
On the duplicate layer that we applied the lter to,
we applied strokes with the History Brush tool (the tool
Opacity was 55%, and we used a big, scratchy-looking
Spatter brush).
B
In the Layers panel for the nal image (which is
shown below), you can see that we restored the original
color to some areas of the duplicate layer.
ptg
184 Chapter 10
Filling an area with a history state
or snapshot
e Fill command, when used with the History
option, lls a layer or selection with pixels from a
designated history state or snapshot. Our Note on
page 182 also applies to this command.
To fill a selection or layer with a history
state or snapshot:
1. Edit your document, and click an image layer.
A
2.
Optional: Create a selection. You can either leave
the selection edges sharp or use the Rene Edge
dialog to feather them.
B
3. On the History panel, click in the leftmost
column for the state or snapshot to be used
as the ll data. e history source icon will
appear where you click.
4.
Choose Edit > Fill (Shift-Backspace/Shift-Delete).
5.
In the Fill dialog, do the following:
Choose Use: History.
C
Choose a Blending Mode and an Opacity
percentage.
Check Preserve Transparency to replace only
existing pixels, or leave it unchecked to allow
pixels to appear anywhere on the current layer.
i s o p t i o n i s a v a i l a b l e o n l y i f t h e c u r r e n t l a y e r
contains transparent pixels.
Click OK.
D
A
i s i s t h e o r i g i n a l i m a g e .
B
We applied the Conté Crayon lter to a duplicate image
layer, selected the bottom part of that layer, then feathered
the selection via the Rene Edge command.
D
e s e l e c t i o n l l e d w i t h t h e u n e d i t e d i m a g e r y a t a n
Opacity of 75%.
C
In the Fill dialog, we chose Use: History.


