Sử dụng photoshop cs5 part 8 pptx
Bạn đang xem bản rút gọn của tài liệu. Xem và tải ngay bản đầy đủ của tài liệu tại đây (936.49 KB, 7 trang )
ptg
48 Chapter 3
Using thumbnail stacks
Before learning about stacks, you need to know how
to rearrange thumbnails in the Content panel.
To rearrange thumbnails manually:
Drag any thumbnail (or select, then drag mul-
tiple thumbnails) to a new location. Okay, that
was a no-brainer. e header on the Sort menu
switches to “Sort Manually.”
➤ u m b n a i l s r e m a i n w h e r e y o u p l a c e t h e m u n l e s s
you change the sorting order or perform a stack-
ing operation.
Another good way to control how many thumbnails
display at a given time is by grouping them in stacks.
i n k o f c a t e g o r i e s f o r t h e m , s u c h a s l a n d s c a p e s o r
portraits, shots of the same subject, shots taken with
a particular camera setting, etc. is is easy, too.
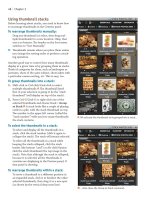
To group thumbnails into a stack:
1. Shift-click or Ctrl-click/Cmd-click to select
multiple thumbnails.
A
e thumbnail listed
rst in your selection is going to be the “stack
thumbnail” (will display on top of the stack).
2.
Press Ctrl-G/Cmd-G or right-click one of the
selected thumbnails and choose Stack > Group
as Stack.
B
A stack looks like a couple of playing
cards in a pile, with the stack thumbnail on top.
e number in the upper left corner (called the
“stack number”) tells you how many thumbnails
the stack contains.
To select the thumbnails in a stack:
To select and display all the thumbnails in a
stack, click the stack number (click it again to
collapse the stack). e stack will remain selected.
To select all the thumbnails in a stack while
keeping the stack collapsed, click the stack
border (the bottom “card”) or Alt-click/Option-
click the stack thumbnail (the top image in the
stack). Note that although the stack is collapsed,
because it is selected, all the thumbnails it
contains are displaying in the Preview panel, if
that panel is showing.
To rearrange thumbnails within a stack:
To move a thumbnail to a dierent position in
an expanded stack, click it to deselect the other
selected thumbnails, then drag it to a new spot
(as shown by the vertical drop zone line).
A
We selected the thumbnails to be grouped into a stack,…
B
…then chose the Group as Stack command.
ptg
Bridge 49
Method 2 (via the context menu)
1.
Select one or more thumbnails in the Content
panel.
2.
Right-click one of the selected thumbnails, then
from the Move To or Copy To submenu on the
context menu, do either of the following:
Select a folder name under Recent Folders or
Favorites.
Select Choose Folder. Locate a folder in the
Choose a Folder dialog, then click OK/Choose.
To delete a file or folder:
1. Click an image or folder thumbnail (or Ctrl-
click/Cmd-click multiple thumbnails or Shift-
click a series of them).
2.
Do either of the following:
Press Ctrl-Backspace/Cmd-Delete, then click
OK in the alert dialog.
Press Del/Delete on your extended keyboard,
then click Delete in the alert dialog, if it
appears.
➤ Oops! Change your mind? To retrieve a deleted
le or folder immediately, choose Edit > Undo.
Or to dig it out of the trash, double-click the
Recycle Bin/Trash icon for your operating
system, then drag the item into the Content
panel in Bridge. Phew.
To rename a file or folder:
1. Click a thumbnail, then click the le or folder
name. e name becomes highlighted.
A
2. Type a new name
B
(for an image le, don’t
try to delete the extension), then press Enter/
Return or click outside the name eld.
To move a whole stack:
1. Collapse the stack, then Alt-click/Option-
click the stack thumbnail. e borders of both
“cards” in the stack should now be highlighted.
2.
Drag the image thumbnail (not the border).
➤ If you drag the top thumbnail of an unselected
stack, you’ll move just that thumbnail, not the
whole stack.
To add a thumbnail to a stack:
Drag a thumbnail over a stack thumbnail or
into an open stack.
To remove a thumbnail from a stack:
1. Click the stack number to expand the stack.
2.
Click a thumbnail to be removed (to deselect the
other thumbnails), then drag it out of the stack.
To ungroup a stack:
1. Click the stack number to expand and select all
the thumbnails in the stack.
2.
Press Control-Shift-G/Cmd-Shift-G (Stacks >
Ungroup from Stack) or right-click the stack
and choose Stack > Ungroup from Stack. e
stack number and border disappear.
Managing files using Bridge
To create a new folder:
1. Via the Folders panel or the Path bar, navigate
to the folder that you want to add a folder to.
2.
Click the New Folder button at the right
end of the Bridge toolbar,
type a name in the
highlighted eld below the new folder, then
press Enter/Return.
You can move your actual les to a dierent folder
either by dragging their thumbnails or by using a
command.
To move or copy files between folders:
Method 1 (by dragging)
1.
Select one or more thumbnails in the Content
panel.
2.
In the Folders panel, navigate to (but don’t
click) the folder or subfolder that you want to
move the selected les into.
3.
To move the selected les, drag them over the
folder name in the Folders panel, or to copy
them, hold down Ctrl/Option while dragging.
A
To rename a le, click
the existing le name…
B
…then type a new name.
ptg
50 Chapter 3
W h e n y o u d o w n l o a d d i g i t a l p h o t o s f r o m y o u r
camera to your computer, they keep the sequen-
tial numerical labels (e.g., “
CRW_0016”) that your
camera assigned to them. Via the Batch Rename
command in Bridge, you can assign more recogniz-
able names to your photos, to make them easier
to identify.
To batch-rename files:
★
1. Display the folder containing the les to be
renamed, then select the thumbnails for the
les to be renamed.
2.
From the Refine menu
at the top of the
Bridge toolbar, choose Tools > Batch Rename
(Ctrl-Shift-R/Cmd-Shift-R). e Batch Rename
dialog opens.
A
3. From the Preset menu, choose Default.
4.
Under Destination Folder, click one of the
following:
Rename in Same Folder to rename the les
and leave them in their current location.
Move to Other Folder to rename the les and
move them to a new location.
Copy to Other Folder to leave the original
les unchanged but rename the copies and
move them to a new location — for a quick way
to duplicate your photos. We recommend using
this option, especially if you didn’t duplicate
your les when you downloaded them.
For the Move or Copy option, click Browse,
choose or create a new folder location, then
click OK/Choose.
5.
Under New Filenames, specify which data
you want included in the names: Text, a good
choice (enter text); Date Time (choose options);
or Sequence Number to include an incremental
number in the names (enter a starting number
and choose a digit option).
To add another row of criteria elds, click
the button, or to remove a row of elds, click
the button.
Click Preview to view a listing of the new le
names, then click OK.
6.
Under Options, you can leave Preserve Current
Filename in XMP Metadata unchecked, but for
Compatibility, do check any other operating
system that you need your renamed les to be
readable in.
7.
Optional: To save the current New Filenames
and Options settings as a preset (to be listed
on the Preset menu), click Save, enter a name,
then click OK.
8.
Click Rename.
A
Via the Batch Rename dialog, you can quickly and easily rename a whole folder full of photos.
ptg
Bridge 51
Searching for files
To find files via Bridge:
1. In Bridge, choose Edit > Find (Ctrl-F/Cmd-F).
e Find dialog opens.
A
2. From the Look In menu in the Source area,
choose the folder to be searched (the current
folder is listed by default). To select a folder
that’s not on the list, choose Look In: Browse,
locate the desired folder, then click OK/Choose.
3.
From the menus in the Criteria area, choose
search criteria (e.g., Filename, Date Created,
Keywords, Label, Rating, or specic camera
settings), choose a parameter from the adjoin-
ing menu, and enter data in the eld. To add
another criterion to the search, click the
button, or to remove a row of elds, click .
4.
From the Match menu, choose “If any criteria
are met” to nd les based on one or more
of the criteria you have specied, or choose “If
all criteria are met” to narrow the selection to
les that meet all of your criteria.
5. Check Include All Subfolders to also search
through any of the subfolders that are
contained within the folder chosen in step 2.
6. Optional: Check Include Non-indexed Files
to search through les that Bridge hasn’t yet
indexed (any folder Bridge has yet to display).
i s c o u l d s l o w d o w n t h e s e a r c h .
7. Click Find. e search results will be placed in a
temporary folder called Search Results: [name
of source folder] and will display in the Content
panel.
B
e folder will be listed on the Path bar
and on the Reveal Recent File or Go to Recent
Folder menu on the Bridge toolbar.
8. To create a collection from the search results,
see the following page.
➤ To discard the current search results and
perform a new search, click New Search, or to
cancel the results, click the Cancel button.
A
Use the Find dialog to search for and locate les based on various criteria.
B
After you click Find,
the search results display
in the Content panel.
e p a r a m e t e r s u s e d f o r
the search and the name
of the folder that was
searched are listed as the
Find Criteria.
QUICK SEARCH FOR A FILE
In the Favorites panel, click
Computer, then double-click the
thumbnail for your hard drive;
or navigate to a particular
folder. In the search fi eld
on the Bridge toolbar, type the
name of the fi le you’re looking
for, then press Enter/Return.
ptg
52 Chapter 3
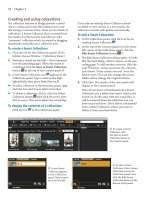
Creating and using collections
e collection features in Bridge provide a useful
way to catalog and access les without your actu-
ally having to relocate them. ere are two kinds of
collections: a Smart Collection that is created from
the results of a Find search, and what we call a
“nonsmart” collection which is created by dragging
thumbnails manually into a collection icon.
To create a Smart Collection:
1. Click the tab for the Collections panel. (If it’s
hidden, choose Window > Collections Panel.)
2. Perform a search via the Edit > Find command
(see the preceding page). When the search is
completed, click the Save as Smart Collection
button at the top of the Content panel.
A
3. A new Smart Collection icon appears in the
Collections panel. Type a name in the high-
lighted eld, then press Enter/Return.
B
➤ To add a collection to the Favorites panel, right-
click the icon and choose Add to Favorites.
➤ To delete a collection, click it, click the Delete
Collection button, then click Yes in the alert.
Not to worry: is won’t delete the actual les.
To display the contents of a collection:
Click its icon in the Collections panel.
If you edit an existing Smart Collection based
on added or new criteria in a new search, the
collection contents will update automatically.
To edit a Smart Collection:
1. In the Collections panel, click the icon for an
existing Smart Collection.
2.
At the top of the Content panel or in the lower
left corner of the Collections panel, click the
Edit Smart Collection button.
C
3.
e Edit Smart Collection dialog opens. It looks
like the Find dialog, which is shown on the pre-
ceding page. To add another criterion, click the
next button, choose and enter the criterion,
and choose “If any criteria are met” from the
Match menu. You can also change the source
folder and/or change the original criteria.
4.
Click Save. e results of the new search will
display in the Content panel.
Note: If you move a thumbnail from a Smart
Collection into a folder that wasn’t used in the
search (or do the same with the actual le), it
will be removed from the collection, but not
from your hard drive. Don’t delete a thumbnail
from a Smart Collection unless you want to
delete it from your hard drive!
A
To create a Smart
Collection, click
the Save as Smart
Collection button in
the Content panel.
B
A new Smart
Collection appears
on the Collections
panel. Type a name
for it in the eld.
C
To edit a Smart
Collection, click a Smart
Collection icon on the
Collections panel, then
click the Edit Smart
Collection button at the
bottom of the panel.
ptg
Bridge 53
A collection can also be created without running a
search rst. We call this a “nonsmart” collection.
You can add to a nonsmart collection by dragging
thumbnails into it (not so for a Smart Collection).
To create a nonsmart collection:
1. Do either of the following:
On the Content panel, select the image thumb-
nails to be placed into a collection. On the
Collections panel, click the New Collection
button, then click Yes in the alert dialog.
While viewing les in Review mode (Ctrl-B/
Cmd-B), drag any les you don’t want to
include in the collection out of the carousel,
then click the New Collection button.
2.
On the panel, rename the collection,
A
then
press Enter/Return. e number of thumbnails
in the collection is listed next to the name.
★
To add thumbnails to a nonsmart
collection:
1. Display the Collections panel.
2.
Drag one or more thumbnails from the Content
panel over a nonsmart collection icon.
B
➤ You can copy and paste thumbnails from a
Smart Collection into a nonsmart one, or from
one nonsmart collection into another.
To remove thumbnails from a nonsmart
collection:
1. On the Collections panel, click the icon for a
nonsmart collection to display its contents.
2.
Select the thumbnails to be removed, then click
Remove From Collection at the top of the
Content panel.
C
If you rename a le or move it from its original
location on disk, Bridge tries to update the link to
any nonsmart collections the le is a member of.
If Bridge is unsuccessful at this, follow these steps.
To relink a missing file to a nonsmart
collection:
1. On the Collections panel, click the collection
to which you want to relink a le or les.
2.
Next to the Missing File Detected alert at the
top of the Content panel, click Fix.
D
3. In the Find Missing Files dialog, click Browse,
locate and select the missing le, then click
Open. Click OK to exit the dialog.
C
To take
selected thumb-
nails out of
the currently
selected col-
lection, click
Remove from
Collection.
A
To create a new col-
lection, click the New
Collection button, then
type a name for it in
the highlighted eld.
D
To relink a le
that’s missing
from a collection,
click Fix.
B
Drag thumbnails to a nonsmart collection listing.
ptg
54 Chapter 3
Exporting the Bridge cache
When the contents of a folder are displayed in
the Content panel in Bridge for the rst time, the
program creates a cache le containing informa-
tion about those les, such as the data it uses to
display ratings, labels, and high-quality thumb-
nails. Having the cache helps speed up the display
of thumbnails when you choose that folder again.
If you want this data to be included with les that
you copy to a removable disc or to a shared folder
on a network, you have to build the cache les and
export them to the current folder rst.
To export the Bridge cache to the current
folder:
1. Choose Edit/Adobe Bridge CS5 > Preferences >
Cache. In the Cache area, check Automatically
Export Cache to Folders When Possible, then
click OK.
2.
Display a folder in Bridge.
3.
Choose Tools > Cache > Build and Export
Cache. In the dialog, check Export Cache to
Folders, keep the Build 100% Previews option
o, and click OK.
4.
Two hidden cache les will be placed in the cur-
rent folder, one named .BridgeCache (metadata
cache) and the other named .BridgeCacheT
(thumbnail cache).
Now if you use the File > Move To (or Copy To)
command in Bridge to move (or copy) selected
thumbnails, the folder cache you just created
will also move or copy, thanks to the export
preference that you checked.
➤ To display the cache le icons in the Content
panel, choose View > Show Hidden Files.
u m b n a i l c a c h e l e s s o m e t i m e s c a u s e d i s p l a y
problems. Purging the cache for the current folder
may solve the problem, because it prompts Bridge
to rebuild the cache.
To purge the cache files from Bridge:
Do either of the following:
To purge the cache les from the current folder,
choose Tools > Cache > Purge Cache for Folder
“[current folder name].”
Two new (hidden)
cache les will be generated.
To purge the cache les for multiple selected
thumbnails, right-click one of them and choose
Purge Cache for Selection.
ATTACHING IPTC INFO TO A FILE
Via the IPTC Core category in the Metadata panel,
you can attach creator, description, copyright, and
other information to the currently selected fi le.
Click the fi eld next to a listing, enter or modify the
fi l e d e s c r i p t i o n i n f o r m a t i o n , p r e s s T a b t o p r o g r e s s
through other fi elds and enter data, then click the
Apply button in the lower right corner of the
panel. (IPTC is an information standard that is used
for describing photos and providing information
about them.)


