Sử dụng photoshop cs5 part 7 pptx
Bạn đang xem bản rút gọn của tài liệu. Xem và tải ngay bản đầy đủ của tài liệu tại đây (399.96 KB, 5 trang )
ptg
Bridge 43
Saving custom workspaces
If you save your customized workspaces, you’ll be
able to access them again quickly at any time and
will avoid having to set up your workspace each
time you launch Bridge.
To save a custom workspace for Bridge:
1. Do all of the following:
Choose a size and location for the overall
Bridge window.
Arrange the panel sizes and groups as desired.
Choose a thumbnail size for the Content panel.
Choose a sorting order from the Sort menu at
the top of the Bridge window (see page 45).
Click a View Content button.
2.
From the Workspace menu on the workspace
switcher, choose New Workspace.
3.
In the New Workspace dialog,
A
enter a
Name for the workspace, check Save Window
Location as Part of Workspace and/or Save Sort
Order as Part of Workspace (both are optional),
then click Save.
Note: Your new workspace will be listed rst on
the workspace switcher, and will be assigned
the rst shortcut (Ctrl-F1/Cmd-F1). To change
the order of workspaces on the bar, drag any
workspace name horizontally to a dierent
slot. When you do this, the shortcuts will be
reassigned based on the new order.
➤ To delete a user-saved workspace, from the
Workspace menu, choose Delete Workspace.
From the menu in the dialog, choose the
workspace to be deleted, then click Delete.
Resetting the Bridge workspaces
When you make a manual change to a saved work-
space, the change sticks with the workspace even
when you switch to a dierent one. As an example,
if you were to change the thumbnail size for the
Filmstrip workspace, click the Essentials work-
space, then click back on the Filmstrip workspace,
the new thumbnail size would still display. Via
the commands for resetting workspaces, you can
restore the default settings to any individual pre-
dened (standard Adobe) or user-saved workspace
or to all the predened workspaces.
To reset the Bridge workspace:
Do either of the following:
To restore the default settings to one work-
space, right-click the workspace name and
choose Reset.
To restore the default settings to all the Adobe
predened workspaces, choose Reset Standard
Workspaces from the Workspace menu.
A
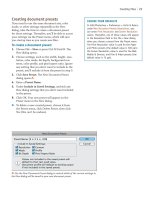
Use the New Workspace dialog to name your workspace and
choose options for it.
CHOOSING COLORS FOR THE BRIDGE
INTERFACE
In Edit/Adobe Bridge CS5 > Preferences > General
(Ctrl-K/Cmd-K), under Appearance, you can choose
a User Interface Brightness (gray) value for the
si
de panes; a different Image Backdrop value
for the Content and Preview panels and for the
background behind images when displayed in Full
Preview View, Slideshow, or Review Mode; and an
Accent Color for the border around selected folders,
th
umbnails, and stacks.
ptg
44 Chapter 3
Rating and labeling thumbnails
If you assign star ratings and/or color labels to your
thumbnails, you’ll be able to control which ones
display based on their ranking, and locate them
easily via the Filter panel or the Find command. In
addition, you can apply a Reject rating to any image
thumbnails that you want to hide from the Content
panel but aren’t ready to delete from your hard drive.
To rate and label thumbnails:
1. Select one or more image thumbnails in the
Content panel.
2.
Do any of the following:
From the Label menu, choose a Rating (to assign
a star ranking) and/or a Label
(to add a color-
coded strip below the thumbnail).
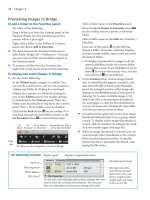
A
Click a thumbnail, then click any one of the ve
dots below it; stars will appear.
B
To remove one
star, click the star to its left. To remove all the
stars from a thumbnail, click to the left of the
r s t o n e .
C
(If you don’t see the dots or stars,
enlarge the thumbnails via the umbnail Size
slider.)
Press one of the keyboard shortcuts that are
listed on the Label menu.
Right-click a thumbnail in the Content panel,
then choose a category from the Label submenu
on the context menu.
Right-click in the Preview panel and choose a
star rating and/or label for that image.
To label the losers with a red “Reject” label,
D
choose Label > Reject or press Alt-Del/Option-
Delete. Note: If Show Reject Files is unchecked
on the View menu, all rejected thumbnails will
be hidden.
➤ If tool tips get in the way of your adding or
removing stars, go to Edit/Adobe Bridge CS5 >
Preferences > umbnails and uncheck Show
Tooltips.
➤ You can assign custom names to the label cate-
gories in Edit/Adobe Bridge CS5 > Preferences >
Labels.
To remove ratings or labels from
thumbnails:
1. Select one or more image thumbnails.
2.
From the Label menu, choose No Rating or press
Ctrl-0/Cmd-0 (zero), and/or choose No Label.
D
i s p o o r f e l l o w h a s a
Reject rating.
C
…but then we changed
our minds, so we clicked
to the left of the stars to
remove them.
B
We clicked the third
dot on this thumbnail to
give it a 3-star rating…
A
i s t h u m b n a i l h a s a n
Approved (green) rating.
RATING THUMBNAILS IN REVIEW MODE
To rate or label images in Review mode, right-click
the large, frontmost image and choose from the
context menu.
ptg
Bridge 45
Choosing a sorting order
e order in which thumbnails display in the Content
panel is determined by the criterion checked on
the Sort menu. is order applies to all folders and
thumbnails in Bridge, not just to the currently
selected one. By applying ratings and/or labels,
choosing a sorting order, and checking categories in
the Filter panel (see below), you’ll be able to locate
the les you need more quickly and eciently. Note
that the sorting order also aects the batch and auto-
mate commands in Bridge, because they process les
based on the current sequence of thumbnails.
To choose a sorting order for thumbnails:
From the Sort menu on the Path bar, choose
a sorting order (such as By Date Created).
A
All thumbnails (except those in stacks) will be
rearranged in the Content panel. To restore the
last manual sort (by dragging), choose Manually.
➤ To reverse the current order, click the Ascending
Order or Descending Order arrowhead.
Filtering the display of thumbnails
e Filter panel lists data specic to les in the current
folder, such as their label, star rating, date created, or
keywords. When you check specic criteria in the
panel, only thumbnails meeting those criteria display
in the Content panel; thumbnails in stacks are ignored.
To filter the display of thumbnails:
Do either of the following:
On the Filter Items by Rating menu on the
Bridge toolbar,
B
check the desired criteria.
On the Filter panel, click the arrowhead to
expand any category, such as Labels or Ratings,
then check a criterion.
C
To require additional
criteria to be met, check more listings, either
in the same category or in other categories. For
example, to display only les that have a 3-star
rating, check the 3-star listing under Ratings.
(To remove a criterion, click the listing again.)
➤ To prevent the current lters (check marks) from
clearing when you display other folders, click the
Keep Filter When Browsing button on the
panel; the button will display a highlight color.
➤ To remove all check marks from the Filter panel,
click the Clear Filter button at the bottom of
the panel or press Ctrl-Alt-A/Cmd-Option-A.
THE FILTER PANEL IS DYNAMIC
The categories that are listed on the Filter panel
(e.g., Ratings, Keywords, Exposure Time) change
dynamically depending on what data is available
for fi les in the currently selected folder and what
categories are checked on the Filter panel menu.
For instance, if you haven’t applied ratings to any
fi l e s i n t h e c u r r e n t f o l d e r , y o u w o n ’ t s e e a R a t i n g s
category; should you apply a rating to one of the
thumbnails, the Ratings category will appear.
A
From the Sort
menu on the
Path bar, choose
a sorting order
for your selected
thumbnails.
B
Control which thumbnails display
via the Filter Items by Rating menu.
C
Because we checked the
three-star ranking in the
Filter panel (under the
Ratings category), only
thumbnails matching
that criterion (that have
three stars) will display
in the Content panel.
ptg
46 Chapter 3
Using Mini Bridge
★
A wonderful new feature of Photoshop CS5 is Mini
Bridge, a miniature version of “big” Bridge in a panel
format. Love it. What are known as panels in Bridge
are called pods in Mini Bridge.
To preview files in Mini Bridge:
1. In Photoshop, click the Mini Bridge button
on the Application bar or choose File > Browse
in Mini Bridge. e resizable Mini Bridge panel
opens (
A
, next page).
2. Click the Browse Files button on the Home
Page (if you don’t see this button, click the Home
Page button at the top of the panel).
3. On the Panel View menu, make sure Path Bar,
Navigation Pod, and Preview Pod are checked.
4. To navigate to a folder, do one of the following:
Click a folder on the Path bar.
In the Navigation pod, click Favorites or Recent
Folders, then click a folder, or click Recent Files,
or the folder for a collection (see pages 52–53).
Make a choice from the Go to Parent, Recent
Items, or Favorites menu on the Toolbar.
Click the Search button on the Toolbar, enter
a le name, then click Search.
5. Use controls at the bottom of the panel to
customize the display of le thumbnails:
Adjust the thumbnail size via the u m b n a i l
Size slider (we keep our thumbnails small).
From the View menu, choose to view content
As umbnails (le names below the thumb-
nails), As Filmstrip (thumbnails in one row),
As Details (large thumbnails and more data), or
As List (tiny thumbnails and columns of data).
6. At the top of the Content pod, you have access
to the following menus for sorting and ltering
thumbnails:
e Select menu gives you access to the
Refresh command (see the tip at right); the
Show Reject Files, Show Hidden Files, and Show
Folders commands; and the Select All, Deselect
All, and Invert Selection commands.
e Filter Items by Rating menu oers even
more options than the one in Bridge, such as Keep
Filter When Browsing and Show 1 or More Stars.
e Sort menu lets you sort thumbnails, such
as by Filename, Type, or Date Created.
7. To preview a thumbnail, select it, then do any of
the following (only one le previews at a time):
View the thumbnail in the Preview pod.
To view the image as a large preview in the
Content pod, press Shift-Spacebar. To enlarge
the preview, click it; you can drag the image in
the preview. To exit the preview, click Close (or
in the Mac OS, you can also press Esc).
For a full-screen preview, press the Spacebar. To
go back to Mini Bridge, press the Spacebar again
or Esc.
To preview multiple thumbnails as a slideshow
or in Review mode, Ctrl-click/Cmd-click to select
them, then choose Slideshow or Review Mode
from the Preview menu at the bottom of
the panel or from the context menu.
➤ To close a pod, click its Close button.
➤ e Mini Bridge panel can be docked to the
bottom of the document window (drag the top
bar until you see a blue drop zone line).
➤ To add a folder to the Favorites area, right-click it
in the Content pod and choose Add to Favorites.
To open files from Mini Bridge into
Photoshop:
1. Select the thumbnails for the le(s) to be opened.
2. Do either of the following:
Double-click one of the selected thumbnails.
Right-click a thumbnail and choose Open or
Open Image.
➤ If a le is in a format that can be opened into
Camera Raw, you can right-click its thumbnail
and choose Open in Camera Raw. See page 63.
➤ e Tools menu in Mini Bridge provides
access to some useful Photoshop commands,
such as Place > In Photoshop (see page 309),
Photoshop > Load Files into Photoshop Layers
(see page 241), and Photoshop > Photomerge
(see pages 250–251).
➤ After you change a thumbnail in some way in
Bridge (say you rename, duplicate, or move it),
if the Content pod doesn’t update automatically,
choose Refresh from the Select menu.
➤ To view a selected image thumbnail in Bridge,
click the Go to Adobe Bridge button at the
top of the panel, or right-click the thumbnail and
choose Reveal in Bridge.
ptg
Bridge 47
B
In Mini Bridge, choose settings to
control how Bridge is launched.
* i s i c o n c h a n g e s d e p e n d i n g o n w h a t o p t i o n i s c u r r e n t l y s e l e c t e d o n t h e m e n u .
Via settings, you can control when Bridge is
launched, a requirement for running Mini
Bridge, and also change the colors for the Mini
Bridge interface.
To choose settings for Mini Bridge:
1. Click the Home Page button at the top of
the panel, then click the Settings button.
2.
Do either or both of the following:
Click Bridge Launching, then choose the
desired settings.
B
To change the colors for the Mini Bridge
panel, click Appearance, then adjust the
User Interface Brightness and/or Image
Backdrop sliders. Also check Color Manage
Panel to have Photoshop color-manage the
thumbnails and preview based on the color
prole that is currently assigned to your
primary display.
3.
Do either of the following:
To choose the other settings category, click
Settings.
To go back to the main Mini Bridge pods,
click the Browse Files button.
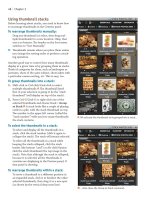
A
Here the Navigation, Preview, and Content pods
are showing.
View menu* for accessing
layout, View Content, and
other options (see page 42)
Search
Path bar
Tools menu for
accessing com-
mands such as
Place and Image
Processor
SortSelect
Filter Items
by Rating
Preview menu* for
accessing Slideshow
and Review modes
u m b n a i l
Size slider
Preview pod
➤ To display the
Preview pod in its
own row, drag the
gripper bar at the
top of the Content
pod downward.
Go to Parent,
Recent Items,
or Favorites
Go to Adobe
Bridge
Home
Page
Toolbar
Navigation pod
Panel View menu for
displaying the Path
bar, Navigation pod,
and Preview pod
Resize a pod by
dragging the
gripper bar.
Resize the panel
by dragging an
edge.


