Preservation of fish and meat - Part 3 doc
Bạn đang xem bản rút gọn của tài liệu. Xem và tải ngay bản đầy đủ của tài liệu tại đây (193.98 KB, 9 trang )
Preservation of fish and meat
16
3 Preparation
3.1 Catching and cleaning fish
Catching and preparing fresh fish
As fish spoils very quickly, measures must already be taken on board
the fishing boat to limit spoilage. First of all, the fish must immedi-
ately be kept out of the salt water so that the fish does not get con-
taminated by bacteria in the salt water.
Apart from preventing contamination, one should also prevent out-
growth of bacteria which are already present. The best way is to re-
move the intestines and gills of the fish on board the fishing boat. Af-
ter that the fish must be washed with clean water to rinse off any
blood or other remains. It is recommended to transport the fish on ice
to shore. However, cleaning and transporting the fish on ice is often
difficult and expensive to realize. All that can be done then is to trans-
port the fish as quickly and carefully as possible to the shore. To pre-
vent the bacteria in the intestines, liver, gills and on the skin of the fish
from increasing, the fish must be kept in a clean boat and in the shade.
Cleaning fish
To clean fish, first of all one needs good and clean tools. Personal hy-
giene is also important (see Chapter 2). It is important that the fish is
not cleaned on the ground but on a clean table or bench. The table
should be at working height and can be made of wood, metal or con-
crete. The surface of the table must be smooth and easy to clean. It is
also handy to clean the fish on a cutting board so that the table is not
damaged.
Knives are the most important tools for cleaning fish. Short knives are
used for small kinds of fish, long flexible knives to fillet larger kinds
of fish and a thick, strong knife to cut open large fish. The knives must
be sharp.
Preparation
17
To salt, dry and smoke fish, it is important that the surface area of the
fish be increased. Then the salt and smoke particles can penetrate eas-
ily into the fish and moisture can work its way out. The method used
to clean fish depends primarily on the size and kind of fish.
1 With very small kinds of fish, such as anchovies, sardines and oth-
ers smaller than 10 cm, usually only the intestines are removed.
Whether or not this is done depends on local customs and the pur-
pose for which the fish is to be used. For some fermentation proc-
esses the intestines are not removed.
2 Fish larger than 15 cm are, apart from being cleaned, also cut
crosswise so that the surface area of the fish is increased and the
flesh becomes less thick. Preservation methods work faster with a
larger surface area of the flesh.
3 In addition to cleaning and splitting fish that are larger than 25 cm,
one also makes extra cuts in the flesh. Sometimes the fish are cut
into chunks or completely filleted.
The way in which the fish are cleaned depends not only on the size of
the fish but also on the wishes of the consumer. Some consumers, for
example, want the fish with its head intact while others especially
want it cut off.
The last thing to be discussed is a brief description of how to gut, split
and fillet fish.
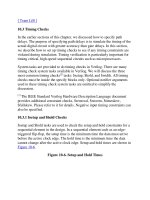
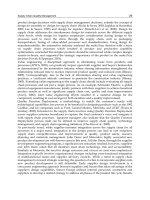
Gutting and scaling (Figure 1)
1 Place the fish on a clean board and hold it by its head. Scrape the
scales off starting at the tail and working towards the head. Try not
to damage the skin of the fish while doing so.
2 Wash the fish in clean (drinking) water and remove all loose scales.
3 Lay the fish on its side on a clean board and cut into the fish along
its gills with a sharp knife. Do the same on the other side but do not
cut the head off.
Preservation of fish and meat
18
4 Cut the gills free by cutting the ends free from the head and body
with the point of the knife.
5 Slit the abdominal wall open from the anal opening towards the
head of the fish. Cut deep enough but try not to damage the intes-
tines of the fish.
6 When the fish has been opened up, the gills and intestines can be
removed by placing one's fingers under the gills and pulling every-
thing out.
7 Scrape any remaining blood out with the knife.
8 Clean the abdominal wall with clean (drinking) water.
Figure 1: Gutting and scaling of fish
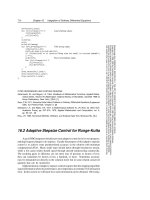
Splitting (Figure 2)
Small and medium-sized fish (Figure 2A)
1 Place the fish on a clean board with its back facing you and its head
to the right if you are right-handed. Slit the fish open down the
middle from the head to the tail, along the middle fish bone, but do
not cut into the underbelly.
Preparation
19
2 Open the fish and remove the intestines and gills. Wash the fish
thoroughly with clean (drinking) water.
Figure 2: Splitting of fish
Large fish (Figure 2B)
Extra cuts are made in the flesh of large fish to increase the surface
area and to decrease the thickness of the fish.
1 Place the fish on a clean board, with the abdominal side facing you
and the head to the right if you are right-handed. Make a cut in the
fish from the gill arch to the tail so that a strip of fish-flesh is left.
2 Turn the fish over and open it up. The strip of flesh must remain
attached at the back.
3 Place the fish with its head to the right and the abdominal side fac-
ing you. Split the head open and cut towards the tail so that a sec-
Preservation of fish and meat
20
ond strip of flesh is formed. In doing so, the abdomen is also cut
open.
4 Open the fish and remove its intestines and gills. Then wash with
clean (drinking) water.
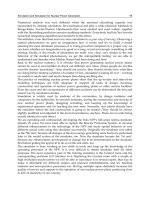
Filleting (Figure 3)
Small fish (Figure 3A)
One can use a fish which has not been cleaned for this.
1 Place the fish on a clean board with its back facing you. Place the
head on the left if you are right-handed. Cut along the contours of
the gill arches until you hit the backbone.
2 With one slice, cut the fillet loose from the backbone from the head
to the tail. In doing so, the abdomen is cut open.
3 When the fillet is loose, you can see the intestines and other organs.
4 Turn the fish over so its abdominal side faces you.
5 Repeat steps 1, 2 and 3.
6 If necessary, cut the fins from the fillets. Then wash the fillets with
clean (drinking) water.
Large fish (Figure 3B)
1 Place the fish on a clean board with the stomach facing up. For
right-handed people the head must be on the right. Cut along the
contours of the gill arches.
2 Remove the head and intestines.
3 Place the fish on its side. For the first fillet, start at the head end and
cut the fish in the direction of the tail to halfway along the back-
bone. Cut as close to the backbone as possible.
4 Also cut the other side of the fillet loose.
5 Turn the fish so that its tail is to the right.
6 Remove the other fillet from the backbone. If necessary, remove the
fins from the fish. Wash the fillets with clean (drinking) water.
With all preservation methods it is important to use fish of the same
size within one batch so that a uniform final product is made.
Preparation
21
Figure 3: Filleting of fish
3.2 Butchering
Only a brief description of how to butcher livestock is given here. The
storage life of consumer meat and meat products depends on the qual-
ity of the fresh meat. Meat must therefore be as clean as possible after
being butchered so that microbial decay is avoided. The chemical re-
actions which occur are also important.
After being killed, the animal is hung upside down so that the blood
can drain from the carcass. After bleeding dry, the head can be re-
Preservation of fish and meat
22
moved. Subsequently the hooves and the hide are removed from most
kinds of animals. After a thorough inspection for visible abnormali-
ties, the carcass can be divided into four parts and each part can be
hung up.
Pigs, after being killed, hung up and bled, are heated so that the hide
with the hairs can be scraped off. The butchering of sheep and goats is
comparable to that of pigs.
It is best after butchering to store the parts of the carcass in cooling
cells. However, as cooling facilities are often absent, the meat must be
consumed or processed as quickly as possible (within several hours).
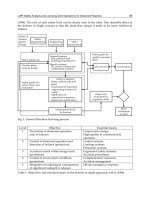
3.3 Cutting meat into pieces for drying
After hanging up the carcass quarters, the meat is trimmed. This
means the membranes within which the meat is enclosed are cut away.
Figure 4: Cutting meat into pieces
Bad parts in the meat such as damaged areas, discolourations, insect
or parasite affected parts must also be cut away. After this the bones
are cut out of the carcass, during which the flesh should be damaged
as little as possible. Then pieces of meat of good quality must be se-
lected for preservation. For the drying of meat, for example, one can
best use lean meat of an animal which has been slaughtered when it is
Preparation
23
middle-aged. The larger pieces of meat are cut into smaller ones fol-
lowing the anatomical lines (Figure 4).
The larger muscles are left in one piece but one piece of meat may
contain a number of smaller muscles. Subsequently the pieces of meat
are cut into strips. There are two ways to cut the pieces into strips:
1 Place the meat on a board and cut it into strips.
2 Hang the meat up and cut strips off it.
In both cases the meat must be cut in the direction of the muscular
tissue (Figure 5).
Figure 5: Cutting meat into strips
The length of the strip can vary from 20 to 70 cm. Short strips of meat
take more time to be hung up, but longer strips can break under their
own weight when drying.
The thickness of the meat is important in determining the necessary
drying time of the meat. In one batch it is important that all the meat
strips are equally thick so that after drying you are not left with too
dry or not dry enough pieces of meat.
Examples of different thicknesses which are used are:
? strips of 1 × 1 cm
? flat strips of 0.5 × (3, 4 or 5 cm)
Preservation of fish and meat
24
The exact shape of the strips depends on the preservation method to be
used.
It is very important that a clean working surface and knife are used so
that the starting material for preservation is good. Personal hygiene is
also very important. Further preparatory work such as salting is de-
scribed under the appropriate preservation method in the following
chapters.