Adobe After Effects 5.0- P10 docx
Bạn đang xem bản rút gọn của tài liệu. Xem và tải ngay bản đầy đủ của tài liệu tại đây (1.47 MB, 30 trang )
LESSON 8
272
Beginning the 3D Composite
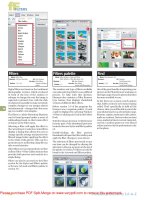
2 In the Composition window, select Top view (or press F11) and select 25% (or lower)
magnification. The wireframe display represents the view of the camera, including its
frame and point of interest, and the camera itself. A row of X’s (so close together they look
like a thick black line) illustrates the position keyframes on the pasteboard.
A. Point of Interest B. Frame C. Camera
3 On the Time Controls palette, drag the Jog or Shuttle () control to scrub along the
timeline, and watch the camera travel along this path.
4 In the Composition window view pop-up menu, select Right view, and then continue
scrubbing along the timeline. You can see the camera moving toward the Girl_Alpha.mov
layer as it zooms in to the point of interest: the woman’s hands.
5 Select Active Camera view (or press F12) and drag the Jog or Shuttle controls in the
Time Controls palette to preview the movement. The view appears to move closer and
closer to the actress’s hands.
A
C
B
AE_CIB.book Page 272 Monday, October 8, 2001 12:08 PM
273
ADOBE AFTER EFFECTS 5.0
Classroom in a Book
By applying the motion-control camera data to the camera layer in this composition, you
have re-created the same movement for the After Effects camera in this composition. As
a result, you are now able to construct a 3D environment around the actress with accurate
perspective.
Adding the hexagon layer
Next you add the hexagon element, rotating and positioning it in 3D space so that it
resembles a platform on which the actress stands.
1 Move the current-time marker to 0:00 and set the Composition window magnification
to a convenient level for your monitor size.
2 In the Project window, select the Hexagon01.psd file and drag it to the Timeline
window so that it is Layer 1 in the layer stack.
3 In the Switches panel, click the 3D layer switch
() to make the hexagons a 3D layer.
The layer disappears in the Composition window.
Viewing 3D layers
In the world of 3D After Effects, what you see in the composition frame is not necessarily how your compo-
sition will look. Only Active Camera view accurately displays the image as it will be rendered. The other
orthogonal (right-angle) views show you the relative positions of layers in 3D space, as if you were looking at
the set of a theatrical production from different points of view: overhead, off in the stage wings, and so forth.
What’s important in the end is what appears in the camera field of vision—what the audience sees. The other
views are available simply to help you visualize the relationships among the various layers, especially the
relationship to the camera.
As the camera-path views in the previous steps show, the layers are positioned on the pasteboard, far from
the composition frame. The position of the layers in relation to the composition frame is somewhat irrelevant.
It is possible to reposition your 3D layers within a view so that they fall within the composition frame. You
do this by deselecting all layers, setting the view to any except the Active Camera view, and using the
track X,Y or the track Z camera tools. The layers appear within the composition frame from the selected point
of view. Some layers are represented in full color and others as gray lines, depending on their positions in 3D
space.
AE_CIB.book Page 273 Monday, October 8, 2001 12:08 PM
LESSON 8
274
Beginning the 3D Composite
4 In the Composition window, select Top view (or press F11), and notice where the
Hexagon01.psd layer is in relation to the camera. To see this, click the Camera 1 layer to
see its path (the condensed line of X’s), and then click the Hexagon01.psd layer to see its
layer handles. Layer 1 is behind the camera, so it does not appear in Active Camera view.
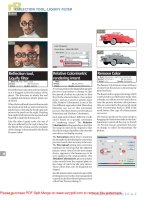
5 Move the pointer over the blue Z-axis arrow of the Hexagon01.psd layer so that the
pointer appears with a small Z. Drag the layer toward the top of the Composition window
so that it is positioned in front of (above) the camera. If necessary, reduce the magnifi-
cation even further (choose View > Zoom Out) to see the pasteboard as you do this.
A. Camera B. Hexagon01.psd layer
BA
AE_CIB.book Page 274 Monday, October 8, 2001 12:08 PM
275
ADOBE AFTER EFFECTS 5.0
Classroom in a Book
6 Select Active Camera view (press F12). The Hexagon01.psd layer now appears in the
Active Camera view because it is in front of the camera in 3D space.
To confirm which layer is which, select layers in the Timeline window and look for the
layer handles in the Composition window. Sometimes you may need to significantly reduce
the magnification to find a selected layer on the pasteboard.
Adding a composition-time marker
Next you’ll add a marker to the timeline so that you can easily reference a specific frame
in the composition. Then—just for practice—you’ll use the shortcut to jump to that
frame.
AE_CIB.book Page 275 Monday, October 8, 2001 12:08 PM
LESSON 8
276
Beginning the 3D Composite
1 In the Timeline window, drag a composition-time marker from the Composition
marker bin
() to the right of the timeline. Using the Info palette display to see the exact
composition-time marker position on the timeline, drag the marker to 2:03.
2 Move the current-time marker ()—not the composition-time marker ()—to any
point on the timeline except 2:03, if necesssary.
3 Press 1 on the main keyboard (not the numeric keypad). The current-time marker
jumps to 2:03, aligned with the composition-time marker.
This 2:03 frame is an important time in this composition because several different
animation events take place here. You can use the composition-time marker to jump
easily to that frame. You’ll have opportunities for more practice with markers in the next
lessons. For more information about composition-time markers, see “Using markers”
and related topics in After Effects online Help.
Animating the hexagon
Now that the hexagon layer is properly positioned in the camera view, you’ll animate the
layer so that it tumbles into the composition frame. Then you’ll add an effect and a
transfer mode to adjust its color.
1 With the current-time marker set to 0:00, select the Hexagon01.psd layer in the
Timeline window.
2 Press P to reveal the Position property, and then press Shift + R, Shift + S, and
Shift + T to open all the Orientation and Rotation, Scale, and Opacity properties.
3 In Position, scrub or type 184, 91, 170 and click the stopwatch to set a keyframe.
4 In Scale, scrub or type 37%. (Do not set a Scale keyframe.)
AE_CIB.book Page 276 Monday, October 8, 2001 12:08 PM
277
ADOBE AFTER EFFECTS 5.0
Classroom in a Book
5 With the X Rotation value at 0˚, click the X Rotation stopwatch to set a keyframe.
6 In Opacity, scrub or type 30% to set the value. (Do not set an Opacity keyframe.)
7 Press 1 to jump to the composition-time marker at 2:03, and change the Position
coordinates to 414, 461, 911 to set a second Position keyframe.
8 Still at 2:03, change the X Rotation value to –270˚, being careful to include the minus
sign.
9 Press accent grave (`) to close the layer properties.
Because Active Camera view is selected, you see the composition as it will appear after you
render it. The Hexagon01.psd layer now animates from its original position, filling the
frame and tumbling into place at the actress’s feet. At this point, the hexagon does not
match the actress’s feet exactly. However, you’ll trim the girl footage layer later in this
lesson, and then the hexagon position will be perfect.
Applying effects and modes to the hexagon
In this short procedure, you’ll add an effect and transfer mode to adjust the color of the
Hexagon01.psd layer.
1 With the Hexagon01.psd layer still selected, choose Effect > Channel > Invert. The
hexagon now appears as black instead of white. Leave the settings at the default values and
close the Effect Controls window.
2 Open the Modes panel in the Timeline window, and select Overlay transfer mode for
the Hexagon01.psd layer, to blend this layer with the background and with other elements
that you’ll place behind it in the next lesson.
3 Preview the animation and save the project.
The hexagon now blends a little better with the overall color of the scene.
Adjusting the live-action footage
In this section, you’ll work with the Girl_Alpha.mov layer. You’ll duplicate the layer and
precompose it with the duplicates to help organize your work. Then you’ll use various
techniques to add a kind of aura to the image of the actress. Finally, you’ll adjust the In
point (which lines up the actress’s feet with the Hexagon01.psd image) and add a
transition effect (so that the girl appears to materialize over time, beginning at her feet, as
if a fog around her is lifting).
AE_CIB.book Page 277 Monday, October 8, 2001 12:08 PM
LESSON 8
278
Beginning the 3D Composite
Duplicating and precomposing the Girl_Alpha.mov
Yo u’ll duplicate the layer, precompose to group the layers together, and apply effects to
add color correction and blurs to the individual layers.
1 In the Timeline window, drag the Girl_Alpha.mov layer to the top of the layer stack.
2 Choose Edit > Duplicate twice to create two more copies of the layer.
3 Select all three Girl_Alpha.mov layers and choose Layer > Pre-compose. The Pre-
compose dialog box opens.
4 In New Composition Name, type Girl Pre-comp. Leave the second option (Move All
Attributes into the New Composition) selected.
5 Select the Open New Composition option (if it’s not already selected) so that the tab
for this composition opens in the Composition and Timeline windows, and click OK.
6 In the Composition or Timeline window, click the Girl Pre-comp tab to bring it to the
front of both windows.
In the Timeline window, the three Girl_Alpha.mov layers are now stacked in the Girl Pre-
comp.
Creating a hazy background shape
Your next task is to add effects to the individual Girl_Alpha.mov layers in the Girl Pre-
comp. After you apply these effects, After Effects automatically updates in the Girl Pre-
comp layer in the 3D Composite Comp to reflect this change.
1 In the Timeline window for the Girl Pre-comp, select the first Girl_Alpha.mov layer
(Layer 1).
2 Choose Effect > Blur & Sharpen > Fast Blur.
3 In the Effect Controls window under Fast Blur, scrub or type 50 for Blurriness. This
layer now appears quite blurred. Leave the other settings at their default values.
AE_CIB.book Page 278 Monday, October 8, 2001 12:08 PM
279
ADOBE AFTER EFFECTS 5.0
Classroom in a Book
To better see the results of the effects as they are applied, use the Solo switch ( ) in the A/V
Features panel. When the Solo switch is on, the Composition window temporarily displays
only that layer, so that all the other layer Video switches
() are dimmed. When you finish
viewing the single layer, click the Solo switch again to turn it off.
4 In the Timeline window Modes panel, select the Overlay transfer mode for Layer 1.
5 Press T to open the Opacity property and scrub or type 80%.
6 Press T again to hide the Opacity property, and then save the project.
The blurred layer blends with the two layers behind it, creating a slight haze around the
actress.
Correcting color with the Hue/Saturation effect
Small changes in the color can help you coordinate elements in your compositions. You’ll
apply the Hue/Saturation effect now, which helps you control these refinements.
1 In the Timeline window, select Layer 2.
2 Choose Effect > Adjust > Hue/Saturation.
3 In the Effect Controls window under Hue/Saturation, scrub or type to set the following
values:
• In Master Hue, set 10°.
AE_CIB.book Page 279 Monday, October 8, 2001 12:08 PM
LESSON 8
280
Beginning the 3D Composite
• In Master Saturation, set –20, being careful to make the number negative.
This effect applies a subtle color correction to Layer 2, reducing the red values.
Yo u can see the change by clicking the Hue/Saturation effect switch ( )in the Effect
Controls window to toggle the effect off and on. As you toggle, watch the Composition window
to see how the effect changes the image colors.
Applying the Echo effect
In After Effects, you can add motion blur only to animated layers in a composition; you
cannot add it to movement within video footage. However, you can simulate motion blur
in video footage by applying the Echo effect to a layer. This effect can display several
previous frames from the footage along with the current frame. Because those frames can
be progressively muted, the results resemble a motion blur.
Note: The order in which effects appear is important in achieving the desire result here—the
Echo must come before the Fast Blur effect in the Effect Controls window.
1 In the Timeline window, select Layer 3.
2 Choose Effect > Time > Echo.
3 In the Effect Controls window, make the following changes:
• In Echo Time (seconds), scrub or type –0.25, to specify the amount of time between
echoes.
AE_CIB.book Page 280 Monday, October 8, 2001 12:08 PM
281
ADOBE AFTER EFFECTS 5.0
Classroom in a Book
• In Number of Echoes, scrub or type 10, so that 10 frames combine to produce the echo
effect.
• Leave the Starting Intensity at 1.00 to display the starting frame in the echo sequence at
full intensity.
• In Decay, scrub or type 0.70 to set the intensity of the echoes.
• In Echo Operator, select Composite In Back, so that the echoed frames appear behind
the original layer.
Try clicking the Solo switch ( ) in the A/V Features panel on and off to see the results of
this effect more clearly.
4 With Layer 3 still selected, choose Effect > Blur & Sharpen > Fast Blur.
5 In the Effect Controls window under Fast Blur, scrub or type 10 as the Blurriness value.
A slight blur is added to this layer, smoothing the results of the Echo effect.
6 Press T to open the Opacity properties for Layer 3, and scrub or type 50%. Then press
T again.
7 Make sure that the Video switches for all layers are turned on and that all Solo switches
are turned off.
AE_CIB.book Page 281 Monday, October 8, 2001 12:08 PM
LESSON 8
282
Beginning the 3D Composite
8 Click the close box on the Girl Pre-comp tab in either the Composition or Timeline
window to close the Girl Pre-comp in those windows. The 3D Composite Comp now
reappears in the Composition and Timeline windows. Then save the project.
You have now combined the three Girl_Alpha.mov layers and the settings for these layers
into one layer in the 3D Composite Comp. The color correction, blur, and echo effects all
appear in the Girl Pre-comp layer.
For more information on the Echo effect, see After Effects online Help and the Effects
documentation on the After Effects Classroom in a Book CD.
Setting the duration, In point, and opacity of a layer
Your next job is to trim, move, and animate the Opacity of the Girl Pre-comp layer.
1 In the Timeline window for the 3D Composite Comp, move the current-time marker
to 1:18.
2 Select the Girl Pre-comp layer, and press Alt + [ (left bracket) (Windows) or
Option + [ (Mac OS) to trim the layer In point.
3 Press Home to return the current-time marker to 0:00 and press [ (left bracket) to
move the layer In point to 0:00. The actress will appear to stand on the hexagon when it
falls into place.
4 Move the current-time marker to 2:07, and press T to reveal the Opacity property for
the Girl Pre-comp layer.
5 Scrub or type 0% as the Opacity value and click the stopwatch to set a keyframe.
6 Move the current-time marker to 2:28 and change the Opacity value to 100%. You have
now created a 20-frame dissolve for this layer.
AE_CIB.book Page 282 Monday, October 8, 2001 12:08 PM
283
ADOBE AFTER EFFECTS 5.0
Classroom in a Book
Revealing a layer with a transition effect
Finally, you’ll apply a transition effect to reveal the Girl Pre-comp layer in the 3D
Composite Comp.
1 With the Girl Pre-comp still selected, choose Effect > Transition > Linear Wipe.
2 In the Timeline window, use the Opacity keyframe navigation arrows under the A/V
Features panel to move the current-time marker to 2:07. Or press J.
3 In the Effect Controls window under the Linear Wipe effect, set the following:
• In Transition Completion, scrub or type 73% and click the stopwatch to set a keyframe.
• In Wipe Angle, scrub or type –160˚, being careful to make the number negative.
• In Feather, scrub or type 50 to add a softness to the edge of the wipe.
Note: At this point, you do not see the footage of the girl because the layer opacity is zero and
also because of the 73% Transition Completion value you just set.
4 In the Timeline window, move the current-time marker to 3:17.
5 In the Effect Controls window, in Transition Completion, scrub or type 0% to set
another keyframe and complete the wipe that reveals the Girl Pre-comp layer. Close the
Effect Controls window.
6 With the Girls Pre-comp layer selected, press U to see all the keyframes. When you are
ready to continue, press U again to hide them, and then deselect all layers.
7 Move the current-time marker to 9:00 and press N to set the end of the work area.
Move the current-time marker to 0:00, preview the animation, and then save the project.
AE_CIB.book Page 283 Monday, October 8, 2001 12:08 PM
LESSON 8
284
Beginning the 3D Composite
The actress is revealed by both a dissolve-in and a linear wipe.
You have now completed Lesson 8, which does not include rendering the 3D Composite
Comp. You’ll continue working with this composition in Lesson 9 before you render it for
use in the final composite.
AE_CIB.book Page 284 Monday, October 8, 2001 12:08 PM
9 Finishing the 3D Composite
Now things are getting really interesting
as you continue to combine elements. You
can use 2D elements—such as text and
numbers—as 3D layers in this composi-
tion. That means you can arrange them
any way you like around the camera to
create a compelling virtual world around
the 2D movie of the actress.
AE_CIB.book Page 287 Monday, October 8, 2001 12:08 PM
LESSON 9
288
Finishing the 3D Composite
In this lesson you’ll learn to do the following:
• Precompose and collapse 3D layers
• Apply the Tint effect
• Position and duplicate layers in 3D space
This lesson picks up the work you began in Lesson 8, using the same project as its basis.
In that lesson, you worked with cameras, null objects, and imported camera data. In this
lesson, you bring that work together with other 3D elements into a complete 3D
composite that you render at the end of this lesson.
Yo u’ll work with two new 3D elements that have been prepared for you: a rings element,
much like the ring image that you used to create circles in Lesson 3, and a starburst
element, similar to the one you created in Lesson 4. You’ll also work with four more
elements that you built in Lessons 2 and 5.
This lesson takes about one hour to complete.
Getting started
At this phase of the work, the memory load is large enough that you may notice some
sluggishness as After Effects processes your work. It’s a good idea to take advantage of the
various configurations that minimize the RAM requirements so that you can see the
changes to your work as quickly as possible. See “Allocating RAM to After Effects” on
page 2.
Make sure that the following files are in the AE_CIB job folder on your hard drive, or copy
them from the After Effects Classroom in a Book CD now:
• In the _mov folder: 3DRings.mov and 3DStarburst.mov
• In the Sample_Movies folder: 3DComp09_final.mov from the
Sample_Movies/Lesson09 folder on the CD
• In the Finished_Projects folder: 3DComposite09_finished.aep
Besides the two prepared movies provided on the CD, you’ll use movies that you created
and rendered in earlier lessons. Make sure that these files are in your _mov folder:
• BoxLightsLine.mov, Squares01.mov, TextCircle.mov, TextLine.mov.
AE_CIB.book Page 288 Monday, October 8, 2001 12:08 PM
289
ADOBE AFTER EFFECTS 5.0
Classroom in a Book
Open and play the sample movie 3DComp09_final.mov to see the work you’ll create in
Lesson 9. When you finish, quit the QuickTime player. You can delete the sample movie
now to save storage space, if necessary.
Importing and organizing the source files
Before you import the source files required for this lesson, you’ll reopen and then rename
the project you worked on in Lesson 8. By saving it under a new name, you give yourself
the option of going back to the original project file and reexamining your work there.
1 Start After Effects and open the 3DComposite08_work.aep project, which is in the
_aep folder inside your AE_CIB job folder.
2 Choose File > Save As, and type 3DComposite09_work.aep.
3 Choose File > Import > Multiple Files.
4 Open the _mov folder in your AE_CIB job folder. Then select the following files one at
a time, and click Open (Windows) or Import (Mac OS) each time:
• 3DRings.mov
• 3DStarburst.mov
• BoxLightsLine.mov
• Te xtCircle.mov
• Te xtLine.mov
5 Click Done to close the Import Multiple Files dialog box.
AE_CIB.book Page 289 Monday, October 8, 2001 12:08 PM
LESSON 9
290
Finishing the 3D Composite
6 In the Project window, drag all the .mov files into the mov files folder, and expand the
folder, if necessary, so that you can see the files inside it.
Now all the files you’ll need for this project are imported and you have a well-organized
Project window for your work.
Adding prepared 3D footage
Two of the imported movies are prepared files that you copied from the After Effects 5.0
Classroom in a Book CD. In this section, you’ll incorporate these files into your compo-
sition.
The first prepared element, the 3DRings.mov, uses the same rings.psd image that you
worked with in Lesson 3. This image was duplicated and animated in 3D space. The
rendered movie uses the same camera move as the current 3D Composite Comp.
The second prepared element, the 3DStarburst.mov, is based on a starburst element like
the one you created in an earlier lesson. This involved duplicating the Starburst.mov,
positioning it in 3D space, and then rendering it, using the same camera move as the
current 3D Composite Comp.
AE_CIB.book Page 290 Monday, October 8, 2001 12:08 PM
291
ADOBE AFTER EFFECTS 5.0
Classroom in a Book
Adding and tinting the rings
Your first task in bringing the 3D elements together is to add the 3DRings.mov element
to the 3D Composite Comp. You’ll also adjust its color after you place it in the composite
by applying the Tint effect and adding a transfer mode.
1 Open the 3D Composite Comp and move the current-time marker to 0:00.
2 In the Project window, select the 3DRings.mov and drag it into the Timeline window
below the Girl Pre-comp in the layer stack, so that the 3DRings.mov is Layer 2.
3 Set the current-time marker to about 1:15 so that you can see the layers as you work.
4 In the Modes panel, select Screen as the Layer 2 transfer mode. The rings begin to
blend with the background.
5 With the layer still selected, choose Effect > Image Control > Tint.
6 In the Effect Controls window, in Map White to, select the same orange-yellow color
you used in Lesson 7. The color used in the sample has the RGB values of R=207 (81%),
G=153 (60%), B=0 (0%), but if you used different values, be sure to enter those numbers.
7 In Amount to Tint, scrub or type 60%. The rings now take on the yellow hue.
8 Press T to open the Opacity property in the Timeline window, and scrub or type 80%.
9 Preview the animation. Press T to hide the Opacity property, and then save the project.
The timing of the 3DRings.mov layer works with the Girl Pre-comp layer dissolve to
create the impression that the rings wipe her onto the screen.
AE_CIB.book Page 291 Monday, October 8, 2001 12:08 PM
LESSON 9
292
Finishing the 3D Composite
Adding the glowing-ball element
Next you’ll add the prepared 3DStarburst.mov to the 3D Composite Comp. In this task,
you’ll position the layer in the 3D Composite, set the proper timing, and then apply a
transfer mode to blend this layer with the layers behind it.
1 Move the current-time marker to 3:27 and drag a composition-time marker from
Composition marker bin at the right side of the Timeline window, pressing Shift as you
drag to snap the new marker to the current time.
2 In the Project window, select the 3DStarburst.mov and drag it into the Timeline
window above the Girl Pre-comp layer in the layer stack, so that the 3DStarburst.mov is
now Layer 1 and its In point is at 3:27.
3 Move the current-time marker to 8:00 so that you can see the results as you continue
working.
4 With Layer 1 selected, choose Effect > Image Control > Tint.
5 In the Effect Controls window, in Map White to, select the same orange-yellow color
you used for the rings. The color used in the sample has the RGB values of R=207 (81%),
G=153 (60%), B=0 (0%), but if you used different values, be sure to enter those numbers.
6 In Amount to Tint, scrub or type 30.
7 In the Modes panel, select Hard Light as the Layer 1 transfer mode.
8 Press 2 (on the main keyboard, not the keypad) to move the current-time marker to
the marker at 3:27, and then press B to define the beginning of the work area.
9 Move the current-time marker to 9:00 and press N to define the end of the work area.
10 Preview the animation, and save the project.
Hard Light transfer mode creates the look of a harsh spotlight shining on the layer images,
adding highlights and deepening the shadows. This contrast makes the glowing ball more
brilliant and dramatic because Hard Light makes the starburst take on more color from
the layers behind it.
If your redraw speed is becoming sluggish, you can temporarily turn off the layer Video
switches (
) for the 3DStarburst.mov and the 3DRings.mov layers. This will increase the
redraw speed as you continue working. You must turn on these Video switches before
rendering. If the Video switches are left turned off, these layers are not rendered.
AE_CIB.book Page 292 Monday, October 8, 2001 12:08 PM
293
ADOBE AFTER EFFECTS 5.0
Classroom in a Book
Adding the TextCircle element
In this task, you add the circular text element that you built in an earlier lesson. After you
duplicate the layer twice, you have all the TextCircle 3D layers you need.
1 Set the current-time marker at 3:13.
2 In the Project window, select the TextCircle.mov and drag it into the Timeline window,
placing it into the Layer 1 position in the layer stack.
3 Choose Edit > Duplicate twice to create two copies of the layer. You now have a total of
three TextCircle.mov layers: Layer 1, Layer 2, and Layer 3.
4 Set the current-time marker to 5:10 and select Layer 2.
5 Press [ (left bracket). The layer duration bar moves so that the Layer 2 In point is at
5:10.
6 Set the current-time marker to 6:11, select Layer 3, and press [ (left bracket) to set the
Layer 3 In point at 6:11.
7 In the Timeline window, open the Switches panel. Then select all three TextCircle.mov
layers and click one of the 3D Layers switches to make them all 3D layers.
All the layers now temporarily disappear in the Composition window because they are
not positioned in the camera view. You’ll correct that in another procedure.
Setting transformation properties for the TextCircle layers
Yo u’ll configure the duplicates separately so that one layer circles around the actress, while
the other two revolve around the glowing-ball element in her hands.
1 With all three TextCircle.mov layers still selected, press S, and then press Shift + P and
Shift + R to open the Scale, Position, and Orientation and Rotation properties for each
layer.
2 Deselect all layers and then move the current-time marker to about 5:00 so that you
can see the results as you work.
3 Set the following transformation properties for Layer 1:
• In Position, scrub or type 406, 292, 928.
• In Scale, scrub or type 36%.
• In Orientation, scrub or type 270˚, 0˚, 145˚. This orientation value hides the start point
of the text animation behind the Girl Pre-comp layer.
AE_CIB.book Page 293 Monday, October 8, 2001 12:08 PM
LESSON 9
294
Finishing the 3D Composite
4 Move the current-time marker to about 6:00 so that you can see the results as you work.
5 Set the following transformation properties for Layer 2:
• In Position, scrub or type 380, 292, 928.
• In Scale, scrub or type 10%, so that the layer passes around the glowing-ball element.
• In Orientation, leave the default settings unchanged: 0˚, 0˚, 0˚.
6 Move the current-time marker to about 7:00.
7 Set the following transformation properties for Layer 3:
• In Position, scrub or type 380, 292, 928.
• In Scale, scrub or type 8%.
• In Orientation, scrub or type 90˚, 0˚, 180˚.
8 Select all three TextCircle.mov layers and press accent grave (`) to close the layer
outlines. Keep the three layers selected.
9 Open the Modes panel, and select Screen transfer mode for one of the layers to set it
for all three TextCircle.mov layers. Then deselect all layers.
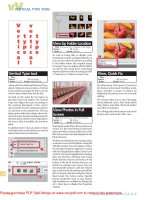
10 Preview the animation, using the work area set from 3:27 to 9:00, and then save the
project.
Image in Composition window (with all layer Video switches turned on)
Precomposing the TextCircle layers
Next, you’ll combine the three TextCircle layers into one by precomposing. This keeps
these element layers grouped together and makes your Timeline window less cluttered.
1 Select all three TextCircle.mov layers and choose Layer > Pre-compose. The Pre-
compose dialog box appears with the second option already selected.
AE_CIB.book Page 294 Monday, October 8, 2001 12:08 PM
295
ADOBE AFTER EFFECTS 5.0
Classroom in a Book
2 Type TextCircle Pre-comp for the name. Deselect the Open New Composition option,
if it is selected, and then click OK.
3 In the Timeline window, click the Switches/Modes bar to open the Switches panel.
4 Click the Collapse Transformations switch
() for the TextCircle Pre-comp layer, and
then save the project. Keep the TextCircle Pre-comp layer selected.
5 Move the current-time marker to 3:13, and press Alt + [ (left bracket) (Windows) or
Option + [ (left bracket) (Mac OS) to trim the TextCircle Pre-comp layer In point.
The duration bar now represents the layer more accurately because this is when the
Te xtCircle layers appear in the composition. Collapsing this layer is necessary to preserve
the 3D state of the layers in the precomposition.
Adding the TextLine element and setting a position
Yo u’ll place several instances of the TextLine element so that they’ll look like little cross-
roads laid out on the platform on which the actress appears to stand. You start by adding
the element to the composition and making it a 3D layer.
1 Press 1 on the main keyboard to move the current-time marker to composition-time
marker 1 (at 2:03).
2 In the Project window, select the TextLine.mov and drag it into the Timeline window
so that it is now Layer 1 in the layer stack. The Layer 1 In point is 2:03.
3 Move the current-time marker to about 3:00 so that you can see the layer in the
Composition window as you work.
AE_CIB.book Page 295 Monday, October 8, 2001 12:08 PM
LESSON 9
296
Finishing the 3D Composite
4 In the Switches panel, click the 3D Layer switch () to make the TextLine.mov a 3D
layer. The layer temporarily disappears in the Composition window because it is not in
the camera view.
5 In the Composition window, select Top view, or press F11, and then select 25% magni-
fication.
6 Examine the positions of the layers by selecting these layers in the Timeline window so
that you can see the layer handles:
• Select the Hexagon01.psd layer. If necessary, reduce the magnification again or resize
the Composition window so that you can see the selection handles on the Composition
window pasteboard.
• Select the TextLine.mov layer.
7 In the Composition window, drag the TextLine.mov layer by the blue Z axis to about
the middle of the square that represents the Hexagon01.psd layer.
8 In the Composition window pop-up menu for orthogonal views, choose Camera 1.
Then increase the magnification in the Composition window.
The TextLine element appears just as the hexagon layer tumbles into place.
Setting transformation properties for the TextLine elements
Your next task is to move the elements into position. You won’t set keyframes here, so the
position of the current-time marker doesn’t matter.
1 In the Timeline window, select the TextLine.mov layer (if it’s not already selected).
2 Press P and then press Shift + S and Shift + R to open the Position, Scale, Orientation,
and Rotation properties for this layer, and enter the following values:
• In Position, scrub or type 412, 461, 920.
• In Scale, scrub or type 55%.
AE_CIB.book Page 296 Monday, October 8, 2001 12:08 PM
297
ADOBE AFTER EFFECTS 5.0
Classroom in a Book
• In Orientation, scrub or type 270˚, 0˚, 0˚. The text line runs horizontally.
3 With the TextLine.mov layer still selected, choose Edit > Duplicate.
4 Select Layer 2, and enter these values (the properties you need are already open):
• In Position, scrub or type to change the third coordinate to 914. Leave the first two
values (412, 461) unchanged.
• Leave Scale set to 55%.
• In Orientation, scrub or type to change the third coordinate to 90˚. Leave the first two
(270˚, 0˚) unchanged. The new text line is nearly vertical.
5 Close the layer properties for Layers 1 and 2, and then save the project.
AE_CIB.book Page 297 Monday, October 8, 2001 12:08 PM
LESSON 9
298
Finishing the 3D Composite
In 3D space, Layer 2 now lies perpendicular to Layer 1: Layer 1 runs horizontally and
Layer 2 is vertical, slanting slightly to the left.
Duplicating and moving TextLine layers
To form a simple grid, you’ll duplicate and move each of the TextLine layers.
1 Move the current-time marker to 3:00, if necessary.
2 Select Layer 1 (the horizontal TextLine.mov layer), and choose Edit > Duplicate.
3 In the Composition window, drag Layer 1 by its green Y axis toward the top of the
slanted vertical line of text.
Note: Increasing the magnification may help you see the green Y-axis line and arrow.
4 In the Timeline window, select Layer 3 (the vertical TextLine.mov layer) and choose
Edit > Duplicate again.
5 In the Composition window, drag Layer 3 by its green Y axis to the right edge of the
lower horizontal line of text.
Now, Layers 2 and 4 intersect at the actress’s feet. Layers 1 and 3 appear to intersect behind
her: above and to the right.
AE_CIB.book Page 298 Monday, October 8, 2001 12:08 PM