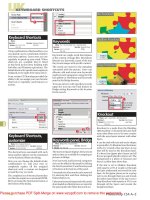
The Adobe Illustrator CS Wow- P4 pot
Bạn đang xem bản rút gọn của tài liệu. Xem và tải ngay bản đầy đủ của tài liệu tại đây (2.83 MB, 30 trang )
up" the path itself to make it look the way you want.
You do this by assigning various attributes to the stroke,
including weight (how thick or thin it looks), whether
the line is solid or dashed, the dash sequence (if the line
is dashed), and the styles of line joins and line caps. You
can also assign your path a stroke of None, in which case
it won't have a visible stroke at all. (Dashed lines, joins,
and caps are covered in the following section, "Expanding
Your Drawing & Coloring Toolset.")
The many ways to fill or stroke an object
To set the fill or stroke for an object, first select the object
and then click on the Fill or Stroke icon near the bottom
of the Toolbox. (You can toggle between fill and stroke by
pressing the X key.) If you want to set the object's stroke
or fill to None, use the / key, or click the None button on
the Toolbox or the Color palette (the little white box with
a red slash through it).
You can set the fill or stroke color you want using
any of the following methods: 1) adjusting the sliders or
sampling a color from the color bar in the Color palette;
2) clicking on a swatch in the Swatches palette; 3) using
the Eyedropper tool to sample color from other objects
in your file; or 4) sampling colors from the Color Picker.
(To open the Adobe Color Picker, double-click the Fill or
Stroke icon in the Toolbox or the Color palette.) In addi-
tion, you can drag color swatches from palettes to selected
objects, or to the Fill/Stroke icon in the Toolbox.
Color palette
The Color palette is a collection of tools that allows you to
mix and choose the colors for your artwork. In addition
to the sliders and edit fields for locating precise colors,
this palette includes a None button so you can set your
Fill or Stroke to no color at all. The Color palette also
sometimes displays a Last Color proxy; this allows you to
easily return to the last color you used before choosing a
pattern, a gradient, or setting None. The Color palette's
menu options include Invert and Complement. Invert
Swapping fill and stroke
When you press the X key by
itself, it toggles the Stroke or
Fill box to active (in front of the
other) on the Tools and Color pal-
ettes. If you press Shift-X it swaps
the actual attributes or contents
of the Stroke and Fill boxes. For
example, if you start with a white
fill and a black stroke, after you
press Shift-X you will have a black
fill and a white stroke. Note: Be-
cause gradients are not allowed on
strokes, Shift-X will not work when
the current fill is a gradient.
Fill and Stroke section of the Tools palette
The Adobe Color Picker
The Color palette. The sliders show the settings
of the Fill or Stroke color—whichever is in front.
Shown on the right is the Last Color proxy (out-
lined in red); when it appears you can click it to
return to the last color used before choosing a
pattern or gradient, or setting a style of None
Chapter 3 Drawing & Coloring
65
Color palette and pop-up menu
Swatches palette showing only the color
swatches
Swatch Options dialog box
Global colors in gradients
CATER (©INMOTION 2003)
By using just two global colors
in the definition of his gradients,
David Cater was able to easily
change the color of this Mini
Cooper as his clients required.
See the David Cater/lnMotion
Gallery in the Advanced Tech-
niques chapter for details
converts a color to its negative color (as in photographic
negative). Complement locates the Adobe color comple-
ment of a selected color (the complements don't seem to
match art school color wheels).
If you're doing print work in CMYK mode, you'll
know you've chosen a non-CMYK color if an exclamation
point appears on the Color palette. Illustrator will auto-
matically correct your color to the nearest CMYK equiva-
lent. Click the exclamation point to move the sliders—this
will show you the corrected color settings.
If you're creating artwork for the Web, you can choose
Web safe RGB from the Palette menu, which displays
the hexadecimal values for colors in the Color palette. If
a non-Web-safe color is selected, an out-of-gamut Web
color icon displays (it looks like a 3D cube). If you want
to stay aware of the CMYK gamut while working in RGB
mode, watch for the exclamation point mentioned in the
preceding paragraph. It displays when you choose a non-
CMYK color, and you can click it to correct the color.
Swatches palette
To save colors you've mixed in the Color palette, drag
them to the Swatches palette from the Color palette, the
Toolbox, or the Gradient palette. You can also save your
current color as a swatch by clicking the New Swatch
button at the bottom of the Swatches palette. If you want
to name the Swatch and set other options as you save it,
either hold Option/Alt as you click the New Swatch but-
ton, or choose New Swatch from the palette menu.
Whenever you copy and paste objects that contain
custom swatches or styles from one document to another,
Illustrator will automatically paste those elements into
the new document's palettes.
The Swatch Options dialog box (which you can open
by double-clicking any swatch) lets you change the indi-
vidual attributes of a swatch—including its name, color
mode, color definition, and whether it's a process or
spot color. (For pattern and gradient swatches, the only
attribute in the Swatch Options dialog box is the name.)
Chapter 3 Drawing & Coloring
66
There's also a check box that lets you decide whether
changes you make to the swatch will be Global (in which
case they'll be applied to all objects using the swatch color
throughout the document) or not. The Global check box
is off by default.
Saving custom swatch libraries
Once you've set up your Swatches palette to your satisfac-
tion, you can save it as a custom swatch library for use
with other documents. This can help you avoid having to
duplicate your efforts later on. Saving a swatch library is
easier than ever in Illustrator CS, thanks to the new Save
Swatch Library command in the palette menu. Use this
command to name and save your swatch library to the
Adobe Illustrator CS > Presets > Swatches folder. The next
time you launch Illustrator, the name you gave your file
will appear in the Window > Swatch Libraries menu.
This is the most efficient method in most cases, but
there are other ways to make your custom Swatches pal-
ette accessible to other documents. If you want, you can
choose to save the custom Swatches palette as part of your
own custom Template (.ait) file, in which case it will be
available when you base new files on the Template (see
the Illustrator Basics chapter for more on Illustrator's
new Templates feature). Or, you can simply save your
file wherever you'd like, and use the Other Library menu
command (available either through the palette menu's
Open Swatch Library command, or via Window > Swatch
Libraries) to open your custom Swatches palette.
Of course, you can always open the original document
when you need to access its Swatches palette—but saving
it as a custom swatch library, as described above, will save
you the trouble.
The Eyedropper and Paint Bucket tools
Two extremely useful Illustrator tools are the Eyedropper
(which picks up stroke, fill, color, and text attributes) and
the Paint Bucket (which deposits stroke, fill, color, and
text attributes). These tools allow you to easily borrow
Using the libraries
The Swatch Library palettes
(Window >Swatch Libraries) let
you open Swatch palettes for
specific color systems (such as
Pantone or Trumatch). Or choose
Other Library to access saved
colors from any document.
The Save Swatch Library command in the
Swatches palette menu makes it easy to save
custom swatch libraries
When deleting swatches
When you click the Trash icon in
the Swatches palette to delete
selected swatches, Illustrator does
not warn you that you might be
deleting colors used in the docu-
ment. Instead Illustrator will con-
vert global colors and spot colors
used to fill objects to non-global
process colors. To be safe, choose
Select All Unused and then click
the Trash.
Note: You will also not be warned
when deleting graphic styles that
might be used in the document.
Chapter 3 Drawing & Coloring 67
Save Swatch Library command
Keep in mind that Using the Save
Swatch Library command will save
only the contents of the Swatch
palette in the library it creates (as
opposed to saving the whole file).
Tint hint: Use global colors
One benefit of using global colors
in your Swatch palette is that you
can easily specify tint percentages
for any color. Just select a colored
object and adjust the Tint slider in
the Color palette or type a num-
ber in the percentage field.
Eyedropper, Paint Bucket, and Measure tools
Using the Eyedropper and Paint Bucket options,
you have complete control over what is picked
up and/or deposited. In addition to Stroke, Fill,
color, and text formatting, the Eyedropper and
Paint Bucket tools can also be used to copy
styles and type attributes (which are discussed
later in the book). See the User Guide for more
about using the Eyedropper and Paint Bucket to
copy those attributes
attributes from one object and add them to another.
To set the default color for your next object, use the
Eyedropper tool to click on an object that contains a
color you want to sample. The Eyedropper will pick up
the color of the object you clicked on. Then you can apply
that color to another object just by clicking on it with the
Paint Bucket tool.
With one tool selected, you can access the other by
holding down Option (Mac) or Alt (Win). In addition to
sampling color from objects, the Eyedropper can sample
colors from a raster image if you hold down the Shift key.
Keep in mind that, by default, a regular click with the
Eyedropper picks up all fill and stroke attributes, includ-
ing whole patterns and gradients. But if you hold down
the Shift key as you click, you'll not only be able to sample
color from any type of object, you'll switch to sampling
color only (as opposed to other attributes). Another effect
of Shift-clicking is that the color you sample will be
applied to only one or the other of the stroke or the fill,
whichever is active in the Toolbox at the time you click.
You can control which attributes the Eyedropper picks
up by using the Eyedropper/Paint Bucket Options dialog
box (accessed by double-clicking the Eyedropper or Paint
Bucket in the toolbox). You can also control how large an
area the Eyedropper samples from raster images by using
the Raster Sample Size menu at the bottom of the dialog
box. Choosing Single Point will sample from a single
pixel; 3x3 will pick up a sample averaged from a 3 pixel
grid surrounding the point you click on; and 5x5 will do
so for a 5 pixel grid. (This will help you get a more accu-
rate color sample in many cases, since it can be difficult to
get the colors that the eye "blends" from many pixels by
clicking on a single point.)
The Pathfinders
It's often easier to create an object by combining two or
more relatively simple shapes than it would be to draw the
more complex result directly. Pathfinder operations let
you easily combine objects to get the result you want. For
Chapter 3 Drawing & Coloring68
examples of the Pathfinders in action, take a look at the
Pathfinder palette chart on the following pages.
There are two effective ways to combine objects using
the Pathfinders: 1) compound shapes, which remain
"live" and editable; and 2) Pathfinder commands, which
become "destructive" (permanent), and can't be returned
to their original editable state except by using Undo.
See the "Add & Expand" lesson for a lesson that helps
you to see compound shapes in action. The "Cutting &
Joining" and "Divide & Color" lessons illustrate some
uses of Pathfinder commands.
EXPANDING YOUR DRAWING & COLORING TOOLSET
This section provides more detail about compound shapes
and related concepts, and explores some of the technical
details involved with creating simple objects in Illustrator.
If you're new to Illustrator you may want to experiment a
bit with the lessons and Galleries later in this chapter to
solidify what you've learned before continuing with this
section. Consider "Expanding Your Drawing & Coloring
Toolset" a reference section that is available when you're
ready to delve deeper into the details of object creation
in Illustrator. Topics covered include the Simplify com-
mand, color modification filters, and Illustrator's new
"Liquify" set of tools.
Compound paths
A compound path consists of one or more simple paths
that have been combined so that they behave as a single
unit. One very useful aspect of compound paths is that a
hole can be created where the original objects overlapped.
These holes are empty areas cut out from others (think
of the center of a donut, or the letter O), through which
objects below can be seen.
To create a compound path, e.g., the letter O, draw
an oval, then draw a smaller oval that will form the cen-
ter hole of the O. Select the two paths, and then choose
Object > Compound Path >Make. Select the completed
letter and apply the fill color of your choice, and the hole
Pathfinder palette
Using the Intersect Pathfinder to cut out the
lower part of the car body. Bottom, the finished
illustration
Tim Girvin used the Divide Pathfinder to create
the logo for the film The Matrix. See his Gallery
in the Type chapter
Left to right: two ovals (the inner oval has no
fill, but appears black because of the black fill of
the larger oval behind it); as part of a compound
path the inner oval knocks a hole into the outer
one where they overlap; the same compound
path with inner oval, which was Direct-selected
and moved to the right to show that the hole is
only where the objects overlap
Chapter 3 Drawing & Coloring 69
Compounds operate as a unit
Compound shapes and compound
paths don't have to overlap to be
useful; apply a "compound" to
multiple objects whenever you
want them to operate as a unit,
as if they were one object.
Example of a compound path used here to make
the letters operate as a unit (see Tip above);
from the Gary Newman Gallery in the Type
chapter
Compound paths or shapes?
The quick answer to this question
is to use compound paths on sim-
ple objects for simple combining
or cutting holes. Use compound
shapes on more complex objects
(such as live type or effects) and
to more fully control how your
objects interact. See the section
"The pros and cons of compound
shapes and paths" (opposite) for
details on when to use which.
Learn to use Compound Shapes
The Minus Back Pathfinder com-
mand is the reverse of the Sub-
tract shape mode. You can create
the same effect using the Subtract
Shape mode by simply reversing
the stacking order of the elements
in your compound shape. See the
Layers chapter for more about ob-
ject stacking order.
will be left empty. To adjust one of the paths within a
compound path, use the Direct Selection tool. To adjust
the compound path as a unit, use the Group Selection or
Selection tool.
In addition to creating holes in objects, you can use
compound paths to force multiple objects to behave as if
they were a single unit. An advanced application of this
is to make separate objects behave as one unit to mask
others. For an example of this using separate "outlined"
type elements (see figures at left extracted from Gary
Newman's "Careers" Gallery in the Type chapter).
Holes and fills with compound paths
For simple holes, the Compound Path >Make command
will generally give the result you need. If your compound
path has multiple overlapping shapes, or you're not get-
ting the desired holes in the spaces, see "Fill Rules.pdf"
on the Wow! CD. Or try using compound shapes
(described in the next section), which give you complete
control. Certain results can be obtained only by using
compound shapes.
Compound shapes
As mentioned earlier, sometimes it's easier to create an
object by combining simpler objects, rather than trying
to draw the complex result directly. A compound shape
is a live combination of shapes using the Add, Subtract,
Intersect, and/or Exclude Pathfinder operations. See the
first four rows of the Pathfinder Commands chart on the
pages following for a look at the various command func-
tions, as well as examples of how they can be used.
Compound shapes can be made from two or more
paths, other compound shapes, text, envelopes, blends,
groups, or any artwork that has vector effects applied
to it. To create a compound shape, choose Window >
Pathfinder to display the Pathfinder palette. Then select
your objects, and choose Make Compound Shape from
the Pathfinder palette menu. To assign a particular Shape
Mode, select one of the components of your compound
Chapter 3 Drawing & Coloring
70
shape and click on the corresponding Shape mode button
on the top row of the Pathfinder palette.
Note: Simply selecting your objects and pressing one of the
Shape Mode buttons creates a compound shape and applies
the shape mode you've chosen to the objects.
с
The pros and cons of compound shapes and paths
Compound paths can be made only from simple objects.
In order to make a compound path from more complex
objects (such as live type or "envelopes") you have to first
convert them into simpler objects (see the Type and Live
Effects & Graphic Styles chapters for details on how to do
this), and you'll only be able to edit them as paths. You
can, however, combine complex objects using compound
shapes and have them remain editable.
As you know by now, compound shapes allow you
to combine objects in a variety of ways using Add, Sub-
tract, Intersect, and Exclude. While keeping these Shape
modes live, you can also continue to apply (or remove)
Shape modes, or a wide variety of effects, to the com-
pound shape as a unit. In later chapters, as you work with
live effects such as envelopes, warps, and drop shadows,
remember that you can integrate effects into your com-
pound shapes while remaining able to edit your objects—
even if your objects are editable type! Compound shapes
can also help you bring objects into Photoshop (see the
"Shape Shifting" lesson in the Illustrator & Other Pro-
grams chapter).
The power of compound shapes does come at a cost.
Compound shapes require Illustrator to perform many
calculations on your behalf, so as a result, too many com-
pound shapes, or too many operations or effects applied
to compound shapes, can slow down the screen redraw
of your image. Although compound paths are much less
powerful or flexible, they won't slow down your redraw.
So if you're working with simple objects, it's best to use
compound paths instead.
Starting objects: the word Sub is a compound
shape ("Subtract" is subtracted from "Sub")
The starting objects from above, after Make
Compound Shape and the corresponding shape
modes have been applied, i.e., "intr" has the
Intersect shape mode applied
In a compound shape all the original objects
remain editable. Here the word "excl" was ex-
panded to "Exclude," then a gradient and drop
shadow were applied to the compound shape
as a whole
Shape Modes
Chapter 3 Drawing & Coloring
71
Chapter 3 Drawing & Coloring72
Chapter 3 Drawing & Coloring 73
The Pathfinder Commands
The Adjust Colors filter (Filter >Colors)
Expand Compound Shapes?
When would you want to expand
a compound shape?
• If a compound shape is so com-
plex that interacting with it is
noticeably slow, then expand it.
• Anything that relies on bound-
ing boxes will behave differ-
ently on the expanded shape if
that shape has a smaller bound-
ing box than the editable com-
pound shape. This affects all the
Align commands and certain
transformations.
• Finally, you must expand a
compound shape before using it
as an envelope. For more about
envelopes, see the Live Effects &
Graphic Styles chapter.
—Pierre Louveaux
Pathfinder commands
The Pathfinder commands consist of Option/Alt-Add,
Option/Alt-Subtract, Option/Ait-Intersect, Option/Alt-
Exclude, Divide, Trim, Merge, Crop, Outline, and Minus
Back, all of which you can use to combine or separate
shapes. See the preceding Pathfinder chart for a guide to
what the various commands do and examples of how they
can be used.
Unlike objects you create using compound shapes, the
results you get when you apply the Pathfinder commands
are destructive (they alter your artwork permanently).
When working with complicated objects, it's best to use
compound shapes instead of Pathfinders (see the Tip
"Compound paths or shapes?" and the section "The Pros
and Cons of Compound Shapes and Paths" earlier in this
chapter).
The Divide, Trim, Merge, Crop, and Outline Path-
finder commands are used to separate (not combine)
shapes—think of them as an advanced form of cookie
cutters. The Trim and Merge commands require that your
objects be filled before you use them.
Hard Mix and Soft Mix
You may notice that Hard Mix and Soft Mix are shown
on the chart but no longer included on the Pathfinder
palette. To restore these Pathfinders, install the WOW
Actions "Pathfinder Filters.aia" from the Wow! CD (in
"SandeeCs Wow Actions" folder in the "WOW Actions"
folder), or apply them from Effect > Pathfinder, then
choose Object >Expand Appearance (for more on Effects
see the "Hard and Soft Mix" section in the Live Effects &
Graphic Styles chapter introduction).
Color modification filters
Located in the Filter > Colors menu, the Adjust Colors
filter lets you adjust the tint of Global colors in selections.
Illustrator no longer allows multiple color spaces in a
single document, so some color spaces will be unavail-
able. The Saturate filter (which integrates Saturate, Satu-
74
Chapter 3 Drawing & Coloring
rate More, Desaturate, and Desaturate More filters) lets
you adjust the saturation of objects and images either by
using sliders or by entering numerical values.
End of Lines
An aspect of Illustrator that often mystifies newcomers
is the way endpoints of stroked lines are drawn. You may
discover that although a set of lines seem to match up
perfectly when viewed in Outline mode, they may visibly
overlap when previewed. Solve this problem by changing
the end caps in the Stroke palette.
Select one of the three end cap styles described below
to determine how the endpoints of your selected paths
will look when previewed.
The first (and default) choice is called a Butt cap; it
causes your path to stop at the end anchor point. Butt
caps are essential for creating exact placement of one path
against another. The middle choice is the Round cap,
which rounds the endpoint in a more natural manner.
Round caps are especially good for softening the effect of
single lines or curves, making them appear slightly less
harsh. The final type is the Projecting cap, which extends
lines and dashes at half the stroke weight beyond the end
anchor point.
In addition to determining the appearance of path
endpoints, cap styles affect the shape of dashed lines (see
illustration at right).
Corner Shapes
The shape of a stroked line at its corner points is deter-
mined by the Join style in the Stroke palette. Each of the
three styles determines the shape of the outside of the
corner; the inside of the corner is always angled.
The default Miter join creates a pointy corner. The
length of the point is determined by the width of the
stroke, the angle of the corner (narrow angles create lon-
ger points, see illustration at right) and the Miter limit
setting on the Stroke palette. Miter limits can range from
lx (which is always blunt) to 500x. Generally the default
The Stroke palette
The same lines shown first in Outline, then
in Preview with Butt cap, Round cap and
Projecting cap
A 5 pt dashed line with a 2 pt dash and 6 pt gap
shown first in Outline, then Preview with
a Butt cap, Round cap, and Projecting cap
A path shown first in Outline, then in Preview
with a Miter join, Round join, and Bevel join
Objects with 6 pt strokes and various Miter
limits, demonstrating that the angles of lines af-
fects Miter limits
Chapter 3 Drawing & Coloring
75
Outlining Dashed Strokes
• Select the dashed object(s). If
any selected objects overlap,
choose Object >Group.
• In the Transparency palette, set
the blending mode to Multiply.
• Choose Object > Flatten Trans-
parency and set the Raster/
Vector Balance slider to 100.
The blending mode will be reset
to Normal. —Pierre Louveaux
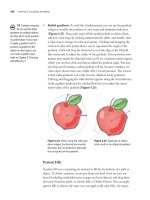
Creating patterns
To create a pattern from a design
you've created, drag the objects
to the Swatches palette!
The Free Transform tool
The Liquify Distortion tools' tear off palette can
be accessed from the Warp tool: see "Tear off
palettes" in the Illustrator Basics chapter
The Distort Filter menu
Miter join with a miter limit of 4x looks just fine.
The Round join creates a rounded outside corner for
which the radius is half the stroke width. Illustrator's
Round join option looks like Photoshop's Stroke layer
effect. See the Illustrator & Other Programs chapter for
more about Illustrator and Photoshop.
The Bevel join creates a squared-off outside corner,
equivalent to a Miter join with the miter limit set to lx.
Patterns
The User Guide has a very informative section on "Cre-
ating and Working with Patterns." For an example of
working with patterns, see the lesson "Intricate Patterns:
Designing Complex Repeating Patterns" in this chapter.
Free Transform & Liquify tools, and Distort filters
You can use Illustrator's Free Transform tool to distort
the size and shape of an object by dragging the corner
points of the object's bounding box. The shape of the
object distorts progressively as you drag the handles.
One of the more recent additions to Illustrator is the
suite of "Liquify" Distortion tools that arrived with Illus-
trator 10. They allow you to distort objects manually, by
dragging the mouse over them. The Warp, Twirl, Pucker,
Bloat, Scallop, Crystallize, and Wrinkle tools work not
only on vector objects, but on embedded raster images as
well. Use the Option/Alt key to resize the Liquify brush as
you drag. These tools are a step beyond the Distort filters
Illustrator had prior to version 10—they're more interac-
tive, more intuitive, and more fun to use.
But the Distort filters Illustrator had prior to version
10 aren't gone—they can still be found under both the
Filter menu (choose the topmost of the two Distort sub-
menus in the Filter menu) and the Effect menu (choose
Effect >Distort & Transform). They do have their uses.
For instance, the ability to control distortion numerically
via the filters' dialog boxes can allow for greater precision.
They can also be used to create in-betweens for anima-
tions in cases where blends might not give the desired
76 Chapter 3 Drawing & Coloring
results or might be too cumbersome.
The Distort niters include Free Distort, Pucker &
Bloat, Roughen, Tweak, Twist, and Zig Zag. All of these
filters distort paths based on the paths' anchor points.
They move (and possibly add) anchor points to create dis-
tortions. Checking the Preview box in the dialog box lets
you see and modify the results as you experiment with
the settings.
Many of the Free Distort functions can also be
performed with the Free Transform tool (for a lesson
using the Free Transform tool, see the "Distort Dynam-
ics" lesson later in this chapter).
Path Simplify command
More is not better when it comes to the number of anchor
points you use to define a path. The more anchor points,
the more complicated the path—which makes the file size
larger and harder to process when printing. The Simplify
command (Object > Path > Simplify) removes excess
anchor points from one or more selected paths with-
out making major changes to the path's original shape.
You might want to apply this command after using the
Auto Trace tool, opening a clip art file, or using Adobe
Streamline.
Two sliders control the amount and type of simpli-
fication. Enable Show Original and turn on the Preview
option to preview the effect of the sliders as you adjust
them. The Preview option also displays the original
number of points in the curve and the number that will
be left if the current settings are applied. Adjust the Curve
Precision slider to determine how accurately the new path
should match the original path. The higher the percent-
age, the more anchor points will remain, and the closer
the new path will be to the original. The endpoints of an
open path are never altered. The Angle Threshold deter-
mines when corner points should become smooth. The
higher the threshold, the more likely a corner point will
remain sharp.
Need more points?
Use the Add Anchor Point tool to
add points at specific locations
along your path. Or use the Ob-
ject > Path >Add Anchor Points
command to neatly place one
point between each existing pair
of points on your path.
The Object >Path >Simplify dialog box can be
used to reduce the number of points and to styl-
ize type
More Simplify Commands
• Use Object >Path>Clean Up to
remove stray points, unpainted
objects, or empty text paths.
• If you want to see the stray
points before deleting them,
use Select>Object>Stray Points
to select them, then press the
Delete key to remove them.
Chapter 3 Drawing & Coloring 77
Simple Realism
Realism from Geometry and Observation
Overview: Draw a mechanical
object using the Rectangle, Rounded
Rectangle, and Ellipse tools; use tints
to fill all of the paths; add selected
highlights and offset shadows to
simulate depth.
The default Fill and Stroke in the Tools palette;
setting the default stroke weight for objects
Creating rounded rectangles and ellipses to
construct the basic forms
Option-Shift/Alt-Shift dragging a selection
to duplicate and constrain it to align with the
original; using the Lasso tool to select specific
points; Shift-dragging to constrain and move
the selected points
Many people believe the only way to achieve realism
in Illustrator is with elaborate gradients and blends,
but this illustration by Andrea Kelley proves that artis-
tic observation is the real secret. Using observation and
some simple Illustrator techniques, Kelley drew techni-
cal product illustrations of computer chip boards for a
handbook for her client, Mitsubishi.
1 Recreating a mechanical object with repeating
geometric shapes by altering copies of objects. Most
artists find that close observation, not complex perspec-
tive, is the most crucial aspect to rendering illustrations.
To sharpen your skills in observing the forms and details
of objects, select a simple mechanical device to render in
grayscale. First, create a new Illustrator document. Then
experiment with the Ellipse, Rectangle, and Rounded
Rectangle tools to draw the basic elements of the device.
After you've made your first object—with the object still
selected—click on the Default Fill and Stroke icon in the
Tool palette, open the Stroke palette (Window > Stroke),
and choose a stroke weight of 0.75 pt using the Weight
pop-up menu. All objects you make from that point on
will have the same fill and stroke as your first object.
Because mechanical and computer devices often have
similar components, you can save time by copying an
Chapter 3 Drawing & Coloring78
object you've drawn and then modifying the shape of the
copy. You can easily align your copy with the original by
holding the Opt-Shift/Alt-Shift keys while dragging out
the copy from the selected object to the desired location.
To illustrate a series of switches, Kelley dragged a
selected switch (while holding Option-Shift/Alt-Shift to
copy and constrain its movement), stretched the switch
copy by selecting one end of the switch knob with the
Lasso and dragged it down (holding the Shift key to con-
strain it vertically). She repeated this process to create a
line of switches with the same switch plate width, but dif-
ferent switch knob lengths.
2 Using tints to fill the objects. At this point, all the
objects are filled with white and have a stroke of black.
Select a single object and set the Stroke to None and the
Fill to black using the Color palette (Window >Color).
Open the Swatches palette (Window > Swatches) and
Option/Alt-click on the New Swatch icon to name it
"Black Spot," and set the Color Type to Spot Color. Click
OK to save your new spot color. Then create a tint using
the Tint slider in the Color palette. Continue to fill indi-
vidual objects (be sure to set their Stroke to None) using
Black Spot as the fill color, and adjust the tints for indi-
vidual objects using the Tint slider until you are happy
with their shades. Kelley used percentages from 10-90%,
with most of the objects being 55-75% black.
3 Creating a few carefully placed highlights. Look
closely at the subject of your drawing and decide where
to place highlights. For lines that follow the contour
of your object, select part or all of your object's path
with the Direct Selection tool, copy (Edit > Copy) and
Paste in Front (Edit > Paste in Front) that path or path
section. Using the Color palette, change the Fill of your
path to None and use the tint slider to change the Stroke
to a light value of gray. While the highlight's path is still
selected, you can reduce or increase the width of your
stroke using the Weight field of the Stroke palette. If you
The drawn object prior to filling selected paths
with gray
Left, the selected path set to the default stroke
and fill colors; right, the selected object set to a
fill of Black and a stroke of None
Creating a new custom spot color that will then
appear in the Swatches palette; setting the se-
lected path to a fill of 73% Spot Black using the
Tint slider in the Color palette
Individual paths filled with tints of Black Spot in
a range from 10% to 90%
Chapter 3 Drawing & Coloring
79
Using Paste in Front on a selected, copied path
to duplicate it directly on top; changing the
Stroke and Fill of the duplicate path to create a
highlighted outline
Using the Stroke palette Weight field to increase
or decrease the width of the highlight path
Placing small circles with a Fill of 0% black
(white) and a darker inset curved path to
simulate depth; Option-Shift/Alt-Shift dragging
a selected path to duplicate the path and con-
strain its movement
Copying a dial and choosing Paste in Back; using
Arrow keys to offset the copy; setting the Fill
"T" tint to 87% black to create a shadow from
the copy
need to trim the length of a highlight, cut its path with
the Scissors tool and then select the unwanted segments
with the Direct Selection tool and delete them.
For some of the knobs and dials on her chip, Kelley
used circular highlights with a value of 0% black (white)
and an inset curved path with a darker value to simulate
depth. Once you are satisfied with the highlights on a
particular knob, select the paths (both the highlights and
the knob) and hold down the Option/Alt key while drag-
ging the objects in order to duplicate them (hold down
Option-Shift/Alt-Shift to copy and constrain the paths as
you drag them).
For her highlights, Kelley used lines that varied in
weight from .2 to .57 pt and colors that varied in tint from
10-50%. She also used carefully placed white circles for
some of the highlights. Try experimenting with differ-
ent Cap and Join styles in the Stroke palette; see "End
of Lines" section and figures in the introduction to this
chapter for more on Caps and Joins.
4 Creating shadows. Follow the same procedure as above,
but this time use darker tints on duplicated paths pasted
behind in order to create shadows. Select a path to make
into a shadow, copy it, and use Edit > Paste in Back to
place a copy of the path directly behind the original path.
Use your Arrow keys to offset the copy, and change the
Fill to a darker tint using the Color palette.
Consider using Effects to create shadows and high-
lights. See the Live Effects & Graphic Styles chapter for
information on building multi-stroke appearances and
saving them as styles that you can use on other artwork.
Symbols
Use Symbols instead of copies of artwork if you want
to export the illustration as a Shockwave Flash file
(Symbols result in a smaller file). See the Brushes
& Symbols chapter to learn more about creating
and modifying Symbols, and about the benefits of
using them.
Chapter 3 Drawing & Coloring
80
Mark Fox/BlackDog
Using techniques similar to those shown in the
next lesson, Mark Fox redesigned this eagle
decal for Bianchi USA—the American branch of
the Italian bicycle manufacturer—under the art
direction of Neal Zimmermann (Zimmermann
Crowe Design).
Chapter 3 Drawing & Coloring 81
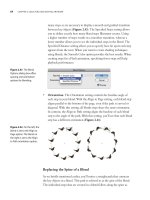
Cutting & Joining
Basic Path Construction with Pathfinders
Overview: Design an illustration
using overlapping objects; use the
Pathfinder palette to join and inter-
sect objects, join lines to circles, and
cut objects from other objects.
Fox's inked sketch drawn with a compass
NOTE: Fox created his image in reverse. As a last
step, he used the Reflect tool to flip the final
image (see the Zen chapter for help reflecting).
Using the Tools palette to set the Fill to None
before starting to draw
Drawing constrained circles from the center
with the Ellipse tool (while holding Option-Shift/
Alt-Shift) to trace over the placed template
To redesign the classic "9 Lives" cat symbol that has
appeared on Eveready batteries for over 50 years, Mark
Fox began with a hand-drawn sketch. Once his sketch
was approved, he inked the sketch with a Rapidograph
pen and a compass, and then reconstructed the ink image
in Illustrator using permanent (destructive) Pathfinder
commands. To permanently apply the top row of Path-
finders, you'll have to hold Option (Mac)/Alt (Win) when
you click these icons. The bottom row of Pathfinder icons
are always permanent. Especially when you work with
permanent Pathfinders, make sure you save incremental
versions of your image as you work.
1 Creating a sketch and placing it as a template. Fox
used a compass to create a precise drawing constructed
of fluid curves. Using his inked sketch as a template, Fox
then used the Ellipse tool to recreate his compass circles
in Illustrator. Create your own sketch using traditional
materials and then scan it, or sketch directly into a paint-
ing program (such as Painter or Photoshop). Save your
sketch as a TIFF or your preferred raster format, and
place it into a new Illustrator document as a template. To
do this, choose File > Place to locate the image you wish
to use as a template, then enable the Template option and
click Place (see the Layers chapter for more on templates).
2 Tracing your template using adjoining and overlap-
ping objects. In order to see what you're doing as you
work, use the Fill/Stroke section of the Tools palette to
Chapter 3 Drawing & Coloring
82
set your Fill to None and Stroke to black before you begin
drawing. Now use the Ellipse and Rectangle tools to
create the basic shapes that will make up your image. Fox
used some circles to form the shapes themselves (like the
rump of the cat), and others to define the areas that would
later be cut from others (like the arc of the underbelly). To
create perfect circles or squares hold the Shift key while
you draw with the Ellipse and Rectangle tools. By default,
ellipse and rectangles are drawn from a corner—in order
to draw these objects from a center point, hold down the
Option (Mac) or Alt (Win) key as you draw. To create a
circle from its center point, you'll need to hold down the
modifier keys Shift+Option (Mac), or Shift+Alt (Win)
as you draw—don't release the modifier keys until after
you release your mouse button. Because Fox measured
everything in millimeters in his inking stage, he created
his circles numerically. With the Ellipse tool, Fox Option-
clicked (Alt clicked for Win) on each center point marked
on his template, entered the correct diameter for Width
and Height, and clicked OK.
3 Constructing curves by combining parts of differ-
ent circles. Once your paths are drawn and in position,
use the Pathfinder palette (Window > Pathfinder) to
combine portions of different circles to create complex
curves. After drawing basic circles, use the Line Segment
tool to draw a line through the circles at the point where
you want to join them, and choose Object > Path >Divide
Objects Below. Then select the sub-sections of the divided
circles that you don't want and delete. To join separate
adjoining curves, select them, hold Option/Alt, and click
the Add to Shape Area Pathfinder icon.
4 Constructing objects using the Intersect Pathfinder
command. If the area you wish to keep is the portion
where objects overlap, use the Intersect command. Fox
used Intersect to create the eyes and the nose of the cat.
To make the eye shape, he drew a circle and then dragged
off a duplicate by holding Option/Alt as he moved it with
Draw a line to mark where objects will be joined
and apply Object >Path >Divide Objects Below
Select and delete unwanted portions of objects
that won't be part of the final curve
Once only the elements you wish to be joined
remain, select them, hold Option/Alt and click
on the Add to Shape Area Pathfinder icon
Constructing the eyes and nose using the Inter-
sect Shape Areas Pathfinder command
Chapter 3 Drawing & Coloring
83
Drawing one line from an anchor point on the
circle and another angled line slightly removed
Creating a perpendicular copy of the angled line
by double-clicking the Rotate tool, specifying a
90° Angle, and clicking copy
Moving the perpendicular copy to the circle's
center and then making it into a guide
Moving the angled line tangent to the circle
using the guide, then lengthening the line
Selecting the two end anchor points of the lines
and closing using Join to connect the lines
Using the Add to Shape Pathfinder command to
attach the circle to the angled shape, then the
completed ears to the cat-head ellipse
the Selection tool. He then positioned the two circles so
the overlap created the desired shape, selected both circles,
and held down Option/Alt while he clicked the Intersect
Shape Areas Pathfinder icon.
5 Attaching lines to circles. Fox connected angled lines
to a tiny circle to form the cat's ear. To smoothly attach
lines to circles, the lines need to lie "tangent" to the circle
(touching the circle at only one anchor point). To work
with precision, turn on Smart Guides (View menu).
Start with the Ellipse tool and draw a small circle. To
create the first tangent line, choose the Line Segment tool,
and place the cursor over the left side anchor-point of the
circle. When you see the word "anchor point" click-drag
downward from that anchor point to draw a vertical line
(hold the Shift key to constrain your line to vertical).
Creating a tangent line that doesn't begin at an anchor
point is trickier. Start by drawing another line slightly
apart from the circle, but at the angle you desire (holding
the Shift key constrains your line to horizontals, verti-
cals, and 45° angles). To help you find the tangent point
for this line, you need to create a line perpendicular to it.
With your angled line selected, double-click the Rotate
tool, enter 90°, and click Copy. Use the Direct selection
tool to grab this perpendicular copy of your line near
the middle and drag it toward the center of your circle;
release the mouse when you see the word "center." With
this line still selected, make it into a guide with View >
Guides > Make Guides. Now select your angled line (mar-
quee it with the Direct selection tool, or click it with the
Selection or Group selection tool). Finally, with the Direct
selection tool, grab the top anchor point and drag it to
where the perpendicular guide meets the circle; release
the mouse when you see the word "intersect."
To adjust the length of either line, switch to the
Selection tool, select the line, and drag the bounding box
from the middle end handle at the open anchor point.
The Add to Shape Pathfinder ignores lines, so to
attach the lines to the circle, first connect the lines
Chapter 3 Drawing & Coloring84
together to form a two-dimensional shape. Using the
Direct Selection tool, marquee the two open anchor
points and choose Object > Path > Join ( -J/Ctrl-J) to
connect the points with a line.
Finally, to unite your angled shape with the circle,
select them both, hold Option/Alt, and click the Add to
Shape Area Pathfinder icon. Fox also used Add to Shape
Area to join the ears to the head (he rotated the first ear
into position, and used the Reflect tool to create a copy for
the other ear—see the Zen of Illustrator chapter for help
with rotation and reflection).
6 Cutting portions of paths with another object. To
create the rear flank of the cat, Fox used a large object to
cut away an area (subtract) from another circle. Use the
Selection tool to select the path you'll use as the cutter
and bring it to the top of the stacking order (in the exact
position) either by choosing Object > Arrange > Bring to
Front, or Edit > Cut and then Edit > Paste in Front ( -F/
Ctrl-F). Marquee or Shift-select to select the cutter object
as well as the objects you want to cut. To apply the cut,
hold Option/Alt and click the Subtract from Shape Area
Pathfinder icon. If you want a different result—Undo,
make adjustments and reapply the Pathfinder.
Joining open paths & closing paths smoothly
Pathfinder >Add to Shape will close open paths, join-
ing them with a straight line. Use the following meth-
od to manually join two open paths or to close a path
smoothly. Since you can only join two points at a time,
start by deleting any stray points (Select >Object >
Stray Points). Before you can join points with a smooth
curve, you need to ensure the points are exactly on top
of each other. Use the Direct Selection tool or Lasso
to select one pair of end anchor points and choose
Object > Path > Average (Both) and click OK, then
Object >Path >Join and click OK. To Average/Join in
one step, press -Shift-Option-J (Mac)/Ctrl-Shift-Alt-J
(Win)—there isn't a menu command for this.
Better to see Pathfinders
If your objects
are styled with
a stroke and no fill, you can swap
the Fill and Stroke styling to bet-
ter see the effects of a Pathfinder
command. To do this, with objects
selected, click on the Swap Fill
and Stroke arrows in the bottom
section of the Tools palette. Click
again to swap it back.
Using the Subtract from Shape Area to cut one
object from others
Manually cut with Scissors
Although it's not as precise as
using a line and "Divide
Objects Below," you can
use the Scissors tool to cut any
path, including open paths. Turn
on Smart Guides (View menu) and
click with the Scissors tool when
the word "Path" appears to place
two coinciding points on the path.
To separate the points, first dese-
lect the path entirely. Then, with
the Direct Selection tool, click on
top of the new points to select
only the top point. Then you can
move or delete the selected point.
Chapter 3 Drawing & Coloring
85
Add & Expand
More Pathfinder Palette Basics
Overview: Create and position
overlapping objects; use the Path-
finder palette to unite the paths into
an editable Compound Shape, then
consolidate the paths with Expand.
Assembling the basic elements for creating the
beaver lodge
Positioning the stick paths to overlap the lodge
path—the final assemblage
Applying Add in the Pathfinder palette to the
selected paths to create a Compound Shape
Note: The Compound Shape will take on the
Fill and Stroke attributes of the topmost object.
The design team of Diane and John Kanzler used the
Pathfinder palette to create a logo and vehicle signage for
the Urban Wildlife Program of the Fund for Animals.
When the illustration was completed and approved by the
client, the Kanzlers used the Expand feature of the Path-
finder palette as the final step to prepare the file for send-
ing to the sign company.
1 Creating and positioning overlapping objects. The
Kanzlers wanted their logo's final lodge to look like it was
made of sticks, like a real beaver lodge. To achieve this
effect, begin by using the Pen tool to draw a basic lodge
form. Set the lodge path's Fill to Black and the Stroke to
None, then adjust the Black to a gray value using the К
slider in the Color palette. (For more on using the Color
palette, see the "Simple Realism" lesson earlier in this
chapter.) Draw a series of jagged logs and branches with
a Fill of Black and a Stroke of None; this will make place-
ment of the individual branch and log paths easier to view
over the gray lodge shape. Next, use the Selection tool
to position the log and branch paths so they overlap the
lodge path. When you are satisfied with the placement of
the logs and branches, choose Select > All to select all the
paths you want to be united.
2 Using the Pathfinder palette to Add. Open the Path-
finder palette (Window > Pathfinder) and click on the
Chapter 3 Drawing & Coloring
86
Add button in the top row of palette choices. The result
is a fully editable Compound Shape that unites all of the
selected paths. You should note that the paths within the
Compound Shape will take on the Fill and Stroke attri-
butes of the topmost path. To reposition any path within
the Compound Shape, select and move it with the Group
Selection tool, or use the Direct Selection tool to click
within a filled path to select and reposition it. You can
use the Direct Selection tool to edit the shape of any path
within the Compound Shape.
3 Using Expand to convert Compound Shapes into a
single path. The Kanzlers maintained the beaver lodge
as a "live" editable Compound Shape during the client
approval process, which made modifications easier.
When their final sign was approved, the Kan-
zlers needed to prepare the file to send to the signage
contractor. The design was to be output directly to the
contractor's vinyl-cutting equipment using an older ver-
sion of Illustrator on the Windows platform. In order to
minimize the possibility of problems in printing their
image with an earlier version of Illustrator, and to reduce
the potential for their illustration to be inadvertently
modified, they chose to apply the Expand command to
permanently unite the separate beaver lodge shapes into
one continuous path. Once you apply Expand to Com-
pound Shape artwork, the separate paths will be united
and you will no longer be able to move the individual
stick shapes independently. Therefore, if you think you
may need to edit the silhouette sometime in the future,
be sure to save a copy of your artwork before you apply
Expand.
To Expand your live Compound Shapes (in a copy of
your file), use the Selection tool to select your Compound
Shape. Then, in the Pathfinder palette, click the Expand
button to permanently apply your Pathfinder—in this
case, to unite your paths. You can also access Expand by
choosing "Expand Compound Shape" from the Path-
finder palette's pop-up menu.
The beaver lodge as a Compound Shape
Using the Group Selection tool to move
individual paths within the Compound Shape
Expanding the Compound Shape to consolidate
all of the individual paths into a single path
(Top) The final, expanded path; (bottom) the
final logo and signage
Chapter 3 Drawing & Coloring 87
Divide & Color
Applying Pathfinder Divide & Subtract
Overview: Design an illustration
using overlapping elements; cre-
ate individual paths using Divide,
and delete unnecessary paths; using
Subtract to cut "holes" and create
Compound Paths; Divide again and
assign colors to divided objects.
Creating the basic elements using the Rectangle
and Ellipse tools
(Top) Selecting all paths and clicking on Divide
in the Pathfinder palette; (bottom) selecting and
deleting unnecessary paths
Illustrator's Pathfinder palette provides many ways to
combine objects. To create this disco clock for a World-
studio Foundation's "Make Time" benefit, John Pirman
used the Divide and Subtract Pathfinder options to
permanently alter his objects. This allowed him to adjust
colors within each of the divided areas in his illustration.
1 Creating and positioning paths; dividing overlap-
ping paths. Pirman created a circle and a number of
rectangles to serve as the background (and later as the
objects to Divide his figure shapes) for his clock face
design. In a new Illustrator document, draw a filled circle
with no Stroke using the Ellipse tool (hold the Shift key
to constrain the ellipse to a circle). Then use the Rect-
angle tool to draw a few rectangles filled with different
gray values, and Stroke of None. Use a selection tool to
move the rectangles around until you are satisfied with
an arrangement of rectangles in relationship to the circle.
Next, choose Select > All, then open the Pathfinder palette
(Window > Pathfinder) and click the Divide button (in
the palette's bottom row). All overlapping paths will split
into separate, editable objects. To delete the extra paths
outside of this "divided circle" shape, first choose Select >
Deselect, then select them, and press Delete.
2 Using Subtract to create "holes" and Divide again.
Next, Pirman drew a series of silhouetted human figures
Chapter 3 Drawing & Coloring
88
with the Pen and Pencil tools and arranged them in
relation to the background. For figures that included
enclosed "negative space" (such as an arm partially touch-
ing another part of the body) he used Pathfinder Sub-
tract to cut the areas as "holes," so objects behind would
show through. To cut enclosed areas into permanent
holes, first make sure that your enclosed paths are on
top of the rest of the figure. Next, set solid fills for all the
objects, with no strokes. Then select your figure and the
enclosed spaces and hold Option (Mac)/Alt (Win) while
you click on Subtract in the Pathfinder palette (holding
Option (Mac)/Alt (Win) while applying a Pathfinder in
the upper row of the palette makes that Pathfinder action
permanent). Your figure with holes has now become a
Compound Path. Use the Selection tool to reposition the
complete figure, the Group Selection tool to reposition
the holes, or the Direct Selection tool to edit the paths.
Pirman created a palette of blues, greens, and white to
apply to his figures. He then positioned each figure over
his "divided circle" background and used his background
objects to divide the figures. To do this, choose differ-
ent color fills for your figures and arrange them in front
of your divided background (the stacking order doesn't
matter). Next, select all your paths (Select > All) and click
Divide in the Pathfinder palette. As before, all of the over-
lapping paths will now be split into individual paths. Use
the Group Selection tool to select and delete paths outside
of your background shape, and then to select individual
sections of the figures in order to change the fill color.
Pirman used colors of similar value to visually integrate
the divided figures.
With his figures divided, Pirman then used his pal-
ette colors to recolor the various divided sections of the
figures and continued to make adjustments to the back-
ground. To do this, color all of the paths that make up
the fully divided illustration using your color palette.
Using the Group Selection tool, click on the individual
paths within the circle shape (hold Shift to select multiple
paths) and style with any Fill color you like.
Drawing a figure that includes enclosed objects
defining "negative space" (top left), selecting all
the objects that create the figure and applying
Pathfinder >Subtract while holding Option/Alt
(top right), the figure now as a Compound Path
Filled figures; positioning the colored figure
paths over the divided circle background
The process of styling individual objects with
different colors.
Chapter 3 Drawing & Coloring