Real World Camera Raw with Adobe Photoshop CS- P7 potx
Bạn đang xem bản rút gọn của tài liệu. Xem và tải ngay bản đầy đủ của tài liệu tại đây (2.9 MB, 30 trang )
162
Real
World
Camera
Raw
w
i
th
Adobe
Photoshop
CS
Figure
5
-
18
Saving
metadata
templatea
Alternatively, you
can
select multiple images and then edit the metadata
directlyinthe Metadatapalette. Clickinthefirst field youwant to edit, and
type in your
entry. Then press Tab to advance to the next field. Continue
until
you've entered
all
the metadata shared
by
the selected images, and
then click the checkmark icon at the lower
-
right of the palette, or press
Enter or
Return,
to confirm the entries
-
see Figure
5
-
19.
Figure
5
-
19
Entering metadata
Keywords.
Keywords show up in the IPTC section of the Metadata palette,
but you can't enter or edit them
theeyou have to use the Keywords pal
-
ette. The Keywords palette contains individual keywords grouped into sets
(represented
by
the folder icons). The default keywords and sets
are
pretty
useless unless you know a lot of people
called Julius and Michael, but you
can easily replace them
with
ones that
are
more useful for your purposes.
To apply a keyword, select one or more images and then click in the
column to the left of the keyword.
A
check mark appears in the column,
and the File Browser writes the keyword to each file's
mnp sidecar file. To
remove a keyword, select the images and then uncheck the checkmark.
3
Chapter
5:
It's
All
About
the
Worknow
163
Deleting a keyword fmm the Keywords palette doesn't delete the key
-
word from any images to which it has been applied, it only deletes it from
the palette. So
I
find that it makes sense to keep only keywords
I
know
I'll
use a lot stored
in
the palette. For keywords that apply only to the current
session,
I
create them
in
a set calledTemp and delete themwhen I'm done,
to keep the palette manageable.
Keyword
setslet you organize keywords, but they also offer avery useful
functionality
-
they let you apply all the keywords
in
the set to selected
images
by
clicking next to the set name rather than the keyword names.
This is
the
only way to apply multiple keywords to a set simultaneously.
When you click next to a keyword to apply it, the Fie Browser insists on
writing the keyword to all the selected images before it
will
let you apply
the next one. Hence the following tip.
Tip:
Sets
Are
Not
Set
in Stone.
I
keep
an
empty set calledTemp (though
it could
as
easily be called Fred or whatever other name tickles your fancy)
purely
for the purpose of applying multiple keywords. When
I
want to apply
multiple keywords to a set of images,
I
drag any existing keywords
I
want
to use
into
theTemp set and create any new ones
I
want to apply inside the
Temp set.
Then
I
click beside the Temp set icon to apply all the keywords it
currently contains to
all
the selected images
-
-
see Figure
5
-
20.
You can drag
keywords
into a set and
add
any
one-off
keywords
to the set,
and
then click beside
the
set
name
to
apply all the
keywords
simultaneously
to
all selected
images.
164
Real World Camera Raw with
Adobe
Photoshop
CS
AU
the work you do
in
the File Browser is aimed at setting things up to
produce converted versions of your chosen raw images, with the correct
Camera Raw settings to get the tone and color you want, and including all
the metadata you've entered.
Solet's lookat this last stage of the workflow,
actually converting your raw images.
Processing Images
When it comes to efficiency in converting raw images, actions are the
key.
I
almost always convert raw images in batches using actions rather
than simply opening them in Photoshop. But before
I
look at the various
automated options,
I'll list the methods for opening raw images manually
from the Fie Browser.
b
Press Return (Mac) or Enter (Windows), double
-
click, or press Com
-
mand
-
0, to open the selected image or images in the Camera Raw
dialog box.
If
you select multiple images, the first one will open in
Camera Raw. Then when you click OK to convert the image or Update
to write the settings to the image's metadata, the second image
will
appear in Camera Raw, and so on.
b
Press Shift
-
Return (Mac) or Shif
-
Enter (Windows), Shift
-
double
-
click
the last selected image of a contiguous selection, or hold down the
Shift key while choosing Open from the File Browser's File menu, to
open the selected image or images in Photoshop while bypassing the
Camera Raw dialog box. The images are converted using the current
Camera Raw settings in each image's metadata or, if no settings have
been specified, using the Camera Default settings for the camera model
on which the images were shot. (Command
-
Shift
-
0 doesn't work, it just
brings the Fie Browser to the foreground; and Shift
-
double
-
clicking
with a discontiguous selection
will
turn the selection into a contiguous
one and then open all the newly
-
selected images as well as the ones
you wanted.)
b
Press Option
-
Return (Mac) or Option
-
Enter (Windows), Option-
double
-
click, or hold down Option whiie choosing Open from the
File Browser's File menu to open the selected image or images in the
Camera Raw dialog box while closing the File Browser.
Chapter
5:
It's
All
About
the
Workflow
165
b
Press Shift
-
Option
-
Retum (Mac) or Shift
-
Option
-
Enter (Wmdows),
Shift
-
Option
-
double
-
click the last selected image of a contiguous se
-
lection, or hold down
Shift
and Option while choosing Open from the
File Browser's File menu to open the selected image or images directly
in Photoshop, bypassing the Camera Flaw dialog box and closing the
File Browser.
Automated conversions
These shortcuts are handy when you're dealing with a handful or so of
images, but for industrial
-
strength operations, the options on the Fie
Browser's Automate menu are
muchmore useful.
I'll
discuss these in much
greater detail
in
Chapter
7,
Exploiting Automation, but for now
I'll
give
you the 30,000
-
foot overview.
Batch.
This
is
the Big Daddy of all the automationfeatures, and is capable
of doing just about anything that Photoshop
can
be made to do. The ba
-
sic idea, though, is that it
will
take selected images in the Fie Browser as
its source and open them in Photoshop using the Camera Flaw settings
for each image. Then it runs an action on the images
in
Photoshop, and
either leaves them open in Photoshop, saves them in a destination folder
(and optionally, renames them
in
the process), or, a potential big hurt
-
me
bunon, saves and closes the files in place.
Most raw
files
are
read
-
only in that Photoshop can't write the raw for
-
mats, but some cameras create their raw files as
TIFE
If you have one of
these cameras, avoid Save and Close like the plague, because it
will
over
-
write your raw originals with the processed versions!
PDF Presentation.
This option lets you create a slideshow in PDF format
or a multi
-
page PDF
with
one image per page. For the slide show, you can
specifyhow long each image stays on screen and choose a mition, but
you
can't
add captions or copyright notices. It's
quick
and easy, but limited.
Contact Sheet
11.
This option lets you build a contact sheet.You can
specify a page sue, select how many images appear per page, choose
whether to preserve rotation or orient
all
images the same way for best
fit, and choose whether or not to include file names as captions,
with
the
choice of font and size.
166
Real World Camera Raw
with
Adobe Photoshop
CS
Picture Package. This option lets you produce a package of each im
-
age, with multiple copies and sizes of the image on the same page
-
-
for
example, on an
8x10
page, you could specify one 5x7, two 25x35, and
four
2x25 inch versions.
You can customize the layout and add captions
-
automated options
are any one of file name, copyright notice, description, credit, or title, all
picked up from the IFTC metadata, or a custom text string. This is a sur
-
prisingly deep little feature.
Web Photo Gallery. This option is like a contact sheet for the Web, but
since it's a digital contact sheet, it offers the option of including feedback
links. Like Picture Package, this feature has surprising depths, which
I'll
look at in detail in Chapter 7, ExploitingAutomation.
All the work you do in the File Browser forms the foundation for future
automation. Images are convertedusingthe right Camera Raw settings at
the correct orientation, and the convertedimages contain
all
the metadata
you attached to the original raws. Since this work is so important, you
should understand how it gets saved and stored, and that means knowing
a little about the File Browser's cache.
The File Browser Cache
Metadata
-
keywords, IFTC info, Camera Raw settings, and almost every
-
thing else that appears on the metadata paletteis stored in the sidecar
.xmp files that accompany your raw images. But previews, thumbnails,
flag or rank information, rotation, and sort order are saved in the File
Browser cache.
The File Browser does a great job of keeping track of everything you do
insidethe Fie Browser, but it has absolutely no knowledge of anything you
do
outsidethe File Browser. If you rename a folder outside the File Browser,
you'll lose
all
the flag, rank, rotate, and sort order information, as well as
the thumbnails and previews that take time to build. Likewise,
if
you move
a folder (which you can only do outside the Fie Browser), you'll lose the
same information. Fortunately, there's a mechanism that lets you set up
folders for work outside the File Browser and that lets you preserve the vital
information through renaming or moving; but to understand how it works,
you need to know a bit about the File Browser's caching mechanism.
r
Chapter
5:
It's All About the
Workflow
167
Understanding the Cache
You won't 6nd a file with a name that remotely resembles
"
Fie Browser
Cache" anywhere on your machine. Instead, the File Browser has its own
folderwhere it stores cache files. On Mac OS, it's the
Userslyoumemamel
LibrarylApplication SupportlAdobelFie BrowserlPhotoshop CS folder.
On Windows, it's the \Documents and
Settings\user\Application
Data\
Adobe\FileBrowser\PhotoshopCS
folder. It's rare that you'll have to in
-
teract
with
the contents of this folder directly, but knowing what they are,
where they are, and what they contain
will
aid your understanding of a
process that sometimes seems mysterious, and
will
simplify troubleshoot
-
ing on those rare occasions when things go wrong.
The
like
cache.
Ifyou examine the contents of the File Browser's cache folder,
you'll find it contains three files for each folder the Fie Bmwser
has
seen.
b
FoldernameXXX (where
XXX
is a three
-
digit number)
is
the cache for
the camera
-
generated thumbnails
b
FoldernameXXXM (where
XXXis
the same three
-
digit number
as
the pre
-
vious file)
is
the cache for the metadata It stores the flagging and rank
-
ing information along with a copy of the camera
-
generated metadata.
Images that have had metadata added,
including Camera Raw settings,
have
all
the image metadata stored in sidecar mp files that take pre
-
cedence over the metadata in the File Browser cache, but the sort order,
flagging, and
ranking metadata exists only
in
the File Bmwser cache.
t
FoldernameXXXT (where
XXX
is the same three
-
digit number
as
the
previous file) is the cache for the high
-
quality thumbnails and pre
-
views. It's usually bigger, sometimes much bigger,
than
the other two
files
-
see Figure
5
-
21.
Figure
5
-
21
We
Browser
cache
6les
The
FileBrowser mates three cachefilesfor eachfolder
it
has
read
168
Real
World
Camera
Raw
with
Adobe
Photoshop
CS
These cache files are "live"
-
they're updated continuously to reflect
everything you do in the File Browser. But they have no knowledge of
anything you do outside the File Browser
such
as
renaming or moving
folders. If you move a folder to a different location, or rename it, the Fie
Browser
thinks
it's a new folder. Hence it starts rebuilding all the previews
and thumbnails, and it loses any flagging or custom sort ordering you've
applied. Fortunately, there's a way to prevent this from happening.
The local cache.
The File Browser's Export Cache command writes a
copy of the live cache files to the folder in which you're
working. The
Ex
-
port Cache feature was designed to let you include the cache in a folder
so that when you bum it to a CD or copy it to a different drive or machine,
the cache information is already there, so the Fie Browser doesn't have to
spend the time reading metadata and generating previews.
When you export the cache, three files are created in the folder on
which you're
working. AdobeP8M.mdO holds the metadata information,
AdobeP8T.tbO contains the small thumbnails, andAdobeP8PtbO contains
the high
-
quality previews. Whenever you choose Export Cache, all three
files
are
updated to reflect the current state of the Fie Browser.
So,
they not
only serve
as
an aid in speeding up the handling of folders transferred to
a different location or burned to a CD or
DVD,
they also provide a useful
fallback position if things do, in fact, go wrong
-
see Figure
5
-
22.
The
exported
cachefiles
I
think of Export Cache as a
'Save
As
"
command for the current state
of the Fie Browser, because
wide the live cache is constantly updated,
the exported cache files are static
-
they get updated only when you
choose Export Cache again or manually delete them outside the File
Browser. Export Cache is useful for the purpose
forwhich it
was
designed,
but I've adopted the habit of exporting the cache whenever
I
do any
significant work on a folder of raw images
-
it takes only a fraction of a
second.
7
Chapter
I:
It%
All
About the Workflow
169
The local cache differs from the main cache in one other very important
way. It moves
with
the folder and applies to the folder in which the Nes
are located.
So
if
you plan on moving or renaming a folder, use Export
Cache first
-
that
way,
when the folder
is
renamed, the Fie Browser can
use the local cache files to read the thumbnails, previews, and metadata.
If this makes your head hurt, a good rule of thumb is, when in doubt,
export the cache!
Tip:
Recover Lost Camera Raw
Settings.
The File Browser cache con
-
tains image metadata, including Camera Raw settings. But Camera Raw
can't read the Fie Browser cache, only its database and sidecar
amp Nes.
If
you've lost the settings for an image, check the Camera Raw section of
the
Metadata palette
-
the settings
will
almost certainly be listed there,
and you can quickly copy them to the Apply Camera Raw Settings dialog
box
-
-
at least it's quicker
than
starting over from scratch.
Working with the Cache
Four commands on the File Browser's Fie menu let you work with the
cache in
*rent ways.
b
Build
Cache
for
Subfolders. Choosing Build Cache for Subfolders lets
you speed up the initial caching of multiple folders of raw images. Copy
the folders
full
of raws to an enclosing folder, point the Fie Browser
at that enclosing folder, and choose Build Cache for Subfolders. The
File Browser then goes to work building a cache for each subfolder.
(Don't even
try
to understand the description of this feature supplied in
Photoshop's online
helpit's quite inaccurateJYou can also
run
Build
Cache for Subfolders on a single folder, which forces the File Browser
to build the cache modally. It's very slightly faster than just pointing
it at a folder and letting it do it's thing, and it keeps you out of trouble
because you can't do anything
until
it's finished building the cache.
b
Purge Cache. Choosing Purge Cache purges the live cache fore nt
folder. It has no effect on local cache
Nes createdwith the Export Cache
command.
Ifyou purge the cache and nothing seems to happen, it's likely
that you've previously exported the cache to the local folder.
As
soon as
the
live
cache
is
purged, the Fie Browser uses the local cache rather
than
rereading all the raw and rebuilding the thumbnails and previews.
170
Real World Camera Raw with Adobe Photoshop
CS
b
Purge
Entire
Cache. Choosing Purge Entire Cache purges
all
the live
cache files
-
the entire contents of the File Browser's cache folder
-
so
use it with extreme caution
if
at all. However, lie Purge Cache, it has no
effect on local cache files created with the Export Cache command.
b
Export
Cache. Choosing Export Cache writes a copy of the live cache
to the folder in which you're working. Unlike the live cache, the export
-
ed local cache doesn't
try
to find the folder by path nameit simply
applies to the folder that encloses it. If you plan to move or rename a
folder, always export the cache first
-
that way, all the cached informa
-
tion remains intact. You should also export the cache for folders that
are destined to be burned to CD or
DVD-that way, the recipient won't
have to wait whiie her copy of Photoshop reads
all
the images, because
the cache is already there, in the folder on the CD. In fact,
I
always
export the cache after doing any significant work in the File Browser,
just so that
I
know
I
have a fallback position
if
things go wrong.
Make
the
Work
Flow
The File Browser is a deep, complex, and very powerful tool, but unless
you take the time to master it, you'll almost certainly wind up spending
more time on your work
than
you really need to. The Fie Browser lets you
do a lot of things once, and once only, so that you don't need to keep do
-
ing them over and over again, whether it's applying Camera Raw settings,
entering copyright notices, or rotating images. The time you spend in the
File Browser will be amply repaid further down the line.
You
can
make the work
flow
even faster with a Little planning. The File
Browser lets you
cany out operations in any order you choose; but the most
efficient way is to proceed from the general to the specific,
startingwith op
-
erations that every image needs (suchas acopyright notice) and continuing
with operations required by progressively smaller numbers of images.
Some tasks, such as entering descriptions or captions, must be done
image by image, and you'll almost certainly want to fine
-
tune the Camera
Raw settings for your hero images on an individual basis. But you probably
don't need to hand
-
tune every single image that you shoot. Instead, use
the File Browser to whittle down the large collection of raws to the images
that
will
make you money, and save the hand work for those.
Metadata, which literally means "data about data," isn't a new idea by any
means. Library catalogs
are
good examples of long
-
established metadata
systems-the
data
is
what lies between the covers of the book, while the
metadata includes information
aboutthe book
-
who wrote it, who pub
-
lished it, when both parties did so, what it's about, and where
in
the library
it's located, for starters.
Metadata isn't new to photography either. Photojournalists have long
relied on the metadata properties specified by the
IPTC (International
Press Telecommunications Council) to
make sure that their images get
delivered correctly
with
the appropriate photo credit. But two factors
are bringing metadata to the front burner for
all
photographers, not just
photojournalists.
b
Digital
cam-
embed a
wealth
of
useful
metadata right
in
the raw
Me.
b
Adobe is
in
the process of usingits considerable clout to promoteXMP
(Extensible Metadata Platform) as a documented, open, extensible
standard for creating, storing and sharing metadata.
Digital captures are already rich
in
metadata straight out of the cam
-
era, but one of the problems that has plagued early adopters has been
a
plethora of proprietary and often incompatible methods of writing and
storing
metadata This is an ongoing battle.
171
172
Real
World
Camera Raw
with
Adobe Photoshop
CS
The
EXIF (Exchangeable Image Fie Format)
"
standard,
"
for example,
is sufficiently vague that the exchangeability pretty much applies exclu
-
sively to JPEGs. Camera vendors are allowed a great deal of freedom (
"
too
much freedom
"
is a phrase
I
rarely use, but it applies here) to use private
proprietary fields in
WF to encode important information.
For example, it seems to bring no conceivable benefit to Canon shooters
if the image White Balance settings are recorded by the camera in such a
way that only Canon
software can read them directly, but that's how the
current Canon cameras work. This is not to single out Canon
-
there's
more than enough blame to go around, and almost every vendor who
produces cameras that shoot raw does something similar with one or
another piece of metadata.
The intent here isn't to beat up on the camera vendors (well, not much),
but rather to demonstrate just
howbadly
we
need a standard framework for
handling metadata. That's why XMP
is
so important to the future not only
of photography, but of all the enterprises that consume photography.
What
Is
XMP,
and Why Should
I
Care?
XMP
an Adobe initiative to promote a standard for metadata, but it's not
a proprietary initiative. Instead, it's an open standard, it's documented,
it's extensible, and it's even somewhat readable by humans. It is, in fact,
a subset of
XML (Extensible Markup Language), which is turn a subset of
SGML (Standard Generalized Markup Language), the international stan
-
dard metalanguage for text markup systems recorded in IS0 8879.
If
you want to delve deeply into
XMP,
I suggest you start by looking
at the available documentation. You can find several useful documents,
including one on building custom File Info panels, at
www.adobe.com:80/
productslxmplmain.html. I'm not going to teach you how to write XML
code in this chapter (it's a bit more difficult than writing actions, but a
good bit easier than writing
JavaScripts), but I
will
show you what XMP
metadata looks like and show you some of the ways in which you can
work with it.
Chapter
6:
Understanding Metadata
173
Crowing
Pains
Because XMP is relatively new, you'll almost certainly encounter some
growing pains if you
try
to work with a mixture of applications, some that
support
XMP, and others that
as
yet do not. There are two things you can
do to lessen,
if
not eliminate, the pain.
b
Ask
the vendors of those applications that don't yet support XMP to
do so.
b
Learn how Photoshop and other Adobe and non
-
Adobe applications
use XMP to record metadata, and find out just which files contain
which pieces of information.
The first is up to you. The second is the core topic of this chapter. The
metadata that you enter in the File Browser for your raw files
will
persist
through
all
the converted images that you create from the raw files, unless
you take deliberate steps to remove it. This is mostly a huge advantage to
photographers
-
-
you can enter the information once, for the raw file, and
know that it
will
be present
in
all
the variants that you create from that raw
file, not as a sidecar file (those are only necessarywith read
-
only raws) but
embedded directly in the
.tif, .psd, .jpg or .eps image.
You know that your copyright notice will be embedded in the image,
and, even better, you know that
if
you deliver the image on read
-
only
media like CD
-
ROM or DVD
-
ROM, you can prove
willful
violation of the
Digital Millennium Copyright Act of
1998
should someone else remove
it. With a little work, you can even put a hidden copy of your copyright
and rights notices that
will
resist
all
but the most skilled and determined
offenders.
However, you may not always want to provide your clients with
all
that
metadata. Some benighted souls still have attitude when it comes to digital
capture: it's highly doubtful that they'd be able to identify the source of the
image from the pixels, but they can do so straightaway from the metadata.
Or maybe you just don't want anyone to know that you shot that image
in Program mode
Metadata may seem mysterious at first, but with only minimal effort,
you can gain a great deal more control over it. And if you're willing to do
some serious heavy lifting, you can accomplish magic!
174
Real World Camera Raw with Adobe Photoshop
CS
XMP
Is
Text
The first important thing to learn is that .xmp files are simply text files,
readable by any text editor or word processor, that conform to a specific
syntax and are saved with a
.xmp extension. So it's easy to read and, if
necessary, edit XMP metadata.
The second important thing to learn is how the user interface in Camera
Raw and the
File Browser relates to the .xmp files that get stored in various
locations on your computer. When you apply keywords or copyright no
-
tices, where does that data actually get stored? The answers may surprise
you, but if you're at
all
curious, it's highly instructive to take a peek at side
-
car .xmp files, saved Camera Raw Settings and Settings Subsets, Metadata
Templates, and even File Browser cache files with a text editor.
For the truly motivated, the third lesson involves the things you can do
by customizing
.xmp files. For example, when you save a custom Metadata
Template, you may be surprised to see all the
junk
that by default gets
saved in it Judicious pruningwith a text editor can make these important
files more reliable. If you're really
gung-ho, you can actually use XMP to
make your own custom
Fie Info panels. Very few photographers have a
use for
all
the fields in the IPTC metadata, for example. With a custom File
Info panel, you can hijack the useless ones and
turn them into something
more useful.
XMP
Uncovered
Thus far, the discussion has been a little on the abstract side. So let's bring
things down to earth and actually look at some
XMP
metadata. We'll start
with a sidecar
.xmp file.
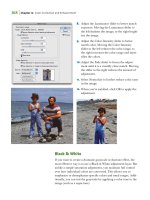
Figure
6
-
1
shows an image, and Figure
6-2
shows what its accompany
-
ing sidecar .xmp file looks like when it's opened in a text editor.
At first glance, the metadata file may seem overwhelming, but once
you break it down into its various components, things start to make a bit
more sense. So
I'll
spend the next several pages walking you through the
different chunks of text in the sidecar file and showing you the correspond
-
ing elements in Photoshop's user interface. Once you see the relationship
between the two, things
will
start to make more sense.
Chapter
6:
Understanding Metadata
175
Figure6-2
<x:xmpmeta
xmlns:x='adobe:ns:meta/'
x:xmptk='XMP toolkit
3.0-28,
The
sidecar
Jrmp
file
framework
1.6'
>
<rdf:RDF
xmlns:rdf='
176
Real
World
Camera
Raw
with
Adobe
Photoshop
CS
Figure
6
-
2
<rdf:Description rdf :about="
~h~~id~~~fil~,
xmlns:exif='
<exif:ExposureTime>l/6O</exif:ExposureTime>
eontinu''
<exif :ShutterSpeedValue>5906891~100OOOO</exif :Shutterspeedvalue>
Chapter
6:
Understanding
Metadata
177
Figure
6
-
2
The
sidecar
amp
file,
mntinued
<rdf:Alt>
<rdf:li
xml:lanq='x-default'>Irnaqes
to Bruce Fraser for RW
Raw</rdf:li>
</rdf:Alt>
</dc:title>
<dc:description>
<rdf :Alt>
<rdf:li
unl:lang='x-default'>Irnage
Submit to Bruce Fraser for
RW Raw</rdf:li>
</rdf:Alt>
</dc:description>
<dc:rights>
trdf :Alt>
<rdf:li
xml:lang='x-default'>+ack
Reznicki
2004
All Rights
Reserved</rdf:li>
</rdf:Alt>
</dc:rights>
<dc:subject>
<rdf: Bag>
<rdf:li>Peaple</rdf:li>
<rdf:li>New York</rdf:li>
</rdf:Bag>
</dc:subject>
</rdf:Description>
178
Real
World
Camera
Raw
with
Adobe
Photoshop
CS
Sidecar
.xmp
Decoded
The first few lines say that this is a .xmp metadata document, identified by
means of a
wmespace.You can thinkof anamespace as the secret decoder
ring for a particular
XMP
schema,
which is the collection of properties the
document deals with. The use of namespaces avoids conflicts between
properties in different
schemas that have the same name but different
meanings. For example, the
"Creator" property in one schema might be
the human who created
a
resource, while
I
another it might refer to the
application used to create the resource.
Schema names look like
URLs, but
if
you point a Web browser at the
ones
in
Adobe .xmps you won't get
far.
They're actually URIs Uniform
Resource Indicators-that may or may not have
an
actual Web page at
-
tached to them (the Adobe ones currently do not).
The second chunk of text is
a
little more interesting. It contains the
Camera
Raw
settings that have been applied to the He, in
a
form that is
readable to humans, albeit with some squinting! See
Figure
6
-
3.
The
bared
lines
cornspond
To
the
Adjust tab
sem'ngs.
The remaining sem'ngs
are
all
null, but it
should
be
reasonably
obvious
that
they
pertain
to
theDetail
Lens,
and
Calibmte
tabs,
respectively
Figure
6-3
<rdf: Description rdf :about='
'
xmlns:crs='
<crs:~ersion>~ .2</crs :version>
ma
<~r~:RawFileName>MayO4Workshop-rl.TIF</crs:RawFileName>
This chunk of text
is
what Photoshoo and the File Browser use to keeo
p?z!
mi
i
I
c
.
F=
'
.I
rT1
-
c
!
I
-
w,
i-
n
track of the custom settings for each raw image.
I
<crs:WhiteBalance>Custom</crs:WhiteBalance>
<crs:Temperature>48OO</crs:Temperature>
<crs:Tint>-S</crs:Tint>
<crs:Exposure>+l.25</crs:Exposure>
<crs:Shadows>O</crs:Shadows>
<crs:Brightness>25</crs:Brightness>
<crs:Contrast>+95</crs:Contrast>
<crs:Saturation>O</cr8:Saturation>
<crs:Sharpness>O</crs:Sharpne~s>
4
<crs:LuminanceSmoothing>O</crs:Luminancesmoothing>
kt-
Chapter
6:
Understanding
Metadata
1
79
me next
hunks
of text hold the
EXlF
data that was extracted from
the raw
file.
They
correspond to the second and
third
entries you see in the
Advanced panel of
FieInfo-FXIF Properties, and the
auxiliary
EXIF
infor-
mationrecorded
in
http:l
ins.adobe.comlexifl1.Olauxl.
Figure
6
-
4
shows
the
metadata and the corresponding Fie Info entries.
180
Real World Camera
Raw
with
Adobe Photoshop
CS
The next chunkof text
is
the PDF Properties section. Notice that the File
Info contains entries, whereas the metadata does
not.The Fie Info entries
are
aliased
from
other
areas
in
the sidecar .xmp 6le-see Figure
6
-
5.
~i~,,,~
6-5
<rdf
:Description
rdf
:about=
"
xmlns:pdf='
PDPhperties
c/rd~:~escrlptmn>
The
next chunkof text
is
the Photoshop Properties.
Again,
note that
tb
metadata contains only the Source
and
Date Created information. The
other
information
that
appem
in
Pie info
is
aliased
from other
parts
of
the sidecar
.xmp 6le-see Figure
6
-
6.
Chapter
6:
Understanding Metadata
181
Next comes
TIFF
Properties, where you'll lind the camera make and
model, the pixel dimensions, and the default resolution for the converted
image, set in Camera Raw.
Again,
the File Info displays some information
aliased £tom elsewhere in the sidecar .xmp Me, including any keywords
applied to the image
-
-
see Figure
6
-
7.
The next two entries record the creation date and, ofparticular interest
to image creators, the copyright
flag
and copyright
URL.
You'll find the
corresponding entries in the Advanced
Fie Info listing under
XMP
Rights
Management
Propertie- Figure
6-8.
182
Real World Camera Raw with
Adobe
Photoshop
CS
The remainder of the text contains the Creator,Tltle, Description, Copy
-
right notice, and keywords. It's the source of the aliased entries you saw
in the Photoshop Properties,
TIFF
Properties,
XMP
Core Properties, and
XMP
Rights
Management Properties
in
Fie Info, and it also shows up in
the
Dublin Core Properties list in File Info
-
-
see Figure
6
-
9.
Why,
youmay
ask,
am
I
tormring you with this kind of information? My
purpose for showing you
all
this
is twofold.
b
Understandingthecontentsofthemetadatafilesmakesthewho1epMcess
by
which you enter and store metadata a great deal less mysterious.
b
Use of a text editor is the only way to remove metadata selectively
from images with complete
control.You can use the metadata palette
or the Fie Info panel to remove some entries, but
if
you want to strip
out some or
all
of the WF metadata, for example, a text editor is your
only recourse. (Earlier,
I
posited the example of removing "Pro&
from the EXIF data
-
you'll be glad to
know
that
if
you simply cut that
line from the
WF
datain the sidecar file, subsequent peeks at File Info
show that it's been replaced
by
the much studlier
"
Manual.")
Chapter
k
Understanding
Metadata
183
~i~~~~
6-9
m1ns:dc-'
DubhCorehperties
<dc: creator>
<rdf:Seq>
<rdf:li>Jack Reznicki</rdf:li>
</rdf:Seq>
</dc:creator>
<dc:title>
<rdf :Alt>
-:li xnL:lang='x+efault'>Images
to
Bruce
maser for
FW
RawC/rd€:li>
</rdf:Alt>
</dc:title>
<dc:description>
<rdf:Alt>
crdf:li
d:hm#rd2fault'>Inrup Suhnit
to
BNoe
Faser
for
IW
Ravc/rdf:li>
</rdf:Alt>
</dc:description>
<dc:riohts>
<rdf :Alt>
<rdf:li
mkwrd2fault'-
Remicki
2004
All
&semaWrdf:li,
</rdf:Alt>
</dc:rights>
<dc:subject>
<rdf :Bag>
<rdf:li>People</rdf:li>
<rdf:li>Neu York</rdf:li>
</rdf:Bag>
</dc:subject>
</rdf:Description>
Sidecar xmp
fdes
aren't the only kinds of 6les that you
can
usefully
manipulate outside of Photoshop and the File Browser.
Next,
I'll
show you
some more advanced examples.
184
Real
World
Camera Raw
with Adobe Photoshop
CS
Meddling
With
Metadata
Backin Chapter
5,
I
showed you how to save anduse metadata templates.
If you save and apply them through Photoshop's user interface, they'll
almost certainly work seamlessly better than
99
percent of the time. But
if you open one of your saved metadata templates
in
a text editor, you
may be in for a shock.
When you do so, the first thing you'll see is the usual line or two de
-
scribing what kind of file the template is. The second thing you'll see is
a copy of the Camera Raw settings for the image that was selected when
you saved the template
-
-
Thomas Knoll actually had to build special code
into Camera Raw to ignore this entirely bogus data.
Cleaning
Up
Metadata Templates
Thomas's code is almost invariably pretty darn bulletproof by the time it
gets seen
by alpha testers, let alone by the public at large, hut I dislike the
idea of applying bogus metadata to thousands of image
-
-
it just seems
like a Bad Idea. So let's take a look at a typical metadata template, and go
through the process of slimming down so it only contains the informa
-
tion I really need.
When you save
MetadataTemplates, Photoshop saves them in a dedi
-
cated folder. Rather than typing the lengthy path names for both Mac and
Widows,
1'11 show you the simplest way to find your saved templates. Just
select a file, choose File Info from the File Browser's File menu, and then,
in the Fie Info dialog
box, pull down the flyout menu at upper right and
choose
ShowTemplates-see Figure
6
-
10.
Once you've located your templates, open one in the text editor of your
choice. Figure
6-1
1
shows a newly saved metadata template.
All
I want it
to do is to set the Copyright Status flag to Copyrighted, enter my name
in the Author field, and set the Copyright Notice to
02004
BNC~ Eraser.
In practice, that is in fact
all
it does, at least when everything is working
properly.
But as computers and software get ever more complicated, we
all
at
some point learn the hard lesson that things don't always work as designed.
One rule that's always stood me in good stead is to keep extraneous junk
to a minimum. A cursory glance at the metadata template shows a whole
lot of extraneous junk!
Figure
6
-
10
Pinding4
metadata
templates
ChwseShow
Temphtes
to
reven1
thesalred
templatefiles
in
the
Macintosh
Finder
or
Windows
Explorer
186
Real World Camera Raw with Adobe Photoshop
CS
Figure
6
-
11
Unedited
metadata
template
All the information here
is
irrelevant-it applies to
thefile that
was
selected
when the
metadara
template
was
first saued.
<?xpacket begin='O*d
id='W5MO~CehiHzreS~NTczkc9d'?><x:~meta
xmlns:
x='adobe:ns:meta/' x:mptk='XMP toolkit
3.0-29,
framework 1.6'>
<rdf:RDF
mlns:rdf='
dns:
iX='
<rdf:Description rdf:about="
xmlns:crs='http://n~.ad~be.~~m/~amera-raw-settings/l.O/'~
<cr~:Version>2.2</crs:Version>
<crs:RawFileName>4FCW3895.TIF<lcrs:RawFileName>
<crs:WhiteBalance>As Shot</crs:WhiteBalance>
<crs:Expasure>tO.OS</crs:Exposure>
<crs:Shadows>O</crs:Shadows>
<crs:Brightness>6l</crs:Brightness>
<crs:Contrast>+33</crs:Contrast>
<crs:Saturation>O</crs:Saturation>
<crs:Sharpness>30</crs:Sharpne~s>
<crs:LuminanceSmoothing>O</crs:LuminanceSmoothing>
<crs:ColorNoiseReduction>Z5</crs:ColorNoiseReduction>
<crs:ChromaticAberrationR>O</crs:ChromaticAberrationR>
<crs:ChromaticAberrationB>O</crs:ChromaticAberrationB>
<crs:VignetteAmount>O</crs:ViqnetteAmount>
<cr~:ShadowTint>O</crs:ShadowTint>
<crs:RedHue>O</crs:RedHue>