Building XNA 2.0 Games- P3 potx
Bạn đang xem bản rút gọn của tài liệu. Xem và tải ngay bản đầy đủ của tài liệu tại đây (1.06 MB, 30 trang )
CHAPTER 3 ■ PLANNING YOUR GAME
47
We have some very rough mockups of a hero and some combat. Let’s round this out with
a level mockup.
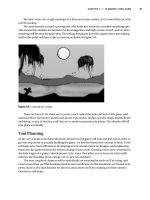
We inadvertently created a protagonist who looks just made for a zombie-smashing epic.
This means that zombies are bound to be the antagonists, and high-octane wrench-and-revolver
smashing will become the game play. The setting, keeping in line with a game that is just making
itself at this point, will have to be a cemetery, as shown in Figure 3-6.
Figure 3-6. Concept art: maps
There we have it! We think we’ve pretty much nailed the look and feel of this game with
minimal effort. We haven’t gotten into power-ups, enemy design, specific maps, health, death
and dying, or any of that fun stuff, but we’ve made tremendous headway. The details will fall
into place eventually.
Tool Planning
So far, we’ve made some basic decisions about how the game will look and feel, but in order to
get one step closer to actually building the game, we need to broach the concept of tools. Tools
will help us be more efficient at developing new level and character designs, and implanting
them into the game without the need to change source code. Creating tools can be essential in
the later stages of a game’s development cycle, since they allow you to focus on what really
matters: the drooling, brain-eating, out-to-get-you zombies!
The next couple of chapters will be specifically on creating the tools we’ll be using, and
even beyond that, we’ll be tweaking them as new needs arise. In the meantime, we’ll need to be
pretty clear on the data formats for the two areas where we’ll be creating all of the content:
characters and maps.
48
CHAPTER 3
■ PLANNING YOUR GAME
Map Editor
Because we are building a tool, we can go back to a more event-based model, where the appli-
cation waits for the user to do something before proceeding. Since we are designing a tool that
can handle the generation of maps, it makes sense to model it after a jigsaw puzzle. Much like
with a jigsaw puzzle, we’ll drag pieces from a bin area to the map area, fitting them in just where
they need to be.
In the mockup of the map editor, shown in Figure 3-7, you can see the map, minus the
bounding boxes, as it should be rendered on the left side, and the map segment palette on the
right side. The map is composed of map segments that are dragged and dropped, allowing us
to give the map a more organic feel than if we used a 16-bit-era grid.
Figure 3-7. Concept art: map editor
Character Editor
The character tool format will use a concept similar to the map editor. We’ll divide the characters
into parts, like arms, torsos, legs, and so on, and then create frames of animation by combining
parts. Figure 3-8 shows the character editor mockup.
We’ll allow ourselves to rotate parts and move them around. This technique allows for
some pretty flexible animation and is what was used in The Dishwasher: Dead Samurai game.
Animations will be made up of frames, and we’ll throw in a scripting system for combos and
animation control. We’ll dwell much more on this in Chapter 5, where we build the character
editor, but this should suffice for planning purposes.
CHAPTER 3 ■ PLANNING YOUR GAME
49
Figure 3-8. Concept art: character editor
Naming the Game
Game naming is an aspect of planning that barely deserves its own section. For one thing, you
don’t even have to give your game a name yet.
■Note When James created the solution for The Dishwasher: Dead Samurai, it was simply named ProjectDish1.
Prior to The Dishwasher, there was ZSX3: Ninjastarmageddon (later renamed Manic Space), which was
originally called ProjectNova.
Long story short: it doesn’t matter what you call your game, but giving it a ProjectX code
name is always fun. Regardless, let’ go ahead and christen this project Zombie Smashers XNA.
A Game Plan
It’s probably a good idea to formulate some approximate plan of attack before you blindly
jump into any development. Doing so will help organize your thoughts and prevent you from
feeling overwhelmed. Here’s a rough rundown of the game plan for our Zombie Smashers XNA
project:
• Create a map editor.
• Create a character editor.
• Create some map and character art.
• Create some maps and characters.
50
CHAPTER 3
■ PLANNING YOUR GAME
• Create the game.
• Bring the map and character functionality into the game.
• Add character movement and collision functionality.
• Add combat functionality.
• And take it from there!
Now we have some structure. It is a little disheartening that we don’t get to the actual game
development until halfway down the list. The fact is that the game is made up of the content;
without anything to create the content, there will be no game. The more time we spend on the
editors and content, the easier it will be to whip together a demo.
Conclusion
We’ve taken a look at planning concepts, or lack thereof, through a case study of James’s own
The Dishwasher: Dead Samurai and our newly christened Zombie Smashers XNA. We’ve examined
some common pitfalls of overambitious indie development along with the unfortunate Teenage
Game Tycoon (TGT) moniker, and settled on a just-ambitious-enough 2D side-scrolling action
platformer. We sketched out some character, map, and game-play concept art, and made some
initial tool plans. Everything may seem a bit vague at this point, but all will be revealed through
implementation!
51
■ ■ ■
CHAPTER 4
The Map Editor
Making a World Maker
Depending on your exposure with the games industry, it may come as a surprise to learn that
that vast majority of game development time is spent on level design, which leads to this ques-
tion: would you rather spend the vast majority of game development time happy or miserable?
Of course, if you have someone else doing level design, it now becomes a matter of keeping that
person happy, which is probably important as well.
Since so much time in designing the game will be spent in the map editor, it’s pretty crit-
ical to have a map editor that is robust and intuitive. Unfortunately, the map editor in our case
study game, The Dishwasher: Dead Samurai (introduced in the previous chapter) was none of
those things. This starts the chapter off in an awkward light and perhaps sets the tone for the
book. A tech book should always reveal the best, cleanest practices. However, this tech book is
setting out to reveal some rather ugly and hacky practices in the name of quick prototyping.
We’ll be using The Dishwasher game as a model for our map editor. A few things will be
cleaner in our version; a few things won’t be. Consider yourself warned.
A map editor that isn’t clean or polished is OK though, because it just needs to serve its
purpose for the level designer. When creating a tool like a map editor, it is important to realize
that the consumer—the person using this product—will be either yourself or a level designer;
in other words, someone who is used to these products. In that light, you do not need to create
the slickest interface or include the best features. The map editor, above all else, just needs to
work by being able to create levels consistently.
Creating a New Project: Zombie Smashers
The first item on the to-do list is to set up our development environment. Before we can get to
creating the actual map editor, we need to create a solution for the game we’re building in this
book, Zombie Smashers XNA.
Begin by opening Visual Studio (as we mentioned in Chapter 2, for the examples in this
book, we are using Visual C# 2005 Express Edition). In Visual Studio, select File ➤ New Project,
select the Windows Game (2.0) template, and type in the project name ZombieSmashers, as
shown in Figure 4-1. Be sure the “Create directory for solution” check box is selected, and
then click OK.
52
CHAPTER 4
■ THE MAP EDITOR
Figure 4-1. Creating the ZombieSmashers project
The next step is to add a MapEditor project, and make sure it is the project that runs when
you start up. In Solution Explorer, right-click ZombieSmashers and select Add ➤ New Project.
After making sure the Windows Game (2.0) template is selected again, enter the name MapEditor, as
shown in Figure 4-2, and click OK.
Figure 4-2. Adding the MapEditor project
CHAPTER 4 ■ THE MAP EDITOR
53
Now, right-click the MapEditor project item in Solution Explorer and select Set As StartUp
Project. This ensures the MapEditor project will run, and not the ZombieSmashers project. Solution
Explorer now includes the MapEditor project, as shown in Figure 4-3.
Figure 4-3. The MapEditor project added to ZombieSmashers
Before we can get to the map bits, we’ll need some basic interface functionality—text
rendering and interaction, mouse cursor rendering and input, scroll arrows, buttons, and that
sort of thing.
Drawing Text
Text rendering is something that the XNA Framework didn’t implement out of the box origi-
nally, so the early adopters had to create their own tools and techniques for implementing
bitmap-based text drawing. Fortunately, we are now living in the 2.0 era, so we have a very
handy tool called Sprite Font. We can add a Sprite Font to our Content project, and the Content
Pipeline will automatically create a bitmap image from it. Then we can load the bitmap and
draw it using our SpriteBatch.
First, add Sprite Font to your project. Add a Fonts folder to your Content project, and
then right-click that folder and select Add ➤ New Item. Select Sprite Font and name the item
Arial.spriteFont, as shown in Figure 4-4. Then click Add.
54
CHAPTER 4
■ THE MAP EDITOR
Figure 4-4. Adding a new Sprite Font
Now we’ll make a Text class to encapsulate some functionality, like state-based color and
size and “cheap” buttons. Select Project ➤ Add Class, name the class Text, as shown in Figure
4-5, and then click Add.
Figure 4-5. Adding a Text class
Time to start coding! We want the Text class to hold references to a SpriteBatch and Arial
SpriteFont, as well as class-level fields for size and color. We’ll declare this at the class level:
CHAPTER 4 ■ THE MAP EDITOR
55
private float size = 1f;
private Color color = Color.white;
SpriteFont font;
SpriteBatch sprite;
Given these fields, and the fact that these fields should have something in them, the
constructor is pretty straightforward:
public Text(SpriteBatch _sprite, SpriteFont _font)
{
font = _font;
sprite = _sprite;
}
We’ll create some properties to set the text color and size. This is the state-based approach.
In our program, we’ll be able to set the text color and size once, and then do all of the drawing.
public Color Color
{
get { return color; }
set { color = value; }
}
public float Size
{
get { return size; }
set { size = value ; }
}
Moving on, the drawing method is fairly straightforward. We’ll send it integer coordinates
and a string, and then the method will cast the coordinates into a Vector2 and draw the string.
public void DrawText(int x, int y, String s)
{
sprite.Begin(SpriteBlendMode.AlphaBlend);
sprite.DrawString(font, s, new Vector2(
(float)x, (float)y), color, 0f, new Vector2(),
size, SpriteEffects.None, 1f);
sprite.End();
}
As for the “cheap” buttons we talked about earlier, we’re going to create a function to draw
“clickable” text. This way, we’ll be able to create buttons from our main project easily, as we’ll
be drawing text. The function defaults the draw color to white. If the mouse location is within
the measured text dimensions (hover), the color will be yellow. If the mouse is hovering and
clicked, the function returns true. Of course, this won’t exactly mimic Windows button behavior,
but it will be good enough.
56
CHAPTER 4
■ THE MAP EDITOR
public bool DrawClickText(int x, int y, String s,
int mosX, int mosY, bool mouseClick)
{
color = Color.White;
bool r = false;
if (mosX > x && mosY > y &&
mosX < x + font.MeasureString(s).X * size &&
mosY < y + font.MeasureString(s).Y * size)
{
color = Color.Yellow;
if (mouseClick)
r = true;
}
DrawText(x, y, s);
return r;
}
Let’s head back to Game1 to test this out! At the class level, we’ll throw in the following:
Text text;
SpriteFont font;
In LoadContent(), we’ll need to instantiate text and load our bitmap:
font = Content.Load<SpriteFont>(@"Fonts/Arial");
text = new Text(spriteBatch, font);
Finally, in Draw(), let’s throw some test strings at it.
text.Size = 3.0f;
text.Color = new Color(0, 0, 0, 125);
for (int i = 0; i < 3; i++)
{
if (i == 2)
text.Color = Color.White;
text.DrawText(25 - i * 2, 250 - i * 2,
"Zombie Smashers XNA FTW!");
}
base.Draw(gameTime);
CHAPTER 4 ■ THE MAP EDITOR
57
Run it. You’ll get a nice drop-shadow effect, as shown in Figure 4-6.
Figure 4-6. Text success!
FTW, for the uninitiated, means “For The Win,” which is exactly how we should be feeling
about Zombie Smashers XNA at this point. Text is ready to go, so it’s time to design our map
editor now.
Creating the Map Editor
Our map editor should allow us to manage everything contained in the game’s world and maps. To
begin creating it, we need to establish a map model format. Our game world will use the hier-
archy laid out in Figure 4-7.
As you can see in the diagram in Figure 4-7, the format has a simple hierarchy, with the top
level representing everything, or the world. The world is composed of interlinking maps. Each
map is composed of map segments, a script, and a collision map. The building block of the map
is the map segment, so let’s start there.
58
CHAPTER 4
■ THE MAP EDITOR
Figure 4-7. Game world format hierarchy
Map Segments
A map segment is a nongridded sprite that you can drag and drop, as well as rotate, to build
your map. The graphics for map segments will be stored on large sprite sheets, where each map
segment definition refers to a rectangle on the sprite sheet for its image source data. Overall,
the following data is contained in a map segment definition:
• Name
• Source sprite sheet index
• Source rectangle
•Flags
Flags will hold any metadata we may want to use later for identifying specific behaviors,
like emitting smoke or spinning. Being the lazy developers that we are, we can hard-code these.
We’ll need to create a class to hold the map segment definitions, a method to load the data,
a graphic containing map segments, and a text file containing the metadata that we’ll be loading.
First, we’ll take care of the class. We add a MapClasses folder in the project, and within that
we add SegmentDefinitions.cs. Here’s the relevant code, minus a few public properties for each
private member:
class SegmentDefinition
{
private string name;
private int sourceIndex;
private Rectangle srcRect;
private int flags;
public SegmentDefinition(string _name,
int _sourceIndex,
Rectangle _srcRect,
int _flags)
{
Name = _name;
SourceIndex = sourceIndex;
SourceRect =_srcRect;
Flags = _flags;
}
CHAPTER 4 ■ THE MAP EDITOR
59
getters and setters
}
The actual file format that we’ll be using for our segment definition metadata will look like
this:
#src n
Name
Source Rectangle: left top right bottom
Flags
The first line refers to the source image. Because we’ll be using large sprite sheets containing
numerous map segments, when we refer to a segment in the metadata, the loading function
needs to know on which sprite sheet each segment belongs. We’ll be using it as a state, so the
line is necessary before Name only if the current segment is on a different sprite sheet as the
previous segment.
We can store the metadata in an ordinary text file, which we call maps.zdx. Before we look
at the metadata itself, let’s take a peek at the actual sprite sheet we’ll be working with. Our sprite
sheet is shown in Figure 4-8.
■Note The .zdx extension means something along the lines of “Zombie Data XNA.” If you’re just using text
files, you can give them whatever extension you like.
Figure 4-8. Maps1 sprite sheet
60
CHAPTER 4
■ THE MAP EDITOR
You can see that we have segments of grass, some stones, and some graves. We’ll add trees
later, but we’re off to a good start. The metadata for this sprite sheet looks like this:
Map Defs
#src 1
grass1
0 26 410 178
0
grass2
0 178 404 369
0
.
.
.
block2
514 93 676 187
0
#end
When reading it, we’ll just skip over the first line, which is sort of a comment.
We create a Map.cs class in the MapClasses folder. For now, we’ll add functionality only to
read and store segment definitions.
using System.IO;
class Map
{
SegmentDefinition[] segDef;
public Map()
{
segDef = new SegmentDefinition[512];
ReadSegmentDefinitions();
}
private void ReadSegmentDefinitions()
{
StreamReader s = new StreamReader(@"Content/maps.zdx");
string t = "";
int n;
int currentTex = 0;
int curDef = -1;
Rectangle tRect = new Rectangle();
string[] split;
t = s.ReadLine();
CHAPTER 4 ■ THE MAP EDITOR
61
while (!s.EndOfStream)
{
t = s.ReadLine();
if (t.StartsWith("#"))
{
if (t.StartsWith("#src"))
{
split = t.Split(' ');
if (split.Length > 1)
{
n = Convert.ToInt32(split[1]);
currentTex = n - 1;
}
}
}
else
{
curDef++;
string name = t;
t = s.ReadLine();
split = t.Split(' ');
if (split.Length > 3)
{
tRect.X = Convert.ToInt32(split[0]);
tRect.Y = Convert.ToInt32(split[1]);
tRect.Width =
Convert.ToInt32(split[2]) - tRect.X;
tRect.Height =
Convert.ToInt32(split[3]) - tRect.Y;
}
else
Console.WriteLine("read fail: " + name);
int tex = currentTex;
t = s.ReadLine();
int flags = Convert.ToInt32(t);
segDef[curDef] = new
SegmentDefinition(name, tex, tRect, flags);
}
}
}
62
CHAPTER 4
■ THE MAP EDITOR
public SegmentDefinition[] SegmentDefinitions
{
get { return segDef; }
}
}
Basically, the process unfolds as follows:
1. Open the metadata file.
2. Skip a line.
3. While not end of file, read a line. If it’s a #src line, change the source sprite sheet. Oth-
erwise do the following:
• Increment the current segment.
• Read three lines: name, srcRect, and flags.
• Instantiate the current segment with name, the source sprite sheet, srcRect, and flags.
4. Close the file.
In order to get maps.zdx into the project, select Show All Files for the MapEditor project.
Right-click the Content folder, and select Include In Project. Then select all the files inside that
Content folder and select Exclude From Project. Next, add the maps.zdx file to the Content folder
and include it in the project. Then, from the Properties window, set the property Copy to Output
Directory to Copy If Newer.
All we need to do to allow our map editor to load segment definitions now is to declare a
new Map object at the class level of Game1 and instantiate it with new in Initialize(). First, add
MapEditor.MapClasses to your reference list at the top, and then add the following to the Game1
class:
SpriteBatch sprite;
Map map;
And:
protected override void Initialize()
{
map = new Map();
base.Initialize();
}
As always, it’s nice to have some visual confirmation of everything working correctly, so
we’re going to add some functionality to display our segment definitions in a palette.
CHAPTER 4 ■ THE MAP EDITOR
63
First, we need to load our sprite sheet, maps1.png. We also added a bitmap that is essen-
tially a solitary white pixel. Unfortunately, SpriteBatch does not allow us to use blank textures.
If we want to create a solid-color rectangle, we must have a bitmap for it. So we’re going to
throw 1x1.bmp, a white image of dimensions 1 × 1, into the mix. At the class level of Game1, add
the following:
Texture2D[] mapsTex;
Texture2D nullTex;
There is a reason behind calling our 1 × 1 texture nullTex. If we were working directly with
the graphics device and not using SpriteBatch, we would have been able to use null as a texture to
draw solid color. SpriteBatch does not accept null as a Texture2D parameter, so we’ll do the
next best thing: pretend we’re sending a null texture.
Load the items in Game1.LoadGraphicsContent(), with these lines:
text = new Text(textTex, sprite);
nullTex = Content.Load<Texture2D>(@"gfx/1x1");
mapsTex = new Texture2D[1];
for (int i = 0; i < mapsTex.Length; i++)
mapsTex[i] = Content.Load<Texture2D>(@"gfx/maps" +
(i + 1).ToString());
We’re creating mapsTex[] with a size of 1, because we have only one sprite sheet so far.
Then we iterate through all members of mapsTex[], loading the images one by one. Notice how
we turn 0 into 1 with (i + 1).ToString(). We must turn nonstring values into strings when
we’re putting together path names.
Now, in Game1.Draw(), take out the text-drawing tests, and then add the following method:
private void DrawMapSegments()
{
Rectangle sRect = new Rectangle();
Rectangle dRect = new Rectangle();
text.Size = 0.8f;
spriteBatch.Begin(SpriteBlendMode.AlphaBlend);
spriteBatch.Draw(nullTex, new Rectangle(500, 20, 280, 550),
new Color(0, 0, 0, 100));
spriteBatch.End();
for (int i = 0; i < 9; i++)
{
SegmentDefinition segDef = map.SegmentDefinitions[i];
if (segDef == null)
continue;
64
CHAPTER 4
■ THE MAP EDITOR
spriteBatch.Begin(SpriteBlendMode.AlphaBlend);
dRect.X = 500;
dRect.Y = 50 + i * 60;
sRect = segDef.SourceRect;
if (sRect.Width > sRect.Height)
{
dRect.Width = 45;
dRect.Height = (int)(((float)sRect.Height /
(float)sRect.Width) * 45.0f);
}
else
{
dRect.Height = 45;
dRect.Width = (int)(((float)sRect.Width /
(float)sRect.Height) * 45.0f);
}
spriteBatch.Draw(
mapsTex[segDef.SourceIndex], dRect, sRect, Color.White);
spriteBatch.End();
text.Color = Color.White;
text.DrawText(dRect.X + 50, dRect.Y, segDef.Name);
}
}
First, we’re using our nullTex to draw a translucent, black rectangle behind our segment
palette. Then we’re iterating through our segment definitions, grabbing a local reference for
each one and drawing each one in the palette. The if clause in the middle is a nifty little function
that causes the destination rectangle to maintain scale while never exceeding 45 pixels on either
dimension. After drawing each segment, we use our text class instance to draw the segment’s
name.
The last thing we need to do is place a call to DrawMapSegments() in our Game1.Draw()
method before base.Draw() is called.
Now run what you have so far, and witness the segment palette in all its glory, as shown in
Figure 4-9.
CHAPTER 4 ■ THE MAP EDITOR
65
Figure 4-9. Segment palette
Simple Interaction
Let’s add some simple interaction. You’ve probably noticed that the mouse cursor disappears
whenever the cursor is in the MapEditor window. This is the first thing we need to remedy. We’ll
start by making our own mouse cursor. We’ve made an image with some simple interface icons,
as shown in Figure 4-10.
Figure 4-10. Icons image
66
CHAPTER 4
■ THE MAP EDITOR
We’ll need some class-level fields to keep track of our mouse:
Texture2D iconsTex;
int mosX, mosY;
bool rightMouseDown;
bool mouseClick;
Make sure to load iconsTex in LoadContent(). Then in Game1.Update(), add the following:
MouseState mState = Mouse.GetState();
mosX = mState.X;
mosY = mState.Y;
bool pMouseDown = rightMouseDown;
if (mState.LeftButton == ButtonState.Pressed)
rightMouseDown = true;
else
rightMouseDown = false;
if (pMouseDown && !rightMouseDown) mouseClick = true;
This slightly unwieldy bit of code stores the current mouse state in our local fields and
catches mouse clicks—transitions between pressed and released—by comparing the current
button state with the previous button state. This isn’t a true mouse click, in that the user could
conceivably mouse-down outside a button, move to within a button, and mouse-up to cause a
click—an invalid scenario under Windows. However, we think we can let it slide.
To draw the cursor, we’ll create a simple function in Game1:
private void DrawCursor()
{
spriteBatch.Begin(SpriteBlendMode.AlphaBlend);
spriteBatch.Draw(iconsTex, new Vector2(mosX, mosY),
new Rectangle(0, 0, 32, 32),
Color.White, 0.0f,
new Vector2(0, 0), 1.0f, SpriteEffects.None, 0.0f);
spriteBatch.End();
}
Put a call to Game1.DrawCursor() at the end of your Game1.Draw() function. Be sure to add
it at the end, so that it is the last thing to be drawn on the screen. Figure 4-11 shows the map
editor with our new cursor.
CHAPTER 4 ■ THE MAP EDITOR
67
Figure 4-11. Map editor with the cursor
This is beginning to look a bit more natural. The next step will be to allow the user to drag
map segments on to the map. This involves adding drawing functionality to the Map class and
adding dragging functionality to the editor.
Drawing the Map
Our map will have a foreground layer and background layer sandwiching the main layer. We’ll
iterate through each layer, drawing all map segments on that layer, and translate and scale
each layer a certain way to give that good-old parallax effect.
We need to add a MapSegment class for storing the data of each map segment as it appears
on the map. It will contain only a segment definition index and a location.
68
CHAPTER 4
■ THE MAP EDITOR
class MapSegment
{
public Vector2 Location;
int segmentIndex;
public int Index
{
get { return segmentIndex; }
set { segmentIndex = value; }
}
}
We need to make the Vector2 member, Location, public here because of how structs work
in .NET languages. Structures like Vector2 are passed by value, and thus if you create a property
(as we do for the segment index), you cannot edit the fields of the Vector2 without creating a
new instance. This may be OK for small-scaled games, but creating hundreds of thousands of
Vector2 objects per frame will never be good for anyone. By creating the Location member as a
public field, we avoid any related issues.
We can put an array of map segments into the Map class now. Since we’re going to be using
parallax scrolling, we’ll have three layers of map segments with up to 64 segments per layer,
hence a two-dimensional array dimensioned 3 by 64.
SegmentDefinition[] segDef;
MapSegment[,] mapSeg;
public Map()
{
segDef = new SegmentDefinition[512];
mapSeg = new MapSegment[3, 64];
ReadSegmentDefinitions();
}
Drawing Functionality
We’ll need some functionality to manipulate and draw map segments from the Map class. We’ll
be doing all of our editing from Game1, so we need to expose some functionality in Map for moving
and adding map segments.
public MapSegment[,] Segments
{
get { return mapSeg; }
}
public int AddSeg(int layer, int index)
{
for (int i = 0; i < 64; i++)
{
CHAPTER 4 ■ THE MAP EDITOR
69
if (mapSeg[layer, i] == null)
{
mapSeg[layer, i] = new MapSegment();
mapSeg[layer, i].Index = index;
return i;
}
}
return -1;
}
Let’s make a Draw() function for Map. We’re sending it the SpriteBatch object and our map
sprite sheets, as well as a Vector2 that is the current scroll value. The scroll value will be used to
allow the user to scroll around the map. When we draw, we’ll always draw relative to the scroll
value.
For the actual drawing, we’ll iterate through mapSeg[] layer by layer, drawing all segments
on each layer in order of first to last. We’ll color each layer a little bit differently and use a different
scalar, so the foreground will scroll faster and the background will scroll more slowly, giving us
that nice parallax effect.
public void Draw(SpriteBatch sprite,
Texture2D[] mapsTex,
Vector2 scroll)
{
Rectangle sRect = new Rectangle();
Rectangle dRect = new Rectangle();
sprite.Begin(SpriteBlendMode.AlphaBlend);
for (int l = 0; l < 3; l++)
{
float scale = 1.0f;
Color color = Color.White;
if (l == 0)
{
color = Color.Gray;
scale = 0.75f;
}
else if (l == 2)
{
color = Color.DarkGray;
scale = 1.25f;
}
scale *= 0.5f;
for (int i = 0; i < 64; i++)
{
70
CHAPTER 4
■ THE MAP EDITOR
if (mapSeg[l, i] != null)
{
sRect = segDef[mapSeg[l, i].Index].SourceRect;
dRect.X = (int)(mapSeg[l, i].Location.X
– scroll.X * scale);
dRect.Y = (int)(mapSeg[l, i].GetLoc().Y
– scroll.X * scale);
dRect.Width = (int)(sRect.Width * scale);
dRect.Height = (int)(sRect.Height * scale);
sprite.Draw(
mapsTex[segDef[mapSeg[l, i].Index].SourceIndex],
dRect,
sRect,
color);
}
}
}
sprite.End();
}
Because SpriteBatch likes rectangles, there’s a lot of ugly type casting at work here. The resul-
tant rectangle’s width and height dimensions are computed by multiplying the source rectangle’s
width and height (integers) by the scalar (a float) and casting the products as integers again.
Drag-and-Drop Functionality
Back in Game1, we need to implement some sort of dragging functionality to allow us to move
map segments from our palette onto the map. We also need to know on which map layer we’re
drawing, and the previous cursor location. At the Game1 class level, add the following:
int mouseDragSeg = -1;
int curLayer = 1;
int pMosX, pMosY;
Then we add some dragging functionality to Update().
if (pMouseDown && !rightMouseDown) mouseClick = true;
if (mouseDragSeg > -1)
{
if (!rightMouseDown)
mouseDragSeg = -1;
CHAPTER 4 ■ THE MAP EDITOR
71
else
{
Vector2 loc = map.Segments[curLayer, mouseDragSeg].Location;
loc.X += (mosX - pMosX);
loc.Y += (mosY - pMosY);
map.Segments[curLayer, mouseDragSeg].Location = loc;
}
}
pMosX = mosX;
pMosY = mosY;
When dragging begins, we’ll store the index of the dragged segment in mouseDragSeg. Then
every time Update() is called, we can update the segment’s location by the amount the mouse
has moved since the last update.
We’ll start the dragging from DrawMapSegments(). This is typically a tremendous taboo, as
we don’t want to put update logic in a drawing function, but we think as long as we acknowl-
edge that it’s a bad practice, we’re nearly making up for doing it.
text.DrawText(dRect.X + 50, dRect.Y, segDef.GetName());
if (rightMouseDown)
{
if (mosX > dRect.X && mosX < 780 &&
mosY > dRect.Y && mosY < dRect.Y + 45)
{
if (mouseDragSeg == -1)
{
int f = map.AddSeg(curLayer, i);
if (f <= -1)
continue;
map.Segments[curLayer, f].Location.X =
(mosX – sRect.Width / 4);
map.Segments[curLayer, f].Location.Y =
(mosY – sRect.Height / 4);
mouseDragSeg = f;
}
}
}
We decided to put the logic in the drawing routine because we already have some nice
destination rectangles to work with here. We simply check that the mouse location is within a
slightly wider, shorter version of the destination rectangle. If it is, and the mouse is down, we
try to create a new segment. If this is successful, we put the segment in the correct location and
set it as the currently dragged segment.