Real World Adobe InDesign CS4- P13 ppsx
Bạn đang xem bản rút gọn của tài liệu. Xem và tải ngay bản đầy đủ của tài liệu tại đây (1.8 MB, 30 trang )
Select a path.
-
Applying an Arrowhead
Add another arrow-
head to the other end
of the line, if you want.
InDesign applies the
arrowhead to the
selected path.
Choose an arrowhead type
from the Start or End pop-up
menus in the Stroke panel.
Note that arrowheads do not
extend the length of a path.
To swap the arrowheads on the beginning and end of a path,
select the path using the Direct Selection tool and choose Reverse
Path from the Paths submenu of the Object menu (see Figure 5-36).
You won’t nd this basic stroke option in the Stroke panel, so stop
looking. Instead, it’s in the Attributes panel (choose Attributes from
the Window menu). Checking the Overprint Stroke option makes
the stroke overprint (rather than knock out of) whatever’s behind it.
is might not seem like much, but if you’re creating color publica-
tions, you’ll nd it’s one of the most important features in InDesign
(see Chapter 10, “Color”).
When you choose a dotted, dashed, or striped stroke, InDesign dis-
plays the Gap Color and the Gap Tint pop-up menus at the bottom
of the Stroke panel (see Figure 5-37). Use these controls to specify the
color and tint of the “blank” areas in the stroke.
When you apply a dotted or dashed stroke to a page item, InDesign
displays the Corners pop-up menu at the bottom of the Stroke panel.
e options on this menu control the way that InDesign draws the
stroke as it crosses points on the path (see Figure 5-38).
When you choose Adjust Dashes, InDesign will change the length
of the dashes in the path so that a dash appears centered on each
point in the path. Choose Adjust Gaps, and InDesign will change
the length of the dashes in the path to accomplish the same eect. As
you’d expect, choosing Adjust Dashes and Gaps changes the length
of both dashes and gaps in the dash pattern, and choosing None does
not adjust the position of dashes in the pattern at all.
Overprint
Gap Color and
Gap Tint
Corner Adjustment
Real_World_Adobe_InDesign_CS4b.pdf 361Real_World_Adobe_InDesign_CS4b.pdf 361 08/04/2009 05:55:06 p.m.08/04/2009 05:55:06 p.m.
.
-
Setting the Gap
Color of a Stroke
Dotted stroke
with gap color
set to “None”
Dotted stroke with
gap color set to a 50%
tint of Black.
Why adjust the dashes and/or gaps in a dash pattern? If you don’t,
you can easily end up with gaps at the corners of paths. It’s particu-
larly noticeable when you apply dashed strokes to rectangles.
Once you’ve applied a stroke to a particular path, you can change the
stroke using any of the following methods. Again, there’s no “right”
way to edit a stroke—which method is best and quickest depends on
how you work and which panels you have open at the time you want
to change the stroke.
Display the Stroke panel, then make changes in the panel.
Click the Stroke selector in the Color panel, then click a color in
the panel (see Chapter 10, “Color,” for more on applying colors
using the Color panel).
Use the Stroke button at the bottom of the Toolbox to apply or
remove colors and gradients from the path.
Editing Strokes
Select a path using the
Direct Selection tool.
Choose Reverse Path from
the Paths submenu of the
Object menu.
InDesign reverses the
direction of the path.
-
Reversing the
Direction of a Path
Real_World_Adobe_InDesign_CS4b.pdf 362Real_World_Adobe_InDesign_CS4b.pdf 362 08/04/2009 05:55:06 p.m.08/04/2009 05:55:06 p.m.
Select the path, then choose a new stroke weight from the Stroke
Weight submenu of the Context menu.
Use the Eyedropper tool to pick up the stroke of a path and apply
that formatting to another path.
To quickly remove a stroke from a path, do one of the following.
Select the path, click the Stroke selector, then click None.
Select the path, display the Swatches panel, click the Stroke
selector at the top of the panel, and then click the None swatch.
Enter 0 in the Weight eld of the Stroke panel.
Stroke Styles
If you’ve looked through the default strokes and haven’t seen the
stroke pattern you’re looking for, you can probably create it using
InDesign’s stroke styles. is is provided that the stroke you’re look-
ing for is dashed, dotted, or striped—InDesign does not yet support
Removing Strokes
-
Corner Adjustment for
Dashed Strokes
If you don’t adjust the
dashed stroke pattern, you
run the risk of unsightly gaps
at the corners of the shape.
Adjust the dashes and/or
gaps to make InDesign
draw the dash centered on
each corner of the path.
Real_World_Adobe_InDesign_CS4b.pdf 363Real_World_Adobe_InDesign_CS4b.pdf 363 08/04/2009 05:55:07 p.m.08/04/2009 05:55:07 p.m.
.
strokes made up of arbitrary shapes. If you need a special skull and
crossbones stroke for your pirate/goth/metal newsletter, you’ll have
to create it from scratch (using text paths, as shown in Chapter 6,
“Where Text Meets Graphics”).
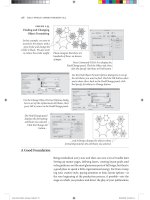
To create a stroke style, follow these steps (see Figure 5-39)
1. Choose Stroke Styles from the Stroke panel menu. InDesign
displays the Stroke Styles dialog box.
2. Click the New button to create a new stroke style. If you want
to base your new stroke style on an existing style, select the
style from the list of stroke styles before you click the button.
InDesign displays the New Stroke Style dialog box.
3. Enter a name for the stroke style. Choose a stroke style type
(Dash, Dotted, or Stripe) from the Type pop-up menu.
4. Set the options for the stroke style. e available options vary
depending on the type of stroke style you selected.
For each type, InDesign displays a preview of the stroke style
with an associated Preview Weight eld. As you would expect,
changing the stroke weight using this eld aects only the pre-
view image of the stroke—the stroke style does not include the
stroke weight.
In each of the stroke style types, the Pattern Length eld
controls the length of the pattern in the stroke style.
Dash. Drag the cursor in the area below the ruler to set the
length of the dashes in the stroke style, or enter values in the
Start or Length elds. To make more than one dash in the pat-
tern, click in the white area and drag. To remove a dash, point at
the black area and drag it away from the ruler.
You can also set the line cap and the way that InDesign
handles the dash pattern around corners. ese options work in
exactly the same way as their counterparts in the Stroke panel,
as discussed previously in this chapter.
Dotted. When you choose Dotted from the Type pop-up menu,
you can add dots to the pattern by clicking below the ruler, or by
entering a value in the Center eld. Either way, you’re control-
ling the location of the center of the dot relative to the pattern
length. You cannot scale the width or height of the dot—it’s
always a circle whose width is determined by the stroke weight.
(If you’re looking for an oval dot, use a dashed stroke with a
rounded line cap.)
Real_World_Adobe_InDesign_CS4b.pdf 364Real_World_Adobe_InDesign_CS4b.pdf 364 08/04/2009 05:55:07 p.m.08/04/2009 05:55:07 p.m.
-
Dening a Stroke Style
Choose Stroke Styles
from the Stroke panel.
InDesign displays the
Stroke Styles dialog box.
Click the New button.
InDesign displays the New
Stroke Style dialog box.
Choose a stroke type from
the Type pop-up menu.
Click the ruler and then drag
to set the location of the dots,
dashes, or stripes…
…or enter values in the
corresponding elds.
If you chose Dash or Stripe, the
controls are a little dierent, but
the idea is the same—drag in the
ruler window or enter values to
dene the stroke’s appearance.
InDesign adds the stroke
style to the list of stroke
styles. Click OK to close the
Stroke Styles dialog box.
Click OK when you’ve
nished dening the
stroke style.
InDesign adds the stroke style to
the list of stroke styles in the Stroke
panel. To apply the stroke style,
choose it from the pop-up menu as
you would any of the default strokes.
To base your stroke style on
an existing stroke style, select
the stroke style before you
click the New button.
Real_World_Adobe_InDesign_CS4b.pdf 365Real_World_Adobe_InDesign_CS4b.pdf 365 08/04/2009 05:55:07 p.m.08/04/2009 05:55:07 p.m.
.
e options on the Corners pop-up menu control the way
that dots are adjusted around corners in paths you’ve applied
the dotted stroke style to. Choose None for no adjustment, or
choose Adjust Gaps to have InDesign increase or decrease the
gap between dots to make dots appear at each point on the path.
Note that adjusting the gaps results in uneven spacing between
dots on a path, but is probably less distracting than having dots
“miss” the corners of a path (particularly on a rectangle).
To remove a dot, drag the dot out of the ruler window.
Stripe. Specify the way that the stripes ll the width of the path
by dragging the cursor to the right of the ruler or by entering
values in the Start and Width elds. To add a new stripe, drag
the cursor in a white area. To remove a stripe, drag the stripe out
of the ruler window.
Stroke styles exist inside a document; creating a stroke style in a
specic document does not add that stroke style to any other docu-
ments. You can copy stroke styles from one document to another.
You can save and load stroke styles, and you can add stroke styles
to all new documents. To add a stroke style to all new documents,
create or load the stroke style when no documents are open.
You apply stroke styles just as you would apply any of the default
stroke types: select an object, then choose the stroke style from the
Type pop-up menu in the Stroke panel.
To edit a stroke style, choose Stroke Styles from the Stroke panel
pop-up menu, select the style from the list of styles in the Stroke
Styles dialog box, and click the Edit button. InDesign displays the
Edit Stroke Style dialog box.
Make changes to the stroke style denition and close the dialog
box, and InDesign will change the appearance of all of the objects
you’ve applied the stroke style to.
To delete a stroke style, choose Stroke Styles from the Stroke panel
pop-up menu, select the style from the list of styles in the Stroke
Styles dialog box, and click the Delete button.
When you delete a stroke style, InDesign will display a dialog box
asking which stroke style you want to use to replace the stroke style
you’re deleting. Choose a stroke style from the pop-up menu and
click the OK button, and InDesign will replace all occurrences of the
deleted style with the stroke style you’ve selected.
Applying Stroke Styles
Editing Stroke Styles
Deleting Stroke Styles
Real_World_Adobe_InDesign_CS4b.pdf 366Real_World_Adobe_InDesign_CS4b.pdf 366 08/04/2009 05:55:08 p.m.08/04/2009 05:55:08 p.m.
To save the stroke styles in your document to a stroke styles le,
choose Stroke Styles from the Stroke panel pop-up menu, select the
styles you want to save from the list of styles in the Stroke Styles
dialog box, and click the Save button. InDesign displays a standard
le dialog box where you can choose a location and enter a le name
for the saved stroke styles le. Saved InDesign stroke style docu-
ments have the le extension “.inst”.
To load stroke styles from a saved stroke styles le, choose Stroke
Styles from the Stroke panel menu to display the Stroke Styles dialog
box, then click the Load button. InDesign displays a standard le
dialog box. Locate and select the le you want to load stroke styles
from and click OK to load the styles into the current document.
To copy a single stroke style from one document to another, select
an object formatted with the stroke style, copy it, and then paste it
into another document. InDesign will bring the stroke style along
with the object, and you can then delete the object.
Fills
Just as strokes determine what the outside of a path looks like, lls
specify the appearance of the inside of a path. Fills can make the
inside of a path a solid color, or a linear or radial gradient. Any path
you create can be lled, including open paths.
To apply a ll, select a path and do one of the following.
Click the Fill selector at the top of the Swatches panel, then click
a color swatch (see Figure 5-40).
Click the Fill selector at the bottom of the Tools panel, then click
the Apply Color button (or press comma). is applies the most
recently selected color or swatch (see Figure 5-41).
Drag a swatch out of the Swatches panel or Color panel and
drop it on a path (see Figure 5-42). e path doesn’t have to be
selected.
Click the Fill selector in the Color panel, then dene a color in
the panel (see Figure 5-43).
Select the Eyedropper tool. Click an object formatted with the
ll you want, then click object to apply the ll (see Figure 5-44).
Saving Stroke Styles
Loading Stroke Styles
Real_World_Adobe_InDesign_CS4b.pdf 367Real_World_Adobe_InDesign_CS4b.pdf 367 08/04/2009 05:55:08 p.m.08/04/2009 05:55:08 p.m.
.
-
Applying a Fill
(Tools Panel Method)
Click the Fill selector (if
it’s not already active)…
Click the
Apply Color
button.
InDesign applies the most recently selected
swatch to the ll of the selected object.
Drag a color swatch out
of the Swatches panel…
-
Applying a Fill
(Drag and Drop
Method)
Note that you don’t need
to select the object when
applying a ll using drag
and drop.
…and drop it in the
interior of a path.
Click the Fill selector (if
it’s not already active)…
Select an object.
…and click a
color swatch.
InDesign applies the swatch to the ll
of the selected object.
-
Applying a Fill
(Swatches Panel
Method)
Real_World_Adobe_InDesign_CS4b.pdf 368Real_World_Adobe_InDesign_CS4b.pdf 368 08/04/2009 05:55:08 p.m.08/04/2009 05:55:08 p.m.
Click the Fill selector
in the Color panel (if it’s
not already active).
Dene a color. You can
change color models,
drag the sliders, enter
values in the elds, or
click anywhere in the
color (as we have in this
example).
-
Applying a Fill
(Color Panel Method)
Select an object.
InDesign applies the color to the ll of the object.
Use the Eyedropper
tool to pick up the
color you want from
another path…
…and then click the
Eyedropper tool on
the path you want
to format.
-
Applying a Fill
(Eyedropper Method)
To quickly remove a ll from a path, do one of the following:
Click the Fill selector in the Tools panel, then click the None
button (or, better yet, press /).
Click the Fill button in the Color panel and then click the None
swatch (if you can’t see the None swatch, it’s because you’ve
hidden the Color panel’s option—choose Show Options from
the Color panel menu to display the options).
Click the Fill button at the bottom of the Toolbox, then click the
None swatch in the Swatches panel.
Gradients
A “gradient” is a type of ll or stroke that creates a graduation from
one color to another—an eect also known as a “fountain,” “blend,”
or “vignette.” InDesign oers two types of gradients: “Linear” and
“Radial.” For either type of gradient ll, you can set the colors used
in the gradient, the rate at which one color blends into another, and
Removing Fills
Real_World_Adobe_InDesign_CS4b.pdf 369Real_World_Adobe_InDesign_CS4b.pdf 369 08/04/2009 05:55:08 p.m.08/04/2009 05:55:08 p.m.
.
the colors used in the gradient (gradients can contain two or more
colors). For Linear gradients, you can set the angle that the gradua-
tion is to follow.
Linear gradients create a smooth color transition (or series of tran-
sitions) from one end of a path to another; Radial gradients create a
graduation from the center of a path to its edges. Gradients applied
to paths are calculated relative to the geometric bounds of the path;
gradients applied to text characters use the geometric bounding box
of the text frame containing the text (not the individual characters
themselves).
To apply a gradient to a path, follow these steps (see Figure 5-45).
1. Select the path using the Selection tool or the Direct Selection
tool, or select text using the Text tool or Path Text tool.
2. Do one of the following.
Click the Fill or Stroke selector in the Tools panel (to specify
which part of the path you want to apply the gradient to).
Click the Apply Gradient button at the bottom of the Tools
panel.
Display the Gradient panel (choose Gradient from the
Window menu), and then click the gradient ramp.
Click an existing gradient swatch in the Swatches panel
(press F5 to display the Swatches panel). You can also drag
the gradient swatch out of the Swatches panel and drop it on
a path (the path doesn’t have to be selected).
Select the Eyedropper tool and click an object formatted with
a gradient, then click the tool again on the selected path.
Select the Gradient tool and drag the tool inside the path.
When you create or edit a gradient, you work with InDesign’s gradi-
ent controls: the gradient ramp, gradient stop icons, and center point
icons. What the heck are we talking about? See Figure 5-46.
In our opinion, the best way to apply gradients is to use the Swatches
panel. Just as applying a color from the Swatches panel establishes a
link between the color swatch and the object you’ve applied it to, so
applying a gradient swatch links the swatch and the objects you’ve
formatted with it. is means that you can edit the denition of the
Applying Gradients
Gradient Controls
Creating a
Gradient Swatch
Real_World_Adobe_InDesign_CS4b.pdf 370Real_World_Adobe_InDesign_CS4b.pdf 370 08/04/2009 05:55:08 p.m.08/04/2009 05:55:08 p.m.
Click the Fill or
Stroke selector…
…then click the Apply
Gradient button…
InDesign applies the
current default gradient.
…or select an object,
then click a gradient
swatch in the Swatches
panel…
…or display the
Gradient panel and
click the gradient
ramp…
…or drag a gradient swatch
out of the Swatches panel…
-
Applying a Gradient
…and drop it on a path (the path
does not have to be selected).
gradient swatch and update the formatting of all of the objects you’ve
applied the swatch to.
To create a gradient swatch, follow these steps (see Figure 5-47).
1. Select an object that has the gradient you want (optional).
2. Display the Swatches panel, if it’s not already visible, then choose
New Gradient Swatch from the Swatches panel menu. InDesign
displays the New Gradient Swatch dialog box. If you selected an
object in Step 1, InDesign picks up the attributes of the gradient
Real_World_Adobe_InDesign_CS4b.pdf 371Real_World_Adobe_InDesign_CS4b.pdf 371 08/04/2009 05:55:08 p.m.08/04/2009 05:55:08 p.m.
.
applied to the object and displays them in this dialog box. If you
did not select an object, the controls in the dialog box re ect the
document’s current default gradient.
3. Specify the colors and gradient stop positions for the gradient, if
necessary.
4. Enter a name for the gradient swatch.
5. Click the OK button to save the gradient swatch. InDesign adds
the gradient swatch to the list of swatches in the Swatches panel.
You can also apply and edit gradients using the Gradient panel (see
Figure 5-48). Like the New Gradient Swatch and Gradient Options
dialog boxes, the Gradient panel contains a gradient ramp, with
center points above the ramp and gradient stops below.
To apply a gradient, select a path, display the Gradient panel, then
click the gradient ramp. InDesign applies the gradient object.
Using the
Gradient Panel
Gradient ramp Center point
Gradient stop Gradient stop
Selected gradient stop
Unselected gradient stop
To change the position of a
center point, select it…
…and then drag it to a new
location on the gradient ramp.
To change the position of a
gradient stop, select it…
…and then drag it to a new
location on the gradient ramp.
To add a new gradient stop,
position the cursor below the
gradient ramp…
…and click.
-
Gradient Controls
…and then drag it away from
the gradient ramp.
To remove a gradient stop,
select it…
Real_World_Adobe_InDesign_CS4b.pdf 372Real_World_Adobe_InDesign_CS4b.pdf 372 08/04/2009 05:55:09 p.m.08/04/2009 05:55:09 p.m.
Choose New Gradient
Swatch from the Swatches
panel menu (or click the
New Swatch button).
InDesign displays the New
Gradient Swatch dialog box.
Enter a name for the
gradient (optional,
but a good idea).
Set up the gradient. If
you selected an object
formatted using a
gradient, that gradient’s
properties will appear here.
Click the OK
button…
-
Creating a
Gradient Swatch
…and InDesign adds the gradient to
the list of available swatches.
To edit a gradient applied to a path, select the path, then display
the Gradient panel (if it’s not already visible). InDesign loads the gra-
dient applied to the path into the Gradient panel. Adjust the gradient
stop positions, add gradient stops, or change the position of center
points or colors, and InDesign applies the changes to the path.
To edit the color, gradient type, or angle of a gradient you’ve applied
to an object, select the object and then display the Gradient panel.
You can use any of the following techniques to change the gradient.
Drag a gradient stop to a new position on the gradient ramp.
Select the stop and enter a new value in the Location eld.
Add a new gradient stop by clicking below the gradient ramp.
Change the position of the center point by dragging it above the
gradient ramp. Or you can select the center point and enter a
new value in the Location eld.
Remove a stop by dragging it away from the gradient ramp.
Reverse the gradient ramp by clicking the Reverse button.
Change the angle of a linear gradient by entering a new value in
the Angle eld.
Editing Gradients
Real_World_Adobe_InDesign_CS4b.pdf 373Real_World_Adobe_InDesign_CS4b.pdf 373 08/04/2009 05:55:09 p.m.08/04/2009 05:55:09 p.m.
.
Change the color of a gradient stop using the Swatches panel. To
do this, select the stop, then hold down Option/Alt and click a
color swatch in the Swatches panel (see Figure 5-49).
Change the color of a gradient stop to an unnamed color. To
do this, select the gradient stop, then display the Color panel.
Specify a color. As you change color values in the Color panel,
InDesign changes the color applied to the gradient stop.
Change the gradient type using the Type pop-up menu.
It’s something every
InDesign user has done at
least once—you select a
gradient stop, then click a
color swatch in the Swatches
panel, expecting to apply the
color to the gradient stop.
Instead, InDesign lls (or
strokes) the path with the
color. How the heck do you
get a swatch color into a
gradient stop?
Select a gradient stop.
Hold down Option/
Alt and click the
color swatch in the
Swatches panel.
InDesign assigns the
color to the gradient
stop.
-
Getting a Swatch Color
into a Gradient Stop
You use the Gradient panel
to edit the gradient applied
to an object. You could,
as shown in this example,
change the location of the
center point between two
gradient stops.
One thing that the Gradient panel has that you
won’t nd elsewhere—the Reverse button, which
reverses the direction of the gradient.
-
Using the
Gradient Panel
Real_World_Adobe_InDesign_CS4b.pdf 374Real_World_Adobe_InDesign_CS4b.pdf 374 08/04/2009 05:55:09 p.m.08/04/2009 05:55:09 p.m.
To apply a gradient to more than one path, select the paths (which
need not already have gradients applied to their lls or strokes), then
drag the Gradient tool. e point at which you start dragging denes
the starting point of the gradient (see Figure 5-50).
Applying a Gradient
to Multiple Paths
Select a series of paths. In this exam-
ple, each path has been formatted
using a radial gradient ll. Position
the Gradient tool over the point at
which you want to place the center
point (for a radial gradient) or start
(for a linear gradient), and then drag
the tool.
InDesign applies a single
gradient to the selected paths.
-
Applying a Gradient to
Multiple Objects
Transparency
Hands down, InDesign’s sexiest feature is its transparency eects.
ese include drop shadows, feathering, support for transparency
inside Photoshop and Illustrator graphics, changing an object’s
opacity or blending mode… the list goes on. But before we go any
further with this wild transparency talk, we just need to be clear
about something: PostScript’s basic drawing model does not allow
for transparency. Period.
So how does InDesign print transparent objects to a PostScript
printer? Simple: it cheats. When the time comes to print, InDesign
uses clipping paths to create the illusion of transparency and/or
rasterizes the transparent objects and sends the printer separated
image data. All of this takes place in the background—InDesign
does not change the objects in your document. Instead, it changes
the way that the objects are sent to the printer.
e way that InDesign sends the transparent objects to the printer
is dened by the Transparency Flattener settings for the spread con-
taining the objects. Flattener settings are described in Chapter 11,
Real_World_Adobe_InDesign_CS4b.pdf 375Real_World_Adobe_InDesign_CS4b.pdf 375 08/04/2009 05:55:09 p.m.08/04/2009 05:55:09 p.m.
.
“Printing.” As a rule of thumb, however, transparent objects make
documents somewhat harder to print.
is brings us to our patented “With Power Comes Responsibil-
ity” speech. It’s very easy to come up with combinations of trans-
parent objects and attener settings that create a document that can
slow a printer to a crawl, or to produce les that take up enormous
amounts of space on your hard drive.
is doesn’t mean that you should avoid using transparency. at
would be silly, given that there’s sometimes no other way to create
a specic creative eect. It’s just that you must bear in mind that
using the feature comes at a cost, and that you need to weigh the
potential risks (slower printing, no printing) against the benet (a
cool layout).
If you’re familiar with Photoshop’s approach to transparency,
you’ll nd InDesign’s a bit dierent: In Photoshop, transparency is
an attribute of layers; in InDesign, transparency is an attribute of
individual page items—or elements of a page item. For example, you
can set the opacity of the ll separately from its stroke, or give the
text inside a frame an eect separate from the frame itself.
Adobe PDF Print Engine. PDF les (since Acrobat 5) support
transparency. So if you’re printing to a device that can understand
transparency in a PDF le, then you don’t have to worry about trans-
parency attening. For example, RIPs based on Adobe’s PDF Print
Engine can print native PDF les with transparency without rst
converting them to PostScript. No PostScript, no problem!
However, if you export an EPS or Acrobat 4 PDF le, or print or
create a PDF le from the Print dialog box, then attening kicks in.
To apply transparency to a page item, work your way through the
following steps (see Figure 5-51).
1. Select a page item with the Selection or Direct Selection tool.
2. Display the Eects panel, if it’s not already visible (choose Eects
from the Window menu).
3. Click on the aspect of the page item you want to aect: Stroke,
Fill, Text (which applies to the text inside a text frame), or Object
(which aects all these facets at once).
4. Choose an option from the Blending Mode pop-up menu,
if necessary.
5. Enter a value in the Opacity eld (or drag the associated slider).
Applying Transparency
Real_World_Adobe_InDesign_CS4b.pdf 376Real_World_Adobe_InDesign_CS4b.pdf 376 08/04/2009 05:55:09 p.m.08/04/2009 05:55:09 p.m.
e transparency blending modes dene the way that the colors in
the transparent objects interact with objects that fall behind them.
When you apply transparency, InDesign calculates the resulting
color based on each color component of the foreground and back-
ground colors. For two overlapping process colors, for example, the
eect of the blending mode will almost certainly dier for each of
the four inks. When we say that a blending mode behaves in a par-
ticular way for a specic gray percentage value, we mean the percent-
age of a color component.
e eect of a blending mode is dependent on the current color
management settings and the Transparency Blend Space (in the Edit
menu). e ink values of the colors in a stack of transparent objects,
for example, will never exceed the maximum ink coverage for the
current color management prole. (For the sake of your press opera-
tor’s sanity, don’t try to prove us wrong.)
e following notes provide a quick description of the most
useful of the blending modes. In these descriptions, the term “fore-
ground color” refers to the color applied to the front-most object;
“background color” refers to the color of the background object, and
“resulting color” is the color you see where the two objects intersect.
Normal. e Normal blending mode adds the foreground color to
the background color. If the foreground color is black, and the opac-
ity percentage is 10%, then 10% black is added to the background
Blending Modes
-
Applying Transparency
to an Object
Select an object.
Display the Eects panel, if
it’s not already visible (press
Command/Ctrl-Shi-F10).
Choose a blending
mode.
You can also adjust opacity (but not
blending mode) using the Control panel.
Enter an opacity
percentage.
InDesign makes the
selected object transparent.
Is that cool, or what?
Real_World_Adobe_InDesign_CS4b.pdf 377Real_World_Adobe_InDesign_CS4b.pdf 377 08/04/2009 05:55:10 p.m.08/04/2009 05:55:10 p.m.
.
color to produce the resulting color. e Normal blending mode at
100% opacity turns transparency o.
Multiply. e Multiply blending mode always results in a darker
color. e one exception is when the foreground color is white or
Paper color, in which case this blending mode has no eect at all.
Multiply is very similar to overprinting one object over another (see
Chapter 10, “Color,” for more on overprinting), or overlapping lines
when drawing with felt pens. We think the Multiply blend mode is
the best choice for drop shadows (see below).
Screen. is blending mode almost always produces a resulting color
that is lighter than the background color (unless the foreground
color is black, which has no eect in this mode). e best real-world
denition of this blending mode comes from Adobe’s Russell Brown:
Screen is like projecting two slides on the same screen. e result is
always lighter than either of the two sources. If the background color
is black or white, the background color remains unchanged.
Overlay. e Overlay blending mode compares the foreground and
background colors, accentuating highlights and shadows in each by
lightening light colors and darkening dark colors. If either the fore-
ground or background color is 50-percent gray, then this mode has
no eect. Overlay increases color contrast and can get out of hand
quickly; we usually reduce the Opacity slider to temper the eect.
So Light. While most people describe the So Light blending
mode as shining a so spotlight on the background color, we like to
think of this mode in terms of playing with semi-translucent colored
acetate. So Light has no eect if the background color is black or
white, but it subtly enhances any other color, making darker colors
(in either the foreground or background) a little darker and lighter
colors a little lighter.
Hard Light. e Hard Light mode is something like two blending
modes in one: If the foreground color is lighter than 50-percent gray,
the Hard Light mode lightens the background color similar to the
Screen mode; if the foreground color is darker than 50-percent gray,
it darkens it using a method similar to the Multiply mode.
Color Dodge and Color Burn. Color Dodge both lightens and
slightly colorizes with the foreground color. Color Burn colorizes
while darkening the background. We nd it’s hard to predict the
Real_World_Adobe_InDesign_CS4b.pdf 378Real_World_Adobe_InDesign_CS4b.pdf 378 08/04/2009 05:55:10 p.m.08/04/2009 05:55:10 p.m.
result with either of these, especially because you’ll see radically dif-
ferent eects depending on whether your Transparency Blend Space
is set to RGB or CMYK.
Darken. e resulting color is equal to the darker of the foreground
and background colors.
Lighten. e resulting color is equal to the lighter of the foreground
and background colors.
Hue. e Hue blending mode creates a new color by blending the
color of the foreground object with the luminance (brightness) and
saturation of the background. Putting a black object set to Hue over a
colored object simply desaturates the background colors.
Saturation. e Saturation mode creates a new color by blending the
foreground color’s saturation and the hue (color) with luminance
values of the background color.
Color. e Color mode is slightly dierent from the Hue mode; it
combines the color and the saturation of the foreground color with
with the luminance of the background color. Placing a solid color set
to Color over an image colorizes the image, like a fake duotone.
Luminosity. Luminosity creates a new color by blending the bright-
ness of the foreground color with the hue and saturation of the back-
ground color.
So what about those options at the bottom of the Eects panel? e
meaning of the terms “Isolate Blending” and “Knockout Group” is
hardly self evident. Both options apply only to groups.
Isolate Blending. When you turn on the Isolate Blending option, and
objects in the group you’ve selected use blending modes other than
the Normal blending mode, InDesign changes the way that the object
in the group interacts with objects behind the group. Regardless of
the blending mode you’ve assigned to the group objects, InDesign
treats them as if the Normal blending mode were assigned. Inside
the group, blending modes behave as you specied (see Figure 5-63).
Knockout Group. When you select a group containing transparent
objects and turn on the Knockout Group option, InDesign makes
the objects in the group opaque to each other (see Figure 5-64). In
Transparency Options
Real_World_Adobe_InDesign_CS4b.pdf 379Real_World_Adobe_InDesign_CS4b.pdf 379 08/04/2009 05:55:10 p.m.08/04/2009 05:55:10 p.m.
.
other words, the option should really be named “Knockout Objects
Inside the Group,” but there’s not room in the panel. Objects outside
the group are treated according to the state of the Isolate Blending
option (see above). And yes, it is possible to have both Isolate Blend-
ing and Knockout Group turned on.
ere’s a dierence between applying transparency to a group and
applying transparency to the objects inside a group (see Figure 5-65).
When you apply transparency to a group, InDesign will override the
transparency settings for any objects in the group that have no trans-
parency applied to them, but leaves transparent objects unchanged.
Unfortunately, any transparency settings applied to a group are
lost if or when you ungroup the objects.
Groups and
Transparency
-
Isolate Blending
e selected group contains
three circles. Each circle is
lled with Black, set to 50%
transparency, and uses the
Multiply blending mode.
e triangle is outside and
behind the group.
With Isolate Blending turned o,
the foreground colors blend with
the background colors according
to their blending modes.
Turn Isolate Blending on, and
InDesign changes the way that the
foreground colors interact with the
background colors.
-
Knockout Group
With Knockout Group
turned o, the objects inside
the group aect each other.
Aer we group the objects together, we
turn on Knockout Group. e objects
in the group become opaque to each
other, but are still transparent to any
background objects.
e selected group contains
three circles. Each circle is
lled with Black, set to 50%
transparency, and uses the
Multiply blending mode.
e triangle is outside and
behind the group.
Real_World_Adobe_InDesign_CS4b.pdf 380Real_World_Adobe_InDesign_CS4b.pdf 380 08/04/2009 05:55:10 p.m.08/04/2009 05:55:10 p.m.
-
Applying Transparency
to a Group
Here the three circles have no
transparency. Instead, they’ve been
grouped and the 50% transparency
has been applied to the group.
ree ungrouped circles, each lled
with a dierent tint of Black and
set to 50% transparency (with the
Normal blend mode).
Transparency Eects
What is it about drop shadows, bevels, and glows? Does everyone
want their page items to appear as if they are the highly mobile space
battleship Nadesico, oating deantly above the page? We’re not sure,
but we do know that these ubiquitous two-dimensional imperson-
ations of three-dimensional space are something no graphic designer
will leave home without—at least until clients stop asking for them.
Fortunately, InDesign lets you apply all of these eects to page
items (text, frames, imported images, and so on), plus a half-dozen
more, including Satin, Inner Shadow, and three dierent kinds of
feathering. You can nd them hiding in the Eects panel, the Eects
submenu (under the Context menu or the Object menu), or the
Eects pop-up menu in the Control panel.
Moreover, you can apply each of InDesign’s eects to an entire
object or just its stroke, ll, or—in the case of a text frame—text. For
example, you could apply a Bevel and Emboss eect to a frame’s ll
color and a drop shadow to the text inside that frame.
Once again we nd ourselves wanting to warn, “with power
comes responsibility.” Just because you can apply eects to every-
thing in sight doesn’t mean you should. Remember that overuse of
eects can cause blindness and itchy palms.
Here’s how to apply an eect to an object (see Figure 5-66):
1. Select an object with the Selection or Direct Selection tool. (To
apply an eect to an image separate from its frame, click on the
image itself with the Direct Selection tool.)
2. In either the Eects panel or the Control panel, choose what
aspect of the object you want to aect: Stroke, Fill, Text, or
Object (to apply the eect to the whole enchilada).
Real_World_Adobe_InDesign_CS4b.pdf 381Real_World_Adobe_InDesign_CS4b.pdf 381 08/04/2009 05:55:10 p.m.08/04/2009 05:55:10 p.m.
.
-
Transparency Eects
You can choose to apply the
eect to the stroke (choose
Stroke), to the ll (choose
Fill), to the text (choose
Text), or to all of the above
(choose Object).
Select a page item.
Choose a transparency
eect from the Eects panel
menu, or from the “ fx”
pop-up menu.
Clicking a checkbox turns
an eect on (or o); click
the name of the eect to see
eect options.
e “ fx” icon indicates that
one or more eects have
been applied to the object.
3. Choose the eect you want from either the Eects (“fx”) pop-up
menu in the Eects panel or Control panel, or from the Eects
submenu (in the Object or Context menu). Alternately, you can
simply double-click on the Object, Stroke, Fill, or Text section of
the Eect panel that you chose in Step 2.
4. You can adjust the settings for that eect in the Eects dialog
box. You can also add more than one eect to the the object’s
stroke, ll, or text by clicking on the checkboxes and panes
along the le edge of the dialog box, and by choosing from the
“Settings for” pop-up menu.
5. Turn on the Preview checkbox to see the eect while the dialog
box is still open, or click OK to accept the changes.
Real_World_Adobe_InDesign_CS4b.pdf 382Real_World_Adobe_InDesign_CS4b.pdf 382 08/04/2009 05:55:10 p.m.08/04/2009 05:55:10 p.m.
Note that if you apply an eect to the whole object, and it’s a text
frame with a ll of None, InDesign applies the eect to the text inside
the frame. Give the frame an opaque ll to aect the frame itself.
e most popular (by far) transparency eect in InDesign’s arse-
nal is the drop shadow. It’s so common that Adobe even added a
Drop Shadow button in the Control panel. Just select an object and
click the button and a default drop shadow is applied (see “Setting
Defaults,” later in this section).
Alternately, you can use the Eects dialog box to control the shad-
ow’s position, color, transparency, noise, and size (see Figure 5-56).
Most of the controls are self-explanatory, but here are some things
to keep in mind.
e Mode pop-up menu sets the transparency blending mode
for the drop shadow. We’ve described all of the useful blend-
ing modes in the section on Transparency, above. e Multiply
blending mode works well with drop shadows.
You can dene the color of the drop shadow by clicking on the
small color swatch to the right of the Mode pop-up menu. e
Opacity eld denes the darkest part of the shadow.
You can control the position of the shadow in two ways: Either
by adjusting the Angle and Distance elds or by changing the
X Oset and Y Oset elds. If you want all your drop shadows
to have the same angle, turn on the Use Global Light checkbox.
Later, to change the global light setting, just change it anywhere
in the Eects dialog box, or choose Global Light from the Eect
panel menu.
A hard-edged shadow is probably not what you were looking
for—what you need is a way to soen the edges of the shadow so
that it looks more realistic. at’s exactly what the Size eld does
(see Figure 5-57).
e Spread eld controls the intensity of the shadow. Technically,
it controls how far out from the center of the shadow the darkest
portion of the shadow will sit. Choosing 50 percent means the
darkest area of the shadow takes up half the size of the shadow.
If you want a more realistic shadow (instead of a mathematically
pure one), bump up the Noise eld a little bit—just 4 or 5 percent
noise makes a huge dierence (see Figure 5-58). Noise values
above 30 or 40 percent are mostly good for special grunge eects.
Drop Shadows
Real_World_Adobe_InDesign_CS4b.pdf 383Real_World_Adobe_InDesign_CS4b.pdf 383 08/04/2009 05:55:11 p.m.08/04/2009 05:55:11 p.m.
.
-
Applying a Drop
Shadow
Typical Display
High Quality Display
Display performance settings
have a big eect on the way
that InDesign displays drop
shadows, but not on how
they print; that’s up to the
transparency attener.
Select an object Choose Drop Shadow from the
“ fx” pop-up menu (or from Eects
submenu of the Context menu or
Object menu, or from the Eects
panel menu).
Enter a value
to set the
transparency
of the shadow.
Click the OK button,
and InDesign applies
the drop shadow.
-
Size and Spread
Enter a value in the Size eld to
control the diusion of the drop
shadow. Entering zero produces a
hard-edged (but still bitmapped)
shadow.
Entering a large Size value
would make the shadow disappear
altogether for this 24-point example
text.
Increasing the
Spread value
makes the
shadow more
dense.
Real_World_Adobe_InDesign_CS4b.pdf 384Real_World_Adobe_InDesign_CS4b.pdf 384 08/04/2009 05:55:11 p.m.08/04/2009 05:55:11 p.m.
If your object is partially transparent, you’ll be able to see your
drop shadow underneath it. If that doesn’t appeal to you, turn
on the Object Knocks Out Shadow checkbox—this ensures that
the drop shadow is removed from behind the object itself.
If you’ve used other e ects on your object—such as a Directional
Feather that blurs out one side of the shape—you can control
whether or not the drop shadow will apply to the object itself (as
though there were no other e ects applied) or the object plus the
e ect. If you want the latter, turn on the Shadow Honors Other
E ects checkbox.
e Inner Shadow e ect is identical to the Drop Shadow e ect except
that the shadow is drawn inside the object rather than outside of it.
e result looks like the object is set behind the rest of the page. Note
that the E ects dialog box settings contains a eld labeled Choke; it
does essentially the same thing as Spread: It controls the position of
the darkest part of the shadow (see Figure 5-59).
In early versions of InDesign, we used to make glows around objects
by making a drop shadow with the horizontal and vertical o set set
to zero. It’s easier to just use the Outer Glow feature (see Figure 5-60).
InDesign also o ers an Inner Glow e ect which sets the glow inside
the object rather than around it, while retaining a sharp vector edge.
For the ultimate in faux three-dimensionality, consider applying
the Bevel and Emboss e ect to an object (see Figure 5-61). InDesign
o ers four types of e ect in the Style pop-up menu: Inner Bevel,
Outer Bevel, Emboss, and Pillow Emboss. e last three in this list
a ect the area around the object, and in fact look pretty dumb unless
Inner Shadow
Outer and Inner Glow
Bevel and Emboss
-
Shadow Noise
Real_World_Adobe_InDesign_CS4b.pdf 385Real_World_Adobe_InDesign_CS4b.pdf 385 08/04/2009 05:55:11 p.m.08/04/2009 05:55:11 p.m.