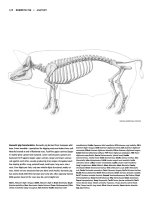
Drawing Realistic Ears pdf
Bạn đang xem bản rút gọn của tài liệu. Xem và tải ngay bản đầy đủ của tài liệu tại đây (76.79 KB, 6 trang )
Drawing Realistic Ears
Unless you are a cartoon artist, drawing realistic ears is one of the the
hardest parts of the human body you will ever learn to draw. Not because it
is hard to draw - but because very few artists think it is important. I mean,
after all "it is nothing but an ear!" Ok, I know I just said it was hard, but let
me show you how to approach drawing realistic ears in a way that will make
drawing them seem like a piece of cake.
Observing a human subject and their body parts is a challenge, especially
attempting drawing realistic ears as they actually are - not as we think they
are. It is even harder if the person is familiar to us, so I have found that using
a grid helps to stay in perspective. By using the one-inch squares as
reference points, or by drawing a face or ear upside down, you are forced to
be observant where maybe normally you wouldn't be.
The main thing is to not get stuck with specific proportions, as no human
face is perfect. The next time you leave your house, pay special attention to
the people you see. Look at their ears - notice the different sizes and shapes.
Making an effort to notice these details will help you in your quest of
drawing realistic ears by making you realize that there is no such thing as a
perfect ear.
Ear Proportions
When applying artistic proportions to the ear, mouth, or an eye - try to go
slow, stay alert, and trust your instincts. The ear is important, as it is the link
between the head and the neck. Place it in correct proportion if possible -
The width of the ear is half of its height.
I have found that what you are seeing in
front of you is not always what you are
actually seeing. Understand? Different
angles or viewpoints always change
things visually, which unknowingly
forces us to place the eyes too high on the
face, shorten the skull too much, or place
the ears crooked on the head or one larger
than the other. Drawing realistic ears is no different. Draw what you see, not
what you think you see!
I'm going to bold this next section because it is so important.
Regardless of the body proportions, drawing realistic ears
have a rule of thumb to follow Learn this rule, and if you are
drawing cartoons or hyper-real portraits, you will have much
better results. The bottom of the ear is in line with the bottom
of the nose where it connects to the head. The top of the ear
should be in line with the brow bone or eyebrow. The top part of the ear
where it connects to the head is in line with the eyes - sketch the face and
draw a line from one to another - remembering that the bottom of the ear
varies with each person. Some people have long ears, and others have short
ones. Three rules of thumb that never change is that there are three main
basic parts of the ear that are necessary: the outer edge, the inner edge, and
the hole leading to the eardrum. If you can get them down on paper, the
battle is half done.
The Shapes of the Ear
In the picture to the right picture I have outlined the most important lines to
keep in mind when drawing realistic ears. The blue line is the outer parts of
the ear, and the orange line the inner parts. Study these curves and also look
at some reference photos to become more familiar with the important
structures of the ear. When you see the ear as made up only of these lines,
you will have come a long way in your understanding of the ear. As you
begin to understand your ear drawings should greatly improve.
Drawing with Live Models
When you are drawing the human ear, you usually are either making one up
or using a photograph. The other alternative is to use a live model for
portrait work. When using a live model,
there are a few rules that portrait
professionals follow for the correct
proportion of work:
Sit the model down, placing them
higher than yourself.
Make sure they are comfortable.
Make sure they can lean against
something.
Ask them if they would like a stool for
their feet.
When placing yourself, try to place
yourself far away from the model, for true
proportion.
Before drawing the ears on the head,
do not draw the head too high on the canvas, as it will make them too tall; if
you draw the head too low, the model will look as if he was too small.
Most portrait artists draw the head in three settings if possible, four if
needed - 1-½ to 2 hours per setting approximately.
Make sure you use contour lines with a light pencil to get the correct outline
and proportion of the ear before beginning the shading. Ears have lots of
"crooks and crevices" that require lots of shading, so knowing where the
light is located will help with the shadow. If not, place an artist's lamp
toward the ear, or sit the model next to a sunny window. The shadows will
make the ear just as attractive as the correct location on the face!