unit 43 internet of things
Bạn đang xem bản rút gọn của tài liệu. Xem và tải ngay bản đầy đủ của tài liệu tại đây (1.02 MB, 34 trang )
<span class="text_page_counter">Trang 1</span><div class="page_container" data-page="1">
<b>Quali ca on TEC Level 5 HND Diploma in Compu ng </b>
<b>Unit number and tle Unit 43: Internet of Things </b>
<b>Student declara on </b>
I cer fy that the assignment submission is en rely my own work and I fully understand the consequences of plagiarism. I understand that making a false declara on is a form of malprac ce.
<b>Student’s signature Grading grid </b>
</div><span class="text_page_counter">Trang 3</span><div class="page_container" data-page="3"><b>❒ Summa ve Feedback: </b>❒<b>❒ Resubmission Feedback:</b>
<b>nternal Veri er’s Comments:</b>
</div><span class="text_page_counter">Trang 5</span><div class="page_container" data-page="5">Assignment Brief 2 (RQF) Higher National Certificate/Diploma in Business Student Name/ID Number:
Unit Number and Title: <sub>Unit 43 Internet of Things </sub><sub>–</sub>
Assignment Title: Assignment 2 Internet of Things –Issue Date:
Submission Date: Internal Verifier Name: Date:
<b>Submission Format: </b>
Format: This assignment is an Individual assignment and speci cally including 1 document: You must use font Calibri size 12, set number of the pages and use multiple line spacing at 1.3. Margins must be: left: 1.25 cm; right: 1 cm; top: 1 cm and bottom: 1 cm. The reference follows Harvard referencing system. The recommended word limit is 2.000-2.500 words. You will not be penalized for exceeding the total word limit. The cover page of the report has to be the Assignment front sheet 2.
Submission Students are compulsory to submit the assignment in due date and in a way requested by
</div><span class="text_page_counter">Trang 6</span><div class="page_container" data-page="6">books etc. If you use ideas, quotes or data (such as diagrams) from books, journals or other sources, you must reference your sources, using the Harvard style. Make sure that you know how to reference properly, and that understand the guidelines on plagiarism. If you do not, you definitely get fail
<b>Unit Learning Outcomes: </b>
<b>LO1 Analyse what aspects of IoT are necessary and appropriate when designing so ware applica ons LO2 Outline a plan for an appropriate IoT applica on using common architecture, frameworks, tools, </b>
hardware and APIs
<b>LO3 Develop an IoT applica on using any combination of hardware, so ware, data, pla orms and services. </b>
</div><span class="text_page_counter">Trang 7</span><div class="page_container" data-page="7"><b>LO4 Evaluate your IoT application and detail the problem your IoT application solves, the poten al impact </b>
on people, business, society and the end user and the problems it might encounter when integra ng into
<b>the wider IoT ecosystem Assignment Brief and Guidance: </b>
You currently work as a product developer for a new startup where you design IoT products for the consumer, corporate, government and defence clients. As part of your role your manager has tasked you to plan and develop a new IoT product, service or applica on for a poten al client. You are required to iden fy a target user and conduct tests with this user and include this feedback into mul ple itera ve versions of your product.
<b>Part 1 (Assignment 1):: For the rst part, you must: </b>
Plan an IoT applica on for a speci c target end user and the tests you intend to conduct with this user. This plan will be in the form of a document and will include suppor ng evidence and material, such as user personas and customer journey maps.
Create mul ple itera ons of your applica on and modify each itera on with enhancements gathered from user feedback and experimenta on. This will follow the pathway outlined in your plan.(log book,)
<b>Part 2 (Assignment 2): For the second part, you must produce a report to prove that: </b>
Show evidence about Developed IoT applica on using any combina on of hardware, so ware, data, pla orms and services (video or images of your IoT system with code snippet)
Evaluate your IoT applica on and detail the problem your IoT applica on solves, the poten al impact on people, business, society and the end user and the problems it might encounter when integra ng into the wider IoT ecosystem
</div><span class="text_page_counter">Trang 9</span><div class="page_container" data-page="9">Learning Outcomes and Assessment Criteria
LO3 Develop an IoT application using any combination of hardware, software, data, platforms and services.
P5 Employ an appropriate set of tools to develop your plan into an IoT application. P6 Run end user experiments and examines feedback.
M5 Reconcile and evaluate end user feedback and determine advantages and disadvantages of your chosen IoT techniques.
D3 Critical evaluate security risks that your application might encounter.
LO4 Evaluate your IoT application and detail the problem your IoT application solves, the potential impact on people, business, society and the end user and the problems it might encounter when integrating into the wider IoT ecosystem
P7 Evaluate end user feedback from your IoT application.
M6 Undertake a critical review and compare your final application with the original plan.
D4 Critique the overall success of your application. Did it solve your problem? What is the potential impact on people, business, society and the end user? What problems might it encounter when integrating into the wider IoT ecosystem?
</div><span class="text_page_counter">Trang 10</span><div class="page_container" data-page="10"><b>Table of Contents </b>
ASSIGNMENT BRIEF 2 (RQF) ... 3
H N C /D B ... 3
</div><span class="text_page_counter">Trang 11</span><div class="page_container" data-page="11">I. INTRODUCTION: ... 6
II. EMPLOY AN APPROPRIATE SET OF TOOLS TO DEVELOP YOUR PLAN INTO AN IOT APPLICATION. (P5) 6 1. I<small>NTRODUCTION</small>:... 6
2. I<small>MPLEMENTATION FROM DESIGN</small>... 7
3. P<small>ROGRAM </small>C<small>OMPILER ON </small>A<small>RDUINO</small> ... 10
4. E<small>RROR AND ROBLEM WHEN DEPLOYIN</small>P <small>G </small>/<small> IMPLEMENT PROJECT</small>: ... 11
III. RUN END USER EXPERIMENTS AND EXAMINES FEEDBACK. (P6)... 12
1. I<small>NTRODUCTION</small> ... 12
2. C<small>ODE IMPLEMENTS FUNCTIONS IN DETAIL</small> ... 12
3. T<small>EST CASE</small> ... 14
4. T<small>EST CASE SUMMARY</small> ... 14
IV. EVALUATE END USER FEEDBACK FROM YOUR IOT APPLICATION. (P7)...14
1. I<small>NTRODUCTION</small> ... E<small>RROR OOKMARK NOT DEFINED</small>! B .2. U<small>SER FEEBACK</small> ... E<small>RROR OOKMARK NOT DEFINED</small>! B .3. S<small>ELF EVALUATION</small>- ... E<small>RROR </small>!B<small>OOKMARK NOT DEFINED</small>.4. O<small>PTIONS TO UPGRADE THE PRODUCT IN THE NEXT VERSIONS</small>... E<small>RROR </small>!B<small>OOKMARK NOT DEFINED</small>.REFERENCE ... 15
</div><span class="text_page_counter">Trang 12</span><div class="page_container" data-page="12"><b>Assignment 2 Answer </b>
<b>Introduc on: </b>
In this Internet of Things (IoT) project, we build a model of a smart home equipped with diverse sensors, all programmed using so ware and Arduino for comprehension and opera on. The primary aim of the smart home is to enhance convenience and safety, ensuring the avoidance of any poten al hazards.
<b>Employ an appropriate set of tools to develop your plan into an IoT applica on. (P5) 1. Introduc on: </b>
We u lize both the Arduino Starter Kit and the Arduino So ware sourced from these pla orms to assist in the construc on of the smart home project as we build this model.
</div><span class="text_page_counter">Trang 13</span><div class="page_container" data-page="13"><b>2. Implementa on from design </b>
The smart home system uses the following components: Arduino Uno.
HC SR04 distance sensor. DHT11 temperature sensor. MQ2 gas sensor.
SG90 servo motor. Male-female jumper wires. Buzzer.
LCD I2C.
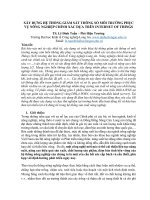
<b> Step 1: </b>
To connect the SG90 servo to the Arduino Uno, establish the connec on by linking the servo's Vcc and Gnd pins to the Arduino's 5V and GND pins, respec vely. Addi onally, connect the servo's signal pin to pin 5 on the Arduino Uno. This con gura on supplies power and control signals to the servo, enabling the Arduino Uno to govern the servo motor.
</div><span class="text_page_counter">Trang 14</span><div class="page_container" data-page="14">This descrip on outlines the process of connec ng the DHT11 temperature and humidity sensor to the Arduino Uno. The detailed instructions involve connec ng the Vcc and GND pins of the DHT11 to the 5V and GND pins of the Arduino Uno, respec vely. Addi onally, the signal pin of the DHT11 is connected to pin 3 of the Arduino Uno. This sequence of connec ons serves to provide power to the sensor and establish communication between the Arduino Uno and the DHT11, enabling the Arduino to read temperature and humidity data from the sensor.
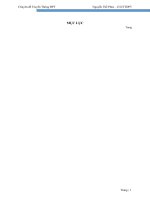
</div><span class="text_page_counter">Trang 15</span><div class="page_container" data-page="15"><b> Step 3: </b>
This step outlines the procedure for connec ng the MQ2 gas sensor to the Arduino Uno. It involves connec ng the power (VCC) and ground (GND) pins of the MQ2 sensor to the 5V and GND pins of the Arduino Uno, respec vely. Addi onally, the signal pin of the MQ2 is linked to analog pin A0 on the Arduino Uno. This con guration ensures that the sensor receives power and enables the Arduino to read the analog signal from the MQ2, facilita ng the detection of various gas concentra ons.
</div><span class="text_page_counter">Trang 16</span><div class="page_container" data-page="16">This step demonstrates the process of connec ng the HC-SR04 ultrasonic distance sensor to the Arduino Uno. To supply power, the VCC and GND pins of the HC-SR04 are linked to the 5V and GND pins of the Arduino Uno, respec vely. Furthermore, the Trig pin of the HC-SR04 is connected to pin 6, and the Echo pin is connected to pin 7 on the Arduino Uno. This con gura on enables the Arduino to both control and gather data from the sensor, facilita ng the measurement of distance using ultrasonic waves.
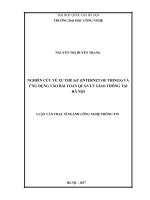
</div><span class="text_page_counter">Trang 17</span><div class="page_container" data-page="17"><b>Step 5: </b>
The illustra on illustrates the connec on process for a buzzer speaker to an Arduino Uno. Power is supplied by linking the VCC and GND pins of the buzzer speaker to the 5V and GND pins of the Arduino Uno, respec vely. Furthermore, the I/O pin of the buzzer speaker is connected to pin 4 on the Arduino Uno, enabling the Arduino to manage the buzzer speaker and produce audible signals to indicate speci c events or conditions within the smart home environment.
</div><span class="text_page_counter">Trang 18</span><div class="page_container" data-page="18">informa on processing.
<b>• Interac on and Connec vity: </b>
The Arduino Uno R3 SMD is equipped with mul ple pins that enable connec ons to external components like sensors, motors, and displays. These pins provide a means to interact with the surrounding environment.
<b> HC SR04: </b>
The HC-SR04 ultrasonic sensor is widely recognized for its applica on in determining the distance between a sensor and an object using the time- - ight concept. of
<b>The HC-SR04 ultrasonic eye's primary job is to: </b>
<b>Measurement of Distance : The HC-SR04 Ultrasonic Sensor emits ultrasonic waves, measures the me taken for the signal to </b>
return a er interac ng with an object, and calculates the distance between the sensor and the object based on the speed of sound
</div><span class="text_page_counter">Trang 19</span><div class="page_container" data-page="19">in the air. This enables non-contact distance measurement. The HC-SR04 operates without physical contact with the object, making it suitable for applica ons where a non-intrusive distance measurement is required.
<b>Accurate and fast: The HC-SR04 ultrasonic sensor is typically u lized for distance measurement with notable precision and </b>
<b>impressive speed. Its rapid response mes enable e icient execu on of ac ons or controls based on distance measurements. MQ2 Func on: </b>
The MQ2 is a gas sensor designed to detect a range of gases, including methane, propane, butane, and smoke. It is widely employed for tasks such as gas leakage detec on and air quality monitoring. The sensor o ers analog output that is propor onal to the concentra on of the detected gas.
<b>Buzzer Func on: </b>
The buzzer serves as an auditory signaling device, genera ng sound or tones in response to an applied electrical signal. It nds applica on in diverse projects where it is employed for purposes such as alarms, noti ca ons, or signaling speci c events.
<b>How does the system operate? </b>
A er connec ng the wires for the devices and supplying power:
When the HC SR04 sensor registers a distance signal within the 50cm range, it triggers the SG90 servo motor to automa cally rotate 90 degrees, thereby opening the system's door.
</div><span class="text_page_counter">Trang 20</span><div class="page_container" data-page="20">The system monitors MQ2 sensor values, and if the gas reading surpasses 100, the buzzer ac vates to no fy the user of a poten al gas leak inside the house.
<b>LCD I2C func on: </b>
LCD I2C is a display screen. It displays temperature and humidity.
<b>3. Program Compiler on Arduino </b>
Step 1: Open App Arduino.
</div><span class="text_page_counter">Trang 21</span><div class="page_container" data-page="21">Step 2: Input code in app Arduino.
Clicking on the checkmark above the applica on will display an output like this, signifying that the code is valid and ready for use
</div><span class="text_page_counter">Trang 22</span><div class="page_container" data-page="22"><b>4. Error and Problem when deploying / implement project: </b>
The repeti ve crashes during program uploads in the Arduino IDE may stem from a con ict with a concurrent Logitech program process.
</div><span class="text_page_counter">Trang 23</span><div class="page_container" data-page="23">To ensure compa bility with Arduino, it is necessary to acquire knowledge of and install the Arduino IDE since it is unable to automa cally iden fy the suitable Board and Port.
A substan al amount of me was invested in resolving a coding issue; This challenge arose due to the considerable heat generated by the microprocessor on the Arduino board.
<b>Run end user experiments and examines feedback. (P6) 1. Introduc on </b>
In this segment, we will provide an explana on of the opera onal principles embedded in the code.
<b>2. Code implements func ons in detail </b>
The code sec on will include the declara on of Arduino pins linked to the temperature and humidity sensor, gas sensor, buzzer, and servo motor within the smart home system.
</div><span class="text_page_counter">Trang 24</span><div class="page_container" data-page="24">input, designs the Trig and Echo pins of the HC-SR04 as outputs, and sets up an output pin for the relay .
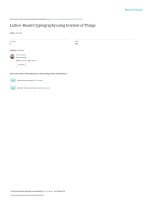
</div><span class="text_page_counter">Trang 25</span><div class="page_container" data-page="25">In this code snippet, the program retrieves temperature and humidity data from the DHT11 sensor and validates the data reading process for any errors. In the event of an error, a corresponding message is displayed on the screen. Contrary, if no errors are encountered, the acquired values are printed on the serial monitor. Following the data retrieval, the code compares the temperature values with a prede ned threshold of 30 degrees. If the temperature reading surpasses 30 degrees, the program ac vates the fan to mi gate the room temperature.
</div><span class="text_page_counter">Trang 27</span><div class="page_container" data-page="27">This code snippet reads input from the HC-SR04 distance sensor, computes the detected distance, and takes ac on accordingly. If the measured distance falls below 50cm, it triggers the signal pin of the servo, prompting the servo to rotate 90 degrees and open the door. Contrary, if the measured distance exceeds 50cm, the servo rotates back to 0 degrees, maintaining a sta onary posi on and indicating that the door is closed.
<b>3. Test case </b>
<b>1 Sensor distance </b> Someone comes to the detected distance.
The door will open automa cally.
<b>4. Test case summary </b>
The door is programmed to open when the measured distance is less than 50cm. In such cases, it automa cally swings 90 degrees but reverts to its original posi on at 0 degrees if the distance exceeds 50cm. The buzzer is triggered once the gas level reaches the predetermined warning threshold. Connec ng the system to a computer allows for real- me monitoring of sensor data.
<b>Evaluate end user feedback from your IoT applica on. (P7) Introduc on: </b>
The smart home ini a ve represents an advanced IoT system designed to deliver a contemporary and secure living experience. By incorpora ng intelligent sensors, the project strives to enhance comfort and promote energy e ciency within individuals' living spaces.
<b>User Feedback: </b>
Users express enthusiasm and creativity in u lizing smart home management applica ons. The utiliza on of
</div><span class="text_page_counter">Trang 28</span><div class="page_container" data-page="28">detect harmful gases and ensure user well-being.
The convenience a orded by distance sensors, automa cally triggering door opening in the presence of an individual, is highly valued for bringing a modern and hassle-free living experience to households.
</div><span class="text_page_counter">Trang 29</span><div class="page_container" data-page="29">Develop innova ve features such as voice control or integra on with artificial intelligence.
<b> Improved Performance: </b>
Op mize system performance to ensure greater stability and reliability.
<b> Open Device Support: </b>
Extend support for new smart devices in the market, broadening compa bility.
</div><span class="text_page_counter">Trang 30</span><div class="page_container" data-page="30">Reference
[1] Alaba, F. A., Othman, M., Hashem, I. T., & Alotaibi, A. F. (2017). Internet of Things security: A
</div><span class="text_page_counter">Trang 31</span><div class="page_container" data-page="31">survey. Journal of Network and Computer Applications, 88, 10-28.
[2] Amadeo, M., Campolo, C., & Molinaro, A. (2016, November). Informa on-centric networking for the internet of things: challenges and opportuni es. IEEE Network, 30(2), 92 98.-
[3] Atzori, L., Iera, A., & Morabito, G. (2010). The internet things: A survey. Computer ofnetworks, 54(15), 2787-2805.
[4] Cárdenas, A. A., Amin, S., Lin, Z. S., Huang, L., Huang, Y. C. Y., & Sastry, S. (2013). A acksagainst process control systems: Risk assessment, detec on, and response. In Proceedings of the 6thACM conference on Security and privacy in wireless and mobile networks (pp. 1-12).
[5] 10 Major Challenges of IoT Adop on (2019, July 15). Postscapes.
h ps://www.postscapes.com/internet-of-things-challenges/ [Accessed on Dec 1, 2023]
</div>