Photoshop cs5 missing manual_3 docx
Bạn đang xem bản rút gọn của tài liệu. Xem và tải ngay bản đầy đủ của tài liệu tại đây (2.9 MB, 78 trang )
293
:
Layer Blend Modes
Figure 7-10:
By placing two images on
separate layers, you can
use Darken mode to zap a
white background. Here, the
top layer has a fairly dark
sunburst and the bottom
layer has a crazy guy on a
white background. If you
change the blend mode of
the sunburst layer to Darken,
the white background on
the layer below it seems to
disappear.
Since parts of the crazy
guy’s face and hand are
lighter than the sunburst—the
sunburst wins the color war
explained on page 292 and
covers him up in those spots—
you can hide those parts of
the sunburst to keep him
whole. Simply add a layer
mask and paint with a Brush
set to black (see page 113 for
more on layer masks).
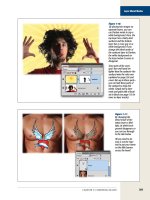
Figure 7-11:
By changing the
blend mode of the
tattoo layer to Mul-
tiply, its white back-
ground disappears so
you can see through
to the skin below.
All you need to do
now is use the Type
tool to put your name
on the little banner
across the heart!
294
P CS: T M M
Layer Blend Modes
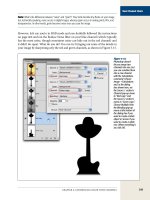
• Color Burn. This mode darkens your image by increasing the overall contrast.
When you use it on 50 percent gray, it intensifies color on the layers below,
which can beautify an ugly sky in a hurry (see Figure 7-12). You can also use it
to colorize a grayscale image, though the paint will be really dark and high con-
trast (it’s better to use Hue mode, discussed on page 301). Keyboard shortcut:
Shift-Option-B (Shift+Alt+B on a PC).
Figure 7-12:
Ain’t nothing like
a dull sky to ruin
a perfectly decent
photo. Happily, you
can whip the sky into
shape by adding a
layer to the top of
your layers stack, fill-
ing it with 50 percent
gray, and changing
its blend mode to
Color Burn. If the
effect is too strong,
you can lower the
gray layer’s opacity,
as shown here. To ap-
ply the color change
only to certain areas
of your image, add
a layer mask (page
113).
Tip: An easy way to fill a layer with 50 percent gray is to make a new layer, go to Edit➝Fill, and then
choose 50% Gray from the Use pop-up menu. Those Adobe programmers think of everything!
• Linear Burn. In this mode (which is actually a combination of Multiply and
Color Burn), Photoshop darkens your image by decreasing brightness. Linear
Burn produces the darkest colors of any Darken blend mode, though with a bit
more contrast than the others. It has a tendency to turn dark pixels solid black,
which makes it ideal for grungy, textured collages like the one in Figure 7-13.
Keyboard shortcut: Shift-Option-A (Shift+Alt+A on a PC).
295
:
Layer Blend Modes
Figure 7-13:
In this Layers panel,
you can see the origi-
nal image near the
bottom followed by a
Threshold Adjustment
layer (page 337).
Popping in three
pieces of art (circled)
and changing their
blend modes to
Linear Burn created
this trendy collage.
The opacity of the
sunbeam and grunge
texture was lowered
to about 60 percent,
and the sunbeam was
positioned over the
boy’s eye. That’s it!
• Darker Color. This mode compares the base and blend colors and keeps the
darkest pixels. No blending going on here—the lighter colors just vanish.
Note: You may have noticed that Photoshop doesn’t have a keyboard shortcut for Darker Color mode.
That’s because this mode didn’t come around until Photoshop CS3 when Adobe started running out of
keyboard shortcut combos. Same goes for Lighter Color mode (page 297).
Lighten Blend Modes
These modes, the opposite of the Darken modes, have the power to lighten, or
dodge, your image (see Chapters 9 [page 376] and 10 [page 447] for more on using
the Dodge tool). Black is the neutral color for this group; it disappears in all but one
of the following modes:
• Lighten. In this mode, the lightest pixels win the war of colors. Photoshop com-
pares all the colors and keeps the lightest ones from the base and the blend,
and then combines them to produce the result color. Everything else is nixed
(including black), which makes this mode perfect for removing a black back-
ground (see Figure 7-14). Keyboard shortcut: Shift-Option-G (Shift+Alt+G on
a PC).
296
P CS: T M M
Layer Blend Modes
Figure 7-14:
To zap the black background of this
fireball (the top layer), change its
blend mode to Lighten. Now the
flames are visible only where they’re
lighter than the colors in the steel ball.
A layer mask was added to hide a few
rogue flames underneath the ball.
• Screen. In this mode, Photoshop multiplies the opposite of the blend and base
colors, making everything a lot lighter as though a bottle of bleach was spilled
on it. It’s great for fixing images that are too dark or underexposed (like when
your camera’s flash doesn’t fire; see page 119). Keyboard shortcut: Shift-Option-
S (Shift+Alt+S on a PC).
• Color Dodge. This mode lightens your image by decreasing contrast. It has a
tendency to turn light pixels solid white, and, unlike the other Lighten modes,
it keeps black pixels, so the dark parts of your image don’t change. You can use
this mode with 50 percent gray to brighten your image—a great way to give hair
some instant highlights (see Figure 7-15). Keyboard shortcut: Shift-Option-D
(Shift+Alt+D on a PC).
297
:
Layer Blend Modes
Figure 7-15:
By filling a layer with
50 percent gray and
changing its blend
mode to Color Dodge,
you get instant hair
highlights—no trip to the
beauty salon required!
Just add a layer mask
to protect other parts of
the image (like the face
and background) from
the highlighting.
• Linear Dodge (Add). This mode lightens your image by increasing brightness.
It’s a combo of Screen and Color Dodge modes, so it’ll lighten your image more
than any other blend mode. But since it tends to turn all light colors white,
it can make your image look unnatural. Keyboard shortcut: Shift-Option-W
(Shift+Alt+W on a PC).
• Lighter Color. With this mode, Photoshop compares the base and blend colors
and keeps only the lightest pixels. Unlike Lighten mode, it doesn’t combine any
colors; it just keeps the lightest ones. (The Note on page 295 explains why this
mode doesn’t have a keyboard shortcut.)
298
P CS: T M M
Layer Blend Modes
Lighting Blend Modes
In contrast to the Lighten and Darken modes, Lighting blend modes do a little dark-
ening and a little lightening to increase the contrast of your image. They have a neu-
tral color of 50 percent gray, which doesn’t affect the result color; it just disappears.
• Overlay. In this mode, if the blend color is darker than 50 percent gray, Photo-
shop multiplies its color value with the base color. If the blend color is lighter
than 50 percent gray, Photoshop multiplies its color value with the inverse of
the base color (like it does in Screen mode). And if the blend color is exactly
50 percent gray, Overlay has no effect on the result color at all. You can use this
mode to increase contrast or colorize a grayscale image. Keyboard shortcut:
Shift-Option-O (Shift+Alt+O on a PC).
• Soft Light. As the name suggests, this mode is the equivalent of shining a soft
light on your image. It makes bright areas brighter (as if they were dodged) and
dark areas darker (as if they were burned). If you paint with black in this mode,
you’ll darken the underlying image; if you paint with white, you’ll lighten it. You
can use this mode to add texture to an image or to make an image look like it’s
reflected in metal (see Figure 7-16). Seasoned Photoshop jockeys use Soft Light
with the Dodge and Burn tools to retouch portraits nondestructively (see page
447). Keyboard shortcut: Shift-Option-F (Shift+Alt+F on a PC).
Figure 7-16:
To create a quick reflection
in a metal object, change
the top layer’s blend mode
to Soft Light.
299
:
Layer Blend Modes
• Hard Light. This mode, which is equivalent to shining a harsh light on your
image, combines Multiply and Screen modes: if the blend color is lighter than
50 percent gray, the image gets lighter (like Screen mode); if it’s darker than 50
percent gray, the image gets darker (like Multiply). If you paint with black or
white in this mode, you simply get black or white. If you really want to increase
the level of detail in an image, you can use this mode in conjunction with the
Emboss filter. Keyboard shortcut: Shift-Option-H (Shift+Alt+H on a PC).
• Vivid Light. In this mode, Photoshop applies Color Burn to increase the con-
trast of colors darker than 50 percent gray and Color Dodge to decrease the
contrast of colors lighter than 50 percent gray. Use Vivid Light to make an im-
age pop or to add texture. Keyboard shortcut: Shift-Option-V (Shift+Alt+V on
a PC).
• Linear Light. This mode combines the Linear Burn and Linear Dodge modes:
It uses Linear Burn to decrease the brightness of colors darker than 50 percent
gray and Linear Dodge to increase the brightness of colors lighter than 50 per-
cent gray. Linear Light is great for adding texture to images, as shown in Figure
7-17. Keyboard shortcut: Shift-Option-J (Shift+Alt+J on a PC).
Figure 7-17:
Want to turn a loved
one to stone? No
problem! Simply use
the Quick Selection
tool (page 149) to
select the person’s
skin and then add a
layer mask to a layer
containing marble or
stone (the top layer
here). Change the
marble layer’s blend
mode to Linear Light
and you’ve got an
instant statue.
300
P CS: T M M
Layer Blend Modes
• Pin Light. This mode combines Lighten and Darken: If the blend color is lighter
than 50 percent gray, it replaces areas of the base color darker than 50 percent
gray with the blend color; pixels lighter than 50 percent gray don’t change at all.
But if the blend color is darker than 50 percent gray, Pin Light replaces lighter
areas of the base color with the blend color and darker areas don’t change. You’ll
rarely use this mode because it can produce odd results (or none at all), but feel
free to experiment with it—especially with filters (see Chapter 15). Keyboard
shortcut: Shift-Option-Z (Shift+Alt+Z on a PC).
• Hard Mix. This mode greatly reduces the range of colors in your image (an
effect known as posterizing), so you end up with large blocks of super-bright
colors like red, green, or blue. In this mode, Photoshop analyzes the sum of the
RGB values in the blend color and adds them to the base color. For example, if
the value of the red, green, or blue channel is 255, Photoshop adds that value to
the base; and if the value is less than 255, Photoshop adds a value of 0. (See page
46 for more on color values.) You can reduce the effect of this mode by lowering
the Fill setting at the top of your Layers panel (see page 78). You won’t use Hard
Mix very often, but it’s fun for the occasional special effect, as you can see in
Figure 7-18. Keyboard shortcut: Shift-Option-L (Shift+Alt+L on a PC).
Figure 7-18:
In Hard Mix mode,
Photoshop changes
all the pixels to pri-
mary colors (see the
figure on page 487),
leaving you with solid
blocks of bright, high-
contrast color.
301
:
Layer Blend Modes
Comparative Blend Modes
This category should really be called “psychedelic.” Its two modes are similar, and
they both produce freaky results that are useful only on Halloween or in grungy col-
lages (discussed earlier in this chapter). However, as you’ll soon find out, they can be
temporarily useful. Black is the neutral color in both modes.
• Difference. This mode analyzes the brightness of both the base and the blend
colors and subtracts the brightest pixels. If you use white as your blend color,
Photoshop inverts (flip-flops) the base color, making the image look like a film
negative. If you use black as your blend color, Photoshop doesn’t change any-
thing. You wouldn’t want to use this mode on your image for keeps, but you can
use it temporarily to locate the midtones (see the box on page 400 for details).
You can also use it to align two layers of the same image (if, say, they were shot at
different exposures): just change the top layer to Difference mode and use your
arrow keys to move the image until you no longer see the odd engraved look.
Keyboard shortcut: Shift-Option-E (Shift+Alt+E on a PC).
• Exclusion. This mode is similar to Difference but results in a little less con-
trast. Blending with white inverts the base color and blending with black doesn’t
do anything. You can also use Exclusion to align images; just follow the steps
for aligning images with Difference mode. Keyboard shortcut: Shift-Option-X
(Shift+Alt+X on a PC).
Hue Blend Modes
All the modes in this category relate to color and luminance (brightness) values (see
page 488 for more on brightness). Depending on the colors in your image, Photo-
shop applies one or two of these modes to the image (they don’t have a neutral color
like the other blend modes). Hue blend modes are extremely practical because you
can use them to change, add, or intensify the colors in your image.
• Hue. This mode keeps the lightness and saturation (color intensity) values of
the base color and adds the hue (another word for “color”) of the blend color.
If you want to change an object’s color without changing how light or dark it is,
use this mode (see page 342). However, Hue can’t introduce a color that isn’t al-
ready there to colorize grayscale images, so you have to use another mode (like
Color, which is explained later in this list). Keyboard shortcut: Shift-Option-U
(Shift+Alt+U on a PC).
• Saturation. This mode keeps the luminance and hue of the base color and picks
up the saturation of the blend color. If you want to increase an image’s color
intensity, this mode can help you out (see Figure 7-19). You can also use Satura-
tion to drain color from part of an image by painting that area black. Because
black has no saturation value, it desaturates intersecting colors. Keyboard short-
cut: Shift-Option-T (Shift+Alt+T on a PC).
302
P CS: T M M
Layer Blend Modes
Figure 7-19:
If you’ve ever been to
Texas, you know the
margaritas there are
much brighter than
the one in the original
image (left).
To boost the color
saturation, add a
new layer filled with
a color that has the
saturation value you
want (it doesn’t mat-
ter which color) and
then change its blend
mode to Saturation.
The image takes on
only the blend color’s
saturation value, not
its hue.
• Color. In this mode, Photoshop keeps the luminance of the base color and picks
up the hue and saturation of the blend color, which makes it handy when you’re
colorizing a grayscale image (see page 358). Keyboard shortcut: Shift-Option-C
(Shift+Alt+C on a PC).
• Luminosity. This mode keeps the base color’s hue and saturation and picks up
the blend color’s luminance. Use Luminosity when you’re sharpening an image
(see page 463), and when you’re using curves or levels Adjustment layers (see
Chapter 9). Keyboard shortcut: Shift-Option-Y (Shift+Alt+Y on a PC).
Up to Speed
Pass Through Mode
When you create a layer group (page 105), Pass Through
appears at the top of the blend mode pop-up menu. In
this mode, Photoshop makes sure that any blend modes,
blending slider settings (page 303), opacity settings, and fill
settings you’ve applied to layers in the group trickle down
to layers below the group.
Let’s say you’ve created a layer group consisting of several
image layers set to Linear Burn mode to create a grunge col-
lage. Pass Through mode lets the Linear Burn effect trickle
down to any background or text on layers below the group.
If you don’t want the blending to affect the layers below the
group, change the layer group’s blend mode to Normal.
303
:
Zapping
Backgrounds with
Blending Sliders
Zapping Backgrounds with Blending Sliders
If the subject of your image is radically brighter or darker than its background, you’ll
want to sit up and pay attention to this section. While blend modes are pretty power-
ful in their own right (and several of them can pulverize a white or black background
instantly), another set of blending options in the Layer Style dialog box (page 128)
can eat backgrounds for lunch—nondestructively!
Photoshop gives you a few different ways to open the Layer Style dialog box (Figure
7-20). Once you’ve selected the image layer you want to work with by clicking it,
open the dialog box using one of the following methods:
• Double-click its layer thumbnail in the Layers panel.
• Click the little fx button at the bottom of the Layers panel and choose Blend-
ing Options.
• Choose Layer➝Layer Style➝Blending Options.
Note: The Blending sliders won’t work on a locked Background layer; you have to double-click the layer
first to make it editable.
At the bottom of the resulting dialog box lie two pairs of sliders (they look like tri-
angles): one set for the This Layer bar and another for the Underlying Layer bar, as
shown in Figure 7-20 (top). Each slider lets you make parts of your image transpar-
ent based on the brightness value of the pixels. The left slider represents the shadows
(blacks) in your image and the right one represents the highlights (whites). If you
want to affect the currently active layer, then tweak the This Layer slider (you’ll learn
about the Underlying Layer slider in a moment).
For example, if the background of your currently active layer is black and the subject
(or object in the foreground) is much brighter, you can hide the black part by drag-
ging the shadow slider (the one on the left) toward the middle until the black part is
transparent. If you want to hide a white background, drag the highlight slider (the
one on the right) toward the middle until the white part is transparent.
Note: If you save your document as a PSD file, you can adjust these sliders anytime you want by activat-
ing the layer and summoning the Layer Style dialog box.
304
P CS: T M M
Zapping
Backgrounds with
Blending Sliders
Figure 7-20:
Top: You can use the
blending sliders to
make short work of
removing solid-col-
ored backgrounds. In
this image, the black
background has been
hidden by dragging
the shadow slider
toward the middle. To
soften the edges of
the bits that remain,
you can split the slider
in half (as described
lower on this page)
and then drag its left
half back to the left.
Bottom: Once you’ve
hidden the black in
this Matrix-like back-
ground, you can see
through to the image
on the layer below,
which makes for a
quickie collage.
To soften your subject’s edges once you’ve hidden the background, you can make
the edge pixels partially transparent by splitting the shadow or highlights slider in
half. To soften the edge pixels after you’ve hidden a black background, Option-click
(Alt-click on a PC) the left half of the shadows slider and drag it slightly back to the
left (circled in Figure 7-20). Likewise, if you’ve hidden a white background, you can
Option-click (Alt-click) the right half of the highlights slider and drag it slightly to
the right to tell Photoshop to make pixels with that particular brightness value par-
tially transparent.
305
:
Auto-Aligning Layers
and Photomerge
You can perform this pixel-hiding magic on colors, too. Just pick the channel (see
Chapter 5) you want to work with from the Blend If pop-up menu above the sliders,
and that particular color appears in the slider instead of black and white.
The Underlying Layer sliders let you control the range of visible colors on layers
below the currently active layer. As you drag the sliders, parts of the image on under-
lying layers appear through the pixels on the active layer as if you’d cut a hole out of
it. If you drag the shadows slider toward the middle, you’ll begin to see the darkest
parts of the underlying image show through the active layer. If you drag the highlight
slider toward the middle, you’ll start to see the lightest parts of the underlying image.
As you can see in Figure 7-20, the blending sliders can do an amazing job of hiding
backgrounds based on color. But if your subject contains some of the colors in the
background, the blending sliders will zap those areas, too. In that case, you’ll have to
use a different method to hide your background, like another blend mode or a layer
mask (discussed earlier in this chapter).
Note: To learn how to combine two images using the Apply Image command, which lets you pick which
channel Photoshop uses to do the blending, head to this book’s Missing CD page at www.missingmanu-
als.com/cds.
Auto-Aligning Layers and Photomerge
If you’ve ever needed to combine a few group shots to get an image where everybody
is smiling and everybody’s eyes are open, you’ll appreciate Auto-Align Layers. Sure,
you can manually align layers, but when you run this command, Photoshop does all
the hard work for you by examining the selected layers and aligning them so identi-
cal areas overlap (see Figure 7-21).
Note: The Auto-Align feature isn’t magic; the angle and the distance from the subject in both shots need
to be the same for it to work. However, in Photoshop CS5, this command takes a look at the lens correc-
tion profiles specified in the new and improved Lens Correction filter (page 655), which helps this tool do
a better job of aligning layers.
Once you’ve gotten your images into the same document (on different layers), select
at least two layers by Shift- or �-clicking them (Ctrl-clicking on a PC), and then
choose Edit➝Auto-Align Layers (this menu item is grayed out unless you have at
least two layers selected). In the resulting dialog box (Figure 7-21, top), you can
choose from these alignment methods:
• Auto. If you’re not sure which method will work best to align your images, let
Photoshop decide. When you choose this option, Photoshop picks either Per-
spective or Cylindrical, depending on which one it thinks will create the best
composition. It usually does a good job aligning your images, though you may
notice some distortion (as explained in the next two bullet points).
306
P CS: T M M
Auto-Aligning Layers
and Photomerge
Figure 7-21:
Top: When you’re trying to align multiple
group shots, the Auto-Align Layers dialog
box’s Reposition option is your best bet.
Bottom: The Auto-Align layers command
is great for merging a few imperfect shots
into one perfect shot (or rather, one
where each subject is smiling). To do that,
combine the images into one document
and place the non-smiling layer atop the
smiling layer. After you run the Auto-Align
layers command, just add a layer mask to
the top layer and then paint the non-smile
away with a black brush so your smiling
pal shows through!
• Perspective. When you choose this method, Photoshop adjusts the four corners
of your layers and repositions, stretches, and skews each one so any overlapping
areas match in perspective. The final image looks slightly warped—both ends
are a little larger than the center of the image, as if they were closer to you. This
method can also make one of your layers look like it’s coming out of the screen
toward you, which can be visually interesting.
307
:
Auto-Aligning Layers
and Photomerge
Tip: Photoshop picks its own reference layer (the layer it tries to align all the other layers with) unless you
designate one yourself using the Lock All layer lock, discussed on page 103.
• Cylindrical. If you’re combining several images into a panorama (see Figure
7-22, top), choose this option. Along with repositioning, stretching, and skew-
ing your layers, Cylindrical helps get rid of any bow-tie lens distortion (where
the subject looks like it’s being pinched inward) by curving the images slightly
(see Figure 7-22, middle).
Figure 7-22:
Top: If you want to stitch these forest images
together, you can use the Auto-Align Layers
command or Photomerge to get it done.
Middle: To compensate for bow-tie lens
distortion, the Cylindrical alignment method
curves your final image slightly (notice that
the bottom and top edges of the image aren’t
straight).
Bottom: The Spherical method gives you a
perfectly rectangular panorama.
• Collage. This method tells Photoshop to scale, rotate, and reposition the layers
to align them with overlapping content without changing their shape. Choose
Collage if you don’t want your images to become distorted in any way.
308
P CS: T M M
Auto-Aligning Layers
and Photomerge
• Spherical. Like Cylindrical, Spherical repositions, stretches, and skews layers to
match up overlapping areas. It also tries to correct barrel distortion (where the
subject looks rounded) by making your panorama perfectly rectangular (see
Figure 7-22, bottom).
• Reposition. If you’re aligning a group shot to hide a frown or closed eyes,
choose this option. It won’t stretch or skew your layers; it’ll just reposition them
so they line up.
The Auto-Align Layers dialog box also gives you two ways to correct camera lens
distortions. Turn on the Vignette Removal checkbox to get rid of darkened or soft
edges caused by wide-angle lenses, or the Geometric Distortion checkbox to make
Photoshop warp your image slightly to reduce the spherical look also caused by
wide-angle lenses or being too close to your subject with a regular lens.
Note: In Photoshop CS5, Auto-Align Layers now uses the camera profiles you set up in the Lens Correc-
tion filter, which should give you more accurate panoramas. See the box on page 658 to learn more about
the new options in the Lens Correction dialog box.
Once you’ve aligned your images, flip to page 309 to see how you can make Photo-
shop blend them together seamlessly using the Auto-Blend command.
Building Panoramas with Photomerge
Photoshop has an automatic photo-stitcher called Photomerge that gives you all the
same options as the Auto-Align Layers dialog box, but you don’t have to combine
your images into the same document first—Photoshop does that for you. This is
really helpful when you’re merging images into a wide shot, though Photoshop CS4
and later, unlike previous versions, doesn’t let you manually arrange your images
into a panorama (see the box on page 310).
To use Photomerge, choose File➝Automate➝Photomerge. In the resulting dialog
box’s Use pop-up menu (at the very top), tell Photoshop whether you want to use
individual files or a whole folder. Click the Browse button to find the images on your
hard drive, or, if you’ve already opened the documents, click the Add Open Files
button. On the left side of the dialog box, you can pick an alignment method or
leave it set to Auto and let Photoshop decide for you. If you want Photoshop to use
layer masks to help cover up any seams, leave the Blend Images Together checkbox
at the bottom of the dialog box turned on (this setting has the same effect as running
the Auto-Blend command discussed on page 309). The Vignette Removal and Geo-
metric Distortion checkboxes work the same way here as they do in the Auto-Align
dialog box (see page 305).
309
:
Auto-Blending
Layers
When you’ve got all the settings the way you want them, click OK. Photoshop com-
bines your images into a new document with each image on its own layer, rotated
and positioned to fit with all the others. All you need to do is crop the image (page
222) to get rid of any transparent bits around the edges, or you can recreate that por-
tion of the image by hand using the Clone Stamp tool (see page 311 and Appendix D
online) or, even simpler, Content-Aware Scale (page 258).
Tip: You’ll find cropping and cloning easier if you flatten (page 112) the image first, though be sure to
choose File➝Save As and give the image another name so you can flatten it without worrying about sav-
ing over the original. Also, you can choose Edit➝Content-Aware Scale (page 258) to slightly “stretch” your
image so you don’t have to crop it quite so much.
Auto-Blending Layers
The Auto-Blend Layers command, which was designed to be used after the Auto-
Align Layers command (page 305), helps you blend images for a panorama or col-
lage, or combine multiple exposures of the same image to create an extended depth
of field (see page 310) so more of an object looks like it’s in focus. When you use this
command, Photoshop creates complex layer masks to blend your images, saving you
a lot of hard work.
Up to Speed
Shooting Panoramas
If you’re taking photos specifically to make a big honkin’
panorama, here are a few things to think about while
you’re snapping away:
• Use a tripod. A tripod or some other stabilizing
surface (like your mate’s shoulder) helps you take
steadier shots. You don’t want your panorama to be
blurry, right?
• Include an overlapping element in each shot.
If you’re taking three shots, make sure you include
some of what’s in the first shot in the second, and
some of the second shot in the third. That way you
have overlapping bits that Photoshop can use to align
your images.
• Keep the lighting (exposure) consistent. Though
Photomerge is pretty darn good at blending images,
you’re going to notice if you took one of your shots
in the shade and the other in direct sunlight. For the
best results, keep your lighting constant by exposing
for the brightest portion of the image manually (even
if it means consulting your camera’s manual).
• Make sure the angles are the same. Photoshop
has one heck of a time matching up images shot at
different angles, but mismatched shots can make for
some interesting creative possibilities.
Note: You can use the Auto-Blend Layers command only when you’re working in RGB or Grayscale mode
(see page 46 for more on color modes).
310
P CS: T M M
Auto-Blending
Layers
To get the best results, start with the Auto-Align Layers command and then choose
Edit➝Auto-Blend Layers. In the resulting dialog box, choose one of the following
blending options:
• Panorama. Select this option to have Photoshop search for overlapping areas in
your images to piece them together into a single image.
• Stack Images. If you’ve fired off several shots of an object with different parts
in focus (known as different depths of field) and you want to combine them into
a single shot that looks like the whole object is in focus, choose this option. Let’s
say you shot a tiger—with a big zoom lens, of course—that was stretched out
lengthwise and facing you. If you shot one image with his head in focus, another
with the middle of his body in focus, and a third with his tail in focus, you can
choose Stack Images to make Photoshop combine the three images into a single
shot with the whole tiger in focus.
• Seamless Tones and Colors. Turn on this checkbox to make Photoshop smooth
any noticeable seams and color differences between your images during the
blending process.
As mentioned earlier, this command has a ton of potential uses. One visually inter-
esting possibility is to make a collage of two or more action shots to create a stop-
motion effect. Figure 7-23 has the details.
Tip: You can also use the Auto-Blend Layers command to help you scan really big images. For example, if
the image is too big to fit onto your scanner in one piece, scan different sections of it—being careful to cre-
ate overlapping areas—and then let Photoshop piece it together for you by running the Auto-Align Layers
command and then running Auto-Blend Layers.
FReQUeNtLY ASKed QUeStIoN
Interacting with Photomerge
Dude, where’s my interactive Photomerge dialog box? I
used to use it all the time to hand-place images into a
panorama!
Sadly, that dialog box is gone; Adobe removed it back in
Photoshop CS4.
Previous versions of Photoshop had an Interactive Layout
option at the bottom of the Photomerge dialog box that
opened a huge window where you could manually arrange
images into a panorama. This wildly useful option let you
control exactly how Photoshop stitched your panorama to-
gether, and let you create nonrectangular panoramas that
went off in all directions instead of just left to right.
Because the out-of-date programming code behind this
dialog box would have required all manner of reworking
to get it to work in recent versions of Photoshop, Adobe
decided to nix it. However if you squeeze your eyes shut
real tight and click your heels together three times, it might
come back. (Kidding!)
311
:
Cloning Between
Documents
Figure 7-23:
You can use the
Auto-Blend Layers
command to create
interesting collages
in mere seconds.
The best part is that
Photoshop does
all the masking for
you, as shown here
in the Layers panel.
Woo-hoo!
Cloning Between Documents
All this combining-images-into-the-same-document business can cause your Lay-
ers panel to get long and unwieldy. And as you learned back in Chapter 3, loading
a document with layers can increase its file size and even slow Photoshop down
(especially if you’ve got an older computer or very little memory). Fortunately, if the
images you want to combine use the same color mode (page 46), there’s a solution.
Sure the Clone Stamp tool is great for tricks like banishing blemishes (page 434) or
giving someone a third eye, but it has other uses, too. To prevent your Layers panel
from becoming overcrowded, use this tool to copy bits and pieces of an image from
312
P CS: T M M
Cloning Between
Documents
one open document to another. Using the Clone Source panel—the clone source is
the object you’re copying—you can clone from up to five different sources whether
or not they’re in the same document.
Here’s how to clone from one open image into another:
1. Open the source (the image[s] you’re cloning from) and the target (the image
you’re cloning to).
To choose clone sources in documents other than the current image, open the
source documents. Click the Arrange Documents button in the Application Bar
(page 67) to choose a preview method that lets you see all your open documents
or just click each document’s tab to activate it (see Chapter 2, page 68, for more
on working with tabbed documents).
2. Press S to grab the Clone Stamp tool, and then open the Clone Source panel.
Choose Window➝Clone Source or click the panel’s icon in the panel dock.
(Full coverage of the Clone Source panel’s many options starts on page 311.)
3. Set the clone source.
Click the tab of the image you want to clone from (like the cats in Figure 7-24,
top left). Then Option-click (Alt-click on a PC) the area you want to copy to set
it as your clone source.
Figure 7-24:
Top: By cloning the
kitties from one
image onto the bird-
houses in another,
you can create a
mischievously cute
collage.
Bottom: The brush
preview is extremely
helpful in positioning
the cloned art (left).
If you mess up and
clone in a little too
much (middle), grab
the History brush
(page 29) and paint
to reveal that part of
the original image
(right). If you’re clon-
ing onto a new layer,
you can also use the
Eraser tool.
313
:
Cloning Between
Documents
4. Create a new layer.
Unless you want to clone the new image on top of your original image (and you
don’t!), head back to your target document and add a new layer by clicking the
“Create a new layer” button at the bottom of the Layers panel. That way, if you
don’t like the result, you can simply toss the new layer instead of having to start
over.
5. Paint to clone the item.
As shown in Figure 7-24 (bottom left), Photoshop displays a preview of the im-
age you’re about to paint inside the brush cursor. If you don’t want your clone
source point to move as your brush cursor moves—because you want to create
multiple instances of an object, for example—turn off the Options bar’s Aligned
checkbox.
Tip: To change brush size and hardness, you can use the Options bar—or keyboard shortcuts. In Photo-
shop CS5, you can alter brush size and hardness by Ctrl-Option-dragging (Right-click+Alt+dragging) in
horizontal/vertical strokes, respectively.
You need a pretty steady hand when you’re working with the Clone Stamp tool be-
cause it’s easy to clone too much and cover up parts of your image. You can solve that
problem by first selecting an area to restrict your brush strokes to that part of the
image. This technique is handy when you want to fill an area with another image, as
shown in Figure 7-25.
Figure 7-25:
If you select the
destination area first,
you don’t have to be
as careful with your
brush. As you can see
here, the brush ex-
tends past the edges
of these digital busi-
ness dudes (circled),
but Photoshop
applies the Matrix-like
background only
within the selection.
314
P CS: T M M
Cloning Between
Documents
You can also clone from one document to another by following the steps just de-
scribed, but your clone target and destination will be in different images. If you want
to get a little fancy and start doing things like pulling source points from multiple
images and changing the angle of your cloned objects, then you need to enlist the
help of the Clone Source panel (Figure 7-26).
Figure 7-26:
Assigning multiple clone sources
is handy when you want to
clone items between open
documents or when you’re
trying to create a complex
scene from different elements.
For example, if you’re trying to
remove a cow that’s standing
in front of a fence, one clone
source can be the fence and
another can be the grass. Once
you’ve activated the Clone
Stamp tool, you can use the
five source buttons shown
here to switch quickly between
different source points without
having to reset them manu-
ally each time. To set a source
point, just Option-click (Alt-click
on a PC) the area you want to
clone, and your cursor turns
into a crosshair like the one
circled here.
Click to set other
open documents
as a clone source
Close
panel
Panel menu
Clone Source
panel dock
Set position Scale Rotate
Reset
Note: You can use the Frame Offset and Lock Frame options shown in Figure 7-26 (available only in
Photoshop Extended) to clone content in video or animation frames.
In the Clone Source panel, you can tweak the following settings:
• Offset. Use this section of the Clone Source panel to move, resize, or rotate the
object you’re copying (the clone source). If you want to move your clone source,
you can change its X and Y coordinates (measured in pixels) here. If you’ve got
the Show Overlay checkbox (explained next) turned on, you see a preview of the
source point on your image that moves as you tweak these settings. To clone the
object at a different size, enter new percentages in the W and H fields (for width
and height). To rotate your clone source—so the cloned item is turned—enter
a number of degrees in the field next to the little triangle. To reset all these op-
tions, click the little curved arrow button.
315
:
Combining Vectors
and Rasters
Tip: You can position your cursor above any of the field labels in the Offset section—X, Y, W, and so
on—to get the handy scrubby cursor (see the figure on page 94). Drag left to decrease the setting and
right to increase it. You can Shift-drag to change it in larger increments or Option-drag (Alt-drag on a PC)
for smaller increments. If you’re a fan of keyboard shortcuts, press Option-Shift-[ (Alt+Shift+[ on a PC) to
decrease your clone source’s width and height proportionally and Option-Shift-] (Alt+Shift+]) to increase
them. To rotate your source, press Option-Shift-< (Alt+Shift+<) to turn it counterclockwise or Option-
Shift-> (Alt+Shift+>) to turn it clockwise.
• Show Overlay. With this checkbox turned on (it’s on automatically), you see a
preview of what you’re about to paint inside your brush cursor. This handy fea-
ture shows you exactly what the cloning will look like before you commit to it.
• Opacity. You can use this field to adjust the opacity of the overlay preview. To
change the opacity of what you’re cloning (your actual brushstrokes), you have
to change the Opacity setting in the Options bar instead.
• Clipped. This checkbox restricts the preview overlay to the area inside your
brush cursor. For Pete’s sake, leave this setting turned on. If you don’t, Photoshop
previews the entire clone source image right underneath your cursor, which
keeps you from seeing anything except the preview.
• Auto Hide. If you turn on this checkbox, the overlay preview disappears as soon
as you click to start painting. It’s a good idea to turn it on so you can see how
much you’ve painted so far.
• Invert. Turning on this checkbox makes Photoshop invert the overlay preview
so it looks like a film negative, which can be helpful if you’re trying to align the
cloned area with something that’s already in your image.
• Blend Mode. You can use this pop-up menu to change the blend mode of the
overlay preview. Your choices—Normal, Darken, Lighten, and Difference—
are explained earlier in this chapter, starting on page 291. To change the blend
mode of the cloned pixels, use the Options bar’s Mode pop-up menu instead.
Combining Vectors and Rasters
A fun trend in the design world is to combine vectors with rasters (page 52 explains
the difference); in other words, to combine illustrations with photographs, a tech-
nique that provides an interesting look and lets you get creative. Because you can
load vectors as Smart Objects (page 123), they remain infinitely resizable, letting you
experiment with them as backgrounds, artful embellishments, and even ornamental
photo frames.
As you can see in Figure 7-27, adding vectors to photos is a ton of fun. It’s as if you’re
blending real images with imaginary ones. Even if you can’t draw these little goodies
yourself, stock-image companies like iStockphoto (www.istockphoto.com) sell af-
fordable vector images so you can still participate in the trend.
316
P CS: T M M
Combining Vectors
and Rasters
Figure 7-27:
As you can see here,
a dash of vector art
can spice up any
photo.
You can add vector art to your images in a couple of ways:
• Place it. With a document open, choose File➝Place and navigate to the vec-
tor file on your hard drive. This inserts the file as a Smart Object (page 123).
Since you’ll most likely need to resize the artwork, Photoshop considerately sur-
rounds it with the Free Transform bounding box and resizing handles (page 95).
Just Shift-drag any corner to make the art bigger or smaller. If you need to rotate
it, place your mouse outside the bounding box and drag in the direction you
want to rotate. Press Return (Enter on a PC) when you’re finished.
• Paste it. If you’re working in a vector-based program like Adobe Illustrator,
you can copy artwork and paste it into your Photoshop document by choos-
ing Edit➝Paste or pressing �-V (Ctrl+V on a PC). When you do, Photoshop
displays the dialog box shown in Figure 7-28, asking how you want to paste it.
If you choose Smart Object, you can resize the artwork as much as you want
without losing quality (see page 123).
Framing a photo with an illustration is not only fun, it’s also incredibly flexible be-
cause you can continually resize the frame without starting over. Here’s how to do it:
1. Open the photo you want to frame and, if necessary, double-click the Back-
ground layer and give it another name to make it editable (page 85).
If your Background layer isn’t locked, or if you’ve already worked with the photo
and renamed this layer, you can skip this step.
317
:
Combining Vectors
and Rasters
Figure 7-28:
When you paste a
piece of vector art,
Photoshop lets you
decide how to paste
it (left). If you choose
Smart Object, the
object appears in
your document
with helpful resizing
handles, as shown
here (right). It also
carries the special
Smart Object badge
(circled) over in the
Layers panel.
2. Choose File➝Place to import the illustration you want to use as the frame.
Selecting the photo layer first ensures that Photoshop puts the Smart Object layer
at the top of your layers stack. Navigate to the EPS (Encapsulated PostScript) or
AI (Adobe Illustrator) file on your hard drive and then click the Place button.
3. Resize the illustration.
Conveniently, the illustration appears in your document with resizing handles
around it, which you’ll probably need to use to make it bigger or smaller. Grab
a corner handle and drag until the frame is big enough to hold the photo. (To
resize all four sides of the illustration at once, press and hold Shift-Option
[Shift+Alt] as you drag a corner handle.) Click inside the bounding box to move
it around. When it’s just right, press Return (Enter).
4. Load the illustration as a selection, as shown in Figure 7-29 (top).
In your Layers panel, �-click (Ctrl+click) the Smart Object’s layer thumbnail to
load it as a selection (you’ll see marching ants). Then turn off the Smart Object’s
visibility eye; you won’t need that layer again unless you want to resize it later.
5. Select the photo layer and add a mask.
Click the circle-within-a-square button at the bottom of the Layers panel to add
a mask (make sure you’re on the right layer first). Photoshop fills the mask with
black around the shape of your selection to hide the edges of the photo. (As
you’ll remember from Chapter 3, when you’re dealing with a layer mask, black
conceals and white reveals.)