Photoshop cs5 missing manual_2 pptx
Bạn đang xem bản rút gọn của tài liệu. Xem và tải ngay bản đầy đủ của tài liệu tại đây (2.6 MB, 78 trang )
215
:
Basic Channel Stunts
Note: What’s the difference between “noise” and “grain”? They both describe tiny flecks on your image,
but, technically speaking, noise occurs in digital images, whereas grain occurs in analog prints, film, and
transparencies. In other words, grain becomes noise once you scan the image.
However, let’s say you’re in RGB mode and you dutifully followed the instructions
on page 462 and ran the Reduce Noise filter on your blue channel (which typically
has the most noise, though sometimes noise can hide out in the red channel) and
it didn’t do squat. What do you do? You can try bringing out some of the details in
your image by sharpening only the red and green channels, as shown in Figure 5-15.
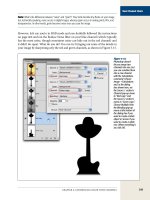
Figure 5-14:
Photoshop doesn’t
let you merge two
channels into one, but
you can combine them
into a new channel
with the Calculations
command: Choose
Image➝Calculations
and, in the dialog
box shown here, set
the Source 1 section’s
Channel pop-up menu
to “Red copy” and
the Source 2 section’s
menu to “Green copy”.
Choose Multiply from
the Blending pop-up
menu at the bottom of
the dialog box if you
want to create a black
object or Screen if you
want to create a white
one. When everything’s
set, click OK.
216
P CS: T M M
Basic Channel Stunts
Tip: The next time you need to sharpen a portrait of someone who’s sensitive about his or her appear-
ance, try sharpening only the red channel to avoid bringing out unwanted details in the person’s skin. (As
you learned earlier in this chapter, most of the fine details live in the high-contrast green channel.)
Here’s how to sharpen without making noise any worse than it already is:
1. Open your image and make a copy of the layer(s) you’re going to sharpen.
If you’re working with a document that has just one layer, select it in your Layers
panel and duplicate it by pressing �-J (Ctrl+J on a PC). If you like, double-click
the layer’s name and rename it Sharpen.
If you’re working on a multilayer document, press and hold the Option key (Alt
on a PC) while choosing Merge Visible from the Layers panel’s menu (see the
figure on page 78). Photoshop combines all the layers into a new layer. Drag this
new layer to the top of your Layers panel and name it Sharpen.
Figure 5-15:
If you select the red and green channels
before running a sharpening filter, you
restrict the sharpening to those channels.
That helps you avoid sharpening, and
therefore accentuating, any noise.
2. Open the Channels panel (page 189) and select the red and green channels.
Click to select one channel and then Shift-click to select the other one, so they’re
both highlighted in your Channels panel. Don’t panic if your image turns a
weird color (like the horse in Figure 5-15); Photoshop is just showing you the
image using only those two color channels.
217
:
Basic Channel Stunts
3. Choose Filter➝Sharpen➝Unsharp Mask (page 463).
When you run a filter while you’ve got only certain channels selected, Photo-
shop applies the sharpening to just those channels. In this case, it won’t apply
any sharpening to the blue channel. Click OK to close the Unsharp Mask dialog
box.
4. In the Channels panel, turn on the composite channel (here, that’s RGB) to
see your new and improved full-color image.
You’re done! If you want to see before and after versions of your image, open the
Layers panel and toggle the Sharpen layer’s visibility eye (page 82) off and on.
Tip: Another, more advanced way to sharpen your image is to use the channel with the highest contrast
to create an intricate edge mask. You can read all about that process on page 475.
Cropping, Resizing,
and Rotating
C
ropping and resizing images are among the most basic edits you’ll ever make,
but they’re also among the most important. A bad crop—or no crop—can ruin
an image, while a good crop can improve it tenfold by snipping away useless or
distracting material. And knowing how to resize an image—by changing either its file
size or its overall dimensions—can be crucial when it’s time to email an image, print
it, or post it on a website. Cropping is pretty straightforward; resizing, not so much. To
resize an image correctly, you first need to understand the relationship between pixels
and resolution—and how they affect image quality. (That can of worms gets opened on
page 238.) Rotating images, on the other hand, is just plain fun.
In this chapter, you’ll learn more than you ever wanted to know about cropping—
from general guidelines to the many ways of cropping in both Photoshop and Cam-
era Raw (a powerful photo-correcting application that comes with Photoshop—see
Chapter 9). You’ll also discover how to resize images without—and this is crucial—
losing image quality. Perhaps most important, you’ll understand once and for all
what resolution really is, when it matters, and how to change it without trashing
your image. Finally, you’ll spend some quality playtime with the various Transform
commands.
Cropping Images
There’s a reason professional photos look so darn good. Besides being shot with
fancy cameras and receiving some post-processing fluffing, they’re also composed
or cropped extremely well (or both). Cropping means eliminating distracting ele-
ments in an image by cutting away unwanted bits around the edges. Good crops
accentuate the subject, drawing the viewer’s eye to it; and bad crops are, well, just
bad, as you can see in Figure 6-1.
220
P CS: T M M
Cropping Images
Figure 6-1:
Left: A poorly cropped im-
age can leave the viewer
distracted by extraneous
stuff around the edges,
like the wall and window
reflection here.
Right: A well-cropped
image forces the viewer
to focus on the subject by
eliminating distractions
(in this case, the empty
space in the background).
This crop also gives the
subject a little breathing
room in the direction
she’s facing, which is
always a good idea (see
the next figure for more
examples).
Technically, you can crop before you take a photo by moving closer to the subject
(also called “cropping with your feet”) and repositioning the subject within the
frame. However, if you don’t get the shot right when you’re out in the field, Photo-
shop can fix it after the fact. But before you go grabbing the Crop tool, you need to
learn a few guidelines.
The Rule of Thirds
Once you understand the rule of thirds, a compositional guideline cherished by both
photography and video pros, you’ll spot it in almost every image you see. The idea
is to divide every picture into nine equal parts using an imaginary tic-tac-toe grid.
If you position the image’s horizon on either the top or the bottom line—never the
center—and the focal point (the most important part of the image) on one of the
spots where the lines intersect, you create a more interesting shot. It’s simpler than it
sounds—just take a look at Figure 6-2.
Note: In Photoshop CS5, the Crop tool actually comes with a rule-of-thirds grid, making this rule easier
than ever to grasp and follow!
221
: , ,
Cropping Images
Figure 6-2:
Top: Imagine a tic-tac-toe grid atop every image. Notice
that the interesting bits of the photos are positioned
where the lines intersect. Most digital cameras let you
add such a grid to the camera’s screen to help you
compose your shots. To figure out how to turn it on,
you may have to root through your camera’s menus or
(shudder) dig out the owner’s manual.
Bottom: Before you crop, notice the direction your
subject is facing. A good crop gives the subject room to
move—or, in this case, fly—through the photo. If the im-
age were cropped tightly to the boy’s face on the right
side, it’d look weird because he’d (theoretically) smack
into the edge of the image if he flew away.
Creative Cropping
Along with applying the rule of thirds, pros also crop in unexpected ways, as Figure
6-3 shows. Unconventional cropping is yet another way to add visual interest to
catch the viewer’s eye.
Creative cropping is especially important when you’re dealing with super-small im-
ages, such as those in a thumbnail gallery or on a website where several images vie
for attention. In such small images, people can see few, if any, details; and, if the
photo contains people, you can forget being able to identify them. Here are some tips
for creating truly enticing, teensy-weensy images:
• Recrop the image. Instead of scaling down the original, focus on a single ele-
ment in the image. You often don’t need to include the whole subject for people
to figure out what it is (Figure 6-3, middle, is a good example).
• Sharpen again after resizing. Even if you sharpened (digitally enhanced the fo-
cus of) the original, go ahead and resharpen it post-resizing using the Unsharp
Mask filter (page 463). Chapter 11 has the full story on sharpening.
• Add a border. To add a touch of class to that tiny ad or thumbnail, give it an
elegant hairline border (page 183) or rounded edge (page 147).
222
P CS: T M M
Cropping Images
Figure 6-3:
Top: Challenge yourself to think outside the box and
crop in unexpected ways. You may not think cropping
someone’s face in half is a good idea, but here’s an
example where it works.
Middle: When you’re close-cropping, you often don’t
need to reveal the whole subject. For example, this
piece of zebra is more visually interesting than the
whole animal, and it’s still obvious what it’s a photo of.
Bottom: Here’s proof that you can’t always trust what
you see! Cropping can easily alter the perceived mean-
ing of an image. For example, the left-hand photo
has been creatively cropped to suit the headline, “Sea
Muffin Wins by a Mile!” But the original photo on the
right reveals another story.
Now that you’ve absorbed a few cropping guidelines, you’re ready to read about the
many ways you can crop in Photoshop, starting with the most common.
The Crop Tool
Photoshop tools don’t get much easier to use than the good ol’ Crop tool. Press C to
grab it from the Tools panel and then drag diagonally to draw a box around the bits
of the image you want to keep. As you can see in Figure 6-4, CS5’s Crop tool comes
with its own rule-of-thirds grid. To move the crop box as you’re drawing it, press and
hold the space bar while dragging. When you’ve got the crop box where you want it,
let go of the space bar and continue drawing the box.
Tip: If you draw a crop box and then decide you don’t want to crop your photo after all, no problem. You
can bail out of a crop-in-progress by pressing the Esc key, or clicking the Cancel button in the Options bar
(the circle with a slash through it).
223
: , ,
Cropping Images
Figure 6-4:
Left: You can find the Crop
tool (circled) in the Tools
panel.
Right: After you draw a
box on your image, Pho-
toshop gives you an idea
of what the end result will
look like by darkening the
edges that’ll be cropped
out. You can easily resize,
reposition, and even
rotate the crop box by fol-
lowing the instructions in
this section. Press Return
(Enter on a PC) or double-
click anywhere inside the
box to accept the crop
when you get it just right.
If you’re not a fan of the
new rule-of-thirds grid,
you can use the Crop
Guide Overlay pop-up
menu in the Options bar
to turn it off, or switch to
a regular document grid
(page 70). (This pop-up
menu is only available if
you have an active crop
box.)
As soon as you let go of the mouse, Photoshop helpfully darkens the outer portion
of the image to give you an idea of what’s destined for the trash bin. (This darkened
portion is called a shield.) Grab any square handle to resize the box or click inside
the box and drag to reposition it (your cursor turns into a tiny arrow). When you
like what you see, press Return (Enter on a PC) or double-click inside the crop box
to accept it.
Keep in mind, though, that when you accept a crop, Photoshop deletes everything in
the shielded area permanently—unless you undo the deletion right away. So if you
change your mind immediately after wielding the crop axe, press �-Z (Ctrl+Z on a
PC) to undo it or step backwards in the History panel (page 27). Better yet, if you like
the crop but want to make sure you keep a copy of the original, uncropped version,
go to File➝Save As right after you crop the photo and give it a new name.
224
P CS: T M M
Cropping Images
Tip: You can toggle the crop shield off and on by pressing the forward slash key (/). You can also change
the shield’s color and transparency using the Options bar (see Figure 6-5) but these settings are visible
only when a crop box is active. Better yet, leave the shield on and change the opacity to 100 percent for a
slick, solid-black background that lets you really see what the cropped image looks like.
Cropping and hiding
Normally when you crop an image, Photoshop deletes the outer edges—they’re gone
forever. But if you’re cropping a layered file (see Chapter 3 for the scoop on layers) or
a single-layered file that has an unlocked Background, you can tell Photoshop not to
vaporize the cropped material, making it easy to retrieve if you change your mind.
To do that, head up to the Options bar and, in the Cropped Area section, turn on the
Hide radio button shown in Figure 6-5; Photoshop politely hides the cropped area
outside the document’s margins instead of deleting it. That way, even though you
won’t see it onscreen, it’s still part of your file.
If you want to resurrect the cropped portion, choose Image➝Reveal All to make
Photoshop resize the canvas and reveal anything that’s loitering outside the edges of
the document (in this case, the bits you cropped). If you want to bring back just a
portion of the cropped area, press V to grab the Move tool (see page 178) and drag
the image back into view.
Figure 6-5:
The Delete and Hide
radio buttons appear
after you draw a crop
box, and they’re active
only when you’re
cropping a file that
doesn’t have a locked
Background or when
you’re cropping a mul-
tilayered file (they’re
grayed out any other
time).
If you want to hide the
portion of the canvas
covered by the crop
shield (rather than
permanently delete it),
turn on the Hide radio
button. After you crop,
the cut bits dangle be-
yond the document’s
new margins—so you
can bring them back if
you want to. For fickle
folks, this is the only
way to roll.
225
: , ,
Cropping Images
Cropping with perspective
If you shoot an image at an angle and then find you need to straighten it (like the
frame shown in Figure 6-6, left), you can crop the image and change its perspective
at the same time using the Crop tool’s Perspective setting.
Note: Photoshop won’t let you crop with perspective if you’ve turned on the Hide option discussed in the
previous section. In that case, set the Cropped Area to Delete and then turn on the Perspective setting.
Figure 6-6:
Left: Cropping to perspec-
tive can instantly (and
painlessly) straighten
objects shot at an angle,
like this painting.
Right: This trick doesn’t
work so well on living crea-
tures, however, as it can
leave them a bit distorted,
as shown here.
To crop with perspective, first draw a crop box around the object you want to
straighten. (The box doesn’t have to be exactly aligned with the object, but you do
want to grab the whole object.) Next, turn on the Perspective checkbox in the Op-
tions bar and then drag the corner handles so the lines of the crop box are parallel
to (or on top of) the angled lines in your image. When everything’s lined up, press
Return (Enter on a PC) or double-click inside the box to accept the crop. If the
planets are properly aligned, the cropped image looks nice and straight (Figure 6-6,
bottom left). Be careful, though: This tool distorts images and can leave living crea-
tures looking like they were photographed in a funhouse mirror (Figure 6-6, bottom
right).
226
P CS: T M M
Cropping Images
Cropping to a specific size
Sometimes you’ll want to crop precisely, like when you’re cropping a photo to fit in
a 4"×6" frame. In that case, you can use the Options bar to enter the width, height,
and resolution (page 238) of the final image to restrict the crop to a certain size so
that it prints perfectly.
Note: As with most of Photoshop’s dialog boxes and panels, any changes you make in the Options bar
stay changed until you change them back. So the next time you crop an image to a specific size, remem-
ber to click the Clear button (shown at the far right of Figure 6-7) to empty the dimension fields so your
crop boxes won’t be restricted to the last measurements you used.
Figure 6-7:
If you know the exact
dimensions you want
your final, cropped
image to be, type
them into the Options
bar’s Width and
Height fields (circled).
If you want to copy
another image’s
dimensions (so that
you can base a crop
on those measure-
ments), open that
model image and
then click the Front
Image button (also
circled) to snag its di-
mensions. When you
click in the document
you want to crop, the
copied dimensions
appear in the Options
bar, ready for you
to use.
Tool Preset picker
To enter custom dimensions, press C to grab the Crop tool and then head up to
the Options bar and enter measurements in the width and height fields (be sure to
include units—see the Note below). Alternatively, you can choose one of the generic
sizes listed in the Crop tool’s Preset menu, shown in Figure 6-7. If you plan to print
the final result, you’ll also need to enter a resolution (page 238); otherwise, you can
leave this box blank.
227
: , ,
Cropping Images
Note: When you enter a custom crop size, be sure to include a unit of measurement, such as px for pixels
or in for inches. Otherwise, Photoshop assumes you mean the unit of measurement that’s set in your
preferences, which may not be what you want (see page 36 to learn how to change this setting).
Now, when you “draw” the crop box—actually, you just need to click your image—
it’s constrained to the aspect ratio (the relationship between width and height) of the
dimensions you entered. Once you accept the crop, the area inside the box perfectly
matches the dimensions you entered.
If the image gets bigger inside the document window after you crop to a specific size,
that means you’ve enlarged the pixels by entering too high a resolution for the box
you drew (flip to page 238 to learn about resolution). In that case, press �-Z (Ctrl+Z
on a PC) to undo the crop and then draw a smaller crop box, or, in the Options bar,
enter smaller dimensions or a lower resolution (or both).
Zooming in by cropping
The Crop tool’s flexibility is all well and good, but what if you want to preserve the
original width-to-height relationship (the aspect ratio) of an image? Say you’ve been
out shooting in the Texas plains and, once you’re parked back at your computer, you
decide to zoom in on that prairie dog you photographed by cropping out all the dirt
around him. Sure, you can draw a crop box around the little rodent, but you have no
way of preserving the shape of the original photo—Photoshop doesn’t have any pre-
sets for cropping to specific aspect ratios (see Figure 6-8). You can work around this
problem in two ways, both of which involve selecting the whole photo first. Here’s
how to zoom into a photo without losing its original shape:
• Open a photo and press C to grab the Crop tool. Draw a box around the entire
image and, while holding the Shift key, drag one of the corner handles inward.
Then click inside the box and drag it into the right position. When you’ve got it
in just the right spot, press Return (Enter on a PC) to accept the crop.
• Open a photo, select its layer, and then press �-A (Ctrl+A on a PC) to select
everything on that layer. This creates a selection around the entire photo that
you can resize and then use to crop. Choose Select➝Transform Selection, and,
while holding down the Shift key (to preserve the selection’s aspect ratio), drag
one of the square corner handles inward. If you want, reposition the bounding
box by dragging it just like you would a crop box. When you get the bounding
box where you want it, press Return (Enter on a PC) or double-click inside the
box to accept it. Now, choose Image➝Crop to get rid of the portion outside the
selection and then dismiss the selection by pressing �-D (Ctrl+D).
Either way, you’ve just zoomed in on an item in the photo and cropped it to the same
aspect ratio as the original. Give yourself a gold star!
228
P CS: T M M
Cropping Images
Figure 6-8:
Here you can see the
original photo (top),
along with the kind
of crop you might
perform freehand
(bottom left) and a
crop that preserves
the aspect ratio of
the original (bottom
right).
Preserving the aspect
ratio is handy when
you’re preparing pho-
tos for a slideshow
and they all need to
be the same shape.
Adding Polaroid-style photo frames
The Crop tool isn’t all work and no play; you can use it for fun stuff like creating a
Polaroid-style photo frame like the one in Figure 6-9. Besides being a fast way to add
a touch of creativity to your image, this kind of frame lets you add a caption to com-
memorate those extra-special moments. Here’s how to add a frame to your photo:
Note: To practice the Polaroid maneuver on your own computer, visit this book’s Missing CD page at
www.missingmanuals.com/cds and download the practice file Trekkers.jpg.
1. Open an image and double-click its Background layer to make it editable.
Remember, the Background layer is initially locked for the reasons explained in
the box on page 85. Until you unlock it, Photoshop restricts what you can do
with it. Just give it a quick double-click to unlock it, and—if you want—give it a
new name in the resulting dialog box.
2. Enlarge the document window so you can see the gray work area all the way
around the image.
To enlarge the window, drag its bottom-right corner until you’ve got a few inches
of gray space on all four sides of your image. This bit of window resizing makes
it easier to see what you’re doing in the next step.
229
: , ,
Cropping Images
Figure 6-9:
Left: To create the look of
a Polaroid, use the Crop
tool (page 222) to add
canvas space around
your photo as shown
here. Be sure to add a
little extra room at the
bottom for a caption!
Right: When you add a
solid white layer and then
add even more canvas
space, the Polaroid really
starts to take shape. Next,
add a caption, merge the
layers, and then rotate
your image. Finish off the
effect by adding a drop
shadow (page 129) large
enough to show around
all four edges. Engage!
3. Add canvas space with the Crop tool.
Draw a box around the image and, while you hold down the Option key (Alt on
a PC), drag one of the crop handles outward about one-quarter inch and then
release the key.
Tip: Holding down Option (Alt) while you drag the corner handles of a crop box forces all four sides of
the box to expand or shrink simultaneously by the same amount. (Otherwise, you’d have to move each
handle one after another.) Press and hold the Shift key to resize the box as a perfect square.
Next, drag the bottom-middle crop handle down another one-quarter inch
(that’s where the caption goes). Finally, press Return (Enter on a PC) to tell Photo-
shop you want to keep the new canvas space. You should see a checkerboard
background around the photo (see Figure 6-9).
Note: If you don’t make the Background layer editable before you increase the canvas space, the area
around the photo ends up the color of your background color chip instead of transparent, so you can’t see
the checkerboard pattern. If you have this problem, press �-Z (Ctrl+Z on a PC) and start over with step 1.
230
P CS: T M M
Cropping Images
4. Create a new layer and drag it below the original photo layer.
At the bottom of the Layers panel, click the new layer icon (it looks like a piece
of paper with a folded corner). To keep from covering up the whole photo in the
next step, drag the new layer’s thumbnail below the original layer. Alternatively,
you can ⌘-click (Ctrl-click) the icon to make Photoshop add the new layer be-
low the currently active layer.
5. Fill the new layer with white to form the Polaroid edges.
Choose Edit➝Fill, pick “white” from the Use pop-up menu, and then click OK.
Now you’ve got a Polaroid-style frame around your photo. (For this technique,
it’s better to use an image layer than a Solid Color Fill layer—see page 91—
because the latter automatically resizes to fill your canvas, making the Polaroid
effect impossible.)
6. Increase your canvas space again so you have room to rotate the image and
add a drop shadow.
Press C to grab the Crop tool and draw a box around the image yet again. Add
equal space on all four sizes by dragging any corner handle while you hold down
the Option key (Alt on a PC). Press Return (Enter) to accept the crop.
7. Add a caption with the Type tool.
Press T to select the Type tool (page 583) and add a caption toward the bot-
tom of the frame. Here’s your big chance to use a handwriting typeface! Bradley
Hand is one good option.
8. Select all three layers.
When you have everything just right, hop over to the Layers panel and �-click
(Ctrl-click) to select the image layer, Type layer, and white Polaroid-frame layer
so you can rotate the whole mess in the next step.
9. If you like, rotate the image just a bit to give it more character.
Summon the Free Transform command by pressing �-T (Ctrl+T on a PC) and
then rotate your photo by positioning your cursor just below the bottom-right
handle. When the cursor turns into a double-sided curved arrow, drag slightly
up or down. Press Return (Enter) to accept the rotation or press Esc to reject it
and try again.
10. Select the white background layer and add a drop shadow (page 129).
Since you selected all three layers in order to rotate them, click the white back-
ground layer to select just that one. Click the tiny cursive fx at the bottom of the
Layers panel and choose Drop Shadow (page 129), and then increase the shadow’s
size quite a bit so it’s visible on all four sides of your new Polaroid frame. Move
the shadow around by dragging in your document and soften it by lowering the
opacity in the Layer Style dialog box. Click OK when you’re finished.
231
: , ,
Cropping Images
When you’re all done, you can add a solid white Fill layer to the bottom of your layer
stack to make your image look like Figure 6-9, right. Fun stuff!
Cropping with Selection Tools
You can also crop an image within the boundaries of a selection. This technique is
helpful if you’ve made a selection and then need to trim the image down to roughly
that same size. The Rectangular Marquee tool (page 139) works best for this kind of
cropping—though all the selection tools work—because Photoshop, bless its elec-
tronic heart, can crop only in rectangles.
After you draw a selection, choose Image➝Crop. Because you’re not using the Crop
tool, you won’t get resizing handles, a shield, or the ability to hide the crop, but the
document still gets reduced to the edges of your selection. If you’re attempting to
crop with an irregular or elliptical selection, you’ll still end up with a rectangular
image that encompasses the area you selected.
Trimming Photos Down to Size
If your image has a solid-colored or transparent (checkerboard) background, you
may find yourself chipping away at its edges to save space in the image’s final des-
tination (a website, a book—whatever). The trim command is incredibly handy for
those situations, especially when you’re trying to tightly crop an image that has a
drop shadow or reflection. Such embellishments make the image’s true edges hard
to see—and therefore tough to crop—because they fade into the background. So it’s
easy to, say, accidentally chop a drop shadow in half when you’re cropping. Fortu-
nately, you can enlist Photoshop’s help in finding the edges of an image and have it
do the cropping for you.
To whittle down your photo, choose Image➝Trim and, in the resulting dialog box
(shown in Figure 6-10), use the radio buttons to tell Photoshop whether you want
to zap transparent pixels or pixels that match the color at the document’s top left or
bottom right. Next, choose which sides of the image you want to trim by turning
their checkboxes on or off and clicking OK. Photoshop trims the document down to
size with zero squinting—or error—on your part.
Note: The Trim command was used on every screenshot in this book to crop the images as closely as
possible. It’s a massive timesaver if you work in production!
232
P CS: T M M
Cropping Images
Figure 6-10:
If you have a hard
time seeing the edges
of an image you want
to crop tightly, let
Photoshop do it for
you by using the Trim
dialog box. In this
example, the goal is
to get rid of the extra
transparent space
at the bottom so the
photo is as small as
possible. You can
do that by choosing
Transparent Pixels in
the dialog box shown
here.
Cropping and Straightening Photos
In Photoshop CS5, you can use the Ruler tool to straighten individual images in a
snap; just flip back to page 71 to learn how. However, if you’ve painstakingly scanned
a slew of photos into a single document, you can save yourself a lot of work by having
Photoshop crop, straighten, and split them into separate files for you—all with the
flick of a single menu command.
With the page of photos open, choose File➝Automate➝“Crop and Straighten
Photos”. Photoshop instantly calculates the angle of the overall image’s edge (that
is, the edge of the photo bits) against the white background, rotates the images, and
then duplicates all the photos into their own perfectly cropped and straightened
documents, as shown in Figure 6-11. It’s like magic!
Note: The “Crop and Straighten Photos” command also works on documents that contain just one image,
provided the picture has white space on all four sides (like the white space you’d have between photos
if you scanned several at once). It also works on layered files (see Chapter 3). Just select the layer of the
image you want to extract, run the command, and Photoshop strips that layer out into its own document
and deletes it from the original document. If that layer contains several images, they’ll get stripped out into
their own individual documents.
233
: , ,
Cropping Images
Figure 6-11:
It’s tough to get a
bunch of photos
perfectly straight
when you’re scanning
(heck, just putting
the lid down moves
’em!). This is a
prime opportunity
to use the “Crop and
Straighten Photos”
command. In one fell
swoop, the photos
(top) get straight-
ened, cropped, and
copied into their own
individual documents
(bottom) right before
your eyes.
Tip: If you want Photoshop to crop and straighten a few photos that all reside on a single layer (but not
all of them), draw a selection around each of them before you run the command (use any selection tool
and hold the Shift key to add to the selection). Photoshop processes only those photos, provided they
(and their individual selection boxes) are next to each other. If they’re not, Photoshop crops and straightens
everything in between, forcing you to close the new, unwanted documents.
Cropping and Straightening in Camera Raw
Camera Raw is an amazing piece of software that photographers use to edit the color
and lighting of images (you’ll learn loads more about it in Chapter 9). It gets installed
with Photoshop, so you don’t have to download it or pay for it separately. Using
Camera Raw to crop and straighten your photos has two big advantages:
• You can undo the crop or straighten (or both) at any time—whether the file
you’re working on is Raw, JPEG, or TIFF. In Chapter 9, you’ll learn how to use
Camera Raw for all three file formats.
234
P CS: T M M
Cropping Images
• If you have several photos that need to be cropped in a similar manner, you
can crop them all at once. Talk about a timesaver!
To open an image in Camera Raw, select the image in Bridge or CS5’s new Mini
Bridge (see Appendix C, online) and then choose File➝“Open in Camera Raw”, or
press �-R (Ctrl+R on a PC). Then follow the instructions in the next section to crop
one or more images.
Cropping images
You follow the exact same steps to crop images in Camera Raw as you do with Photo-
shop CS5’s Ruler tool (page 71). With an image open, select the Crop tool at the
top of the Camera Raw window and draw a box around the image, as Figure 6-12
illustrates. Then click the Crop tool and hold down the mouse button to reveal a
handy pull-down menu that lists aspect ratios as well as a Custom option. If you
pick Custom, a dialog box appears so you can enter a specific ratio or dimensions
in pixels, inches, or centimeters. Whichever method you use, Camera Raw places a
crop box atop your image, which you can resize by dragging any resulting handle or
the box itself.
Tip: You can exit the crop box by pressing the Esc or Delete key (Backspace on a PC) while the Crop tool
is active or by choosing Clear Crop from the Crop tool’s pull-down menu.
When you’re finished, press Return (Enter on a PC) to see what the newly cropped
image looks like. If you need to edit or undo the crop, just grab the Crop tool to make
the crop box reappear for your editing pleasure.
If you have several images that need to be cropped in the same way, the steps are
almost identical. Just open the images in Camera Raw by selecting them in Bridge
or Mini Bridge (see Appendix C, online) or simply by finding them on your hard
drive and opening them from there. When the thumbnails appear in the filmstrip
on the left side of the Camera Raw window, click the Select All button and then use
the Crop tool as described in this section. All the photos get cropped simultaneously,
and each filmstrip thumbnail updates according to how you cropped the first image.
(A tiny Crop tool icon, circled in Figure 6-12, also appears at the bottom left of each
thumbnail.)
At this point, you can click:
• The Save Images button to convert, rename, or relocate the file(s)—or any
combination of those tasks—so you don’t overwrite the original. If you save
them in Photoshop format, you can tell Camera Raw to preserve the cropped
pixels in case you want to resurrect them later (see Figure 6-13 for details).
• The Open Images button to apply the changes and open the photo(s) in
Photoshop.
235
: , ,
Cropping Images
Figure 6-12:
Open one or more
images in Camera Raw
and use the Crop tool
just like you would in
Photoshop. (Remem-
ber, Camera Raw is
actually a separate
program.) Simply drag
across the image to
draw a box and then
press Return (Enter
on a PC) to accept the
crop.
If you’ve opened
multiple images (as
shown here), you see
their thumbnails in
the filmstrip on the left
side. To crop all the
images at once, click
the Select All button in
the upper left (circled)
and draw the crop box.
You’ll see the crop,
along with a tiny Crop
tool icon (circled, left),
applied to all selected
thumbnails. The blue,
underlined text below
the preview window
(circled) changes to
reflect the size of the
crop box as you draw.
• Cancel to exit Camera Raw without applying the changes.
• Done to apply the changes (which you can edit the next time you open the im-
age in Camera Raw) and exit the Camera Raw window.
Tip: You can use keyboard shortcuts to change how the Save, Open, Cancel, and Done buttons at the
bottom of the Camera Raw window behave: To open a copy of the image in Photoshop without updating
the original Raw file, Option-click (Alt-click on a PC) the Open button. To open the image as a Smart
Object (page 123), Shift-click the Open button. To skip the Save As dialog box and make Camera Raw
use the same location, name, and format you used last time you saved the file, Option-click (Alt-click) the
Save Image button. To change the Camera Raw settings back to what they were originally, Option-click
(Alt-click) the Cancel button.
236
P CS: T M M
Resizing Images
Figure 6-13:
To see and work with your original,
pre-cropped image in Photoshop,
click Camera Raw’s Save Images
button, choose Photoshop from the
Format pop-up menu, and then
turn on the Preserve Cropped Pixels
checkbox.
Next time you open that file in
Photoshop, the photo appears on
its own layer. If you want to see the
hidden, cropped bits, use the Move
tool to drag them back into view or
choose Image➝Reveal All.
Straightening images
If you need to straighten a bunch of images at a similar angle, Camera Raw can
handle them all at once, too. Open the images and grab the Straighten tool (it’s just
to the right of the Crop tool) and draw a line across the horizon—or anything in the
image that’s supposed to be straight—as shown in Figure 6-14, top.
The image won’t straighten immediately—instead you see what looks like a rotated
crop box so you can check the angle (Figure 6-14, bottom). If it’s okay, press Return
(Enter on a PC) and Camera Raw straightens the photo. If you didn’t get it perfectly
straight, you can have another go by choosing the Straighten tool again or by open-
ing the image in Camera Raw again (if you closed it).
Resizing Images
No matter what you’ve whipped up in Photoshop, there will come a time when you
need to change the size of your masterpiece. For example, if you want to print, email,
or post an image on a website, you need different-sized versions for each of those
tasks. Changing an image’s size isn’t hard; Photoshop gives you oodles of options.
The challenge lies in doing it without sending its quality down the tubes.
Sure, you can let the “Save for Web & Devices” dialog box (page 248) or the Print
dialog box (page 678) do the resizing for you, but if you’re aiming to be a serious pixel-
pusher, you’ll want far more control. That, my friend, brings you up against the grand-
daddy of Photoshop principles: Image Resolution—the measurement that determines
the size of the pixels in your image, which in turn controls the quality of your prints.
237
: , ,
Resizing Images
Figure 6-14:
Top: Camera Raw can’t take a
document full of images and then crop,
straighten, and split them out into
individual documents automatically
like Photoshop (page 232). But you
can use it to straighten one or more
images simultaneously. Just activate the
Straighten tool and draw a line across a
part of the image that’s supposed to be
straight (circled).
Bottom: You’ll see what looks like a ro-
tated crop box (shown here). Just press
Return (Enter on a PC) to accept it and
Camera Raw straightens the image.
Arguably, resolution is one of the toughest digital-image editing concepts to wrap
your brain around. Many people grapple with questions like “What the heck is reso-
lution?” “How do I change an image’s resolution?” and “What’s the minimum resolu-
tion I need to print good-looking photos?” In the following pages, you’ll learn all the
nitty-gritty you need to answer these—and other—questions.
238
P CS: T M M
Resizing Images
Note: Resolution doesn’t mean a hill of beans unless you’re sending your image to a printer. If you’re not
going to print it, don’t worry about resolution—focus on the pixel dimensions instead.
Pixels and Resolution
As you learned in Chapter 2 (see the box on page 52), the smallest element of a raster
image is a pixel. When they’re small enough and viewed together, these tiny blocks
of color form an image (see Figure 6-15).
Note: Some digital images aren’t comprised of pixels—they’re made up of vectors, a series of points and
paths. One of the best things about working with vectors is that none of the size-versus-quality challenges
you run into with pixel-based images apply: You can make vectors as big or as small as you like and they’ll
always look great. To learn more about using vectors, trot on over to Chapter 13.
Figure 6-15:
Raster images are comprised of individual blocks of color
called pixels. To see them, zoom into the image by pressing
�-+ (Ctrl-+ on a PC) repeatedly or use the Zoom tool in the
Tools panel. (Press � or Ctrl and the – key to zoom out.)
At 3,200 percent magnification, you can see the individual
pixels that make up a tiny section of this sunflower.
Pixels have no predetermined size, which is where resolution enters the, uh, picture.
Resolution is a measurement that determines how many pixels get packed into a
given space, which in turn controls how big or small the pixels are. It’s helpful to
think of resolution as pixel density—how closely the pixels are packed together. In
fact, it’s measured in terms of pixels per inch—or ppi, as folks tend to call it.
239
: , ,
Resizing Images
Note: You’ll also hear resolution referred to as dpi, which stands for “dots per inch.” This usage isn’t
strictly accurate because dpi is technically a measurement used by printers (since they actually print dots).
Nevertheless, many folks mistakenly say “dpi” when they mean “ppi.”
One helpful way to understand resolution is to relate it to something in the real
world. Imagine you’re baking cookies (hang in there; it’ll make sense in a minute).
When you pour brown sugar into a measuring cup, the sugar reaches the one-cup
line. But after you pack the granules firmly into the cup, the sugar reaches only
the half-cup line. You still have the same number of granules (which are like pix-
els), they’re just smaller because they’re packed more tightly together (they have a
higher resolution) in the confines of the measuring cup (the Photoshop document).
The loosely packed granules you started with are like low resolution, and the firmly
packed granules are like high resolution. (Hungry yet?)
Since increasing image resolution—from, say, 72 ppi to 300 ppi—makes the pix-
els smaller and packs them together more tightly, it results in a physically smaller
but smoother and better-looking printed image. Lowering image resolution, on the
other hand, means enlarging and loosening the pixels, which results in a physically
larger image that, as you might suspect, looks like it was made from Legos because
the pixels are so big you can see each one individually.
A printer is one of the few devices capable of modifying its output (that is, the print)
based on an image’s resolution. In other words, send your inkjet printer a low-res ver-
sion and a high-res version of the same picture and it’ll spit out images that differ
vastly in size and quality. The resolution on a computer monitor, on the other hand, is
handled by the video driver (the software that controls what you see on the monitor),
not the resolution specified in the image. That’s why an 85 ppi image looks identical
to an 850 ppi image onscreen. The bottom line: Printers can take advantage of higher
resolutions (scanners can, too, but that’s a story for page 57), but monitors can’t.
The Mighty Image Size Dialog Box
If you can’t trust your monitor to show your image’s true resolution, who can you
trust? Why, the Image Size dialog box, shown in Figure 6-16, which not only displays
the current resolution of any open document, but also lets you change it.
To summon this dialog box and check your document’s resolution, choose
Image➝Image Size. The dialog box reveals all kinds of info about your image: its
file size (that is, how much space it takes up on your hard drive), its pixel (onscreen)
dimensions, how big it would be if you printed it, and its resolution. If you’re prepar-
ing an image to email or post on the Web, you only need to worry about the pixel
dimensions at the top of the dialog box. If you’re going to print the image, focus your
attention on the Document Size portion in the middle instead.