sử dụng simulink trong matlab (2)
Bạn đang xem bản rút gọn của tài liệu. Xem và tải ngay bản đầy đủ của tài liệu tại đây (1.98 MB, 184 trang )
Computation
Visualization
Programming
Creating Graphical User Interfaces
Version 6
MAT LA B
®
The Language of Technical Computing
How to Contact The MathWorks:
www.mathworks.com Web
comp.soft-sys.matlab Newsgroup
Technical support
Product enhancement suggestions
Bug reports
Documentation error reports
Order status, license renewals, passcodes
Sales, pricing, and general information
508-647-7000 Phone
508-647-7001 Fax
The MathWorks, Inc. Mail
3 Apple Hill Drive
Natick, MA 01760-2098
For contact information about worldwide offices, see the MathWorks Web site.
Creating Graphical User Interfaces
COPYRIGHT 2000 - 2002 by The MathWorks, Inc.
The software described in this document is furnished under a license agreement. The software may be used
or copied only under the terms of the license agreement. No part of this manual may be photocopied or repro-
duced in any form without prior written consent from The MathWorks, Inc.
FEDERAL ACQUISITION: This provision applies to all acquisitions of the Program and Documentation by
or for the federal government of the United States. By accepting delivery of the Program, the government
hereby agrees that this software qualifies as "commercial" computer software within the meaning of FAR
Part 12.212, DFARS Part 227.7202-1, DFARS Part 227.7202-3, DFARS Part 252.227-7013, and DFARS Part
252.227-7014. The terms and conditions of The MathWorks, Inc. Software License Agreement shall pertain
to the government’s use and disclosure of the Program and Documentation, and shall supersede any
conflicting contractual terms or conditions. If this license fails to meet the government’s minimum needs or
is inconsistent in any respect with federal procurement law, the government agrees to return the Program
and Documentation, unused, to MathWorks.
MATLAB, Simulink, Stateflow, Handle Graphics, and Real-Time Workshop are registered trademarks, and
TargetBox is a trademark of The MathWorks, Inc.
Other product or brand names are trademarks or registered trademarks of their respective holders.
Printing History: November 2000 Online only New for MATLAB 6.0 (Release12)
June 2001 Online only Revised for MATLAB 6.1 (Release 12.1)
July 2002 Online only Revised for MATLAB 6.5 (Release 13)
i
Contents
1
Getting Started with GUIDE
GUIDE — GUI Development Environment . . . . . . . . . . . . . . 1-2
GUIDE Toolset . . . . . . . . . . . . . . . . . . . . . . . . . . . . . . . . . . . . . . 1-3
GUI FIG-Files and M-Files . . . . . . . . . . . . . . . . . . . . . . . . . . . . . 1-5
Using GUIDE Templates . . . . . . . . . . . . . . . . . . . . . . . . . . . . . . . 1-6
2
Example: Creating a GUI
Designing the GUI . . . . . . . . . . . . . . . . . . . . . . . . . . . . . . . . . . . . 2-2
Laying Out the GUI . . . . . . . . . . . . . . . . . . . . . . . . . . . . . . . . . . . 2-3
Layout and Code for the Example . . . . . . . . . . . . . . . . . . . . . . . 2-3
Open a New GUI in the Layout Editor . . . . . . . . . . . . . . . . . . . 2-4
Set the GUI Figure Size . . . . . . . . . . . . . . . . . . . . . . . . . . . . . . . 2-4
Add the Components . . . . . . . . . . . . . . . . . . . . . . . . . . . . . . . . . . 2-6
Align the Objects . . . . . . . . . . . . . . . . . . . . . . . . . . . . . . . . . . . . . 2-7
Programming the GUI . . . . . . . . . . . . . . . . . . . . . . . . . . . . . . . . . 2-9
Set Properties for the GUI Components . . . . . . . . . . . . . . . . . . 2-9
Opening the GUI M-File . . . . . . . . . . . . . . . . . . . . . . . . . . . . . . 2-13
Opening Function . . . . . . . . . . . . . . . . . . . . . . . . . . . . . . . . . . . 2-15
Sharing Data Between Callbacks . . . . . . . . . . . . . . . . . . . . . . . 2-15
Adding Code to the Opening Function . . . . . . . . . . . . . . . . . . . 2-16
Adding Code to the Callbacks . . . . . . . . . . . . . . . . . . . . . . . . . . 2-17
Using the Object Browser to Identify Callbacks . . . . . . . . . . . 2-20
Saving and Running the GUI . . . . . . . . . . . . . . . . . . . . . . . . . 2-21
ii Contents
3
MATLAB GUIs
What Is a GUI? . . . . . . . . . . . . . . . . . . . . . . . . . . . . . . . . . . . . . . . . 3-2
Creating GUIs with GUIDE . . . . . . . . . . . . . . . . . . . . . . . . . . . . 3-3
GUI Development Environment . . . . . . . . . . . . . . . . . . . . . . . . . 3-3
Editing Version 5 GUIs with Version 6 GUIDE . . . . . . . . . . . . . 3-4
Using GUIDE Templates . . . . . . . . . . . . . . . . . . . . . . . . . . . . . . . 3-6
Blank GUI . . . . . . . . . . . . . . . . . . . . . . . . . . . . . . . . . . . . . . . . . . 3-7
GUI with UIcontrols . . . . . . . . . . . . . . . . . . . . . . . . . . . . . . . . . . 3-8
GUI with Axes and Menu . . . . . . . . . . . . . . . . . . . . . . . . . . . . . . 3-9
Modal Question Dialog . . . . . . . . . . . . . . . . . . . . . . . . . . . . . . . 3-10
Example: Using the Modal Dialog to Confirm an Operation 3-13
View the Layout and GUI M-File . . . . . . . . . . . . . . . . . . . . . . . 3-13
Setting Up the Close Confirmation Dialog . . . . . . . . . . . . . . . . 3-14
Setting Up the GUI with the Close Button . . . . . . . . . . . . . . . 3-15
Running the GUI with the Close Button . . . . . . . . . . . . . . . . . 3-16
How the GUI and Dialog Work . . . . . . . . . . . . . . . . . . . . . . . . . 3-17
Example: Displaying an Image File . . . . . . . . . . . . . . . . . . . . 3-19
Selecting GUI Options . . . . . . . . . . . . . . . . . . . . . . . . . . . . . . . . 3-21
Configuring the GUI M-File . . . . . . . . . . . . . . . . . . . . . . . . . . . 3-21
Resize Behavior . . . . . . . . . . . . . . . . . . . . . . . . . . . . . . . . . . . . . 3-22
Command-Line Accessibility . . . . . . . . . . . . . . . . . . . . . . . . . . . 3-23
Generate FIG-File and M-File . . . . . . . . . . . . . . . . . . . . . . . . . . 3-25
Generate Callback Function Prototypes . . . . . . . . . . . . . . . . . . 3-26
GUI Allows Only One Instance to Run (Singleton) . . . . . . . . . 3-27
Using the System Background Colors . . . . . . . . . . . . . . . . . . . 3-28
Generate FIG-File Only . . . . . . . . . . . . . . . . . . . . . . . . . . . . . . . 3-28
User Interface Controls . . . . . . . . . . . . . . . . . . . . . . . . . . . . . . . 3-30
Push Buttons . . . . . . . . . . . . . . . . . . . . . . . . . . . . . . . . . . . . . . . 3-30
Toggle Buttons . . . . . . . . . . . . . . . . . . . . . . . . . . . . . . . . . . . . . . 3-31
Radio Buttons . . . . . . . . . . . . . . . . . . . . . . . . . . . . . . . . . . . . . . 3-31
Check Boxes . . . . . . . . . . . . . . . . . . . . . . . . . . . . . . . . . . . . . . . 3-33
Edit Text . . . . . . . . . . . . . . . . . . . . . . . . . . . . . . . . . . . . . . . . . . 3-33
iii
Static Text . . . . . . . . . . . . . . . . . . . . . . . . . . . . . . . . . . . . . . . . . 3-34
Sliders . . . . . . . . . . . . . . . . . . . . . . . . . . . . . . . . . . . . . . . . . . . . . 3-35
Frames . . . . . . . . . . . . . . . . . . . . . . . . . . . . . . . . . . . . . . . . . . . . 3-37
List Boxes . . . . . . . . . . . . . . . . . . . . . . . . . . . . . . . . . . . . . . . . . 3-37
Pop-Up Menus . . . . . . . . . . . . . . . . . . . . . . . . . . . . . . . . . . . . . . 3-39
Enabling or Disabling Controls . . . . . . . . . . . . . . . . . . . . . . . . . 3-41
Axes . . . . . . . . . . . . . . . . . . . . . . . . . . . . . . . . . . . . . . . . . . . . . . . 3-41
Figure . . . . . . . . . . . . . . . . . . . . . . . . . . . . . . . . . . . . . . . . . . . . . 3-42
Renaming GUI Files and Tags . . . . . . . . . . . . . . . . . . . . . . . . . 3-44
Renaming GUI Files Using Save As . . . . . . . . . . . . . . . . . . . . . 3-44
Changing Component Tag Properties . . . . . . . . . . . . . . . . . . . . 3-44
Updating Callback Properties and Functions After Changing Tags 3-45
Changing the Name of Callback Properties . . . . . . . . . . . . . . . 3-45
Exporting a GUI to a Single M-File . . . . . . . . . . . . . . . . . . . . 3-47
4
GUIDE Layout Tools
Laying Out GUIs — The Layout Editor . . . . . . . . . . . . . . . . . . 4-2
Placing Objects In the Layout Area . . . . . . . . . . . . . . . . . . . . . . 4-2
Running the GUI . . . . . . . . . . . . . . . . . . . . . . . . . . . . . . . . . . . . . 4-3
Saving the Layout . . . . . . . . . . . . . . . . . . . . . . . . . . . . . . . . . . . . 4-5
Displaying Your GUI . . . . . . . . . . . . . . . . . . . . . . . . . . . . . . . . . . 4-5
Layout Editor Preferences . . . . . . . . . . . . . . . . . . . . . . . . . . . . . . 4-6
Layout Editor Context Menus . . . . . . . . . . . . . . . . . . . . . . . . . . . 4-6
Aligning Components in the Layout Editor . . . . . . . . . . . . . . 4-9
Aligning Groups of Components — The Alignment Tool . . . . . . 4-9
Grids and Rulers . . . . . . . . . . . . . . . . . . . . . . . . . . . . . . . . . . . . 4-11
Aligning Components to Guide Lines . . . . . . . . . . . . . . . . . . . . 4-12
Front to Back Positioning . . . . . . . . . . . . . . . . . . . . . . . . . . . . . 4-12
Setting Component Properties — The Property Inspector 4-14
Viewing the Object Hierarchy — The Object Browser . . . 4-16
iv Contents
Creating Menus — The Menu Editor . . . . . . . . . . . . . . . . . . . 4-17
Defining Menus for the Menu Bar . . . . . . . . . . . . . . . . . . . . . . 4-17
Menu Callbacks . . . . . . . . . . . . . . . . . . . . . . . . . . . . . . . . . . . . . 4-22
Defining Context Menus . . . . . . . . . . . . . . . . . . . . . . . . . . . . . . 4-23
Setting the Tab Order — The Tab Order Editor . . . . . . . . . 4-27
5
Programming GUIs
Understanding the GUI M-File . . . . . . . . . . . . . . . . . . . . . . . . . 5-2
Sharing Data with the Handles Structure . . . . . . . . . . . . . . . . . 5-2
Functions and Callbacks in the M-File . . . . . . . . . . . . . . . . . . . . 5-3
Opening Function . . . . . . . . . . . . . . . . . . . . . . . . . . . . . . . . . . . . . 5-4
Output Function . . . . . . . . . . . . . . . . . . . . . . . . . . . . . . . . . . . . . . 5-5
Callbacks . . . . . . . . . . . . . . . . . . . . . . . . . . . . . . . . . . . . . . . . . . . 5-6
Input and Output Arguments . . . . . . . . . . . . . . . . . . . . . . . . . . . 5-6
Managing GUI Data with the Handles Structure . . . . . . . . . 5-8
Example: Passing Data Between Callbacks . . . . . . . . . . . . . . . . 5-8
Application Data . . . . . . . . . . . . . . . . . . . . . . . . . . . . . . . . . . . . 5-11
Designing for Cross-Platform Compatibility . . . . . . . . . . . . 5-12
Using the Default System Font . . . . . . . . . . . . . . . . . . . . . . . . . 5-12
Using Standard Background Color . . . . . . . . . . . . . . . . . . . . . . 5-13
Cross-Platform Compatible Figure Units . . . . . . . . . . . . . . . . . 5-14
Types of Callbacks . . . . . . . . . . . . . . . . . . . . . . . . . . . . . . . . . . . 5-15
Callback Properties for All Graphics Objects . . . . . . . . . . . . . . 5-15
Callback Properties for Figures . . . . . . . . . . . . . . . . . . . . . . . . 5-15
Which Callback Executes . . . . . . . . . . . . . . . . . . . . . . . . . . . . . 5-16
Adding A Callback . . . . . . . . . . . . . . . . . . . . . . . . . . . . . . . . . . . 5-16
Interrupting Executing Callbacks . . . . . . . . . . . . . . . . . . . . . 5-17
Controlling Interruptibility . . . . . . . . . . . . . . . . . . . . . . . . . . . . 5-17
The Event Queue . . . . . . . . . . . . . . . . . . . . . . . . . . . . . . . . . . . . 5-17
Event Processing During Callback Execution . . . . . . . . . . . . . 5-18
v
Controlling Figure Window Behavior . . . . . . . . . . . . . . . . . . 5-20
Using Modal Figure Windows . . . . . . . . . . . . . . . . . . . . . . . . . . 5-20
6
Application Examples
GUI with Multiple Axes . . . . . . . . . . . . . . . . . . . . . . . . . . . . . . . . 6-2
Techniques Used in the Example . . . . . . . . . . . . . . . . . . . . . . . . 6-2
View the Layout and GUI M-File . . . . . . . . . . . . . . . . . . . . . . . . 6-3
Design of the GUI . . . . . . . . . . . . . . . . . . . . . . . . . . . . . . . . . . . . 6-3
Plot Push Button Callback . . . . . . . . . . . . . . . . . . . . . . . . . . . . . 6-6
List Box Directory Reader . . . . . . . . . . . . . . . . . . . . . . . . . . . . . 6-9
View the Layout and GUI M-File . . . . . . . . . . . . . . . . . . . . . . . . 6-9
Implementing the GUI . . . . . . . . . . . . . . . . . . . . . . . . . . . . . . . 6-10
Specifying the Directory to List . . . . . . . . . . . . . . . . . . . . . . . . . 6-10
Loading the List Box . . . . . . . . . . . . . . . . . . . . . . . . . . . . . . . . . 6-11
Accessing Workspace Variables from a List Box . . . . . . . . . 6-15
Techniques Used in This Example . . . . . . . . . . . . . . . . . . . . . . 6-15
View the Layout and GUI M-File . . . . . . . . . . . . . . . . . . . . . . . 6-16
Reading Workspace Variables . . . . . . . . . . . . . . . . . . . . . . . . . . 6-16
Reading the Selections from the List Box . . . . . . . . . . . . . . . . . 6-17
A GUI to Set Simulink Model Parameters . . . . . . . . . . . . . . 6-19
Techniques Used in This Example . . . . . . . . . . . . . . . . . . . . . . 6-19
View the Layout and GUI M-File . . . . . . . . . . . . . . . . . . . . . . . 6-19
How to Use the GUI (Text of GUI Help) . . . . . . . . . . . . . . . . . . 6-20
Running the GUI . . . . . . . . . . . . . . . . . . . . . . . . . . . . . . . . . . . . 6-21
Programming the Slider and Edit Text Components . . . . . . . . 6-22
Running the Simulation from the GUI . . . . . . . . . . . . . . . . . . . 6-24
Removing Results from the List Box . . . . . . . . . . . . . . . . . . . . 6-26
Plotting the Results Data . . . . . . . . . . . . . . . . . . . . . . . . . . . . . 6-27
The GUI Help Button . . . . . . . . . . . . . . . . . . . . . . . . . . . . . . . . 6-29
Closing the GUI . . . . . . . . . . . . . . . . . . . . . . . . . . . . . . . . . . . . . 6-29
The List Box Callback and Create Function . . . . . . . . . . . . . . 6-29
vi Contents
An Address Book Reader . . . . . . . . . . . . . . . . . . . . . . . . . . . . . 6-31
Techniques Used in This Example . . . . . . . . . . . . . . . . . . . . . . 6-31
Managing Shared Data . . . . . . . . . . . . . . . . . . . . . . . . . . . . . . . 6-31
View the Layout and GUI M-File . . . . . . . . . . . . . . . . . . . . . . . 6-32
Running the GUI . . . . . . . . . . . . . . . . . . . . . . . . . . . . . . . . . . . . 6-32
Loading an Address Book Into the Reader . . . . . . . . . . . . . . . . 6-34
The Contact Name Callback . . . . . . . . . . . . . . . . . . . . . . . . . . . 6-36
The Contact Phone Number Callback . . . . . . . . . . . . . . . . . . . . 6-38
Paging Through the Address Book — Prev/Next . . . . . . . . . . . 6-39
Saving Changes to the Address Book from the Menu . . . . . . . 6-41
The Create New Menu . . . . . . . . . . . . . . . . . . . . . . . . . . . . . . . . 6-43
The Address Book Resize Function . . . . . . . . . . . . . . . . . . . . . . 6-43
1
Getting Started with
GUIDE
GUIDE — GUI Development
Environment (p. 1-2)
Introduction to GUIDE and the Layout Editor
GUI FIG-Files and M-Files (p. 1-5) How GUIDE stores GUIs
Using GUIDE Templates (p. 1-6) GUIDE provides templates — simple examples of GUIs,
which you can modify for your own purposes.
1 Getting Started with GUIDE
1-2
GUIDE — GUI Development Environment
GUIDE, the MATLAB Graphical User Interface development environment,
provides a set of tools for creating GUIs. These tools greatly simplify the
process of laying out and programming a GUI. This section introduces you to
GUIDE and the layout tools it provides.
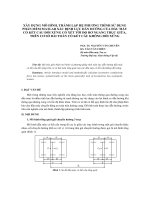
When you open a GUI in GUIDE, it is displayed in the Layout Editor, which is
the control panel for all of the GUIDE tools. The Layout Editor enables you to
lay out a GUI quickly and easily by dragging components, such as push
buttons, pop-up menus, or axes, from the component palette into the layout
area. The following picture shows the Layout Editor.
GUIDE — GUI Development Environment
1-3
Once you lay out your GUI and set each component’s properties, using the tools
in the Layout Editor, you can program the GUI with the M-file Editor. Finally,
when you press the
Run button on the toolbar, the functioning GUI appears
outside the Layout Editor window.
GUIDE Toolset
For more information on the full set of GUIDE development tools, see the
following sections:
Component
Palette
Alignment Tool
Menu Editor
Property Inspector
Run Button
Layout Area
Figure Resize Tab
Undo
Redo
Object Browser
M-file Editor
1 Getting Started with GUIDE
1-4
• “Laying Out GUIs — The Layout Editor” on page 4-2 — add and arrange
objects in the figure window.
• “Aligning Components in the Layout Editor” on page 4-9 — align objects
with respect to each other.
• “Setting Component Properties — The Property Inspector” on page 4-14 —
inspect and set property values.
• “Viewing the Object Hierarchy — The Object Browser” on page 4-16 —
observe a hierarchical list of the Handle Graphics objects in the current
MATLAB session.
• “Creating Menus — The Menu Editor” on page 4-17 — create a menu bar or
a context menu for any component in your layout.
• “Setting the Tab Order — The Tab Order Editor” on page 4-27 — change the
order in which components are selected by tabbing.
GUI FIG-Files and M-Files
1-5
GUI FIG-Files and M-Files
GUIDE stores GUIs in two files, which are generated the first time you save or
run the GUI:
• FIG-file — a file with extension
.fig that contains a complete description of
the GUI figure layout and the components of the GUI: push buttons, menus,
axes, and so on. When you make changes to the GUI layout in the Layout
Editor, your changes are saved in the FIG-file.
• M-file — a file with extension .m that contains the code that controls the
GUI, including the callbacks for its components. This file is referred to as the
GUI M-file. When you first run or save a GUI from the Layout Editor,
GUIDE generates the GUI M-file with blank stubs for each of the callbacks.
You can than program the callbacks using the M-file editor.
Note In the documentation for releases prior to Release 13, the GUI M-file
was referred to as the “application M-file.”
1 Getting Started with GUIDE
1-6
Using GUIDE Templates
GUIDE provides templates for several basic types of GUIs. You can modify
these templates to make your own GUIs. The advantage of using the templates
is that you can create GUIs more quickly and easily.
To view the templates, enter
guide at the MATLAB prompt. This displays the
GUIDE Quick Start dialog, as shown in the following figure.
When you select a template in the left pane, a preview of it appears in the right
pane. Clicking
OK opens the template in the Layout editor. See “Using GUIDE
Templates” on page 3-6 for more information about GUIDE templates.
The next section, “Getting Started with GUIDE” on page 1-1, provides a
detailed example of how to create a GUI using GUIDE.
2
Example: Creating a GUI
This section presents an example that shows how to use GUIDE to create graphical user interfaces
(GUIs).
Designing the GUI (p. 2-2) Design the GUI before actually creating it in GUIDE.
Laying Out the GUI (p. 2-3) Use the GUIDE Layout Editor to arrange the GUI
components, such as push buttons, pop-up menus, and
axes.
Programming the GUI (p. 2-9) Use the M-file editor to program the GUI
Saving and Running the GUI (p. 2-21) Run the GUI from the Layout Editor.
2 Example: Creating a GUI
2-2
Designing the GUI
The GUI used in this example contains an axes that displays either a surface,
mesh, or contour plot of data selected from the pop-up menu. The following
picture shows a sketch that you might use as a starting point for the design.
The pop-up menu contains three strings — “peaks,” “membrane,” and “sinc,”
which correspond to MATLAB functions. The user can select the data to plot
from this menu.
Select Data
peaks
Contour
Mesh
Surf
Axes
Push buttons to select
plot type
Menu for selecting data
Laying Out the GUI
2-3
Laying Out the GUI
This section illustrates how to lay out GUI components (i.e., user interface
controls, such as push buttons, pop-up menus, static text, etc.) in the GUI. We
recommend that you create the GUI for yourself, as this is the best way to learn
how to use GUIDE.
The section explains how to:
• Open a completed version layout and code for the example
• Open a new GUI in the Layout Editor
• Set the GUI figure size
• Add the components
• Align the objects
Layout and Code for the Example
If you are reading this in the MATLAB Help browser, you can click the
following links to display the GUIDE Layout Editor and the MATLAB Editor
with a completed version of this example. This enables you to see the values of
all component properties and to understand how the components are
assembled to create the GUI. You can also see a complete listing of the code
that is discussed in the following sections.
Note The following links execute MATLAB commands and are designed to
work within the MATLAB Help browser. If you are reading this online or in
PDF, you should go to the corresponding section in the MATLAB Help
Browser to use the links.
• Layout Editor with completed GUI layout
• MATLAB Editor with completed M-file
View an Animated Demo
The following link displays an animated version of this example.
Show GUIDE demonstration
2 Example: Creating a GUI
2-4
Open a New GUI in the Layout Editor
Open GUIDE by typing guide at the MATLAB prompt. This displays the
Quick Start dialog shown in the following figure:
If GUIDE is already open, you can display a similar dialog, without the
Open
Existing GUI
tab, by selecting New from the File menu.
In the
Quick Start dialog, select the Blank GUI (default) template. Click OK
to display the blank GUI in the Layout Editor, as shown in the following figure.
You can choose to save your GUI immediately under a different name by
selecting
Save on startup. Otherwise, GUIDE prompts you to do so the first
time you run the GUI.
Set the GUI Figure Size
Specify the size of the GUI by resizing the grid area in the Layout Editor. Click
on the lower-right corner and resize the grid until it is about 4-by-3 inches.
Laying Out the GUI
2-5
If you want to set the position or size of the GUI to an exact value, do the
following:
1 Select Property Inspector from the View menu.
2 Select the button next to Units and then select inches from the pop-up
menu
3 Click the + sign next to Position.
4 Type the x and y coordinates of the point where you want the lower left
corner of the GUI to appear, and its width and height, as shown in the
following figure.
5 Reset the Units property to characters.
Note Setting the Units property to characters gives the GUI a more
consistent appearance across platforms.
Click corner to resize
2 Example: Creating a GUI
2-6
Add the Components
Select the components to add from the palette and drag them into the layout
area. You can resize components from any corner handle while it is selected.
Add three push buttons, a static text, a pop-up menu, and an axes. Arrange
them as shown in the following figure. Resize the axes component to about
2-by-2 inches by selecting it with the mouse, and then clicking and dragging the
lower-right corner.
Laying Out the GUI
2-7
Align the Objects
You can align components with respect to one another with the Alignment Tool.
For example, to align the three push buttons:
1 Select all three push buttons by pressing Ctrl and clicking them.
2 Select Align Objects from the Tools menu to display the Alignment Tool.
3 Make the following settings in the Alignment Tool, as shown in the following
figure.
- 20 pixels spacing between push buttons in the vertical direction.
- Left-aligned in the horizontal direction.
4 Click OK.
2 Example: Creating a GUI
2-8
To learn more about the Layout Editor, see “Laying Out GUIs — The Layout
Editor” on page 4-2
Programming the GUI
2-9
Programming the GUI
After laying out the GUI, the next step is to program it. This section explains
how to do so. The section covers
• Setting properties for the GUI components
• Opening the GUI M-file
• The opening function
• Sharing data between callbacks
• Adding code to the opening function
• Adding code to the callbacks
• Using the Object Browser to identify callbacks
Set Properties for the GUI Components
To set the properties of each GUI component, select the Property Inspector
from the
View menu to display the Property Inspector. When you select a
component in the Layout Editor, the Property Inspector displays the
component’s properties. If no component is selected, the Property Inspector
displays the properties of the GUI figure, as shown in the following figure.
Name Property
Scroll down the list of properties until you come to Name. In the field next to
Name, type Simple GUI, as shown in the following figure. This is the title that
is displayed at the top of the GUI.
2 Example: Creating a GUI
2-10
String Property
You can set the label in a GUI component by its String property. For example,
to set the label of the top push button, select the push button in the Layout
Editor and then scroll down in the Property Inspector until you come to
String.
In the field to the right of String, change
Push Button to Surf, as shown in the
following figure.
You can view the change by clicking the Layout Editor. Similarly, change the
String property of the middle push button to Mesh, the bottom push button to
Contour, and the Static Text to Select Data.
Pop-up Menu Items. To set pop-up menu items, select the popup menu in the
Layout Editor. In the Property Inspector, click the icon next to
String. This
opens the
String property edit box. Delete Popup Menu in the String property
edit box, and type
peaks, membrane, and sinc on three separate lines, as shown
in the following figure:
Programming the GUI
2-11
When you click on the Layout Editor, the GUI appears as in the following
figure.