PHP & MYSQL NOVICETO NINJA pptx
Bạn đang xem bản rút gọn của tài liệu. Xem và tải ngay bản đầy đủ của tài liệu tại đây (11.65 MB, 57 trang )
PANTONE 2955 CPANTONE Orange 021 C
CMYK 100, 45, 0, 37CMYK O, 53, 100, 0
Black 100%Black 50%
CMYK:
Pantone:
Grey scale
FIFTH
EDITION
THE EASY WAY TO BUILD YOUR OWN DATABASE DRIVEN WEBSITE
PHP & MYSQL
NOVICE TO NINJA
BY KEVIN YANK
Thanks for your interest!
Thanks again for your interest in “PHP & MySQL:
Novice to Ninja”. It’s great that you’ve decided to
download this sample PDF, as it’ll give you a taste of
the full 500+ page version of the book.
Just to recap, this book covers:
Reach out to us on Twitter or Facebook (with your comments)
Contact us at support (with any questions).
0 Database design: Mastering SQL, table construction, and interaction
0 Object Oriented Programming: Crash course in OOP principles
0 Shopping carts: Developing an ecommerce platform from scratch
0 Latest technologies: Updates for Win 7, Mac OS X Lion, and the latest
versions of PHP, MySQL, phpMyAdmin, XAMPP, MAMP, & HTML5
0 And much more
Learn rock-solid PHP programming principles
from the start.
Learn Best-practice Coding
100% Satisfaction Guarantee
:HZDQW\RXWRIHHODVFRQ¿GHQWDVZHGRWKDWWKLVERRNZLOOGHOLYHUWKHJRRGVVR
\RXKDYHDIXOOGD\VWRSOD\ZLWKLW,ILQWKDWWLPH\RXIHHOWKHERRNIDOOVVKRUW
VLPSO\VHQGLWEDFNDQGZH¶OOJLYH\RXDSURPSWUHIXQGRIWKHIXOOSXUFKDVHSULFH
PLQXVVKLSSLQJDQGKDQGOLQJ
&OLFNKHUHWRRUGHUDQGGRZQORDGWKH'LJLWDO
%XQGOHWRVXLWDOO\RXUGHYLFHVIURP.LQGOHV!
WRL3DGVDQGPRUH
phpmysql5-teaser.indd 1 2/05/12 1:08 PM
PHP & MySQL: Novice to Ninja
What’s in This Excerpt
This excerpt comprises large extracts from two chapters of PHP & MySQL: Novice
to Ninja:
Chapter 1: Introducing MySQL
Although I’m sure you’ll be anxious to start building dynamic web pages, I’ll
begin with an introduction to databases in general, and the MySQL relational
database management system in particular. If you have never worked with a
relational database before, this should definitely be an enlightening chapter that
will whet your appetite for what’s to come!
Chapter 2: Introducing PHP
Here’s where the fun really starts. In this chapter, I’ll introduce you to the PHP
scripting language, which you can use to build dynamic web pages that present
up-to-the-moment information to your visitors. Readers with previous program-
ming experience will probably only need a quick skim of this chapter, as I ex-
plain the essentials of the language from the ground up. This is a must-read
chapter for beginners, however.
What’s in the Rest of the Book
Installation
Before you can start building your database driven website, you must first ensure
that you have the right tools for the job. In this chapter, I’ll tell you where to
obtain the two essential components you’ll need: the PHP scripting language
and the MySQL database management system. I’ll step you through the setup
procedures on Windows, Linux, and Mac OS X, and show you how to test that
PHP is operational on your web server.
Publishing MySQL Data on the Web
In this chapter you’ll bring together PHP and MySQL, which you’ll have seen
separately in the previous chapters, to create some of your first database driven
web pages. You’ll explore the basic techniques of using PHP to retrieve inform-
ation from a database and display it on the Web in real time. I’ll also show you
how to use PHP to create web-based forms for adding new entries to, and
modifying existing information in, a MySQL database on the fly.
Relational Database Design
Although you’ll have worked with a very simple sample database in the previous
chapters, most database driven websites require the storage of more complex
forms of data than you’ll have dealt with at this point. Far too many database
driven website designs are abandoned midstream or are forced to start again
from the beginning, because of mistakes made early on during the design of the
database structure. In this critical chapter you’ll learn the essential principles
of good database design, emphasizing the importance of data normalization. If
you’re unsure what that means, then this is definitely an important chapter for
you to read!
Structured PHP Programming
Techniques to better structure your code are useful in all but the simplest of
PHP projects. The PHP language offers many facilities to help you do this, and
in this chapter, I’ll cover some of the simple techniques that exist to keep your
code manageable and maintainable. You’ll learn to use include files to avoid
having to write the same code more than once when it’s needed by many pages
of your site, and I’ll show you how to write your own functions to extend the
built-in capabilities of PHP and to streamline the code that appears within your
scripts.
A Content Management System
In many ways the climax of the book, this chapter is the big payoff for all you
frustrated site builders who are tired of updating hundreds of pages whenever
you need to make a change to a site’s design. I’ll walk you through the code for
a basic content management system that allows you to manage a database of
jokes, their categories, and their authors. A system like this can be used to
manage simple content on your website; just a few modifications, and you’ll
have a site administration system that will have your content providers submit-
ting content for publication on your site in no time—all without having to know
a shred of HTML!
PHP & MySQL: Novice to Ninja (www.sitepoint.com)
viii
Content Formatting with Regular Expressions
Just because you’re implementing a nice, easy tool to allow site administrators
to add content to your site without their knowing HTML, that content can still
be jazzed up, instead of settling for just plain, unformatted text. In this chapter,
I’ll show you some neat tweaks you can make to the page that displays the
contents of your database—tweaks that allow it to incorporate simple formatting
such as bold or italicized text, among other options.
Cookies, Sessions, and Access Control
What are sessions, and how are they related to cookies, a long-suffering techno-
logy for preserving stored data on the Web? What makes persistent data so im-
portant in current ecommerce systems and other web applications? This chapter
answers all those questions by explaining how PHP supports both cookies and
sessions, and explores the link between the two. You’ll then put these pieces
together to build a simple shopping cart system, as well as an access control
system for your website.
MySQL Administration
While MySQL is a good, simple database solution for those without the need
for many frills, it does have some complexities of its own that you’ll need to
understand if you’re going to rely on a MySQL database to store your content.
In this section, I’ll teach you how to perform backups of, and manage access to,
your MySQL database. In addition to a couple of inside tricks (like what to do
if you forget your MySQL password), I’ll explain how to speed up your database
when it gets slow, and how to link together the data in your database in useful
ways.
Advanced SQL Queries
In previous chapters, we saw what was involved in modeling complex relation-
ships between pieces of information in a relational database like MySQL. Al-
though the theory was quite sound, putting these concepts into practice requires
that you learn a few more tricks of Structured Query Language. In this chapter,
I’ll cover some of the more advanced features of this language to help you juggle
complex data like a pro.
Binary Data
Some of the most interesting applications of database driven web design include
some juggling of binary files. Online file storage services are prime examples,
Order the print version of this book to get all 500+ pages!
ix
but even a system as simple as a personal photo gallery can benefit from storing
binary files (that is, pictures) in a database for retrieval and management on the
fly. In this chapter, I’ll demonstrate how to speed up your website by creating
static copies of dynamic pages at regular intervals—using PHP, of course! With
these basic file-juggling skills in hand, you’ll go on to develop a simple online
file storage and viewing system, and learn the ins and outs of working with
binary data in MySQL.
Interested in finding out more?
This sample gives you a taste of what’s in the book, but remember: you’re only
seeing a small piece of the action.
The full version of PHP & MySQL: Novice to Ninja is available now. There’s a
page at the end of these sample chapters with a link to the download page.
And once you’ve worked your way through the book, find out how much of a
server-side star you are with the online SitePoint PHP & MySQL quiz!
PHP & MySQL: Novice to Ninja (www.sitepoint.com)
x
Chapter
1
Introducing MySQL
We’ve installed and set up two software programs: the Apache web server with
PHP, and the MySQL database server. If you followed my recommendation, you
would have set them up using an all-in-one package like XAMPP or MAMP, but
don’t let that diminish your sense of accomplishment!
As I explained in that chapter, PHP is a server-side scripting language that lets you
insert instructions into your web pages that your web server software (in most cases,
Apache) will execute before it sends those pages to browsers that request them. In
a brief example, I showed how it was possible to insert the current date into a web
page every time it was requested.
Now, that’s all well and good, but it really gets interesting when a database is added
to the mix. In this chapter, we’ll learn what a database is, and how to work with
your own MySQL databases using Structured Query Language.
An Introduction to Databases
A database server (in our case, MySQL) is a program that can store large amounts
of information in an organized format that’s easily accessible through programming
languages like PHP. For example, you could tell PHP to look in the database for a
list of jokes that you’d like to appear on your website.
In this example, the jokes would be stored entirely in the database. The advantage
of this approach is twofold: First, instead of writing an HTML page for each joke,
you could write a single PHP script that was designed to fetch any joke from the
database and display it by generating an HTML page for it on the fly. Second, adding
a joke to your website would be a simple matter of inserting the joke into the data-
base. The PHP code would take care of the rest, automatically displaying the new
joke along with the others when it fetched the list from the database.
Let’s run with this example as we look at how data is stored in a database. A database
is composed of one or more tables, each of which contains a list of items, or things.
For our joke database, we’d probably start with a table called joke that would contain
a list of jokes. Each table in a database has one or more columns, or fields. Each
column holds a certain piece of information about each item in the table. In our
example, our joke table might have one column for the text of the jokes, and another
for the dates on which the jokes were added to the database. Each joke stored in
this way would be said to be a row or entry in the table. These rows and columns
form a table that looks like Figure 1.1.
Figure 1.1. A typical database table containing a list of jokes
Notice that, in addition to columns for the joke text (joketext) and the date of the
joke (jokedate), I’ve included a column named id. As a matter of good design, a
database table should always provide a means by which we can identify each of its
rows uniquely. Since it’s possible that two identical jokes could be entered on the
same date, we can’t rely upon the joketext and jokedate columns to tell all the
jokes apart. The function of the id column, therefore, is to assign a unique number
PHP & MySQL: Novice to Ninja (www.sitepoint.com)
PHP & MySQL: Novice to Ninja2
to each joke so that we have an easy way to refer to them and to keep track of which
joke is which.
To review, the table in Figure 1.1 is a three-column table with two rows, or entries.
Each row in the table contains three fields, one for each column in the table: the
joke’s ID, its text, and the date of the joke. With this basic terminology under your
belt, you’re ready to dive into using MySQL.
Using phpMyAdmin to Run SQL Queries
Just as a web server is designed to respond to requests from a client (a web browser),
the MySQL database server responds to requests from client programs. Later in this
book, we’ll write our own MySQL client programs in the form of PHP scripts, but
for now we can use a client program that comes bundled with both XAMPP and
MAMP: phpMyAdmin.
phpMyAdmin is itself a sophisticated web application written in PHP. Besides being
included in XAMPP and MAMP, phpMyAdmin is provided by most commercial
web hosts who offer PHP and MySQL as a tool for developers to manage their
websites’ MySQL databases. Much like PHP and MySQL, phpMyAdmin’s ubiquity
makes it an attractive tool for beginners to learn and use.
Don’t have phpMyAdmin?
If you opted to follow manual setup instructions rather than use the all-in-one
package offered by XAMPP or MAMP to set up your web server, you probably
don’t have phpMyAdmin installed on your server. The good news is that you can
download and install it from the phpMyAdmin website,
1
where instructions are
provided.
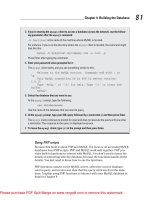
If you’re using XAMPP on Windows, you can access phpMyAdmin by clicking the
Admin… button next to MySql (sic) in the XAMPP Control Panel window, as shown
in Figure 1.2.
1
/>Order the print version of this book to get all 500+ pages!
3Introducing MySQL
Figure 1.2. Click the Admin… button to open phpMyAdmin
To access phpMyAdmin using MAMP on Mac OS X, click the Open start page button
in the MAMP window. Then click the phpMyAdmin tab at the top of the screen, as
shown in Figure 1.3.
Figure 1.3. You can access phpMyAdmin from MAMP’s start page
Either way, you should now have phpMyAdmin open in your default web browser,
which should look like Figure 1.4. As of this writing, XAMPP includes the more
recent (and better-looking) version 3.4 of phpMyAdmin, so I’ll be showing screen-
shots of that. If you’re using the older version 3.3, it won’t look quite as nice, but it
should work just the same.
PHP & MySQL: Novice to Ninja (www.sitepoint.com)
PHP & MySQL: Novice to Ninja4
Figure 1.4. If you can see this, you have phpMyAdmin
If you go clicking around phpMyAdmin, you’ll discover all the tools you need to
manage every aspect of your MySQL server and the data it contains. For now, I’m
going to ignore all of those features and focus on a particular one: the SQL query
window.
See the row of buttons just beneath the phpMyAdmin logo? Clicking the second
icon, indicated in Figure 1.5, opens the SQL query window shown in Figure 1.6.
Figure 1.5. Click the second button …
Order the print version of this book to get all 500+ pages!
5Introducing MySQL
Figure 1.6. … to open the SQL query window
Into that big, empty text box you can type commands to ask your database server
questions or make it perform tasks. Let’s try a few simple commands to take a look
around your MySQL server.
The MySQL server can actually keep track of more than one database. This allows
a web host to set up a single MySQL server for use by several of its subscribers, for
example. So, your first step after connecting to the server should be to choose a
database with which to work. First, let’s retrieve a list of databases on the current
server.
Type this command into the SQL query window, then click Go:
SHOW DATABASES
You might think at first that nothing has happened, but you should now see the
results in the main phpMyAdmin window, as shown in Figure 1.7.
PHP & MySQL: Novice to Ninja (www.sitepoint.com)
PHP & MySQL: Novice to Ninja6
Figure 1.7. The query results are displayed in the main phpMyAdmin window
Your list of databases might be as long as the one shown in Figure 1.7, or if you’re
running MAMP it may only contain two critical databases. XAMPP uses additional
databases to store configuration of its own, whereas MAMP is designed to avoid
cluttering up your MySQL server with its own data. Either way, you will have
databases named information_schema and mysql.
The MySQL server uses the first database, named information_schema, to keep
track of all the other databases on the server. Unless you’re doing some very advanced
stuff, you’ll probably leave this database alone.
The second database, mysql, is special too. MySQL uses it to keep track of users,
their passwords, and what they’re allowed to do.
A third database, named test, is a sample database that’s included with MySQL
out of the box (again, MAMP does away with this database so you can start clean).
If you see it in the list, you can delete the test database because you’ll be creating
your own database in a moment.
Order the print version of this book to get all 500+ pages!
7Introducing MySQL
Deleting stuff in MySQL is called “dropping” it, and the command for doing so is
appropriately named:
DROP DATABASE test
If you type this command into the SQL query window and click Go, phpMyAdmin
will probably display an error message: "DROP DATABASE" statements are disabled.
This message indicates that a safety feature built into phpMyAdmin is preventing
you from running dangerous-looking queries like this one.
If you want to be able to drop databases (and this is probably a good ability to have,
given the amount of experimentation I’m going to encourage you to do in this book),
there is a way to do so tucked away in phpMyAdmin. In the main phpMyAdmin
window, click the Databases tab (the leftmost tab at the top of the main window
area). You’ll be presented with a list of databases on the server, with a checkbox
next to each. Check the one you want to delete (test in this case); then click the
Drop button at the bottom-right of the list as shown in Figure 1.8.
Figure 1.8. The ability to drop a database in phpMyAdmin is well hidden
phpMyAdmin presents one last prompt to make sure you mean to obliterate the
database. If you confirm this, MySQL will obediently delete the database, and
phpMyAdmin will display a message to verify it was successful.
Note that there are other potentially hazardous commands you can send to MySQL
in addition to DROP DATABASE, but phpMyAdmin won’t always protect you if you
PHP & MySQL: Novice to Ninja (www.sitepoint.com)
PHP & MySQL: Novice to Ninja8
make a mistake. You have to be very careful to type your commands correctly in
the SQL query window, otherwise you can destroy your entire database—along
with all the information it contains—with a single command!
Structured Query Language
The commands we’ll use to direct MySQL throughout the rest of this book are part
of a standard called Structured Query Language, or SQL (pronounced as either
“sequel” or “ess-cue-ell”—take your pick). Commands in SQL are also referred to
as queries; I’ll use these two terms interchangeably.
SQL is the standard language for interacting with most databases, so, even if you
move from MySQL to a database like Microsoft SQL Server in the future, you’ll find
that the majority of commands are identical. It’s important that you understand the
distinction between SQL and MySQL. MySQL is the database server software that
you’re using. SQL is the language that you use to interact with that database.
Learn SQL in Depth
In this book, I’ll teach you the essentials of SQL that every PHP developer needs
to know. If you decide to make a career out of building database driven websites,
it pays to know some of the more advanced details of SQL, especially when it
comes to making your sites run as quickly and smoothly as possible. To dive
deeper into SQL, I highly recommend the book Simply SQL
2
by Rudy Limeback.
Creating a Database
When the time comes to deploy your first database driven website on the Web,
you’re likely to find that your web host or IT department has already created a
MySQL database to use. Since you’re in charge of your own MySQL server, however,
you’ll need to create your own database to use in developing your site.
It’s just as easy to create a database as it is to delete one. Open the SQL query window
again, and type this command:
CREATE DATABASE ijdb
2
/>Order the print version of this book to get all 500+ pages!
9Introducing MySQL
I chose to name the database ijdb, for Internet Joke Database,
3
because that fits with
the example I gave at the beginning of this chapter: a website that displays a database
of jokes. Feel free to give the database any name you like, though.
Case Sensitivity in SQL Queries
Most MySQL commands are not case-sensitive, which means you can type CREATE
DATABASE, create database, or even CrEaTe DaTaBaSe, and it will know
what you mean. Database names and table names, however, are case-sensitive
when the MySQL server is running on an operating system with a case-sensitive
file system (such as Linux or Mac OS X, depending on your system configuration).
Additionally, table, column, and other names must be spelled exactly the same
when they’re used more than once in the same query.
For consistency, this book will respect the accepted convention of typing database
commands in all capitals, and database entities (databases, tables, columns, and
so on) in all lowercase.
Now that you have a database, you need to tell phpMyAdmin that you want to use
it. You’ve probably noticed by now that the left-hand sidebar in the main phpMy-
Admin window contains a list of all the databases on your MySQL server. When
you clicked Go to run your CREATE DATABASE command (you did click Go, didn’t
you?), this sidebar updated to show your new database’s name in a drop-down
menu, as shown in Figure 1.9.
Figure 1.9. phpMyAdmin autoselects your new database for you
3
With a tip of the hat to the Internet Movie Database [].
PHP & MySQL: Novice to Ninja (www.sitepoint.com)
PHP & MySQL: Novice to Ninja10
It’s nice of phpMyAdmin to autoselect your new database for you, but you’ll need
to know how to select it yourself. Click the home button (the first in the row of icons
beneath the phpMyAdmin logo) to go back to the home page of phpMyAdmin. The
sidebar will once again display a list of all databases on your server.
To select a database to work with, just click its name in the sidebar. With your
database selected, click the Query window button again to open a new SQL query
window. This query window is slightly different from the last one: the caption for
the text box now says Run SQL query/queries on database ijdb. Commands typed into
this query window will run on your new database, instead of your MySQL server
as a whole.
Figure 1.10. You must open a new query window to work with this database
You’re now ready to use your database. Since a database is empty until you add
tables to it, our first order of business is to create a table that will hold your jokes
(now might be a good time to think of some!).
Creating a Table
The SQL commands we’ve encountered so far have been reasonably simple, but as
tables are so flexible, it takes a more complicated command to create them. The
basic form of the command is as follows:
CREATE TABLE table_name (
column1Name column1Type column1Details,
column2Name column2Type column2Details,
⋮
) DEFAULT CHARACTER SET charset ENGINE=InnoDB
Order the print version of this book to get all 500+ pages!
11Introducing MySQL
Let’s continue with the joke table I showed you in Figure 1.1. You’ll recall that it
had three columns: id (a number), joketext (the text of the joke), and jokedate
(the date on which the joke was entered). This is the command to create that table:
CREATE TABLE joke (
id INT NOT NULL AUTO_INCREMENT PRIMARY KEY,
joketext TEXT,
jokedate DATE NOT NULL
) DEFAULT CHARACTER SET utf8 ENGINE=InnoDB
Looks scary, huh? Let’s break it down:
CREATE TABLE joke (
This first line is fairly simple; it says that we want to create a new table named
joke. The opening parenthesis (() marks the beginning of the list of columns
in the table.
id INT NOT NULL AUTO_INCREMENT PRIMARY KEY,
This second line says that we want a column called id that contains an integer
(INT); that is, a whole number. The rest of this line deals with special details
for the column:
1. First, when creating a row in this table, this column cannot be left blank (NOT
NULL).
2. Next, if we don’t specify a value for this column when we add a new entry
to the table, we want MySQL to automatically pick a value that’s one more
than the highest value in the table so far (AUTO_INCREMENT).
3. Finally, this column is to act as a unique identifier for the entries in the table,
so all values in this column must be unique (PRIMARY KEY).
joketext TEXT,
This third line is super simple; it says that we want a column called joketext,
which will contain text (TEXT).
jokedate DATE NOT NULL
This fourth line defines our last column, called jokedate; this will contain a
date (DATE) that cannot be left blank (NOT NULL).
PHP & MySQL: Novice to Ninja (www.sitepoint.com)
PHP & MySQL: Novice to Ninja12
) DEFAULT CHARACTER SET utf8
The closing parenthesis ()) marks the end of the list of columns in the table.
DEFAULT CHARACTER SET utf8 tells MySQL that you’ll be storing UTF-8 encoded
text in this table. UTF-8 is the most common encoding used for web content,
so you should employ it in all your database tables that you intend to use on
the Web.
ENGINE=InnoDB
This tells MySQL which storage engine to use to create this table.
Think of a storage engine as a file format. When building a website, you’ll typ-
ically choose to use the JPEG format for the photos on your site, but stick with
the PNG format for the images that make up your site design. Both formats are
supported by browsers, but they each have strengths and weaknesses. Likewise,
MySQL supports multiple formats for database tables.
The InnoDB format is by far the best choice for website databases like the one
we’ll build in this book. The older MyISAM format is the default, however, so
we must tell MySQL that we want it to create an InnoDB table.
Note that we assigned a specific data type to each column we created. id will contain
integers, joketext will contain text, and jokedate will contain dates. MySQL re-
quires you to specify in advance a data type for each column. This helps to keep
your data organized, and allows you to compare the values within a column in
powerful ways, as we’ll see later.
Now, if you type the above command correctly and click Go, the main phpMyAdmin
window will confirm that the query executed successfully, and your first table will
be created. If you made a typing mistake, phpMyAdmin will tell you there was a
problem with the query you typed, and will try to indicate where it had trouble
understanding what you meant.
Let’s have a look at your new table to make sure it was created properly. Type the
following command into the SQL query window, and click Go:
SHOW TABLES
phpMyAdmin should display the output shown in Figure 1.11.
Order the print version of this book to get all 500+ pages!
13Introducing MySQL
Figure 1.11. phpMyAdmin lists the tables in the currently selected database
This is a list of all the tables in your database (which we named ijdb). The list
contains only one table: the joke table you just created. So far, everything seems
fine. Let’s take a closer look at the joke table itself using a DESCRIBE query:
DESCRIBE joke
As you can see in Figure 1.12, there are three columns (or fields) in this table, which
appear as the three rows in this table of results. The details are a little cryptic, but
if you look at them closely, you should be able to figure out what they mean. It’s
nothing to be worried about, though. You have better things to do, like adding some
jokes to your table!
Figure 1.12. phpMyAdmin lists the columns in the joke table as rows
We need to look at just one more task before we do that, though: deleting a table.
This task is as frighteningly easy as deleting a database with a DROP DATABASE
command—except that phpMyAdmin won’t protect you here. Don’t run this com-
mand with your joke table, unless you actually do want to be rid of it! If you really
want to try it, be prepared to re-create your joke table from scratch:
DROP TABLE tableName
Let PHP Do the Typing
At this stage, you might be thinking that databases seem a little cumbersome. SQL
can be tricky to type, as its commands tend to be long and verbose compared to
PHP & MySQL: Novice to Ninja (www.sitepoint.com)
PHP & MySQL: Novice to Ninja14
other computer languages. You’re probably dreading the thought of typing in a
complete library of jokes in the form of INSERT commands.
Don’t sweat it! As we proceed through this book, you’ll be surprised at how few
SQL queries you actually type by hand. Generally, you’ll be writing PHP scripts
that type your SQL for you. For example, if you want to be able to insert a bunch
of jokes into your database, you’ll typically create a PHP script for adding jokes that
includes the necessary INSERT query, with a placeholder for the joke text. You can
then run that PHP script whenever you have jokes to add. The PHP script prompts
you to enter your joke, then issues the appropriate INSERT query to your MySQL
server.
For now, however, it’s important to gain a good feel for typing SQL by hand. It will
give you a strong sense of the inner workings of MySQL databases, and will make
you appreciate all the more the work that PHP will save you!
Order the print version of this book to get all 500+ pages!
15Introducing MySQL
PHP & MySQL: Novice to Ninja (www.sitepoint.com)
Chapter
2
Introducing PHP
PHP is a server-side language. This concept may be a little difficult to grasp, espe-
cially if you’ve only ever designed websites using client-side languages like HTML,
CSS, and JavaScript.
A server-side language is similar to JavaScript in that it allows you to embed little
programs (scripts) into the HTML code of a web page. When executed, these programs
give you greater control over what appears in the browser window than HTML alone
can provide. The key difference between JavaScript and PHP is the stage of loading
the web page at which these embedded programs are executed.
Client-side languages like JavaScript are read and executed by the web browser after
downloading the web page (embedded programs and all) from the web server. In
contrast, server-side languages like PHP are run by the web server, before sending
the web page to the browser. Whereas client-side languages give you control over
how a page behaves once it’s displayed by the browser, server-side languages let
you generate customized pages on the fly before they’re even sent to the browser.
Once the web server has executed the PHP code embedded in a web page, the result
takes the place of the PHP code in the page. All the browser sees is standard HTML
code when it receives the page, hence the name “server-side language.” Let’s look
back at our today.php example:
chapter3/today.php
<!DOCTYPE html>
<html lang="en">
<head>
<meta charset="utf-8">
<title>Today’s Date</title>
</head>
<body>
<p>Today’s date (according to this web server) is
<?php
echo date('l, F jS Y.');
?>
</p>
</body>
</html>
Most of this is plain HTML except the line between <?php and ?> is PHP code.
<?php marks the start of an embedded PHP script and ?> marks its end. The web
server is asked to interpret everything between these two delimiters and convert it
to regular HTML code before it sends the web page to the requesting browser. The
browser is presented with the following:
<!DOCTYPE html>
<html lang="en">
<head>
<meta charset="utf-8">
<title>Today’s Date</title>
</head>
<body>
<p>Today’s date (according to this web server) is
Sunday, April 1st 2012.
</p>
</body>
</html>
PHP & MySQL: Novice to Ninja (www.sitepoint.com)
PHP & MySQL: Novice to Ninja18
Notice that all signs of the PHP code have disappeared. In its place the output of
the script has appeared, and it looks just like standard HTML. This example
demonstrates several advantages of server-side scripting:
No browser compatibility issues
PHP scripts are interpreted by the web server alone, so there’s no need to worry
about whether the language features you’re using are supported by the visitor’s
browser.
Access to server-side resources
In the above example, we placed the date according to the web server into the
web page. If we had inserted the date using JavaScript, we’d only be able to
display the date according to the computer on which the web browser was
running. Granted, there are more impressive examples of the exploitation of
server-side resources, such as inserting content pulled out of a MySQL database
(hint, hint …).
Reduced load on the client
JavaScript can delay the display of a web page significantly (especially on mobile
devices!), as the browser must run the script before it can display the web page.
With server-side code this burden is passed to the web server, which you can
make as beefy as your application requires (and your wallet can afford).
Basic Syntax and Statements
PHP syntax will be very familiar to anyone with an understanding of JavaScript, C,
C++, C#, Objective-C, Java, Perl, or any other C-derived language. But if these lan-
guages are unfamiliar to you, or if you’re new to programming in general, there’s
no need to worry about it.
A PHP script consists of a series of commands, or statements. Each statement is an
instruction that must be followed by the web server before it can proceed to the
next instruction. PHP statements, like those in the aforementioned languages, are
always terminated by a semicolon (;).
This is a typical PHP statement:
echo 'This is a <strong>test</strong>!';
Order the print version of this book to get all 500+ pages!
19Introducing PHP