IPM for Bedding Plants A Scouting and Pest Management Guide
Bạn đang xem bản rút gọn của tài liệu. Xem và tải ngay bản đầy đủ của tài liệu tại đây (1.19 MB, 64 trang )
/>
IPM Publication No. 407, 2nd Edition
INTRODUCTION—6
I. INTRODUCTION
The techniques of integrated pest management (IPM) offer a
practical way for growers to maintain profitable crop production while effectively managing pests. Using IPM, growers
can improve plant protection of annuals, perennials, herbs,
vegetable transplants, foliage plants, and flowering potted
plants, while minimizing reliance on chemical pesticides.
Integrated Pest Management for Bedding Plants: A Scouting and Pest Management Guide explains how to monitor for
the presence of pests during all phases of production. This
guide covers the crops that are commonly produced in the
greenhouse between January and July. Although this publication is intended primarily as a training guide for scouts, it
will also be useful for private consultants, growers, greenhouse managers, pesticide applicators, and students. Everyone associated with pest management in a greenhouse can
benefit from understanding the basics of scouting and how it
contributes to economically sound pest management practices.
How to Use this Publication
This guide provides a foundation in greenhouse scouting that
can be used to develop a program for any given greenhouse.
Use this publication with Cornell Guidelines for the Integrated Management of Greenhouse Florist Crops: Management
of Pests and Crop Growth, which offers specific, up-to-date
information on pest control strategies and pesticides (Media
Services Resource Center, Cornell University, 607-255-2080).
ESSENTIALS OF IPM—7
ESSENTIALS OF IPM—8
Start with a Clean Greenhouse
II. THE ESSENTIALS OF IPM
Growers with a successful IPM program develop a sitespecific strategy that includes careful assessment of pest
problems. By inspecting their crops, they discover pest and
cultural problems while these are still minor and can be easily and inexpensively managed. This early detection and intervention is the foundation of any IPM program.
Intervention occurs only when necessary, and relies on the
use of a combination of compatible, effective management tactics—cultural, physical, mechanical, chemical, and biological. The IPM approach to pest management enables growers to
produce a profitable, high-quality crop at minimal risk to
themselves and the environment.
IPM has traditionally focused on improving crop quality
through management of crop pests. As the importance of the
relationship between plant health and pest injury has become more clearly defined, the emphasis of IPM programs
has evolved to total crop management. Scouting has been expanded to include regular monitoring of soil and irrigation
water chemistry; such vigilance alerts the scout to stressful
growing environments that need correcting.
A successful IPM program includes monitoring, accurate
problem identification, timely implementation, and evaluation of the appropriate management strategy. Information
gathered by the scout is recorded on scouting forms (see appendix) and presented to the person responsible for pest management. This person decides upon and carries out an appropriate course of action, which is evaluated by the scout at the
next monitoring visit.
At the end of a cropping season, the plant debris and spilled
potting soil on the bench are likely to contain insects (especially eggs and pupae), bacteria, and plant pathogens. Remove all debris, including weeds on or under the benches.
Thoroughly clean: sweep or vacuum the benches and floor,
hose everything down with water or soapy water in a forceful
spray, and then disinfest with an appropriate product labeled for greenhouse use (e.g., GreenShield, ZeroTol, or Physan 20). Disinfest the inside greenhouse walls and certain
electrical fixtures (turn off electricity before treatment). For
an additional margin of safety, leave the wet greenhouse
sealed up and heated for a few days, then keep it empty for
two to four weeks.
Monitor and Identify Problems
Monitoring, or scouting, is the basis of any IPM program.
Monitoring is the regular, systematic inspection of the crops,
benches, greenhouse floors, and exteriors to identify and assess insect, disease, weed, and cultural problems. It includes
inspection of foliage, flowers, and root systems, determination of soil pH and conductivity, and the use of insect traps.
Other monitoring tools include sentinel and indicator plants,
disease detection kits, and the submission of plant or soil
samples to diagnostic labs for analysis. Furthermore, monitoring includes an overall inspection of the greenhouse for
production practices and greenhouse conditions that contribute to pest problems, such as watering nozzles left on floors or
areas of standing water, or poor air movement.
This information is then used to decide whether action is
needed and which techniques to use. Accurate information
gathered through scouting is the basis for sound pest management decisions.
Your ability to accurately identify plant problems is
critical to the success of an IPM program. The charts in this
manual and the references listed in the bibliography will assist you in identifying plant problems. Samples should be
ESSENTIALS OF IPM—9
submitted to a university or private lab if they cannot be accurately diagnosed at the greenhouse. IPM strategies should
be timely and pest specific, because a missed diagnosis can delay implementation of the proper set of controls. Scouting
methods are explained in section III.
Develop a Management Plan
After each scouting session, record and summarize your observations. This information includes insect identification and
counts, disease incidence and severity, and location of weeds.
Also make notes about cultural aspects of the crop (such as
crop height and plant development) and management of soil
fertility and water. Give this information to the grower
along with an evaluation of the effectiveness of past controls.
This information is used to formulate management recommendations, which are discussed in subsequent sections.
Consider Best Management Practices
Best management practices, which include integrated pest
management strategies, are standard rules and routines that
reduce environmental impacts. In greenhouses, following best
management practices means managing fertilizers and pesticides to minimize contamination of water runoff. For example,
greenhouse managers can practice good sanitation and detect
pests early. They can prevent spills of concentrated chemicals
by purchasing waterproof tubs and using them for secondary
containment of bagged fertilizers or concentrated solutions.
They can provide a locked metal cabinet for pesticides, and
update the list of contents regularly.
Many municipalities require businesses to avoid situations that could pollute the water table. Some logical improvements in the ways we handle chemicals in greenhouses
can reduce the potential problems and the need for regulations.
SCOUTING METHODS—10
III. SCOUTING METHODS
Setting Up a Scouting Program
Scouts might be growers, other greenhouse employees, or
private consultants. Most growers find hiring a consultant to
be worth the cost. This person is experienced in problem
identification, brings an unbiased outlook to the greenhouse, and cannot be diverted to other activities.
On the other hand, an employee scout has more flexibility to change the scouting schedule to accommodate pesticide applications or shipping schedules. This means that
incoming plants could be inspected immediately as they arrive at the greenhouse, helping to prevent unwanted pest
entry. This person would also be at the greenhouse every
day, so problems detected as the crops are handled could be
quickly diagnosed.
The grower must first decide whether to use an independent scout or a greenhouse employee. Once a scout is selected, the grower and scout should agree on several topics
before the program begins. The amount of time to be spent
scouting, when scouting will take place, and (for independent scouts) what the scout will charge, are all important
subjects. Some scouts charge by the hour, while others receive a flat fee per visit.
Establish an isolated area where plants will be left
and examined by the grower after rogueing, or receive permission from the grower to discard them directly. Other details, such as responsibility for sending plants to diagnostic
labs (and who will pay for this) as well as purchase of
sticky cards, also need to be discussed.
The scout and grower should consider the type of information to be left at the end of each session. How much detail does the grower want, and are management recommendations desired? Finally, it is important to establish good
SCOUTING METHODS—11
communication with the person in charge of pest management decisions and other employees who regularly work
with the plants; they will often notice the development of
new problems during the time between scouting sessions.
Follow the sanitation protocol outlined in table 1 to reduce the possibility of spreading insects or diseases and to
minimize contact with pesticide residues. Before leaving
one business or house to scout another, wipe off your clothing
and wash your hands. Treat plants gently as you inspect
them.
Another part of being a responsible scout is continuing
education. Attend trade and educational shows, read trade
journals, and stay in contact with other scouts. New pest
problems will always develop, as will new ways to manage
them. To remain effective, you need to be aware of these
changes.
Finally, remember that at times the grower’s priorities
will be different from yours. Patience and good communication will be essential at these times. Don’t expect to see all
management recommendations implemented every week,
but be prepared to prioritize problems and alert the grower
to those that are urgent.
The Scouting Process
Gather background information
The next step before the scouting season begins is to gather
background information about historical problem areas, the
greenhouse layout, irrigation, pesticide application equipment, and media and fertilizer. All of these factors can interact to affect the development and management of pest
problems.
Historical Problem Areas and Crops. Find out which crops
tend to have pest problems so you can pay particular attention to those plants while scouting. In addition, many
greenhouses have spots that have environmental problems,
such as poor drainage, limited air movement, or cold spots
that can lead to pest problems. These areas should also be
noted when gathering background information.
SCOUTING METHODS—12
Table 1. Scouting sanitation protocol
Procedure
Justification
Avoid wearing yellow,
blue, or light-colored
clothing.
Wear disposable gloves.
Check the pest control
record before entering an
area.
Monitor least-infested
first, heavily infested
areas last. Base this
judgment on conversations with the grower
and your previous visit.
Examine stock plants
first, then cuttings.
Don’t carry infected
plants to a clean area or
another greenhouse.
After encountering
bacterial blight on
geraniums, wash hands
and shoe soles immediately. DO NOT continue
to handle the plants. DO
NOT visit another
greenhouse that day.
Light colors attract many insects, which
could then be carried on your clothing to
another area.
Disposing of gloves helps prevent
pathogens from being transferred among
plants. Wash or change gloves after
contact with contaminated material.
Gloves will help protect against contact
with pesticide residue on plants.
Reduces your risk of pesticide exposure
and points you to possible problem
areas.
Minimizes the possibility of inadvertently carrying insects or pathogens from
one area to another or from older to
younger plants.
Reduces the chance of infesting stock
plants.
Minimizes the spread of insects and
diseases. When rogueing plants or
removing dead leaves, place the material
in a plastic bag, then remove it from the
greenhouse.
Minimizes the possibility that this
disease, for which there is no control,
will be spread as you scout.
Greenhouse Layout. At the first visit, inspect each greenhouse for situations that may lead to pest problems, such as
watering nozzles left on the floor, areas of standing water,
weeds, algae, and plants left from a previous crop. Look for
whiteflies and thrips on the weeds, and for shore flies on the
algae. Check for weeds outside the greenhouse that will need
to be controlled in the spring. A 15-foot border around the
greenhouse should be kept free of weeds.
SCOUTING METHODS—13
Determine patterns of plant movement during a normal
production cycle. For example, do plants move from propagation to a holding house, from which they are distributed
throughout all greenhouses? If so, inspect plants carefully before they leave the holding area. Do all greenhouses share a
common headhouse through which all plants pass as they
are moved from one range to another? This means that a problem in one house could quickly be distributed to all greenhouses.
Irrigation. Several types of irrigation systems are used in
greenhouses. These include hand watering, drip irrigation,
overhead spray watering, capillary mats, and subirrigation
(troughs or ebb and flow benches).
Hand watering and drip irrigation can lead to dry spots,
either where the person watering missed an area (often in the
center of the bench), or where a drip tube is clogged or has
been knocked out of the pot. Dry plants may not grow fully or
may show phytotoxicity from pesticides more readily than
healthy plants would. Splashing from hand overhead spray
watering can spread pathogens and exacerbate foliar diseases
when there is poor air movement or insufficient drying time
before nightfall.
Fungus gnat and shore fly populations may be higher on
capillary mats, which remain continuously wet. The flood
trays used in ebb and flow systems can inhibit good air circulation, thus contributing to foliar disease. There is little evidence, however, that this type of system causes a significant
increase in root system disease.
Pesticide Application Equipment. Greenhouse growers apply
pesticides in both dry and liquid forms. To do so, they use
three main types of applicators: hydraulic sprayers, lowvolume sprayers, and granular applicators.
Hydraulic sprayers depend on pressure derived from a
pump. In greenhouses, applicators use either a backpack
sprayer, a small portable sprayer, or a large, stationary unit.
These sprayers typically create small droplets (10–400 microns in diam.) that are propelled forward.
Small hydraulic sprayers are useful when only a few
plants need to be treated, but the low pressure they deliver
can make adequate coverage difficult. Large hydraulic
sprayers put out a high volume of material at higher pres-
SCOUTING METHODS—14
sures, making thorough coverage easier to achieve. This type
of machine is ideal for reaching insects that feed in concealed
areas, such as leaf axils.
Low-volume sprayers, such as mist blowers, foggers, and
electrostatic sprayers, provide coverage that is equal to or
better than that of hydraulic sprayers with less pesticide.
Sometimes called aerosols, they produce tiny droplets (10–80
microns in diam.) that are subject to drift; for this reason they
are best used indoors.
The mist blower’s small engine and fan create an air
stream into which pesticide is injected. People applying
products with low-volume equipment must verify that the
product being used is labeled for low-volume application.
Operators must also ensure that the air stream doesn’t damage the plants or create drift that might harm natural enemies in areas adjacent to those being sprayed.
Foggers can be thermal or mechanical. Thermal foggers
vaporize the pesticide into a fog, which hangs in the atmosphere of the greenhouse. Applicators should wear hearing
protection and respirators. Mechanical foggers have a small
compressor that makes fine droplets and a small, hand-held
fan that distributes them as a fog.
Some pesticides are sold in aerosol cans that are opened in
the greenhouse to disperse the chemical in a fine mist. These
tend to provide variable coverage and are most effective
against mobile adult pests on upper leaf surfaces.
Electrostatic sprayers use either water or compressed air
as a propellant. As the liquid passes through the nozzle, a
static electric charge is induced into the flow. Charged particles are attracted to the plants, which are grounded. Electrostatic sprayers produce uniform coverage, often with less pesticide or carrier than hydraulic sprayers. Like foggers, they
work well indoors.
Granular applicators spread dry granules of pesticide
across a given area. Obtaining uniform distribution of granules with granular applicators can be difficult. Growers who
are treating individual pots should use a teaspoon or other
volume measure and distribute the granules evenly across the
soil. Work the granules into the soil and water, but do not
float the granules off the bench soil surface or out of the pots.
Media and Fertilizer. Media type and fertilizer can also
play a role in the development of pest problems. For example,
SCOUTING METHODS—15
fungus gnat larvae prefer media high in organic matter.
Poorly drained soil can favor the growth of root rot pathogens. Highly soluble nitrogen fertilizers tend to favor aphid
reproduction, and micronutrient deficiencies or excesses can
lead to noncontagious diseases. High levels of soluble salts
may injure roots, making them more susceptible to disease development.
Create an IPM Notebook
The IPM notebook serves as a resource center at each greenhouse. It will contain information used weekly, such as blank
scouting forms, greenhouse maps, and all scouting records.
This book, which is always kept in the same place, should
also contain pesticide recommendations, spray records, MSDS
sheets, pesticide labels, and fact sheets or trade journal articles pertaining to pest problems. Other relevant information,
such as fertilizer inputs, should also be included here. Establish this notebook before scouting begins, as you are preparing
scouting forms and greenhouse maps. Continue to add new information to keep everyone on the IPM team up-to-date.
Develop a scouting strategy
Base your scouting strategy on the grower’s schedule for the
crop and the pests you expect to encounter (see table 2). To determine the date that the crop should be pest-free, project
backwards from the expected sale date. The pest-free date is
affected by the capacity of the insect, disease, or mite to injure a plant at a certain stage, as well as how difficult it is to
detect the problem and the likelihood of the problem to
spread.
To illustrate, fungus gnat larvae can seriously injure root
systems that are less than three weeks old. Older roots, however, can tolerate a higher population of larvae. As a second
example, even a small number of aphids—because of their
great capacity for reproduction—is a concern on young plants,
whereas on mature plants, one or two aphids could be washed
off before sale. Thus, scouting for these two insects would be a
priority during the first few weeks of the crop.
Whiteflies mature from eggs to adults in about one month,
so these insects should be under control at least one month before sale. A few geraniums with Botrytis blight can be managed by removing the infected leaves and improving air circu
SCOUTING METHODS—17
SCOUTING METHODS—16
lation, yet if a few geraniums have rust lesions, a fungicide is
needed. Rust lesions are also more difficult to see than
Botrytis blight, so individual plants will need to be examined for rust, whereas Botrytis will usually be visible as you
move through the crop.
Sometimes apparent injury is not necessarily related to
current pest levels. For example, injury from thrips feeding
early in the crop cycle may not be noticeable until several
weeks later, when flowers and leaves have expanded.
Scouting Procedures
Scouting Equipment
Table 2 lists the equipment used by a greenhouse scout. A supplier list is included in the bibliography.
Scouting Route and Schedule
Establish a sampling route that will allow you to visit all
areas of the greenhouse and inspect different plants each
week. The pests that commonly attack bedding plants do not
distribute themselves evenly throughout the crop. For example, whiteflies tend to have a clumped distribution; contagious diseases are usually spread by water or air movement,
which are rarely uniform.
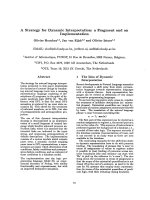
In a typical greenhouse layout, the most efficient route is
a zig-zag pattern down the aisle between two benches (figure
1). Stop at about 10 locations in an area of 1000 ft2, examining
a plant or flat on each side of the aisle as well as any baskets
overhead. Start this pattern at a slightly different location
each week. The number and density of plants will affect the
scouting pattern, as will the location and size of benches in
the greenhouse.
Table 2. Greenhouse scouting equipment and use
Equipment
Use
Hand lens of at least 10x
power
Optivisor® (a hands-free
Examine suspected arthropod or disease
problems under magnification.
Optivisor® allows you to keep both
magnifier)
Blank scouting and report
forms with clipboard
and pen
Colored survey flags and
flagging tape
Sticky cards, stakes, and
clothespins
Potato disks
Hand counter (tally
meter)
Plastic gloves
hands free as you inspect plants.
Record scouting observations on forms
and report findings to grower. Pen
attached to clipboard is useful.
Mark sentinel plants or problem areas.
Garbage bags
Small plastic and paper
bags
Plastic wrap
Vials of alcohol, small
artist’s brush, and
tweezers
QTA TospoTM detection
kit
Bleach solution (10%) or
other disinfectant and
rag. Prepare fresh solution weekly and store
out of direct light.
Monitor adult insect flight activity.
Monitor immature fungus gnat activity.
Fast, accurate way to count large numbers of insects.
Protect scout from pesticide residues and
prevent disease transmission during
root system inspection.
Isolate plants that are rogued or sent out
for diagnosis.
Attach plastic bag to belt while scouting
to discard leaves and sticky cards. Use
paper bags for transporting soil or
tissue samples.
Wrap sticky cards for later ID or counting
Collect and preserve insects and mites
for identification.
Test performed by the scout to determine
if a plant is infected with INSV or
TSWV.
Wash plastic gloves between root inspections to prevent disease transmission. Wipe gloves after applying
bleach. Disinfest shoe soles after visiting a greenhouse with a suspect bacterial blight infestation on geraniums.
SCOUTING METHODS—18
SCOUTING METHODS—19
what they’ve seen or news of problems in other greenhouse
operations.
Bench
Bench
Aisle
Aisle
Door
Bench
Aisle
Bench
Figure 1. Scouting pattern down aisles and between benches
Scout the greenhouse once a week by inspecting plants and assessing root system health. Leave information in the IPM
Notebook at the end of each session. A consistent schedule is
necessary to accurately observe pest activity and trends.
Scouting should take place on the same day of each week, and
at the same time each week. This way the grower knows
when you are coming and can prepare questions or schedule
pesticide applications accordingly.
It is possible that before a scouting visit, an area of the
greenhouse will have been treated with pesticide or plant
growth regulator. Always check pesticide application records in the IPM Notebook for the reentry intervals specified
by the Worker Protection Standards before entering a greenhouse. Be sure the grower keeps up-to-date records about the
materials sprayed, the date, and the location. Knowledge
about these applications will help scouts to evaluate the current pest situation and to protect their personal safety.
The time it takes to scout bedding plants depends on the
experience and skill of the scout, the level of pest infestation,
the size of the greenhouse(s), and the number and kind of
plant species. A new scout may require an average of 20-25
minutes to inspect every 1,000 sq. ft. Once the scout is comfortable with pest identification, experienced at making pest
counts, and familiar with the greenhouse layout, the time
needed for scouting generally drops to an average of 10–15
minutes per 1,000 sq. ft.
As a rule of thumb, allot four hours per week for a greenhouse of approximately 1.5 acres. An additional one to two
hours per range each week is optimal but may not be feasible.
Allow time to discuss your work with the grower before and
after scouting. Growers can guide your scouting by telling you
1. Monitoring for thrips with blue and
yellow sticky cards, J. Sanderson
Greenhouse Overview
Each time you enter a greenhouse to begin scouting, scan the
entire crop for plants that are off-color, of uneven height, or
abnormal in some other way. Make a note of the bench location and be sure to examine that area in detail as you work
along your scouting route. Look under the benches for weeds,
and check those weeds for insects. Note on the data sheet any
presence of insects on weeds. A small weed population can be
pulled by hand as you scout.
Do the same outside, noting the presence of weeds and ornamental plantings and any insects on them. Usually these
weeds are too numerous for hand removal. They should be
killed with an herbicide and replaced with a gravel border
over weed barrier fabric.
Using Sticky Cards
Use colored sticky cards to monitor changes in adult insect
populations and to detect pest populations in new shipments
of plant material that has just arrived at the greenhouse.
The color of the trap is attractive to a particular insect,
which is caught on the adhesive surface. Sticky traps do not,
however, significantly reduce insect populations.
Yellow cards are used to detect winged aphids, fungus
gnats, shore flies, whiteflies, leafminer flies, and thrips.
They will not pick up mites or wingless aphids. They also attract many natural enemies of insects, so try not to release
beneficials near yellow sticky cards. Blue sticky cards also
attract thrips, although it is more difficult to see the thrips
against the blue background (photos 1, 2).
Examine sticky cards weekly as part of the scouting routine. Identify and count insects, then record this information
with the other scouting data. Weekly changes in insect counts
indicate general levels and trends of insect activity in a
greenhouse. Because there are no guidelines for relating the
number of insects on a trap to the population on the crop, you
should use plant inspections as the primary source of information for pest management decisions.
Place traps in hanging baskets, at bench level, or on the
floor (if the greenhouse has soil floors). Place one card per
1,000 sq. ft. Number each card. Correlate the number to a spe-
2. A winged aphid, J. Sanderson
SCOUTING METHODS—20
cific location; that location will have a card (or replacement
card) for the life of the crop. Use both sides of the card each
week. If only a few insects are caught in a week, the card may
be reused. Circle the insects with a waterproof marker so
they are not counted again. Place cards at the level of the
crop canopy, moving them each week as the plants grow.
Sometimes a different approach is used if a specific insect
is of primary concern. For example, cards placed horizontally
above the soil may be more effective for fungus gnat and shore
fly monitoring. For thrips, cards should be placed in areas of
air movement because thrips move around the greenhouse
primarily on air currents. Attach cards near vents or other
openings, on the eastern and western ends of the greenhouse,
and near floors and ceilings until you are able to determine
the most “popular” spots; continue to place cards in only the
spots that collect thrips.
In hanging baskets, suspend cards from the support used to
hang the baskets. At bench level, clip a card to a stake with
double clothespins and place the stake in a pot. At the basket
or bench level, set cards vertically. Choose whether cards
will be oriented with the short or long side parallel to the
ground, and maintain this orientation for the life of the crop.
Keep the bottom third of the card below the crop canopy.
At the floor level, cards should be placed horizontally,
since the purpose of these cards is to catch insects as they
emerge from the soil. Another technique that may be used is
to coat the inside of a clear plastic shoe box or sweater box
with sticky material so the insects are caught as they emerge
from the soil. These traps can help to determine the need for
soil treatment.
Research in California has shown that the time spent
counting yellow sticky cards for thrips and whiteflies can be
cut by 80 percent if the scout counts only a one-inch vertical
strip in the center of the card. This method is not effective for
aphids and was not tested for fungus gnats or shoreflies.
Unusual insects may occasionally be found on these cards.
Several species of parasitic wasps may be seen in greenhouses
where few pesticide applications are made. Insects not normally seen in the greenhouse may enter from outside through
open vents or doors. If an unknown species is trapped more
than twice, it should be identified. Always be alert to the arrival of a new pest. Sticky cards covered with insects can be
wrapped in plastic to be saved for identification.
SCOUTING METHODS—21
Descriptions of Insects on Sticky Cards
2. A winged aphid, J. Sanderson
3. Fungus gnat, J. Sanderson
Aphid. (varied species) Family Aphididae. These are small
(1/8 inch) insects that vary in color from black to green. Only
the winged forms will be caught on sticky traps (photo 2).
They tend to shrivel after a few days on the trap, but if fresh
will appear stout with cornicles visible near the tip of the
abdomen. The wings are often spread out on the trap and a
large dark vein will be visible near the front of the forewing.
Nymphs may be seen near the body of the adult.
Fungus gnat. (Bradysia spp.) Family Sciaridae. These are
small (1/16 inch) slender flies that resemble small mosquitoes. Distinguish them by their long legs and antennae (photo
3). They appear to be hunchbacked and have one pair of clear
wings with a Y-shaped vein in the center.
Leafminer. (Liriomyza spp.) Family Agromyzidae. These are
small (1/16 inch) stout-bodied flies that are mostly black
with areas of bright yellow. There is typically a bright yellow patch on the thorax. Being flies (order Diptera), they
have only one pair of wings (photo 4).
Moth fly; drain fly. (varied species) Family Psychodidae.
These are small (1/16 inch) flies that appear fuzzy due to a
covering of fine hairs. They are often trapped in wet or poorly
drained growing areas.
4. Leaf miner flies, J. Sanderson
5. Shore fly, J. Sanderson
6. Thrips, J. Sanderson
Shore fly. (Scatella stagnalis) Family Ephydridae. These
are medium (1/8 inch) stout-bodied flies that are dark in
color (photo 5). They have bristle-like antennae that are
shorter than the head and not always visible. The wings (one
pair) are dark gray and have three to five distinct white
spots.
Thrips. (varied species, typically Frankliniella occidentalis) Family Thripidae. Thrips are very small (1/32 to 1/16
inch) slender, elongated insects. They are usually the smallest insect on a trap and may be confused with specks of dirt
(photo 6). Thrips are black to yellow and have hair fringes
on their wings. These fringes are not always visible on traps
because the wings of the thrips tend to fold over its body.
SCOUTING METHODS—22
Whitefly. (varied species) Family Aleurodidae. These are
small (1/16 to 1/8 inch) insects with white wings and yellow
to orange bodies (photo 7). The white wings disintegrate
quickly, leaving behind only the body, which can easily be
confused with thrips. The wingless whitefly body tends to be
shorter and stouter than the thrips.
Parasitic wasp. (varied species) Order Hymenoptera. Many
parasitic wasps in the order Hymenoptera may be seen on
yellow sticky traps (photo 8). They are generally small (1/16
to 1/8 inch) with bodies that range from slender to stout.
They often have long, elbowed antennae. Their abdomens
tend to be pointed at the rear. Parasitoid wings tend to be
clear, with only one large vein on the forewing. The
hindwings are usually without veins and much smaller than
the front wings.
SCOUTING METHODS—23
(table 3). Key plants are the species or varieties most likely
to have pest problems. Key locations are areas of a greenhouse that are most likely to be the site of pest problems,
such as spots with poor floor drainage, benches near vents, or
production areas near stock plants.
Table 3. Some key pests of greenhouse bedding plants
Plant
Cultivar(s) Pest(s)1
Ageratum
All
Whiteflies, WFT, aphids, TSSM
Alyssum
All
Whiteflies, WFT, aphids,
Rhizoctonia
Basil
All
Fusarium wilt, INSV/TSWV
Begonia
All
WFT, damping off (Rhizoctonia
solani; Pythium spp.), Botrytis,
INSV, TSWV
Begonia
Tuberous
WFT, INSV/TSWV, bacterial
leaf spot of begonia
(Xanthomonas campestris pv.
begoniae), powdery mildew
Celosia
All
WFT, aphids, damping off
Cyclamen
WFT, aphids, TSSM, cyclamen
mite, INSV/TSWV, Fusarium
wilt, Botrytis
All
WFT, leaf miners, aphids,
whiteflies, European corn borer,
cabbage looper, Pseudomonas leaf
spot, Fusarium wilt, Rhizoctonia,
Pythium root rot, INSV/TSWV,
Leafminers
Seed-grown Aphid, WFT, Botrytis blight,
INSV
Other Insect Monitoring Tools
Occasionally other types of insect monitoring devices are used
in greenhouse scouting. Potato disks may be placed on the soil
surface to monitor for fungus gnat larvae. Cut a potato into 1to 2-inch cubes and press the raw surface lightly into the soil.
If larvae are present, they may be seen feeding on the potato
when it is lifted from the soil after 24 hours.
Duct tape or packing tape may be wrapped sticky side out
on bench legs to determine if slugs feeding on benches are moving up from the greenhouse floor; look for their slime trails on
the tape.
Pheromone traps are occasionally used in greenhouses to
detect European corn borer.
Chrysanthemum
Plant Inspections
This section explains how to inspect plant tops and root systems for arthropods, diseases, and cultural problems. Descriptions of specific arthropod and disease problems can be found
in subsequent sections.
Dahlia
All
1
INSV = impatiens necrotic spot virus; TSSM = two-spotted spider mite;
TSWV = tomato spotted wilt virus; WFT = western flower thrips, AMV =
alfalfa mosaic virus, PVY = potato virus y, TMV = tobacco mosaic virus
Scout by Key Pests, Plants, and Locations
Be familiar with the key pests, plants, and locations for the
crops grown in your greenhouses. Key pests are the insects,
mites, and diseases most likely to cause problems on a plant
7. Whiteflies on yellow sticky card,
J. Sanderson
8. Parasitoids (5) and shore flies (2),
J. Sanderson
SCOUTING METHODS—25
SCOUTING METHODS—24
Table 3—Continued
Table 3—Continued
Pest(s)1
Plant
Cultivar(s)
Pest(s)1
Plant
Cultivar(s)
Dahlia
Tubergrown
WFT, TSWV
Geraniums
Dianthus
All
WFT, Botrytis blight
Seed-grown Whiteflies, Botrytis blight,
Pythium root rot, bacterial
zonals
blight (Xanthomonas campestris
pv. pelargonii) if near infested
cuttings, Pseudomonas leaf spot,
Acidovorax leaf spot
WFT, aphids, whiteflies, TSSM,
INSV, TSWV, Pythium root rot,
Pseudomonas leaf spot, powdery
mildew, leafminers
Dracaena A l l
(spike)
Easter lily A l l
WFT, TSSM
Gazania
All
WFT
Geraniums
Cuttinggrown
zonals
Fungus gnats, whiteflies (esp.
‘Aurora,’ ‘Snow Mass’), Botrytis
blight, foxglove aphid, bacterial
blight(Xanthomonas campestris
pv. pelargonii), root rot (Pythiumspp.), rust, Fe/Mn toxicity at
low (esp. ‘Aurora’), Southern
wilt (Ralstonia solanacearum)
WFT (especially flowers of
‘Sybil Holmes’ and foliage of
certain cultivars), TSSM,
whiteflies, bacterial blight of
geraniums (Xanthomonas campestris pv. pelargonii), oedema
Geraniums
Ivy types
(cuttinggrown)
Aphid, lily symptomless virus,
cucumber mosaic virus, Pythium
root rot, Rhizoctonia
Gerbera
Daisies
Herbs
All, esp.
Whiteflies, aphids, WFT,
vegetaTSSM, mealybugs, Rhizoctonia,
tively
Pythium
propagated
Hydrangea
All
Impatiens
All
wallerana
(sultani)
and hybrid
varieties
Kale,
flowering
All
Imported cabbage worm, diamondback moth,
Marigolds
All
WFT, leaf miners, aphids,
Botrytis blight, TSSM, Alternaria leaf spot, micronutrient
toxicity (Hi Fe or Mn), Leafminers
Aphid, whiteflies, TSSM,
powdery mildew, hydrangea
virescence phytoplasma
WFT, aphids, broad mites,
TSSM, TSWV/ INSV, Pseudomonas leaf spot, Alternaria leaf
spot, crown rot (Rhizoctonia
solani), (Pythium spp.), Botrytis
stem & leaf blight
1
INSV = impatiens necrotic spot virus; TSSM = two-spotted spider mite;
TSWV = tomato spotted wilt virus; WFT = western flower thrips, AMV =
alfalfa mosaic virus, PVY = potato virus y, TMV = tobacco mosaic virus
SCOUTING METHODS—26
Table 3—Continued
Table 3—Continued
1
Plant
Cultivar(s)
Pest(s)
New
Guinea
Impatiens
All
WFT, broad mites, INSV/TSWV,
crown rot (Rhizoctonia solani),
crown rot (Pythium irregulare),
Botrytis stem and leaf blight,
Myrothecium leaf spot, Phyllosticta leaf spot, powdery mildew
Pansy
All
Aphids, WFT, black root rot
(Thielaviopsis basicola), downy
mildew, crown rot (Phytophthora parasitica), downy
mildew, Cercospora leaf spot,
anthracnose, powdery mildew
Petunia
VegetaINSV/TSWV, powdery mildew,
tively
AMV, PVY, TMV
propagated
Petunia
All
WFT, damping off, (Rhizoctonia
solani), Leafminers
Pepper
All
WFT, aphids, TSWV/INSV,
bacterial leaf spot
Portulaca
All
WFT, INSV, Papaya mosaic
virus
Primula
All
Aphids, WFT, whiteflies,
Botrytis, INSV/TSWV, Pythium
root rot
Aphids, WFT, INSV/TSWV,
powdery mildew
Ranunculus
All
SCOUTING METHODS—27
Plant
Cultivar(s)
Pest(s)1
Rosemary
All
Pythium, Fusarium, Rhizoctonia
root rot, powdery mildew
Salvia
All
Snapdragon
All
Aphids, whiteflies, downy
mildew, Rhizoctonia
WFT, aphids, Pythium root rot,
downy mildew, rust
Tomato
All
Whiteflies, aphids, WFT,
TSWV/INSV, bacterial leaf
spot, bacterial canker, Rhizoctonia, Leafminers
Verbena
Flowering
annuals
(seedgrown)
WFT, aphids, potyvirus,
TSWV/INSV, Phytophthora
crown rot
Vinca vine
TSSM, Rhizoctonia
Vinca (Ca- A l l
tharanthus)
WFT, broad mites, damping off
and crown rot, Phytophthora
parasitica, Rhizoctonia
Zinnia
Whiteflies, WFT, melon and
green peach aphids, bacterial
leaf spot (Xanthomonas campestris), Alternaria leaf spot
All
1
INSV = impatiens necrotic spot virus; TSSM = two-spotted spider mite;
TSWV = tomato spotted wilt virus; WFT = western flower thrips, AMV = alfalfa mosaic virus, PVY = potato virus y, TMV = tobacco mosaic virus
Crop Plants
In general, inspect 10 to 20 plants or plug trays per 1,000 sq. ft.
Be sure to inspect a few plants of each cultivar or species each
week. Base the number of plants inspected on the number of
different species or varieties being grown, the size of each
plant’s key pest complex, and the specific part of the production cycle. For example, geraniums are pestered by thrips,
whiteflies, Botrytis, Bacterial blight, rust, and oedema, all
of which can develop at any point in the crop production cycle. Therefore, you will want to check for these pests at every
scouting visit.
SCOUTING METHODS—28
9. Scouting for whiteflies, J. Lamboy
10. Greenhouse whitefly adults, eggs,
and crawlers, J. Sanderson
Many plants are affected by fungus gnat larvae and
damping off, which are a concern primarily during the first
few weeks of production. Crop history also plays a role; check
for a problem that has occurred regularly in the past until you
are certain it is not present. Be vigilant with problems resulting from ongoing environmental circumstances, such as poor air
circulation or standing water.
Systematically examine the tops and bottoms of leaves.
Some arthropod pests, such as mites and whiteflies, are found
primarily on leaf undersides, whereas aphids are most commonly seen on tender new growth. Most disease symptoms will
be visible on the upper leaf surface, although downy mildew
and powdery mildew can appear first on leaf undersides. For
plants with six or fewer leaves, examine the entire plant. For
larger plants, look over the entire plant, holding it above
your head to see the leaf undersides (photos 9, 10). An Optivisor® is useful for this purpose. Select six leaves from all
parts of the plant (upper, middle, lower) and examine them
individually.
Examine the length of all stems and branches for insects,
mites, and disease symptoms. Many arthropod and disease
problems are specific to certain parts of the plant. Some
aphids prefer terminal growth, whereas mealybugs may be
located at any point, although often they are visible in leaf
axils or where branches and stems meet. Western flower
thrips adults and larvae are most commonly found in flowers.
Sometimes they are visible on leaves and in leaf axils, or
hidden within buds. Check stems and branches carefully for
diseased areas—primarily at the root-stem junction, or where
branches and stems meet. Leaf spots develop first on the
older, lower leaves of seedlings.
Sentinel plants. Sentinel plants are individual plants within
the crop that are monitored to provide information about the
development of a problem. They can be marked crop plants
that you check each week (usually for insect development) or
non-crop plants that you place and check (usually for viruses). Sentinel plants can help you determine how quickly a
problem is developing, whether control is necessary, and
whether previous controls were effective. On crop plants used
to follow insect development, wrap flagging tape around a
branch where a problem is observed. Write the date and a description of the problem on the tape. Examine this plant at
SCOUTING METHODS—29
SCOUTING METHODS—30
the next visit. If a treatment was used, assess the effectiveness of the treatment. If no treatment was applied, check for
continued development of the problem.
Table 4. Monitoring root system health
Parameter How to Measure
Interpreting the Results
Indicator plants. Indicator plants are of a different species
than the crop and are used because they have distinctive
symptoms of a pest or are especially attractive to that pest.
For example, they would be used to show the presence of
thrips carrying the tospoviruses INSV or TSWV. These
plants will develop viral symptoms within one week if fed on
by infected thrips (photo 11). The petunia cultivars ‘Red
Cloud,’ ‘Summer Madness,’ and ‘Super Magic Coral’ have all
been shown to work as indicators for tospoviruses, while any
variety of fava bean may be used (photo 14). See section VII
for more information on using indicator plants for tospoviruses.
Tomatoes are sometimes used as indicators of ethylene
gas, which can cause plants to become stunted and distorted.
These plants react quickly to the presence of ethylene, which
can be released into the greenhouse if a gas heater is not functioning properly. Yellowing leaves on ivy geraniums may be
an indication of ethylene.
Root System Health. Inspect 10 plants per 1,000 sq. ft. for root
system health, which is based on the size of the root ball and
the color and disease status of the root system. Test a soil
sample from two plants of the same species for pH and conductivity. A description of the techniques and a root health
rating system are shown in table 4.
Preparation of the Scouting Report
At the end of each scouting visit, summarize your findings on
the Scouting Summary Report Form (see Appendix). Leave
this in the IPM notebook. Provide any other information not
specified on this form (such as management suggestions) that
the grower has requested. It is also a good idea to speak with
the grower before you leave the greenhouse to provide a verbal summary of your observations.
11. Thrips on yellow sticky card, S. Gill
A small root system is
normal during the first few
weeks of the crop. If a full
root system is not seen by
about the fourth week, the
health of the plant is
probably compromised.
Average the values for 10
plants. An average greater
than 2 indicates poor root
system health. Look for
evidence of root rots,
especially in the bottom of
containers.
A pH value below 5.0 or
above 6.5 is cause for
concern. Check references
for optimum levels for
specific crops. A pH value
below 6.0 is sometimes a
problem for marigold or
geranium cultivars sensitive
to iron/manganese toxicity.
Size of root
ball
Y = root ball is filling
the pot
N = root ball is not
filling the pot
Root system
color
1 = healthy white with
noticeable root hairs
2 = some brown roots,
many lacking root hairs
3 = majority of the roots
dead
Soil pH
Take 2 level tablespoons of soil at least
1/4" below soil surface
from each of two pots.
Combine with 4
tablespoons of distilled
water. Keep the volume
ratio 1:2 (soil:water).
Mix and allow to sit
for 45 minutes. Pour off
extract liquid and test.
Use same sample
This value should be
extract liquid as for
between 0.5 and 1.5 µS
pH.
(micro siemens; 1 µs = 1
mmhos). It is normal for this
value to rise as the crop
grows. Lower values are
appropriate for young
seedlings and plants ready
for sale. Check references
for optimum levels for
specific crops.
Soil conductivity
14. INSV symptoms on fava bean
indicator plant, M. Daughtrey
MANAGEMENT STRATEGY—31
IV. DEVELOPING, IMPLEMENTING,
AND EVALUATING A MANAGEMENT
PLAN
IPM growers use a variety of cost-effective methods to keep
pests at acceptable levels. Some of these strategies are listed
in table 5. Those appropriate to specific insects and diseases
will be mentioned as those pests are discussed. A management
technique for a specific problem aims to reduce its severity as
well as prevent its recurrence.
Table 5. IPM approaches for bedding plants
Approach
Cultural
Mechanical
Biological
Chemical
Resistant plant
varieties
Examples
Adjust incorrect pH or salts to promote root
health. Eliminate weeds and standing water.
Use HAF fans to improve air movement.
Remove diseased leaves or plants.
Remove plants infested with insects or mites.
Screening, which prevents insects from entering
the greenhouse, may be cost effective.
Apply biopesticides (insect toxins or pathogens
sold as pesticides).
Use fungal antagonists (naturally occurring
soil fungi that displace plant pathogenic fungi).
Release natural enemies.
Use pesticides judiciously.
Spot-treat in a timely fashion.
Limited use in bedding plant production at
present
The short-term need is to reduce a problem to acceptable levels as quickly as possible. Doing so usually involves disposing
of severely infested plant material and using pesticides. The
least toxic materials that will be effective are used first, applied as spot treatments whenever possible.
Over the long term, there are several steps that should be
taken to help prevent a problem from recurring. Whenever
MANAGEMENT STRATEGY—32
possible, use a reputable supplier of clean plant material and
develop a plan to prevent pests from entering and spreading
in the greenhouse. For example, establish an isolation area in
which incoming plants can be held and inspected for arthropod and disease problems before they enter the greenhouse,
and keep the plants isolated until these problems have been
treated. To help prevent the spread of problems, keep doors
to bays off a common headhouse closed.
Change growing conditions that lead to pest problems,
such as incorrect pH of irrigation water, algae around
benches, or weeds in and around the greenhouse. The most obvious step is to simply stay on top of small problems before
they become big ones.
Developing a Management Plan
Management strategies are developed before the bedding
plant season so that the necessary management tools can be
readied; these tactics are then modified as needed during the
season.
Pest biology, production practices and equipment, and
economics all need to be considered when management strategies are formulated. A pest present in high numbers that can
spread or reproduce quickly will need to be controlled quickly,
whereas a pest detected early at low levels could be managed
with an insect growth regulator or biological control, which
act more slowly.
Greenhouse style and pesticide application equipment
will also determine what management approaches will be effective. For example, a crop in a large gutter-connected greenhouse that contains varied crops may not be a suitable candidate for biological control if pesticides are to be used on other
nearby crops. Capillary mats or flood trays that block spray
coverage from underneath could limit the effective use of contact insecticides, as could small, low-pressure sprayers that
do not provide adequate coverage. Areas with frequent
worker activity will need to be managed with techniques
that have limited or no worker re-entry intervals.
Economics also play an important role in a management
strategy. Important considerations are the cost of pesticides
or natural enemies (including the labor to apply or release
them) and the labor cost to rogue dead plants or plant parts.
MANAGEMENT STRATEGY—33
MANAGEMENT STRATEGY—34
It may be less costly to discard heavily infested plants than
to apply pesticides and risk spread to clean plants. The value
of the crop and impact of a pest on that value are also important. Botrytis on geranium flowers is not as urgent a problem
as thrips on cyclamen.
natural enemies of bedding plant arthropod and disease pests
that are discussed in the biological control section.
Implementing a Management Plan
After each scouting session, record and summarize your observations. This information includes insect identification and
counts, disease incidence and severity, location of weeds, and
an evaluation of the effectiveness of previous control measures. Also make notes about cultural aspects of the crop (crop
height, plant development, etc.) and management of soil fertility and water. A final part of an implementation plan is to
have a clear understanding of whose responsibility it is develop and implement the management strategy. The information gathered during scouting should be given to this person as
soon as the monitoring session is finished.
When a specific action needs to be taken, the grower
should do so in a timely fashion. If pesticides are to be used,
they should be applied as soon as possible after observing a
problem, assuming the susceptible life stage is present. Apply
a labeled pesticide correctly, using the appropriate equipment. Some control failures are the result of improper application techniques or equipment. Cryptic pests, such as thrips
larvae or mealybugs, will need to be treated with a sprayer
that provides excellent coverage with small particle sizes. A
low-pressure backpack sprayer will not give adequate coverage in a dense crop with a large canopy.
Use of biological control requires commitment on the part
of the grower. Because many biological controls are not compatible with many pesticides, the grower often has to be
willing to use nonchemical methods to manage all pests found
in the crop. Biological control agents act more slowly than
chemical controls and cannot be expected to be a rescue treatment. Many biological controls are host-specific, and many
operate only under specific environmental conditions. Essential to this method are 1) regular scouting to detect small
problems that are more easily managed non-chemically, and
2) a reliable supplier of natural enemies. There are many
Evaluation
Evaluation, a critical part of an IPM program, is accomplished during monitoring sessions. Because IPM is a dynamic
process, management tactics are constantly evaluated and
changed.
Begin an evaluation by checking the spray records before
each scouting session. When scouting an area that received a
pesticide application after your last visit, look for indications that it was effective. Signs of efficacy are dead, dried,
or blackened insects and mites, a drop in trap catches or visual observations, or lack of disease progression. Indicator and
sentinel plants, described in section III, are also important
evaluation tools. Water-sensitive cards may be used to determine whether adequate coverage was obtained. Place
these inconspicuously in the crop just before pesticides are applied. They will turn blue where water hits them, so a card
with few blue areas indicates poor coverage.
There are several reasons why a pesticide application
may not be effective (assuming a pesticide known to kill the
insect, mite, or pathogen was used). Poor coverage of plant
surfaces can result in incomplete contact with the pest. Water
pH that is too high can cause pesticides to lose effectiveness.
Also, pesticides that have been stored incorrectly, such as
liquids that have been allowed to freeze, or dry materials
that have become wet, can become less effective. Finally,
some materials require irrigation. Too much or too little water will result in leaching or reduced plant uptake.
CASE STUDIES—35
11. Thrips on yellow sticky card, S. Gill
VI. CASE STUDIES
These case studies, drawn from actual experiences in New
York greenhouses, show how pest management strategies are
implemented and evaluated.
Case Study 1: Thrips and INSV on
Impatiens
12. Petunia indicator plant for thrips,
M. Daughtrey
A grower who had experienced large losses for the past two
years in his impatiens crop because of INSV decided to use
indicator plants for early virus detection (table 6; photos 1114).
Table 6. Thrips average in impatiens house
13. Petunia ‘Calypso’ with thrips feeding
injury, M. Daughtrey
DATE
Trap
Catch
AVG.
Jan. 2
9
16
all 0
0, 2, 2, 4
0, 0, 0, 2
0
2
0.5
23
30
Feb. 6
13
20
27
all 0
all 0
all 0
0, 0, 0, 4
0, 0, 0, 4
0, 1, 1, 0
0
0
0
1
1
0.5
*INSV=impatiens necrotic spot virus
TSWV=tomato spotted wilt virus
14. INSV symptoms on fava bean
indicator plant, M. Daughtrey
Petunias (indicator plant
for INSV/ TSWV*) were
placed December 26.
No thrips controls have
been used because populations are
so low.
On February 27, INSV
symptoms appear on
petunia indicator plants.
QTA-TospoTM kit
confirms plant is infected.
CASE STUDIES—37
CASE STUDIES—36
Table 7. Map of greenhouse and card counts
Strategy Implemented on February 27
Even though thrips numbers were too low up to this point to
warrant spraying, the presence of a virus means there are
viruliferous thrips in the greenhouse (and therefore there is
no tolerance for thrips).
• Remove indicator plant, taking it from the greenhouse in a
sealed plastic bag. Replace it with non-infected indicator.
• Treat for thrips three times at 5-day intervals.
• Inspect at least twice as many plants as normal for INSV
in this house for the next 3 to 4 weeks.
• Try to identify the reservoir of the virus.
• Do not move plants into or out of this house.
Results
• Use of indicator plants alerted the grower to the
need to spray for thrips to control the spread of the
virus. Only six plants out of 3,000 were lost to the virus.
Case Study 2: Whiteflies on Hidden
Weeds
Shown in table 7 are the greenhouse map and yellow sticky
card counts for the first eight weeks of a geranium crop grown
in a gutter-connected greenhouse. An average of three
whitefly-infested plants were observed each week in this
3,000 sq. ft. bay. The doors to the adjoining bays were kept
closed, and pesticides were not applied until March 15. What
was going on?
STEAM
PIPE ➝
DOOR
TO
DOOR
TO
NEXT
BAY
NEXT
BAY
Whitefly Card Counts—House 3
Date
Card 1
Card 2
Card 3
7-Feb
14-Feb
21-Feb
28-Feb
7-Mar
14-Mar
21-Mar
28-Mar
0
0
0
0
0
0
3
0
0
0
0
0
1
1
5
0
4
5
7
15
18
20
5
0
On March 14, after he finished counting the cards, the scout
looked behind the steam pipe near card 3 and saw a clump of
about 20 weeds that were heavily infested with whiteflies.
He pulled them and removed them from the greenhouse. He
did not place them in a bag, so as he walked through the
greenhouse, many of the insects were knocked off the weeds.
Thus there were whitefly adults on all cards the following
week. On March 15 the grower applied a wet spray to control
CASE STUDIES—38
the adults, and no further card catches were recorded. (Remember, the insects counted on the 21st probably arrived
there on the 14th, after the card was counted but before pesticides were applied.) This infestation might have been
avoided if the scout had thoroughly inspected for weeds at
the beginning of the season (photo 15).
Case Study 3: Importance of Early
Intervention
This grower, as her poinsettia crop was finishing, brought 50
fuchsia cuttings into the greenhouse on December 12. The scout
found the fuchsia cuttings to be infested with whiteflies. He
also found weeds with whiteflies.
At this point, the cuttings should have been treated with
a pesticide or discarded and replaced with clean plants, and
the weeds should have been removed. Instead, nothing was
done until December 19 to either the cuttings or the weeds (see
table 8).
CASE STUDIES—39
Table 8. Whitefly counts and control measures used
Date
12-5
12-12
WF on
YSC1
18.5
22.7
12-19
73.4
12-27
1-2
18.4
11.6
1-9
1-16
1-23
1-30
2-6
----8.0
62.4
95
37
2-13
4
2-20
3.2
2-27
3-5
3-12
1.2
4.2
22
Whitefly
Observations
fuchsia cuttings
and weeds infested
with whitefly
fuchsia cuttings
infested with
whitefly
Control Measures
Used
12/19 Resmethrin
12/23 Resmethrin
many whitefly
immatures seen on
fuchsia
1/8 Marathon
2/3 Plantfume
103
2/10 Plantfume
103
2/17 Plantfume
103
3-12 Threw out
fuchsias
1 WF = whiteflies; YSC = yellow sticky card
Results
15. Whiteflies on greenhouse weed,
J. Sanderson
The Resmethrin applications of December 19 and 23 caused
some adult mortality, so the YSC count on December 27 was
much lower than the previous week. The eggs laid by the
high adult populations of December 12 and 19 were not affected by the Resmethrin. These are seen as immatures on
plants on January 2, and as adults on the YSC on January 23.
This scenario illustrates why pest management decisions
should be based on plant and YSC observations. A small number of adults seen on cards January 2 and 16 did not mean the
population was declining, only that immatures were the predominant life stage.
CASE STUDIES—40
Marathon could not be applied earlier than January 8 because the cuttings did not have an adequate root system for
uptake. It took four weeks for this application to noticeably
reduce the adult whitefly population; a wet spray should
have been used in the interim. The large number of adults
still present in February, four weeks after the Marathon application, is due to the continued presence of weed hosts.
Plantfume 103 did have an effect, although three applications were probably not necessary. The grower discarded the
cuttings, on which many whiteflies could still be seen, on
March 12. Whiteflies caught that day were moving up from
the weeds on the floor.
If the grower had thrown out the infested cuttings and
removed the weeds when they were first observed, several
pesticide applications could have been avoided. Furthermore, the crop would not have to have been discarded because
it was infested.
Case Study 4: Root Rot Management
A grower noted a few collapsing poinsettia cuttings during
propagation and thought no more of it. Several weeks later,
however, she began to lose dozens of transplants. The roots
were soft and discolored, and brown cankers showed at the
base of some stems (photo 16).
Determining the Source of the Problem
The grower took the following steps:
• Sent a sample to the diagnostic lab. Results showed that
Pythium aphanidermatum was causing the transplant
losses.
• Checked soluble salts in the media using a saturated media extract. Results indicated that salts were at EC 5.7
(excessively high).
• Examined sticky card counts, which showed that fungus
gnat populations had quadrupled since the last count (1
month earlier).
16. Pythium root rot on poinsettia,
J. Lamboy
CASE STUDIES—41
Addressing the Problem
Then the grower
• discarded plants with symptoms;
• irrigated poinsettias with only water for one week to reduce salt levels before resuming the regular fertilization
program, thus making the root system less susceptible to
Pythium attack. She tested the soil and, two weeks later,
performed a foliar analysis to check the status of the micronutrients.
• treated the crop with a fungicide drench to protect
against Pythium;
• drenched onto the surface of the growing medium a material effective against fungus gnat larvae. The reason? So
adult fungus gnats would not be moving about the greenhouse spreading Pythium.
• permanently reconfigured the propagation area to eliminate puddling around the base of rooting strips. (Puddling
would facilitate the spread of a fungus with swimming
spores such as Pythium aphanidermatum).
• decided to make fungus gnat card counts on a weekly basis
during poinsettia propagation, beginning two weeks before receiving cuttings;
• resolved to inspect the root health of the poinsettia crop
regularly, sending in samples for diagnosis when appropriate.
ARTHROPOD PESTS—42
6. Thrips, J. Sanderson
VII. ARTHROPOD PESTS
11. Thrips on yellow sticky card, S. Gill
Table 9 summarizes how to monitor for and manage the arthropod pests found most often in the greenhouse. Details
about each pest can be found in separate sections below, presented in the same order as in the table. We also encourage
you to consult the references in the bibliography.
Western Flower Thrips
(Frankliniella occiden-
talis)
12. Petunia indicator plant for thrips,
M. Daughtrey
The western flower thrips (WFT) is one of the most common
pests in greenhouses (photo 6). It attacks chrysanthemums,
cyclamen, African violet, portulaca, cineraria, impatiens,
ivy geraniums, and many other crops (photos 11–13, 17). WFT
can transmit impatiens necrotic spot tospovirus (INSV) and
tomato spotted wilt tospovirus (TSWV), two viruses with a
wide host range that includes most bedding plants.
Actual size: –
13. Petunia ‘Calypso’ with thrips feeding
injury, M. Daughtrey
17. Western flower thrips feeding on
plant tissue and pollen, D. Gilrein
Thrips eggs are inserted into plant tissue, where they are
protected from natural enemies and insecticides. Larvae are
sometimes seen on leaves, but more often feed in the protection
of buds and leaf axils, which hampers control of these stages.
The majority of WFT pupae are found in the soil. Adult WFT
are typically found on foliage or in flowers.
ARTHROPOD PESTS—43
ARTHROPOD PESTS—44
Table 9. Monitoring and management of arthropod pests
Table 9—Continued
Arthro- Monitoring
pod Pest
Signs or
Symptoms
Management
Arthro- Monitoring
pod Pest
Signs or
Symptoms
Management
Western
Flower
Thrips
Distorted or
stunted new
growth; white
feeding scars
on new
growth or
flowers that
sometimes
have small
black specks
(frass) on
them.
Geraniums
will develop a
symptom
similar to
oedema.
Cuttings may
develop poor
root systems
from larval
feeding.
Young plants
will be stunted
or dead in
severe cases.
Eliminate weeds
inside and establish a
15-foot weed-free
border around the
greenhouse. Do not
carry over thripsinfested stock plants.
Use 3 pesticide
applications at 5-day
intervals (warm
weather) or 7-day
intervals (cool
weather). Rotate
insecticide classes
monthly.
Melon/
Cotton
Aphid
Small (1/16 inch) light
yellow to dark green
aphid with black
cornicles. Usually seen
on stems. Look for
white shed skins.
TwoSpotted
Spider
Mite
Visual inspection of
plants, especially leaf
undersides. Look first
on plants in hot, dry
areas or near doors and
walkways.
Avoid high N
fertilization. Eliminate
weeds, and do not
keep aphid-infested
plants in the
greenhouse. Wash
aphids off plants. Use
biological or chemical
control.
Avoid fertilizing
plants that have
mites. Wash leaves if
air circulation will
promote fast drying.
Use biological or
chemical controls.
Cyclamen
Mite
Visual inspection of
plants, primarily the
growing tips. Mites are
very small and are best
seen with a dissecting
microscope. This makes
it difficult to detect
them prior to onset of
injury.
Same as cyclamen mite.
Honeydew
and sooty
mold; distorted
new growth.
Melon/cotton
aphid usually
occurs in
clumps within
crop.
Stippling on
upper leaf
surface,
followed by
yellowing and
bronzing of
foliage.
Webbing may
develop when
high populations are
present. Ivy
geran-iums
will not exhibit
stippling, but
may develop
oedema.
Distorted or
stunted new
growth.
Blackened
shoot tips.
African violet,
ivy, and
clematis are
common hosts.
Bronzing of
undersides of
lower leaves
and curling
and stunting
of new
growth.
Fungus
Gnats
Shore
Flies
Green
Peach
Aphid
YSC just above crop
canopy will detect
adults; check plants
during the growing
season by tapping new
growth and flowers
onto white paper. Blow
into the flowers first.
Look for small (1/16 in.)
light brown cigarshaped insects with
feathery wing margins
and smaller yellow
larvae.
YSC just above soil
surface for adults;
potato slices (1.5 in. x 1
in.) on soil surface for
larvae; these may
attract mice. Favored by
damp areas and organic
material. Larvae are
white with shiny black
heads. Adults resem-ble
small mosquitoes.
YSC. Adults can be
distinguished by white
spots on wings. Favored
by damp areas and algal
growth, which they
feed on. Adults
resemble fruit flies.
Visual inspection of
plants, since only
winged adults will
come to YSC. 1/16-1/8inch long green to pink
adults occur mainly on
growing tips, especially
on leaf undersides.
Cornicles are light
green; slightly darker
than the body. Look for
white shed skins.
They do not
directly injure
plants but may
carry several
plant pathogens. High
populations
can leave
unsightly
droppings on
plants.
Honeydew
and sooty
mold; distorted new
growth. Green
peach aphid is
usually spread
throughout
the crop.
Avoid overwatering
and wet floors.
Eliminate weeds.
Clean up spilled
media. Keep compost
piles and other
sources of microbial
activity far away from
the greenhouse. Use
biological or chemical
control.
Control algae by
controlling excess
water and fertilizer
runoff. If this is not
effective, use
chemical control.
Broad
Mite
Avoid high N
fertilization. Eliminate
weeds, and do not
keep aphid-infested
plants in the
greenhouse. Wash
aphids off plants. Use
biological or chemical
control.
Rogue out infested
plants. Use chemical
control.
Rogue out infested
plants. Use chemical
control.
ARTHROPOD PESTS—45
ARTHROPOD PESTS—46
Table 9—Continued
Arthro- Monitoring
pod Pest
Signs or
Symptoms
Management
Greenhouse
White-fly
(GHWF)
YSC for adults; visual
inspection of plants for
adults and immature
stages. Turn leaves over
to inspect for nymphs.
Adults hold wings
nearly flat over body.
Eliminate weeds and
leftover poinsettias.
Use chemical or
biological control.
Silverleaf
Whitefly
Same as greenhouse
whitefly. Adults hold
wings at an angle over
body, giving them a
narrower profile when
viewed from above.
Body color more yellow
than GHWF.
Primarily a
nuisance pest,
but its
presence
detracts from
the value of
the plant.
High populations can
result in
honeydew
and sooty
mold, and
unmarketable
plants.
Primarily a
nuisance pest,
but its
presence
detracts from
the value of
the plant.
High
populations
can result in
honeydew
and sooty
mold, and
unmarketable
plants.
Honeydew
and sooty
mold on
leaves,
followed by
leaf yellowing
and leaf drop
at high
populations.
Mealybugs
Common on foliage
plants. Visual inspection: Look for cottony
white masses in leaf
axils and on undersides
of leaves.
Eliminate weeds and
leftover poinsettias.
Use chemical or
biological control.
Western Flower Thrips, continued
The life cycle of WFT is shown in figure 2.
Provided courtesy of IPM Laboratories, Inc., Locke, NY
Figure 2. Thrips life cycle
Rogue severely
infested plants. Wash
off plants. Use
biological or chemical
control. Young
nymphs are most
susceptible to
pesticides.
The western flower thrips is generally the most abundant
thrips species in the greenhouse. Occasionally other species
may be present. It can be important to distinguish between
these to know if the thrips present will vector tospoviruses.
Although identifying thrips to species can be difficult, it is
possible to separate Frankliniella occidentalis from thrips
that are not in the genus Frankliniella. As shown in table 10,
do so by examining the thrips body on the sticky trap, using a
hand lens to look for setae (hairs) on the thorax.
Table 10. Comparison of Frankliniella and non-Frankliniella
thrips
Frankliniella species
Setae on the anterior (front)
of the thorax
Non-Frankliniella species
No setae on the anterior of
the thorax