Making the connections a how to guide for organic chemistry lab techniques
Bạn đang xem bản rút gọn của tài liệu. Xem và tải ngay bản đầy đủ của tài liệu tại đây (21.15 MB, 198 trang )
t //
L '//
Wfs
Making the Connections
A How-To Guide for Organic Chemistry Lab Techniques
Anne B. Padi'as
HAYDEN f - f y j
MCNEIL
*W
3 f t
www.pdfgrip.com
Making the Connections
A How-To Guide for
Organic Chemistry
Lab Techniques
Anne B. Padfas
The University of A r i z o n a
HAYDEN
Hvl
MCNEIL
www.pdfgrip.com
Copyright © 2007 by Anne B. Padfas.
Copyright © 2007 by Hayden-McNeil Publishing, Inc. on illustrations.
All rights reserved.
Permission in writing must be obtained from the publisher before any part of this
work may be reproduced or transmitted in any form or by any means, electronic or
mechanical, including photocopying and recording, or by any information storage
or retrieval system.
Printed in the United States of America.
10 9 8 7 6 5 4 3 2 1
ISBN 978-0-7380-1985-7
Hayden-McNeil Publishing, Inc.
14903 Pilot Drive
Plymouth, Michigan 48170
www.hmpublishing.com
Padi'as 1985-7 W 0 7 V 2
www.pdfgrip.com
Table of Contents
Introduction
vii
Chapter 1: First the Basics
1
ALWAYS Safety First
1
Why?
What Is Available in the Lab?
What Should I Wear?
What Should I Pay Attention to?
Chemical Waste
The Why and How of a Laboratory Notebook
The Basics About Notebooks
What to Do Before Coming to Lab
What to Write During Lab
What to Write After Lab
Important Calculations
1
1
2
3
4
4
4
5
7
12
13
Basic Lab Techniques
16
Glassware
Clean Glassware
Thermometers
Weighing Samples
Measuring Volumes
Heating Methods
Cooling Methods
16
IB
IB
20
21
22
24
www.pdfgrip.com
Generating a Vacuum
Filtration
Basic Reaction Setup
Solvents
Melting and Dissolving
Polarity and Intermolecular Forces
Solubility and Solvent Strength
C h a p t e r 2: H o w to Identify C o m p o u n d s
iv
25
26
30
37
37
38
40
45
Phase Diagrams
46
M e l t i n g Point for Solids
How Is It Done in the Lab?
47
48
Boiling Point for Volatile Liquids
51
How Is It Done in the Lab?
52
Density of Liquids
53
Optical Rotation (Polarimetry)
How Is It Done in the Lab?
Enantiomeric Excess or Optical Purity
54
56
57
Refractive Index
58
How Is It Done in the Lab?
60
Elemental Analysis (Molecular Formula)
62
Spectroscopy Introduction
63
Infrared Spectroscopy
The Basic Principles
The Instrument
The Sample
The Spectrum
How to Interpret an IR Spectrum
Some Representative IR Spectra
64
64
65
66
69
71
72
NMR
The Basic Principles
The Instrument
The Sample
The Spectrum
A Simple Explanation of NMR Spectra
Equivalent Hydrogens and Integration
Chemical Shift
Splitting
75
75
77
79
80
81
85
86
87
www.pdfgrip.com
How to Interpret NMR Spectra
A Few Simple Examples of NMR Spectra
Ultraviolet Spectroscopy
The Basic Principles
The Instrument
The Spectrum
Molar Absorptivity
M a s s Spectrometry
The Basic Principles
The Instrument
The Spectrum
Isotope Patterns
How to Interpret a Mass Spectrum
Some Representative Mass Spectra
Other Mass Spec Techniques
C h a p t e r 3 : Purification Techniques
91
92
94
94
95
96
97
98
98
98
99
101
103
103
105
107
Recrystallization
What Is It Good For?
The Basic Principles
How Is It Done in the Lab?
107
107
108
109
Extraction
What Is It Good For?
The Basic Principles
How Is It Done in the Lab?
116
116
117
119
Drying the Organic Fractions
How Is It Done in the Lab?
125
126
Distillation
What Is It Good For?
On a Molecular Level
Simple Distillation
Microscale Distillation
Fractional Distillation
Vacuum Distillation
Azeotropic Distillation
Steam Distillation
Rotary Evaporation
129
129
129
130
134
136
138
140
141
144
Sublimation
What Is It Good For?
On a Molecular Level
146
146
146
V
www.pdfgrip.com
The Basic Principle
How Is It Done in the Lab?
vi
146
148
Chromatography
What Is It Good For?
On a Molecular Level
150
150
150
Thin Layer Chromatography
Selecting a TLC Plate
Spotting
Developing
Visualization
Analysis and Applications o f T L C
153
154
155
156
157
159
C o l u m n Chromatography
Selecting a Column
Filling the Column
Selecting Eluent
Loading the Column
Running the Column
160
161
162
163
164
165
Other Column Chromatography Methods
Flash Chromatography
High Performance Liquid Chromatography (HPLC)
Supercritical Fluid Chromatography (SFC)
166
166
166
167
Gas Chromatography
Gas Chromatography Setup
Selecting a Column
The Carrier Gas
Injection
The Microliter Syringe
Detection
Running the GC
Analysis of the Gas Chromatogram
167
169
169
170
170
171
172
172
174
C h a p t e r 4 : Running a Reaction
177
Setup
177
Execution of the Reaction
178
The W o r k u p
178
Primary Identification
179
Purification and Final Identification
179
Index
1 81
www.pdfgrip.com
Introduction
Organic chemistry is the science of carbon molecules. Organic chemists identify
many compounds from nature, and then synthesize the useful ones or analogs
thereof. The "building" of molecules is an essential part of organic chemistry.
The title of the book "Making the Connections" refers to the making of bonds to
build these molecules.This book is meant as an instructional tool, and to facilitate
the learning process I have included many everyday examples of the chemical
principles you will be using in the laboratory. The title is also intended to refer
to this aim of "Making the Connections" with the things you already know and
understand.
Organic chemistry laboratories have a rather bad reputation as being dangerous.
This reputation is still based on a vision of laboratories of about 50 years ago and
on the omnipresent explosions whenever the hero in an action movie enters a
laboratory. However as you will find out, working in a laboratory is quite safe. All
you need is a little knowledge and a lot of common sense.
We have recently become a lot more aware of the short-term and the long-term
effects that chemicals might have on the human anatomy The sweet smell of benzene and the odor of dichloromethane are now forever associated with cancer.
Abbreviations such as DDT, PCBs and dioxins now result in a reaction of fear
from most people, and legitimately so. The word "chemical" conjures up a feeling
of suspicion, even though everything around us is made up of chemicals in the
true sense of the word. Chemistry has brought us society as we know it today,
with nylon, antibiotics, painkillers, CDs, computer chips, iPods, brightly colored
fabrics, and low-fat margarine. As with everything, a balance has to be found.
In a laboratory environment, many dangers associated with chemistry, and in
particular organic chemistry, are amplified. Explosions and fires can happen, but
usually do not. For those eventualities, the safety rules are established and will be
strictly enforced. Vigilance is always required. Any time people are in a chemistry
building, they should be somewhat paranoid and more attentive than in any other
building.
An important part of any laboratory course is learning to perform experimental
work in an appropriately safe and efficient manner. I am convinced that a basic understanding of the procedures and the logic behind them will help you to perform
the experiments in a safe manner. However, as in any high hazard environment,
you have to adhere to certain rules. Your own safety will depend on your knowledge of the following rules and regulations. Most of them will already be familiar
to you due to your experiences in other laboratory courses, but some will be new
because of the unique safety hazards present in organic laboratories.
vii
www.pdfgrip.com
www.pdfgrip.com
First the Basics
ALWAYS Safety First
Why?
Safety is important for you, as well as for your coworkers. There are inherent dangers
in organic chemistry lab; the chemicals you will work with may be very flammable, and
some are toxic. Safety is your number one priority. By working safely and in control of
the situation, you not only protect yourself and your classmates, but you also protect the
environment from the effect of harmful chemicals.
What Is Available in the Lab?
A laboratory is always equipped with an alarm system and a sprinkler system, which will
be activated either when an alarm is pulled or triggered by an occurrence in the building.
Each laboratory room is equipped with safety showers, eyewashes, and fire extinguishers. The lab rooms have multiple exit doors to allow for quick evacuation.
If anything goes wrong, your instructor must be alerted immediately. Most emergencies
can be handled with available personnel. But if there is any doubt that help is needed,
CALL 911. It is much better to err on the side of caution. When calling 911, it is
advisable to use a line phone, as most cell phones don't tell the operator where you are
located.
www.pdfgrip.com
The safety shower should only be used if necessary; that is, when your clothing
is on fire or if a large amount of chemicals has been spilled on your body and
clothing. If this is not the case, it is more efficient to use the faucets and spray
heads in the sink. Any contamination of the skin must be rinsed with water for
15 minutes.
If any chemical comes in contact with your eye, use the eyewash station. Hold your
eye open with your fingers, and irrigate your eye for 15 minutes. This may seem
like a very long time, but taking this precaution is vital to your safety!
The fire extinguisher can be used if there is a fire in the lab. If the fire is in a beaker
or flask, it is usually much safer to cover the container and let the fire die due to
lack of oxygen. If you are not sure how to use a fire extinguisher, don't do it. If you
are not sure that you can extinguish the fire, don't do it. Call your instructor, who
has been trained to use a fire extinguisher. Be aware that there are different kinds
of fire extinguishers. The most common fire extinguisher in a teaching laboratory is
labeled as "ABC," and is appropriate for use in the event of most chemical fires.
2
Each organic chemistry laboratory is equipped with fume hoods. A hood is an
enclosed space with a high continuous air flow, which will keep noxious and toxic
fumes out of the general laboratory space. Hoods are often used in teaching laboratories to dispense reagents in a safe fashion. Frequently the workbenches in the
laboratory are equipped with either overhead vent hoods or down drafts on the
benches itself.
What Should I Wear?
Your eyes are the most vulnerable part of your body. At all times, you should wear
goggles in the lab. No exceptions. The goggles must be "chemical resistant"; the
vent holes at the top of these goggles do not allow any liquid to get inside.
Lots of people wear contact lenses. Accident statistics show that wearing contacts
is not more dangerous than wearing glasses in the lab, as long as goggles are worn,
but you have to be very aware of the fact that you are wearing these contacts. If an
accident occurs and you are wearing contacts, remove them as soon as possible.
Any exposed part of your body is vulnerable to contamination by chemicals. An
apron or lab coat should be worn at all times. Shoulders should be covered, so no
tank tops without a lab coat.
Closed-toe shoes are also essential. Sandals or flip-flops are not allowed.
The remaining question is: Should gloves be worn or not? There is no denying that
gloves play an essential part in lab safety. However, you should be conscious of the
fact that gloves are also composed of chemicals, and therefore the right kind of
glove should be worn for specific chemicals. Also, it is more difficult to manipulate
www.pdfgrip.com
small items when wearing gloves, and the chance of spills increases with glove use.
For most experiments, gloves are not essential as the chemicals used are not toxic
or caustic. If necessary, gloves can be requested.
What Should I Pay Attention to?
No smoking, eating or drinking are allowed in the laboratory. Never taste
anything in the lab.
•
Never leave an experiment in progress unattended, especially if heating is
involved. Should you need to leave the lab while an experiment is in progress,
get your instructor or a classmate to keep watch over your reaction while you
are gone.
For most experiments, digital thermometers are the best choice. However, for
certain experiments, mercury thermometers are irreplaceable. Special rules
apply to mercury thermometers because of the highly toxic nature of mercury.
If you break a mercury thermometer, do not try to clean it up. You should
notify your instructor immediately so that the problem will be taken care of.
Make absolutely certain you do not walk through the mercury-contaminated
area. You sure don't want to track toxic mercury back to your apartment or
dorm room. To avoid breaking a thermometer, secure it at all times with a
clamp. Just because you put it in your sand bath, for example, doesn't mean it
is secured there!
•
If there is a desk area in your lab room, there will be a very clear dividing line
between the non-chemical area and the laboratory area. Classroom rules apply to a desk area, while laboratory rules strictly apply once the line into the
lab section is crossed.
•
Aisles must be kept free of obstructions, such as backpacks, coats and other
large items.
•
Never fill a pipet by mouth suction. Avoid contamination of reagents. Use
clean and dry scooping and measuring equipment.
•
Do not use any glass containers, such as beakers or crystallizing dishes, to
collect ice out of an ice machine. It is impossible to see the glass shards of
a broken container in the ice, and fellow students could get seriously cut if
they put their hand in. Use plastic scoops when removing ice from the ice
machine.
•
If the faucets for the deionized water are made of plastic, treat them gently!
•
Immediately report defective equipment to the instructor so it can be repaired.
3
www.pdfgrip.com
Chemical Waste
One thing to remember about chemicals is that they don't just go away. Therefore we are all responsible for making sure they get where they belong. There are
several waste streams in each laboratory, whether teaching or research: aqueous
waste, regular garbage, glass waste, liquid organic waste, solid chemical waste and
special waste streams. We'll discuss all of these in order.
Rule # 1: Only water goes down the drain. It could be soapy water, or it could
be very slightly acidic or alkaline, but that's where it stops. NO EXCEPTIONS! The effluent of the laboratories joins all the other effluent of the city
and it is therefore essential that no hazardous materials whatsoever go down
the drain.
Regular garbage: All solid non-chemical non-glass waste goes in the garbage
cans. Lots of paper towels end up here.
Glass waste: All glass waste, in particular Pasteur pipets and other sharp
objects, are collected in special containers to avoid harmful accidents.
4
Liquid organic waste: All organic waste, except the solids, goes into the
liquid waste container. This includes the organic solutions generated during
your experiments, and all the acetone washings of the glassware. This waste
has to be clearly identified at all times with waste tags, and will be disposed of
responsibly. These containers have to be capped at all times when not in use,
according to EPA (Environmental Protection Agency) rules.
Solid chemical waste: Solid organic chemical waste should be placed into
a designated container. This waste includes silica gel from columns, drying
agents, contaminated filter paper, etc. It will be disposed of by the laboratory
personnel in a responsible fashion.
Special waste streams: For certain experiments, separate specific waste
streams will be created. This includes Cr waste from an oxidation reaction
or the catalyst used in catalytic hydrogenation. These mixtures require special
treatment due to either their toxicity or inherent chemical properties.
The W h y a n d H o w of a Laboratory Notebook
The Basics About Notebooks
A laboratory notebook is the essential record of what happened in the laboratory.
This is valid for teaching laboratories, synthetic research laboratory, or analytical
chemistry laboratory. If you do an experiment, you need to write down exactly
what you did and what happened. Fellow scientists should be able to read your
www.pdfgrip.com
notebook, and maybe come up with possible alternative explanations for what
happened. If a chemist in a pharmaceutical company made the drug taxol for
the first time, other scientists might want to repeat this synthesis and potentially
improve upon it. To be able to publish experimental results, such as the synthesis
of a drug, an official record of these experiments has to exist.
There are some basic rules as far as notebooks are concerned:
•
The pages in a notebook are always numbered.
No pages are ever removed.
•
All entries are in ink, and are never deleted. If you change your mind about
something, you can always scratch out an entry, but never erase.
The entries should be dated.
What to Do Before Coming to Lab
First and foremost, you should read and understand the experiment. Read through
the description of the experiment, and ascertain that you understand all the underlying chemical principles. If not, look up the chemistry background and study
it.
Once you completely understand the experiment, you can start making entries in
the notebook. Here is what should appear in the notebook:
Date
Title of the experiment
Objective: What is the purpose of this experiment? It could be to learn a new
technique, to examine a reaction mechanism, or to synthesize a compound, or
to analyze a mixture, or a number of other possibilities.
Write the balanced chemical equation, if appropriate. In case of a synthesis
reaction, write the starting materials and product. Use the space above and
below the arrow to define the reaction conditions, such as temperature and
solvent.
A complete balanced chemical equation shows all the reactants, products,
catalysts, and solvent and reaction conditions using structural formulas. Also
give the molecular weight of each reactant, the amount used and the number
of moles used. For example:
5
www.pdfgrip.com
50.0 mL
MW 88, d = 0.806 g/mL
0.46 mol
bp 102°
MW 70
bp 35-38°
MW 70
bp 31 °
The introductory section of your report should contain any physical constant
that may be needed to perform or interpret the experiment. For example:
molecular weight, melting points for solids, boiling points for liquids, density,
solubility, etc. Don't list all constants you can find, only the ones that have a
bearing on the experiment. It is convenient and efficient to list the physical
constants in table format, as illustrated in Table 1-1. However, quite a few of
these physical constants can be incorporated in the chemical equation.
6
Table 1-1.
Compound
MW
2-methyl-2-butanol
88
mp
(°C)
bp
(°C)
d
(9/mL)
102
0.806
Extremely corrosive,
strong acid
Phosphoric acid
•
Safety
Considerations
2-mefhyl-2-butene
70
35-38
Flammable
2-methyl-l-butene
70
31
Flammable
Write the procedure. You should be able to run the experiment using only
your outline of the procedure, without the lab manual or a literature article.
Your outline should contain enough information to allow you to perform the
experiment, but no more. Complete sentences are not needed; a bullet format
is preferred. Quantities of materials are required. New procedures may require
a rather detailed description, but for familiar procedures only minimum information is needed. In fact, the name of the procedure may suffice; for example,
"recrystallize from methanol." Copying the procedure word for word from the
original source is unacceptable; summarizing in your own words will be more
helpful to you.
www.pdfgrip.com
Writing the procedure might seem like a waste of time, but doing so will
ensure that you know and understand all the steps. Even researchers with decades of experience write out the procedure every time they do an experiment.
It might be an abbreviated version with just quantities and keywords, but that
is all the information needed to run the experiment.
An easy format is to use the left half of a page to write out the procedure
so that you can follow along during lab, and use the right half for recording
observations and results on the right side.
What to Write During Lab
When you begin the actual experiment, keep your notebook nearby so you are able
to record the operations you perform. While you are working, the notebook serves
as a place where a rough transcript of your experimental method is recorded. Data
from actual weights, volume measurements, and determinations of physical constants are also noted. The purpose here is not to write a recipe, but rather to record
what you did and what you observed. These observations will help you write reports without resorting to memory. They will also help you or other workers repeat
the experiment.
When your product has been prepared and purified, or isolated if it is an isolation
experiment, you should record such pertinent data as the melting point or boiling
point of the substance, its density, its index of refraction, spectral data and the
conditions under which spectra were determined.
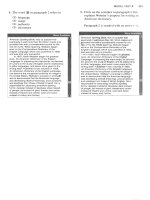
Figure 1.1 shows a typical laboratory notebook. Note how much detail is given
about what really happened during the experiment. The format can vary, and the
important thing is to record information during the experiment.
7
www.pdfgrip.com
www.pdfgrip.com
Chapter 1 • First the Basics
www.pdfgrip.com
www.pdfgrip.com
The W h y and H o w of a L a b o r a t o r y N o t e b o o k
www.pdfgrip.com
o
www.pdfgrip.com
Chapter 1 • First the Basics
www.pdfgrip.com
11
www.pdfgrip.com
What to Write After Lab
First you have to evaluate your data and analyze your results. Some basic calculations will often be necessary, such as % yield and recovery.
In your report you should include the results of the analyses you performed, such
as running a TLC plate or measuring a melting point. You should also include any
spectra you recorded, as well as your analysis of the spectra. What information can
you ascertain from reading the spectra?
You must also draw some conclusions and write a discussion. This is where you
demonstrate your understanding of what happened in the experiment. You discuss
the results you obtained and draw whatever conclusions you can. Give the proposed mechanism for the reaction in question, if appropriate. Your report can also
contain discussion of the following topics:
12
•
What did you expect to happen?
•
What actually happened?
•
Why did it happen?
•
What can explain the differences between your expectations and the actual
results?
What did you learn about the reliability and limitations of the techniques
used?
•
What did you learn about the reliability and limitations of the equipment
used?
•
What did you learn about the chemistry?
•
How could your results have been improved?
•
What could this chemistry or technique be applied to?
The whole purpose of this part of the report is to convince your instructor that you
really understand what you did in the lab, and why, and where it can lead to, etc.
BE THOUGHTFUL AND THOROUGH!
Finally, make sure you cite your data and observations while explaining and interpreting your result.
Various formats for reporting the results of the laboratory experiments may be
used. You may write the report directly in your notebook, or your instructor may
require a more formal report that you write separately from your notebook. When
you do original research, these reports should include a detailed description of all
www.pdfgrip.com
the experimental steps undertaken. Frequently, the style used in scientific periodicals, such as Journal of the American Chemical Society, is applied to writing laboratory reports.
Important Calculations
Laboratory results usually require you to perform some calculations. Here are
some examples of calculations that are typically used.
Conversion of V o l u m e to Moss a n d N u m b e r of Moles f o r a Pure Liquid
Amounts of pure liquid reagents are specified in volume measure (mL or L). To
convert volume to mass or to number of moles, use the following formulae:
mass (g) = volume (mL) X density (g/mL)
# of moles = [volume (mL) X density (g/mL)] / M W (g/mol)
Example: We start a reaction with 20 mL of 1-butanol. How many grams
and moles does this represent?
Solution: 1-butanol: d = 0.810 g/mL, M W 74 g/mol
mass (g) = 20 mL X 0.810 g/mL = 16.2 g
# of moles = (20 mL X 0.810 g/mL) / 74 g/mol = 0.219 mol
Conversion of Concentration to Mass f o r a Solute
The calculation for the amount of solute in a solvent depends on the type of solution used. The concentration of the solute may be given in several different sets of
units, such as weight/weight (w/w), weight/vol (w/v) and volume/volume (v/v).
We shall only be dealing with w/v relationships, which can be expressed in terms
of molar concentrations or as mass of solute per unit volume of solvent.
a.
Concentrations expressed in terms of molarity: If the molar concentration of the
solute is known, then the following equation is applicable:
Solute mass = M X V X M W
M = solute molarity in mol/L
V = volume of solution in L
M W = molecular weight of solute in g/mol
Example: Calculate the amount of sodium hydroxide present in 100 mL of a
3.5 M solution of NaOH in water.
Solution: Mass NaOH = 3.5 mol/L X 0.100 L X 40 g/mol = 14 g
13