Tài liệu Oracle CRM On Demand Dashboards- P5 ppt
Bạn đang xem bản rút gọn của tài liệu. Xem và tải ngay bản đầy đủ của tài liệu tại đây (764.98 KB, 20 trang )
/ Oracle CRM On Demand Dashboards / Michael D. Lairson / 174 534-3
Oracle CRM On Demand Dashboards
/ Oracle CRM On Demand Dashboards / Michael D. Lairson / 174 534-3
Chapter 4: Dashboard Pages and Properties
referring to the tabs in your dashboard here, not pages in a printed dashboard. Also
important to note here is the message on the screen stating that clicking Cancel does
not undo operations in the section. What this means is each change you make to
the individual dashboard pages here is immediately saved and immediately takes
effect. Clicking Finished is not necessary to commit these changes to Oracle CRM
On Demand, just as clicking Cancel does not undo the changes made to the
dashboard pages here. One thing you will notice as you make changes to your
dashboard pages in this section is that the screen refreshes itself after each change.
This is actually the application sending the change to the database and returning to
the Dashboard Properties screen. This is why the Cancel button is of no
consequence here.
Each page that you have added to your dashboard is listed in the Dashboard
Pages section. Next to each page is the Hide Page check box. Clicking the check
box makes the associated page invisible. This can be quite useful when you are
updating a dashboard and are not quite ready to commit to eliminating a dashboard
page or developing a new page that is not ready for user consumption. Rather than
delete the old page or expose a new page too early, you can hide the page and
delete or expose it later when you are comfortable doing so.
Under the Operations heading, you find two buttons for each dashboard page.
The first is the Rename button. Clicking Rename takes you to the Edit Item Name
and Description screen, as shown in Figure 4-10. Here you can change the name of
the dashboard page in the Name field and the description of the dashboard page in
the Description field. The check box on this screen allows you to preserve any
Dashboard Properties window
Please purchase PDF Split-Merge on www.verypdf.com to remove this watermark.
/ Oracle CRM On Demand Dashboards / Michael D. Lairson / 174 534-3
Oracle CRM On Demand Dashboards
references you have made to this dashboard page using the old name. If, for
instance, you have set up some navigation to the selected dashboard page before
changing the name of the page, you will need to preserve this reference by checking
the Preserve References To Old Name Of This Item check box or update your
references. After making changes to the name and description on this screen, click
the Update button to commit the changes and return to the Dashboard Properties
screen. Clicking Cancel takes you back to the previous page without saving changes.
Also under the Operations heading for each dashboard page is a Delete Page
button. This button does exactly as its name implies and permanently deletes your
dashboard page. When you click the Delete Page button, you are shown the
Confirm Deletion screen (see Figure 4-11) and must click the Yes link to confirm that
you want to delete the dashboard page.
Finally, under the Reorder heading you will find Move Up and Move Down
buttons. Each click of one of these buttons will reposition the associated dashboard
page one position up or down. The dashboard page listed first in this ordered list
will be the first, or leftmost, tab in the dashboard.
After completing changes to the dashboard properties, click the Finished button
to return to the Dashboard Editor screen and continue configuring your dashboard.
Confirm Deletion screen
Edit Item Name and Description screen
Please purchase PDF Split-Merge on www.verypdf.com to remove this watermark.
/ Oracle CRM On Demand Dashboards / Michael D. Lairson / 174 534-3 / Blind folio:
Chapter
5
Dashboard Objects
59
Please purchase PDF Split-Merge on www.verypdf.com to remove this watermark.
/ Oracle CRM On Demand Dashboards / Michael D. Lairson / 174 534-3
Oracle CRM On Demand Dashboards
/ Oracle CRM On Demand Dashboards / Michael D. Lairson / 174 534-3
Chapter 5: Dashboard Objects
dashboard is a webpage that may contain many different elements.
Most people think about dashboards as containing reports, and that is
certainly the most common use of a dashboard. Reports are not the
only elements that you can include in your dashboards, however. This
chapter focuses on many of the nonreport elements that you may use
in your dashboards. For each of these elements, I discuss the process of adding it to
the dashboard, setting its properties, renaming it, and deleting it from the
dashboard. Along the way, I will also provide some thoughts on different uses for
these elements.
If a dashboard is an HTML page, and it is, then a section is a frame on the HTML
page. Everything that you add to a dashboard will be positioned inside a section,
and each section will reside in a column on the dashboard. The section is the
container into which all of the other dashboard objects will go when you add them
to your dashboard. If you add a dashboard object to a dashboard before placing a
section, a new section is automatically created with the new object you just added
to the dashboard already in the section.
Every section has three buttons in the upper-right corner. The Properties button,
the Rename button, and the Delete button are used to configure the section on the
dashboard. Section objects are configured separately from the objects they contain.
This section of this chapter describes each of the configuration options in detail. We
will start with the Properties menu. When you click Properties, you are presented
with five options: Guided Navigation, Format Section, Drill In Place, Arrange
Horizontally, and Collapsible. The Rename and Delete options are presented in their
own buttons, and are also described later on. Figure 5-1 shows the Properties menu
opened on a Section object in the Dashboard Editor screen.
A
Dashboard section with Properties menu
Please purchase PDF Split-Merge on www.verypdf.com to remove this watermark.
/ Oracle CRM On Demand Dashboards / Michael D. Lairson / 174 534-3
Oracle CRM On Demand Dashboards
/ Oracle CRM On Demand Dashboards / Michael D. Lairson / 174 534-3
Chapter 5: Dashboard Objects
The first option under Properties on the Section object is Guided Navigation.
Essentially, activating Guided Navigation on a Section object turns the entire section
on or off based on the results of a source request. The source request is a report in
Oracle CRM On Demand. In order to understand this concept, it may be necessary
to step back just a bit and discuss the role of reports in Oracle CRM On Demand.
Reports in Oracle CRM On Demand can serve many purposes, the most obvious
of which is a report that you view on the screen to view or analyze your customer
relationship management (CRM) data. The report can be so much more than that,
ranging from a simple list of records to hosting custom JavaScript code to expanding
the functionality of the Oracle CRM On Demand application. At its core, the CRM
On Demand report is a query against the Oracle CRM On Demand database. A
query, regardless of complexity, will do one of two things: return results or return no
results.
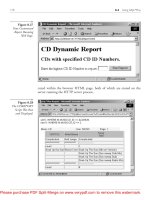
In Figure 5-2 you see the Guided Navigation Section Properties window that
opens when you select Guided Navigation in the Section Properties menu. The
instruction at the top of this window indicates that you should “specify a Source
Request to create a conditional Dashboard Section. The section will always appear if
no Source Request is referenced.” The first field on this window is a radio button
selector indicating if a source request should or should not be referenced. The
default setting here is No for the reference source request. That means any section
that you add to a dashboard without modifying guided navigation properties will
always appear in the dashboard, as it is not referencing another source request.
So, what happens if we change this setting to Yes and reference a source request?
If a source request is referenced by the section, the section will only display if the
specified criteria are met. Select a source request in the Source Request field by
Guided Navigation Section Properties window
Please purchase PDF Split-Merge on www.verypdf.com to remove this watermark.
/ Oracle CRM On Demand Dashboards / Michael D. Lairson / 174 534-3
Oracle CRM On Demand Dashboards
/ Oracle CRM On Demand Dashboards / Michael D. Lairson / 174 534-3
Chapter 5: Dashboard Objects
clicking the Browse button and selecting a report from the Shared Folders. Next,
determine when the section, and all of its contents, should appear on the
dashboard. Your choice is to make it appear when the source request returns rows or
when the source request returns nothing.
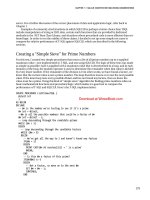
Uses for this feature vary. You could display a section only when there are open
opportunities over a certain size for instance. This would require a simple report that is
filtered on the revenue amount and sales stage on opportunities. Let us assume we
want to only show a report that lists activities associated with opportunities when there
are open opportunities with more than one million dollars in revenue. This activity
report will appear at the top of our dashboard to bring the user’s attention to these very
important activities. The rest of the dashboard may contain other reports about smaller
opportunities, leads, and other activities, but this urgent activity report will simply not
be visible when there are no big opportunities, and it will be visible when there are.
First, create the Source Request report. This report does not need to be designed
for viewing if its only purpose is to perform a check for the existence of large open
opportunities. This report can be a simple report that includes only a single column
and a couple of filters. An example of this is shown in Figure 5-3. Here I have added
Source request report
Please purchase PDF Split-Merge on www.verypdf.com to remove this watermark.
/ Oracle CRM On Demand Dashboards / Michael D. Lairson / 174 534-3
Oracle CRM On Demand Dashboards
/ Oracle CRM On Demand Dashboards / Michael D. Lairson / 174 534-3
Chapter 5: Dashboard Objects
the # of Opportunities metric column and two filters. One filter eliminates all
opportunities that are closed, and the other filter eliminates all opportunities that are
less than one million dollars in revenue. The result is either no results or a single row
with the number of open opportunities with more than one million in revenue.
Next, since this is a book about dashboards, I am going to assume we already
have the report built that we want to display on the dashboard. We will skip that
step and go back to the dashboard and adjust the Guided Navigation property on
the section. On the Guided Navigation Properties window, select the Source
Request report that performs the check for the large open opportunities. Since we
want to see this section only when this report returns rows, select the If Request
Returns Rows radio button and click OK.
Now the section and all of its contents will appear in the dashboard only when
there are open opportunities with one million dollars in revenue or more. If the
Source Request report returns no results, the section will not appear at all.
Figure 5-4 shows an example of this dashboard when there are million-dollar
opportunities, and Figure 5-5 shows an example of this dashboard when there are
no million-dollar opportunities. Both figures are the same dashboard, with the
difference being the presence of large opportunities in the first figure and no large
opportunities in the second. Notice that the section containing the Opportunity
report has completely disappeared in Figure 5-5.
Dashboard with section visible due to large opportunities
Please purchase PDF Split-Merge on www.verypdf.com to remove this watermark.
/ Oracle CRM On Demand Dashboards / Michael D. Lairson / 174 534-3
Oracle CRM On Demand Dashboards
/ Oracle CRM On Demand Dashboards / Michael D. Lairson / 174 534-3
Chapter 5: Dashboard Objects
Some variations on the use of the Guided Navigation feature include using it to
hide reports with no results and adding data access security to the dashboard by
hiding sections for particular users.
If you are familiar with the custom No Results view on a report, then you know that
you can replace the default No Results image with some custom text in your report.
This custom text only appears when the report contains no rows. Using Guided
Navigation, you can take this one step further within your dashboard. The source
request for your section can be the same report contained within the section. By
setting up the section in this way, you are effectively displaying the report only when
there is something to display, and hiding it otherwise. Using this method, you can
build dashboards that only display reports when there is something to report.
The risk here is that your users, if not informed of this logic, may assume that
your dashboard is not functioning properly because it contains certain reports some
times and not others. It is wise to include some explanatory text in a section that
will always appear on the dashboard using the Text object.
This next use of the Guided Navigation feature is one that I devised to counteract
the lack of dashboard-specific access controls. I want to be able to control who sees
Dashboard with section hidden due to no large opportunities
Please purchase PDF Split-Merge on www.verypdf.com to remove this watermark.
/ Oracle CRM On Demand Dashboards / Michael D. Lairson / 174 534-3
Oracle CRM On Demand Dashboards
/ Oracle CRM On Demand Dashboards / Michael D. Lairson / 174 534-3
Chapter 5: Dashboard Objects
my dashboards, whether it be by user role, reporting level, territory, or specific
individual. This capability is not something that is native to Oracle CRM On
Demand. You cannot place dashboards in access-controlled folders like you can
with reports. Any user who has access to the Dashboard tab will be able to see all
dashboards in the Select Dashboard list. There is no way around this, as of this
writing. There are certainly ways to control which users see report data and which
users can view entire reports, and those controls hold true in the dashboard in that a
user who cannot see a report because it is in a folder that they have no access to
will not see that report in a dashboard. The section will still be visible, so in the case
of a section with a single report, the report may disappear because the user has no
access to the report folder, but the section remains, so any section border, Collapse
button, or other formats are still visible and will look out of place.
The report folder security is also role-based, so you are forced to use roles as the
determining factor in who sees the report. Using the Guided Navigation option on
the dashboard section and a little ingenuity with your Source Request report, you
can effectively set up some visibility rules based on many different factors. So let us
walk through the secret to this type of visibility control.
First, the key is the Source Request report. We will use a couple of different
filters on this request to ensure that rows are returned in the report only when a user
who should have access to the dashboard is the user signed in to Oracle CRM On
Demand. For this example, I will limit the dashboard access to users who have a
sales role, are assigned to the East territory, and are in my branch of the user
hierarchy. This level of control is hardly possible with standard report access
controls.
To set up the Source Request report, we can create a new report using virtually
any subject area as long as it contains the User domain, since we are only interested
in user data for this report. To the report we add the User Name column. Next we
add several filters. First is the User Email is equal to the REPLUSER session variable.
Running the report at this point would simply return the name of the individual
signed in. We do not want this report to return any values unless the user has a sales
role, is in the East territory, and reports up to me. This calls for a few more filters, as
shown in Figure 5-6. With all of these filters set, the only time this report will return
a result is for a user who meets all of the specified criteria.
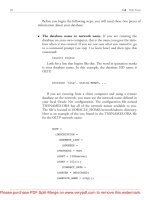
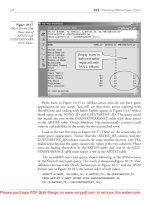
For me, it is not enough to just hide the sections on the dashboard if a user does
not have access to it. Since all users will still be able to see it listed on the
Dashboard tab and show the dashboard, even if it is empty, I like to include a
section that only appears when the source request returns no results. In this section,
I include a Text object that informs users that they are not authorized to view the
dashboard. This way, users who attempt to view a dashboard that they have no
access to are not allowed to assume that the dashboard is malfunctioning because
nothing appears on the screen. Figure 5-7 shows an example of a dashboard with
such a message displayed due to the source request returning no rows.
Please purchase PDF Split-Merge on www.verypdf.com to remove this watermark.
/ Oracle CRM On Demand Dashboards / Michael D. Lairson / 174 534-3
Oracle CRM On Demand Dashboards
/ Oracle CRM On Demand Dashboards / Michael D. Lairson / 174 534-3
Chapter 5: Dashboard Objects
Clicking the Properties button on a section in your dashboard brings up the
Properties menu. The second option on this menu is Format Section. Clicking
Format Section opens the Section Properties window shown in Figure 5-8. If you
are familiar with formatting views and cells in reports, which I have to assume you
are if you are this deep into this book, then you have seen a window similar to this
before.
Source report with filters
Dashboard with “user not authorized” message
Please purchase PDF Split-Merge on www.verypdf.com to remove this watermark.
/ Oracle CRM On Demand Dashboards / Michael D. Lairson / 174 534-3
Oracle CRM On Demand Dashboards
/ Oracle CRM On Demand Dashboards / Michael D. Lairson / 174 534-3
Chapter 5: Dashboard Objects
Within the Cell portion of the Section Properties window, you are able to apply
horizontal and vertical alignment and add a background color to the section. Don’t
let the word “Cell” confuse you here. I suspect it is the product of code reuse from
other areas of the Answers On Demand application. The settings here are applied
to the layout of the section. Selecting Center from the Horizontal Alignment field,
for instance, will center the contents of the section. If the section contains a report,
the report will be centered in the section, but the cell formatting within the report
is not affected. The default horizontal alignment is left, and the default vertical
alignment is top. To apply a background color, click the white box next to
Background Color, and select the desired color. You can also use the six-digit
hexadecimal color code for a specific shade by typing in the color code in the field
to the left of the Restore Default button. For example, typing in this field
results in a red background.
Within the Border portion of the Section Properties window, you can add single,
double-line, or thick borders to one or more sides of your section. You are able to
select only one style of border for the dashboard section. You apply the selected style
to any side of the section to which you add a border. To add a border, you can
choose All from the Position field to apply a border to all four sides, or you can click
the sides of the box in the diagram below the Position field. The color selector beside
Section Properties window
Please purchase PDF Split-Merge on www.verypdf.com to remove this watermark.
/ Oracle CRM On Demand Dashboards / Michael D. Lairson / 174 534-3
Oracle CRM On Demand Dashboards
/ Oracle CRM On Demand Dashboards / Michael D. Lairson / 174 534-3
Chapter 5: Dashboard Objects
Border Color works exactly like the Background Color selector on this window and
allows you to change the color of all borders applied to the dashboard section.
Expand the Additional Formatting Options portion of the Section Properties
window, and you find fields that allow you to adjust the size of your dashboard
section and the padding around the contents of the section. The Height and Width
fields allow you to adjust the size of the dashboard section, much like you would
size a frame on an HTML webpage. You can enter exact sizes in pixels in these
fields or enter percentages. Typing in both the Height and Width fields will
result in a dashboard section that is 500 pixels high by 500 pixels wide. Typing
in the Width field results in a section that is half the width of the dashboard window.
You should be aware, however, that the section height and width settings set the
bottom, or floor, value for the section size. If you add a report that is 800 pixels
wide to a section that is formatted to be 300 pixels wide, the section will grow to
accommodate the report.
Padding provides space between the sides of the dashboard section and contents
of the section. Adding padding around the section values will override any specified
height or width if the padding results in a larger section size than the height and
width settings call for. The inverse is also true. If the specified cell height and width
settings result in a larger section than the padding would cause, the height and
width measurements apply.
If you happen to be knowledgeable on using cascading style sheets, you can
apply your custom cascading style sheet using the cascading style sheets fields.
There are three small icons in the upper-right corner of the Section Properties
window. The left icon, an eraser, resets all of the section properties settings to the
default values. The copy icon copies all of the settings so you can access the section
properties of another section and paste the settings to that section in one click.
To provide an example of a formatted section in a dashboard, I have employed
nearly all of the Format Section options in the dashboard shown in Figure 5-9. Again,
this is to demonstrate the results of the formatting options, not necessarily great design
choices. For this example, I have set the alignment to Center for both horizontal and
vertical, so the report in the section is centered. I also added a background color to
the section and a top and bottom thick border. Finally, I set the Width to 600 pixels
and the Height to 400 pixels, and put a 100-pixel padding around all four sides.
The Drill In Place option on the Properties menu is a toggle. Clicking the Drill In
Place option will enable or disable the option. When Drill In Place is enabled, a
check mark is displayed next to the option in the menu.
The Drill In Place setting controls how report results are displayed when a
dashboard user drills down using a hyperlink within the reports. The results can
appear in the dashboard, replacing the original report, or the results can replace the
entire dashboard.
Please purchase PDF Split-Merge on www.verypdf.com to remove this watermark.
/ Oracle CRM On Demand Dashboards / Michael D. Lairson / 174 534-3
Oracle CRM On Demand Dashboards
/ Oracle CRM On Demand Dashboards / Michael D. Lairson / 174 534-3
Chapter 5: Dashboard Objects
When the Drill In Place option is enabled, the results of the drill-down will
occupy the space within the dashboard of the original report. If the section contains
multiple reports, the Drill In Place setting applies to all of the reports in the section.
When the Drill In Place option is disabled, the results of the drill-down will
replace the entire dashboard. This is somewhat contradictory to the fact that this is a
section setting. Disabling the Drill In Place option on one section can result in
replacing the entire dashboard with a drill-down result, regardless of what the other
sections contain or their settings.
The Arrange Horizontally option on the Properties menu is a toggle. Clicking the
Arrange Horizontally option will enable or disable the option. When enabled, a
check mark appears next to the Arrange Horizontally option.
Section formatting example
Please purchase PDF Split-Merge on www.verypdf.com to remove this watermark.
/ Oracle CRM On Demand Dashboards / Michael D. Lairson / 174 534-3
Oracle CRM On Demand Dashboards
/ Oracle CRM On Demand Dashboards / Michael D. Lairson / 174 534-3
Chapter 5: Dashboard Objects
The Arrange Horizontally setting controls how items within the section are
arranged when the dashboard displays. The dashboard objects will always be
arranged vertically in sections on the Dashboard Editor screen, but when the Arrange
Horizontally option is enabled, the message “(Arrange Horizontally)” appears just
below the section name on the Dashboard Editor screen, and the objects within the
section are presented side by side. This is different from splitting the dashboard into
columns and including objects in separate sections in different columns.
Arranging reports horizontally is quite useful when you want to place a few
small charts side by side on the dashboard. Placing them all in the same section and
arranging them horizontally takes up less room and is a cleaner look than using
multiple columns and sections.
The Collapsible option on the Properties menu is also a toggle. Clicking the
Collapsible option will enable or disable the option. When enabled, a check mark
appears next to the Collapsible menu option.
You may have noticed on some of the dashboards in Oracle CRM On Demand
that there is a small button in the upper-right corner of many of the dashboard
sections. This button, shown in Figure 5-10, is the Collapse button. When the
characters on the button are pointing up, the section is expanded. When pointing
down, the section has been collapsed. Notice in Figure 5-10 that the contents of the
Collapsible dashboard sections
Please purchase PDF Split-Merge on www.verypdf.com to remove this watermark.
/ Oracle CRM On Demand Dashboards / Michael D. Lairson / 174 534-3
Oracle CRM On Demand Dashboards
/ Oracle CRM On Demand Dashboards / Michael D. Lairson / 174 534-3
Chapter 5: Dashboard Objects
collapsed section are not visible, but the Collapse button remains visible. Clicking
this button again expands the section, exposing the section contents. This allows the
user to turn sections of the dashboard on or off at will. This can be particularly
useful when the dashboard is rather long and requires a lot of scrolling. It is also
useful if you want to print a portion of the dashboard.
The Rename button on the dashboard section opens the Rename window, shown in
Figure 5-11. By default, your dashboard sections are named sequentially as Section 1,
Section 2, and so on. This section name does not appear on your dashboard unless
you open the rename screen and indicate that it should by selecting the Display
Section Heading check box.
You can change the name of the section by replacing the default section name
with a custom name here on the Rename window. You can also format the section
heading by clicking the Properties button to the right of the section name field.
Clicking the Properties button opens the Section Heading Properties window shown
in Figure 5-12.
In the Font section of the Section Heading Properties window, you can select a
different font family. The options here are Arial, Arial Black, Arial Narrow, Courier
New, Garamond, Lucida Sans Unicode, Microsoft Sans Serif, Times New Roman,
Tahoma, or Verdana. You can enter a specific point size for the section heading in
the Size field. The font color is configurable by clicking the box next to Color and
selecting a color or typing in the desired six-digit hexadecimal color code on the
Color Selector. Your section heading can be made bold, italic, or both by making a
selection in the Style field. The last font setting is the Effects field, where you can
choose to underline or strike through the section heading.
Within the Cell portion of the Section Heading Properties window, you are able
to apply horizontal and vertical alignment and add a background color to the section.
The settings here are applied to the layout of the section title only. Selecting Center
from the Horizontal Alignment field, for instance, will center the heading. To apply a
background color to the heading bar, which by default has a light blue shade, click
the white box next to Background Color, and select or enter the desired color code.
Rename window (Section object)
Please purchase PDF Split-Merge on www.verypdf.com to remove this watermark.
/ Oracle CRM On Demand Dashboards / Michael D. Lairson / 174 534-3
Oracle CRM On Demand Dashboards
/ Oracle CRM On Demand Dashboards / Michael D. Lairson / 174 534-3
Chapter 5: Dashboard Objects
Within the Border portion of the Section Heading Properties window, you can
add single, double-line, or thick borders to one or more sides of your section
heading. You are able to select only one style of border for the dashboard section. To
add a border, you can choose All from the Position field to apply a border to all four
sides, or you can click on the sides of the box in the diagram below the Position
field. The color selector beside Border Color works exactly like the other Color
Selectors on this window and allows you to change the color of all borders applied
to the dashboard section heading.
Expand the Additional Formatting Options portion of the Section Heading
Properties window, and you find fields that allow you to adjust the size of your
dashboard section and the padding around the contents of the section. The Height
and Width fields allow you to adjust the size of the dashboard section heading. You
can enter exact sizes in pixels in these fields or enter percentages. Padding provides
space between the sides of the dashboard section heading cell and the text of the
section heading.
Section Heading Properties window
Please purchase PDF Split-Merge on www.verypdf.com to remove this watermark.
/ Oracle CRM On Demand Dashboards / Michael D. Lairson / 174 534-3
Oracle CRM On Demand Dashboards
/ Oracle CRM On Demand Dashboards / Michael D. Lairson / 174 534-3
Chapter 5: Dashboard Objects
The Clear Formats, Copy, and Paste icons are in the upper-right corner of the
Section Heading Properties window, allowing you to copy and paste all of the
settings from one section heading to another.
Wrapping up our tour of the Section object on the dashboard, we have the Delete
button. Its function is obvious. If you click the Delete button on the Section object,
the entire section and all of its contents are removed from the dashboard layout. You
do not receive a confirmation dialog, so take care that you do not accidentally
delete your section while trying to click the Properties or Rename button.
The Link or Image object provides the capability to display a hyperlink to another
website URL or a specific report in the report library. This object also allows you to
display an image on your dashboard. The image can be made clickable so users can
navigate to the specified URL or report. To add a Link or Image object to your
dashboard, click and drag Link or Image from the list of dashboard objects to a
section on your dashboard layout in the Dashboard Editor screen. Dropping a Link
or Image object onto your dashboard generates no results until you have modified
the object’s properties.
Click the Properties button on the Link or Image object to open the Link or Image
Properties window, shown in Figure 5-13. By completing some or all of these fields
Link or Image Properties window
Please purchase PDF Split-Merge on www.verypdf.com to remove this watermark.
/ Oracle CRM On Demand Dashboards / Michael D. Lairson / 174 534-3
Oracle CRM On Demand Dashboards
/ Oracle CRM On Demand Dashboards / Michael D. Lairson / 174 534-3
Chapter 5: Dashboard Objects
you can create a number of different elements on your dashboard. You can create a
text link, image link, or both that, when clicked, can open a webpage or report from
the Oracle CRM On Demand report library. You can also include just text or just an
image without the link to another page or report. The nature of the Link or Image
Properties window is that everything is additive. You can create a link, add a text
caption, and add an image (these last two are optional).
To create a text link, you enter text into the Caption field. The text you enter here
will appear on the dashboard as a hyperlink. There is no real practical limit to how
much text you can include as your caption. I have never hit a hard limit here, but it
would be rather unusual to include much more than a sentence or two.
Below the Caption field, you find two radio buttons. These are used to identify
the type of destination that your link is going to take dashboard users to when they
click it. The first option is URL. This option allows you to access any webpage as
long as you know the URL for it. For instance, if you want to provide a link to your
company home page from the dashboard, you would select the URL Destination
option and enter the full URL in the Destination field. The http:// portion of the URL
is required. For a link to the Oracle website, for instance, you would select URL and
enter in the Destination field.
You can also use a mailto URL here to create a link that initiates a new e-mail
message. Enter a URL in—for example, mailto:?subject=Dashboard—
and the resulting hyperlink in the dashboard, when clicked, will open the user’s
default e-mail application and create a new message addressed to
with a subject of Dashboard. You can also include some inline JavaScript in the URL
field. I do not attempt to teach the use of JavaScript, but a simple example might be
adding a caption of “Dashboard Developer,” a destination of “URL,” destination field
text of “javascript:alert("Mike Lairson"),” and the target “New Window” would display
in the dashboard a link with the text “Dashboard Developer” that, when clicked,
opens a browser pop-up window that includes the text “Mike Lairson.”
Your other destination option on the Link or Image Properties window is
Request. This is referring to a report request in Oracle CRM On Demand. Select the
Request radio button, and rather than enter a URL in the Destination field, you will
browse for the desired report. Click the Browse button and the Choose Request
window opens with the Company Wide Shared Folder and Pre-built Analysis Folders
listed. Drill down into the folders and select a report. Notice that your personal
report folder is not an available option. When you click OK, the URL for the
selected report appears in the Destination field.
Next up is the target selection. The results of your link can be opened in either
the current window, replacing the dashboard, or in a new browser window. To open
a report or URL in the same window as the dashboard, select the Current Window
radio button. The target page of the hyperlink opens within the dashboard window
below the Select Dashboard field. If your destination is a report request, a hyperlink
is positioned at the bottom of the resulting window that returns you to the dashboard.
Please purchase PDF Split-Merge on www.verypdf.com to remove this watermark.
/ Oracle CRM On Demand Dashboards / Michael D. Lairson / 174 534-3
Oracle CRM On Demand Dashboards
/ Oracle CRM On Demand Dashboards / Michael D. Lairson / 174 534-3
Chapter 5: Dashboard Objects
Click the Return link and you are taken right back to the dashboard window from
whence you came. A Return link is not provided for the results of links from the
dashboard to a URL.
Select the New Window option, and your hyperlinked report or URL will open
in a new browser window. The dashboard remains open in your browser.
If you want to include an image on your dashboard, you enter the URL for it in
the Image field on the Link or Image Properties window. This URL needs to be the
full URL with the http:// or https:// prefix and file name for the image. If a partial
URL is entered, the URL entered is appended to /OnDemandContent/user/analytics.
The image must be located on a web server that the dashboard user has access to.
An image located behind a firewall, for instance, would be unavailable to a user
working from outside the network. The image also needs to be in a format that is
displayable within a web browser.
The Layout field allows you to position the caption relative to the image. This is a
bit counterintuitive since the Layout field is located with the Image field rather than
the caption field, but the Layout option actually describes the location of the caption
as it relates to the image. Your options are Above, Below, Left, and Right.
You can also include an image in the dashboard without making it a clickable
link to another report or URL. If you leave the Destination field blank, the image will
just be an image, and clicking it will have no effect. The same holds true for a
caption that you add to your dashboard without a destination. The caption is just
text, rather than a hyperlink, if you do not include a destination on the Link or
Image Properties screen.
Often, the available real estate on the Dashboard screen is just not enough to do
what you want to do. One potential solution is to add a link to the dashboard that
opens the same dashboard in a new window but without the CRM On Demand user
interface objects like the page tabs and Action bar. The most difficult part of creating
this link on your dashboard is discovering the correct URL for the dashboard.
Begin by saving your dashboard and accessing the Dashboard tab. It is important
that you open the dashboard on the Dashboard tab, and not the preview window
that appears when you save the dashboard. Once the dashboard is loaded on the
Dashboard tab, and before you click anything else, right-click the blue bar below
the Select Dashboard field. Note the location of the cursor in Figure 5-14. If your
dashboard contains multiple pages, right-click the blue bar to the right of the tabs.
Do not navigate to any of the other pages in the dashboard before right-clicking the
blue bar on the dashboard page.
When you right-click the dashboard, the right-click menu appears. Select
Properties if you are using Internet Explorer. You will select This Frame and then
View Frame Info if you are using Firefox. On the resulting window, highlight and
copy the contents of the Address field to your clipboard. This is the address for
Please purchase PDF Split-Merge on www.verypdf.com to remove this watermark.
/ Oracle CRM On Demand Dashboards / Michael D. Lairson / 174 534-3
Oracle CRM On Demand Dashboards
/ Oracle CRM On Demand Dashboards / Michael D. Lairson / 174 534-3
Chapter 5: Dashboard Objects
the dashboard content inside the dashboard frame, and is the link you will add to
your dashboard to break it out of the frame and open it into a new browser
window.
The address URL will look something like the following example. Note that
some characters may be URL-encoded, so a / may be represented as %2f:
.dll?Dashboard&PortalPath=/shared/Company_123456-1ABC2_Shared_Folder/
_portal/Marketing+Quarterly+Initiatives.
Locating the dashboard frame URL
Please purchase PDF Split-Merge on www.verypdf.com to remove this watermark.