Tài liệu Oracle CRM On Demand Dashboards- P4 ppt
Bạn đang xem bản rút gọn của tài liệu. Xem và tải ngay bản đầy đủ của tài liệu tại đây (478.74 KB, 20 trang )
/ Oracle CRM On Demand Dashboards / Michael D. Lairson / 174 534-3 / Blind folio:
Chapter
3
The Manage Dashboard
Screen
37
Please purchase PDF Split-Merge on www.verypdf.com to remove this watermark.
/ Oracle CRM On Demand Dashboards / Michael D. Lairson / 174 534-3
Oracle CRM On Demand Dashboards
/ Oracle CRM On Demand Dashboards / Michael D. Lairson / 174 534-3
Chapter 3: The Manage Dashboard Screen
here are a few prerequisites to creating a dashboard in Oracle CRM On
Demand. You will have, by this point, determined that a dashboard is
the correct solution to fill your reporting need. You will have a plan for
what you want to include on that dashboard and will know who will be
using it and how. Of course, you should also have the reports you
developed and saved in Oracle CRM On Demand that you intend to place on your
dashboard. This book will not do much to help you with this last prerequisite. If you
need a resource for developing reports in Oracle CRM On Demand, please stop here
and pick up a copy of Oracle CRM On Demand Reporting (McGraw-Hill, 2008).
In this chapter, you will read about the Dashboard tab in Oracle CRM On
Demand, particularly the Manage Dashboards page. If you access the Dashboard
tab in Oracle CRM On Demand and do not see the Manage Dashboard link at the
right end of the header just below the Help link, you are most likely missing the
Manage Dashboard privilege in your Role setup. Your system administrator can
assist you with this if you do not have access to update your role settings.
The Dashboard interface is simple. To access dashboards in Oracle CRM On
Demand, you open the Dashboard screen by clicking the Dashboard tab. Upon
accessing the Dashboard tab, the Overview Dashboard loads automatically. This is
because the Overview Dashboard is the first dashboard listed and the default
dashboard in the Select Dashboard field. Besides the dashboard itself, there are only
two elements on this screen.
The Select Dashboard field and Show button are used to select and execute a
dashboard. If no custom dashboards have been created in your Oracle CRM On
Demand environment yet, you will probably see only the six prebuilt dashboards
listed here. If you happen to be using a version of Oracle CRM On Demand with
Contact On Demand integrated or a Partner Management version of Oracle CRM
On Demand, you could also see the Communications or Channel Manager
Snapshot dashboards here. As new dashboards are added to your instance, they will
appear in this list, in alphabetical order, below the six prebuilt dashboards. Your
custom dashboards are separated from the prebuilt dashboards in the list by a
dashed line.
When you select a dashboard from the Select Dashboard field, the selected
dashboard does not run right away. If it did, it would get rather annoying, rather
quickly. To run a dashboard, select the dashboard from the Select Dashboard field
and click the Show button. The Dashboard screen will refresh and begin loading the
dashboard. When a dashboard loads, all of the reports on the dashboard execute at
once, which sometimes means that the reports render on the screen at different
times rather than all together.
T
Please purchase PDF Split-Merge on www.verypdf.com to remove this watermark.
/ Oracle CRM On Demand Dashboards / Michael D. Lairson / 174 534-3
Oracle CRM On Demand Dashboards
/ Oracle CRM On Demand Dashboards / Michael D. Lairson / 174 534-3
Chapter 3: The Manage Dashboard Screen
Dashboards load inside a frame on the Dashboard screen below the light blue
bar just below the Select Dashboard field. This frame will contain scrollbars, both
vertical and horizontal, if the size of the dashboard is larger than the size of the
frame.
The other element on the Dashboard screen is a hyperlink to the Manage
Dashboards screen. The Manage Dashboards link, located on the right side of the
Dashboard header, is only visible if you have the Manage Dashboards privilege
enabled on your user role. If you do not see this link on the Dashboard screen,
contact your system administrator to have your user role modified. You will need to
sign out and sign back in to see the change.
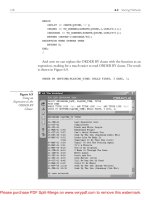
When you click the Manage Dashboards hyperlink on the Dashboard tab, you
navigate to the Manage Dashboards screen, as shown in Figure 3-1. It is on this
screen that you will create new custom dashboards. Creating a new dashboard is a
two-step process. The act of creating the dashboard record is just the first step. The
design step is the second step, and is much more involved.
The elements on the Manage Dashboards screen include the New Dashboard
button, which, as the name implies, is used to create the dashboard record. Once a
custom dashboard exists in Oracle CRM On Demand, the other links on this screen
become active.
Manage Dashboards screen
Please purchase PDF Split-Merge on www.verypdf.com to remove this watermark.
/ Oracle CRM On Demand Dashboards / Michael D. Lairson / 174 534-3
Oracle CRM On Demand Dashboards
/ Oracle CRM On Demand Dashboards / Michael D. Lairson / 174 534-3
Chapter 3: The Manage Dashboard Screen
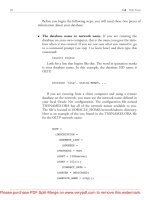
Below the Manage Dashboards header, you will see the dashboard name and
description of all of the custom dashboards. To the left of each dashboard name, you
will find an Edit link along with a drop-down menu containing the Delete and
Design links. By clicking the Dashboard Name header, you can change the sort
order of the dashboard list.
You may notice that the six prebuilt dashboards are not shown in the list of
dashboards on the Manage Dashboards screen. This begs the question of how you
change or delete the prebuilt dashboards. The simple answer to that question is that
you cannot. As of this writing, the six dashboards included with every instance of
Oracle CRM On Demand are neither editable nor removable. They always appear in
the Select Dashboard field on the Dashboard tab. This, of course, is subject to
change in future releases of Oracle CRM On Demand as the features and
functionality continue to expand and be enhanced with each release.
Before you can begin laying out your new dashboard with reports and links and
prompts, you must create a new dashboard record. I like to think of this step as
creating the canvas for the dashboard I am about to create. That is essentially what
you are doing when you click the New Dashboard button and create that dashboard
record. You are creating the unique URL, or webpage, that will be your dashboard.
To create the dashboard, click the New Dashboard button. This brings you to the
Dashboard Edit screen shown in Figure 3-2. There is not much to this screen, as you
can see. There are only two fields, and of the two, only the Dashboard Name field is
required. To create your dashboard, enter a name for the dashboard in the
Dashboard Name field. Bear in mind that the name you give the dashboard here
will appear in the Select Dashboard field on the Dashboard tab, so it pays to be
both concise and as descriptive as possible with the dashboard name.
If you find that you just cannot describe your dashboard with a simple
dashboard name, you can take advantage of the Description field. The Description
field, it is good to know, is really only helpful for you and other dashboard
Dashboard Edit screen
Please purchase PDF Split-Merge on www.verypdf.com to remove this watermark.
/ Oracle CRM On Demand Dashboards / Michael D. Lairson / 174 534-3
Oracle CRM On Demand Dashboards
/ Oracle CRM On Demand Dashboards / Michael D. Lairson / 174 534-3
Chapter 3: The Manage Dashboard Screen
developers. The description that you enter here only shows up on the Manage
Dashboards screen, to which most of the users of your Oracle CRM On Demand
application probably have no access. All most users will ever see before actually
executing the dashboard is the dashboard name in the Select Dashboard field on the
Dashboard tab.
Once you have named, and optionally described, your dashboard on the
Dashboard Edit screen, click the Save button to save the dashboard record and
return to the Manage Dashboards screen. If you are creating multiple dashboards,
you also have the option of clicking the Save & New Dashboard button. This button
saves the current dashboard and brings you right back to the Dashboard Edit screen,
ready to create another dashboard record.
The Cancel button allows you to exit the Dashboard Edit screen without saving
or creating the dashboard record.
Back on the Manage Dashboards screen, after creating a new dashboard record,
you will see the newly created dashboard in the list of custom dashboards. To the
left of the dashboard name are the Edit link and the drop-down menu with the
Delete and Design options. The Edit link will bring you right back to the Dashboard
Edit screen, where you can change the name and description of the dashboard.
Inside the drop-down menu to the left of each dashboard listed on the Manage
Dashboards screen you will find a Delete link. The Delete link, as you might expect,
allows you to delete a dashboard record. Deleted dashboards do not appear in the
Deleted Items list like other records in Oracle CRM On Demand. This means that
once deleted, that dashboard is gone forever and cannot be recovered.
When you click the Delete link, you are presented with a confirmation dialog
box, so it does take two clicks to delete a dashboard.
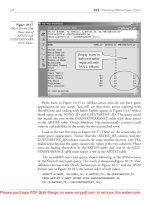
The final element of the Manage Dashboards screen is the Design link that appears
in the drop-down menu to the immediate left of each dashboard name. The Design
link opens the window shown in Figure 3-3. This is the Dashboard Editor window,
which is the focus of the remainder of this book. For now, I will offer a brief
description of the elements of the Dashboard Editor window. You will find
exhaustive detail about each of these elements in the chapters that follow.
Beginning with the buttons to the right of the dashboard name in the header, the first
is the Dashboard Properties button. There are not many properties to edit here.
Essentially, the dashboard properties that you are able to modify here include the
Please purchase PDF Split-Merge on www.verypdf.com to remove this watermark.
/ Oracle CRM On Demand Dashboards / Michael D. Lairson / 174 534-3
Oracle CRM On Demand Dashboards
/ Oracle CRM On Demand Dashboards / Michael D. Lairson / 174 534-3
Chapter 3: The Manage Dashboard Screen
dashboard description and the name and description of any additional dashboard
pages. This brings us to the Page Selector and Add Dashboard Page buttons to the
right of the dashboard properties button.
The Page Selector button allows you to select the page within the dashboard that
you want to modify. Clearly, this indicates that it is possible to have multiple pages in
your dashboard, which is what the Add Dashboard Page button allows you to do. In the
next chapter, you can read much more about pages in a dashboard and their properties.
Next up is the PDF and Print Control properties button. With the PDF and Print
Control settings, you are able to identify print settings such as page size, orientation,
and headers and footers. It is not unusual for users to want to print dashboards, and
with these settings you can control how that printout will appear and what
information will print on the page. The Add Column button gives you the ability to
split the dashboard page into multiple columns. Each column will have its own
Properties button and Delete button, allowing you to format each column
independently and remove columns from the layout.
Under the Dashboard Objects heading on the Dashboard Editor screen, we find five
objects that may be dragged onto the dashboard canvas. Each of these is covered in
great detail in Chapter 5 of this book. Here I provide a brief description of each.
Dashboard Editor window
Please purchase PDF Split-Merge on www.verypdf.com to remove this watermark.
/ Oracle CRM On Demand Dashboards / Michael D. Lairson / 174 534-3
Oracle CRM On Demand Dashboards
/ Oracle CRM On Demand Dashboards / Michael D. Lairson / 174 534-3
Chapter 3: The Manage Dashboard Screen
First is the Section object. Multiple sections may be added to your dashboard
and configured independently. A section is essentially a frame within the dashboard.
All of the other objects that you place on your dashboard will be positioned inside a
section. A number of options may be set for each section. Sections may be
collapsible, they may be displayed dynamically based on the results of a query
request, they may have their own title displayed and be formatted with borders, and
so forth.
The next object is the Link or Image object. This is a simple object that allows
you to display a hyperlink or image in your dashboard. This can be a link to another
report in Oracle CRM On Demand or any webpage URL.
The Text object allows you to add some static text to your dashboard. This may
be descriptive text, like we see in the prebuilt dashboards. You could include
anything here, from instructions on how to use the dashboard, to important phone
numbers, to a copyright statement.
The Folder object is an interesting one. This object allows you to embed a report
folder in your dashboard. The folder can be any folder in the reports’ Shared Folders.
This essentially places a folder of report hyperlinks right on the dashboard screen.
The Guided Navigation Link object, shown in the list as “Guided Nav. Link,”
allows you to place a hyperlink on the dashboard, but display that link only when
certain conditions are met. Those conditions are determined by whether or not rows
are returned in another query request saved as a report in Oracle CRM On Demand.
The final section on the Dashboard Editor screen is Saved Content. This is where you
will find all of the shared reports in Oracle CRM On Demand that you can add to
your dashboard. Detailed information on adding reports to your dashboard is in
Chapter 6. Essentially, the process of adding reports to a dashboard is a matter of
locating the report in the folders in the Saved Content section, and clicking and
dragging the report to the dashboard canvas. You may then adjust the properties and
layout settings for each report independently to specify exactly how each report will
appear in the dashboard.
Please purchase PDF Split-Merge on www.verypdf.com to remove this watermark.
This page intentionally left blank
Please purchase PDF Split-Merge on www.verypdf.com to remove this watermark.
/ Oracle CRM On Demand Dashboards / Michael D. Lairson / 174 534-3 / Blind folio:
Chapter
4
Dashboard Pages
and Properties
45
Please purchase PDF Split-Merge on www.verypdf.com to remove this watermark.
/ Oracle CRM On Demand Dashboards / Michael D. Lairson / 174 534-3
Oracle CRM On Demand Dashboards
/ Oracle CRM On Demand Dashboards / Michael D. Lairson / 174 534-3
Chapter 4: Dashboard Pages and Properties
said earlier that a dashboard is a webpage that contains frames into
which you place reports and other dashboard objects. When you
created the dashboard record, as described in the previous chapter,
you created that webpage. At this point, your dashboard is empty. In
this chapter, I describe the process of configuring the dashboard by
setting the dashboard properties and configuring dashboard pages. I should point
out that the order of the remainder of this book is designed for your reference and
ease of finding information rather than implying an order to how you complete your
dashboard. Once you have created the dashboard record, which is an obvious first
step, the order in which you configure the elements on that dashboard is not terribly
important.
Across the top of the Dashboard Editor screen are a number of buttons that are used
to configure the dashboard page. Figure 4-1 shows these elements. The first button is
the Dashboard Properties button. You can identify this button by the pointing finger
icon; or, by hovering your mouse over the button, you will see the name of the
button in a tooltip. I am going to skip this button for now and move to the next
element.
Next up on the Dashboard Editor toolbar is the Page Selector. This field allows you
to select the page that you are designing on the Dashboard Editor screen. When you
initially create a new dashboard, that dashboard will contain only a single page
named “Page 1,” and this is what you see in the Page drop-down list field.
Your dashboard may contain many pages. The number of pages that can be
included in your dashboard is technically unlimited. Your dashboard may, however,
become unwieldy, reaching a practical limit, if you add too many pages.
I
Dashboard Editor toolbar
Please purchase PDF Split-Merge on www.verypdf.com to remove this watermark.
/ Oracle CRM On Demand Dashboards / Michael D. Lairson / 174 534-3
Oracle CRM On Demand Dashboards
/ Oracle CRM On Demand Dashboards / Michael D. Lairson / 174 534-3
Chapter 4: Dashboard Pages and Properties
Dashboard pages are presented as tabs within the dashboard, as shown in
Figure 4-2. Clicking a tab in the dashboard opens the page and executes all of the
reports that have been added to that page.
To add a new dashboard page, click the Add Dashboard Page button. This button
looks like a sheet of paper with a plus sign on it. When you click the Add
Dashboard Page button, the Add Dashboard Page window, shown in Figure 4-3,
opens. This is a simple window that contains just two fields. Name your new
dashboard page by completing the Page Name field. The name that you give your
dashboard page will appear on the respective page tab. The description you enter in
the Page Description field appears as a tooltip when your user places their mouse
pointer over the dashboard page tab.
So why would you want to have multiple pages in your dashboard? Well, there
are a few reasons, and they all have something to do with the way users use the
dashboard and interact with it. It would often be just as easy to provide three separate
dashboards as it would be to provide a single dashboard with three pages. So the first
reason is to provide multiple dashboards in as few clicks as possible. I cannot count
the number of times I have been asked to find a way to present a report/dashboard to
Dashboard page tabs
Add Dashboard Page window
Please purchase PDF Split-Merge on www.verypdf.com to remove this watermark.
/ Oracle CRM On Demand Dashboards / Michael D. Lairson / 174 534-3
Oracle CRM On Demand Dashboards
/ Oracle CRM On Demand Dashboards / Michael D. Lairson / 174 534-3
Chapter 4: Dashboard Pages and Properties
the user in fewer clicks. As technology continues to progress, a trend that I predict
will continue is the reduction of clicks. By putting multiple pages in your dashboard,
the user can access the dashboard and then be a single click away from the next
dashboard page. When we get to the topic of dashboard filter prompts, you will see
that a single prompt can affect one or all pages in the dashboard, further reducing the
number of clicks necessary to get to the dashboard data.
Another reason is for printing. Reports, as you know, are designed for presentation
on the computer screen more so than the printed page. Dashboards are often
designed to provide a high-level summary of sales and service data that is printed and
provided to executives, included in presentations, and even posted on bulletin boards
in the company break room. Dashboards can be designed for the printed page for this
purpose, but may require multiple pages to include the necessary data.
Similarly, the dashboard may contain reports from multiple subject areas and
display reports for multiple unrelated topics. That is the power of the dashboard. It
brings multiple reports from multiple subjects together in a single place. Sometimes,
this togetherness is desired for practicality, but as humans, we still have a need to
segment and organize, so we include multiple pages to separate our sales reports
from our service reports, for example. Whether it is a matter of usability, practicality,
or personal preference, the multipage dashboard is a popular and useful tool in
Oracle CRM On Demand.
The next button on the Dashboard Editor toolbar looks like a printer with a pointing
finger on top of it. This is the PDF and Print Control Properties button, and clicking
it opens the PDF and Print Control window shown in Figure 4-4. You will use this
window to adjust the way your dashboard pages print.
PDF and Print Control window
Please purchase PDF Split-Merge on www.verypdf.com to remove this watermark.
/ Oracle CRM On Demand Dashboards / Michael D. Lairson / 174 534-3
Oracle CRM On Demand Dashboards
/ Oracle CRM On Demand Dashboards / Michael D. Lairson / 174 534-3
Chapter 4: Dashboard Pages and Properties
When you print a dashboard, you have two options. You can open the
dashboard to a new HTML screen and send that screen to your printer by clicking
the Printer Friendly link at the bottom of your dashboard, and then use your browser
print controls to print the screen. The other option is a PDF file. Click the Printer
Friendly link at the bottom of your dashboard and select PDF. This opens the
dashboard into a PDF file that you can then send to your printer.
Nearly all of the settings available here on the PDF and Print Control window
affect the PDF print option and do nothing for the HTML print option. This has to do
with the nature of the two formats. An HTML file is not affected by the paradigm of
the printed page. A single HTML page can go on and on without a break in it. The
scroll bars at the bottom and right of the HTML screen are there because your
computer screen is not large enough to contain the entire HTML page, not because
of any particular paper size or page breaks.
That being said, a couple of settings here can affect the HTML presentation of
the dashboard, and I will point those out as we go.
In the Page Settings section of the PDF and Print Control window, you have three
fields. The first two pertain to the size and orientation of the printout that you desire
for the printed version of your dashboard. These settings do not affect the way the
dashboard is displayed on the screen in any way.
The Paper Size field defaults to User Default, which will be the default setting in
your installed PDF viewer. The options available in this field are US Letter (8.5" ×
11"), A4 (210 mm × 297 mm), A3 (297 mm × 420 mm), A5 (148 mm × 210 mm),
Folio (8.5" × 13"), and Legal (8.5" × 14").
The Orientation field allows you to select a print orientation of Portrait or
Landscape. Again, this does not affect the appearance of the dashboard on the
screen, but rather changes the orientation of the dashboard elements on the printed
page.
The third setting here in the Page Settings section is the Print Rows option. You
can choose to print visible rows or all rows in the embedded reports. This setting
applies to reports with Table views that default to the first set of records and have
paging controls. For instance, a list of accounts may default to show only the first 25
records in the table. You have the option within the report to page through the
records 25 rows at a time or show all rows by clicking the Show All Pages button on
the table paging controls. If you open the report in an HTML-printer-friendly view,
you will see just the visible rows on the screen. This holds true regardless of the
setting in the Print Rows field. However, if you set the Print Rows field to All and
open the dashboard in PDF Printer Friendly view, you will see all of the rows in the
table, not just the first 25.
If you leave this setting at Visible, then the HTML and PDF Printer Friendly views
behave exactly the same. You will only see the visible rows in the printer-friendly view.
Please purchase PDF Split-Merge on www.verypdf.com to remove this watermark.
/ Oracle CRM On Demand Dashboards / Michael D. Lairson / 174 534-3
Oracle CRM On Demand Dashboards
/ Oracle CRM On Demand Dashboards / Michael D. Lairson / 174 534-3
Chapter 4: Dashboard Pages and Properties
If you want to print all rows, you would need to first display all of the rows in the table
before clicking the Printer Friendly link at the bottom of the dashboard.
The other section on the PDF and Print Control window is the Header And Footer
section. You have the option of including a header, footer, or both on your printed
dashboard. Including either a header or footer consists of two steps. First, click the
Include Header or Include Footer check box. Next to each check box field is an Edit
button. Click the Edit button to configure the header or footer on the Edit Header or
Edit Footer window shown in Figure 4-5. On this window, we have five text fields to
work with in formatting our page header or footer.
You have at your disposal three rows of text for your header or footer. The first
and third rows are single columns, and the middle row is three columns. This
provides you with the flexibility of having three rows of text, with the center row
laid out in columns as the fields appear, but it also allows for two single-column
rows by using only the first and third rows. The center row is ignored if there is
nothing entered into those fields. You can also have two rows in your header or
footer, where either the top row or the bottom row has three columns.
Each of these five fields is a text field. You can enter text in these fields that you
want to appear in the header and footer of your printed dashboard. As you enter text
in these fields, you can use the formatting buttons to make your text bold, italic, or
underlined. Clicking these buttons adds tags to the text field. If you have text
selected when you click a button, the start tag will be positioned before the selected
Edit Header window
Please purchase PDF Split-Merge on www.verypdf.com to remove this watermark.
/ Oracle CRM On Demand Dashboards / Michael D. Lairson / 174 534-3
Oracle CRM On Demand Dashboards
/ Oracle CRM On Demand Dashboards / Michael D. Lairson / 174 534-3
Chapter 4: Dashboard Pages and Properties
text and the end tag will be positioned after the selected text. You can also add
these tags by typing them in directly.
This sentence includes the tags for [b]bold[/b], [i]italics[/i], and [u]underline[/u]
around their corresponding text effects. When you are looking at the Edit Header
window, the text you enter into the text field will not appear formatted, so these tags
will also help you imagine how the text will appear in the header and footer.
The Line Break button inserts a line break at the current cursor position. The line
break symbol [br/] appears in the text field indicating the position of the line break.
The Insert field button gives you the ability to insert dynamic elements into your
header and footer, such as dates, times, and page numbers. The options available to
you from the Insert Field menu are Saved Name, Author Name, Date, Time, Page
Number, and Image. When you click one of these options, a bit of code is inserted
into the text field at the current cursor position. Table 4-1 describes these codes.
The Saved Name expression returns the name of the dashboard page. If you have
not added any pages to your dashboard, you will want to go ahead and rename the
dashboard page if you want something other than the default “Page 1” returned by
the Saved Name expression in your header or footer.
The Author Name expression actually returns the entire user sign-in ID for the
current user. This may not be the most desirable result, as the user ID actually
includes the company name prefix and the slash, which appears as a hash/pound
sign (#) in the results in your header or footer. It may be desirable to include it in the
footer, however, if you want to know who printed that dashboard left in the copier
or on the printer in the office.
The Date expression returns the date in month/day/year format. This format is not
editable. In other words, you cannot change the code to @{timeCreated[yy/mm/dd]}
to change the format to year/month/day.
The Time expression returns the time at which the dashboard was opened in
Oracle CRM On Demand. The data repository time is shown, which is not
Saved Name @{savedName}
Author Name @{authorName}
Date @{timeCreated[mm/dd/yy]}
Time @{timeCreated[hh::mm::ss]}
Page Number @{pageNumber}
Image @{fmap: …}
Insert Fields for Dashboard Headers and Footers
Please purchase PDF Split-Merge on www.verypdf.com to remove this watermark.
/ Oracle CRM On Demand Dashboards / Michael D. Lairson / 174 534-3
Oracle CRM On Demand Dashboards
/ Oracle CRM On Demand Dashboards / Michael D. Lairson / 174 534-3
Chapter 4: Dashboard Pages and Properties
necessarily the user’s local time. It is a good idea to include some text after the
@{timeCreated[hh::mm::ss]} expression to indicate the correct time zone so there is
no confusion.
The Page Number expression returns a single number indicating the page
number of the printed dashboard. This does not correspond to the dashboard page
number. In other words, if your dashboard has three pages, it appears with three
tabs in Oracle CRM On Demand. If you add a header to the second page (tab) in
your dashboard and insert the page number in the header or footer, the first page of
the printed dashboard page will be page number one.
The Image expression allows you to insert one of the stock images from the
Oracle BI Presentation Server. Because Oracle CRM On Demand is a hosted service,
you do not have the ability to add custom images to the presentation server and are
limited to the images provided by default. Of course, these images are more useful
for conditional formatting within your reports than they are for headers and footers.
Eventually, Oracle may provide access to the Presentation Server for loading custom
images, but that ability is currently not available in Oracle CRM On Demand. If you
do want to select one of the stock images, you simply select Image from the Insert
Field menu, and the Graphics window (see Figure 4-6) opens for you to make your
selection. Click one of the images on the left to open the library of images within the
selected family, and then select one of the images and click OK. The result is an
expression such as @{fmap:meters/light/stop/1r.gif} in the header or footer text field.
Graphics window
Please purchase PDF Split-Merge on www.verypdf.com to remove this watermark.
/ Oracle CRM On Demand Dashboards / Michael D. Lairson / 174 534-3
Oracle CRM On Demand Dashboards
/ Oracle CRM On Demand Dashboards / Michael D. Lairson / 174 534-3
Chapter 4: Dashboard Pages and Properties
Returning to the Edit Header or Edit Footer window, you find that there is a Clear
button to the right of the Insert Field button. This button will clear the entire header
or footer. Clicking this button removes all text and expressions entered into the five
text fields.
Next to each of the text fields, you find an Edit Format button. When you click
an Edit Format button, the Edit Format window opens, as shown in Figure 4-7. The
Edit Format window allows you to make decisions on the way the fonts and header
and footer sections appear on your dashboard. The font settings available here allow
you to set the font family, size, color, style, and effects. The default font is 10 point
Arial, and the default color is black with regular styling and no effects.
Your font options are Arial, Arial Black, Arial Narrow, Courier New, Garamond,
Lucida Sans Unicode, Microsoft Sans Serif, Times New Roman, Tahoma, and
Verdana. If your company has a standard font, you may want to select a font for
your dashboard header and footer that adheres to this standard.
To change the font color, click on the white box to open the color selector. You
can choose from 48 standard colors. Alternatively, if you know the six-digit
hexadecimal color code for your desired color, you can enter and the six-digit
code in the field at the bottom of the color selector pop-up. You may also make your
font bold, italic, or both using the Style field. The available effects are underlined
and strikethrough. The difference between setting font styles here as opposed to the
tags discussed earlier is that settings applied here apply to the entire text block
rather than just the text inside the formatting tags. The format tags will take
precedence over formatting applied on the Edit Format screen.
Blank dashboard with multiple columns
Please purchase PDF Split-Merge on www.verypdf.com to remove this watermark.
/ Oracle CRM On Demand Dashboards / Michael D. Lairson / 174 534-3
Oracle CRM On Demand Dashboards
/ Oracle CRM On Demand Dashboards / Michael D. Lairson / 174 534-3
Chapter 4: Dashboard Pages and Properties
Within the cell portion of the Edit Format window, you are able to apply
horizontal and vertical alignment and add a background color to the cell. The
default horizontal alignment is centered for the top and bottom rows of the header
or footer as well as the center column in the second row. The default is left-aligned
in the first column of the second row, and right-aligned in the third column of the
second row. To apply a background color, click the white box next to Background
Color, and select the desired color.
You can add single, double, or thick borders to one or more sides of your cell.
You are able to select only one style of border for the text block. You apply the
selected style to any side of the text block to which you add a border. To add a
border, you can choose All from the Position field to apply a border to all four sides,
or you can click on the sides of the cell in the diagram below the Position field. The
color selector beside Border Color works exactly like the others on this window and
allows you to change the color of all borders applied to this cell.
Expand the Additional Formatting Options section, and you find fields that allow
you to adjust the size of your text block and the padding around the value within
the cell. The Height and Width fields allow you to adjust the size of the cell by
entering a desired size in points or a percentage. In the second row of the header
and footer, where you have three columns, you will find that the default width is set
to 33%, 34%, and 33%, respectively. Padding provides space between the sides of
the text box and the text displayed therein.
If you happen to be knowledgeable on using cascading style sheets, you can
apply your custom cascading style sheet using the respective fields. You can use a
cascading style sheet to apply font formats to the cell.
There are three small icons in the upper-right corner of the Edit Format window.
The left icon, an eraser, resets all of the format settings to the default values. The
copy icon copies all of the settings so you can format another text block; click the
third icon, paste, to apply the same formats to the text block.
Click OK to apply the format changes to the text block. You will not see any of
the formatting back on the Edit Header or Edit Footer screen.
Finally, back on the Edit Header or Edit Footer screen, we find one last field: the
Display In Browser When Applicable check box. When you select this check box,
the header will appear on the dashboard in the Oracle CRM On Demand interface.
Footers only appear on a printed dashboard and not on the screen.
Click OK on the Edit Header or Edit Footer screen to apply the changes and
return to the Edit Dashboard screen.
The last button on the Edit Dashboard toolbar is the Add Column button. When you
first create your new dashboard or dashboard page, you have exactly one column in
your dashboard. You can add a column by clicking the Add Column button. The
new column appears as a light gray block to the right of the existing column.
Please purchase PDF Split-Merge on www.verypdf.com to remove this watermark.
/ Oracle CRM On Demand Dashboards / Michael D. Lairson / 174 534-3
Oracle CRM On Demand Dashboards
/ Oracle CRM On Demand Dashboards / Michael D. Lairson / 174 534-3
Chapter 4: Dashboard Pages and Properties
Column Properties window
Each of these column blocks contains a Properties button and a Delete button.
Figure 4-7 shows a blank dashboard page with multiple columns and breaks
between columns.
Each time you click the New Column button, an additional column area is
added to the dashboard to the right of the last column in the dashboard. You can
add as many columns as you like, but it quickly becomes impractical to have a
dashboard that is more than two columns wide.
Columns may be formatted by clicking the Properties button and selecting
Column Properties. The resulting Column Properties window, shown in Figure 4-8,
allows you to modify the alignment, background color, and border. You can also set
the width of your columns on this screen.
The other option under the Properties button on all columns other than the first
column is the Break option. Click the Properties button and select Break, and you
have three options. The Column Break option will insert a break between the selected
column and the previous column, moving the selected column down to a new row.
To move the column back up to the previous row, select the No Break option.
The third option here is the Page Break With Column Break selection, which
inserts a column break as well as a page break. Here again, we see another
reference to page, which at this point, you should see has several meanings.
Please purchase PDF Split-Merge on www.verypdf.com to remove this watermark.
/ Oracle CRM On Demand Dashboards / Michael D. Lairson / 174 534-3
Oracle CRM On Demand Dashboards
/ Oracle CRM On Demand Dashboards / Michael D. Lairson / 174 534-3
Chapter 4: Dashboard Pages and Properties
The page break appears on the Dashboard Editor screen between rows as “
Page Break with Column Break
” indicating where the page break will be when the dashboard is
printed. If you have a page break in your dashboard and view that dashboard in
Oracle CRM On Demand, you will not see an actual break in the page. Interestingly,
however, if you have added a header to your dashboard and selected the Display In
Browser When Applicable check box, you will actually see the header repeated on
the screen where the page break is located.
When you open the dashboard in the PDF Printer Friendly view, you will find
that the pages do break in the printed dashboard. This is extremely useful when you
want to display multiple charts on a dashboard on the computer screen but want to
print each chart on a separate page.
In Figure 4-7 I am showing a dashboard page with four columns. The Original
Column is in the upper-left corner. One click of the Add Column button gives us the
second column with No Break selected as the Break option. Another click of the
New Column button adds a third column to the right of this column. If you then add
a column break, this third column moves down to be a single column below the top
two columns. One more click of the New Column button adds a column to the right
of the third column. If you then add a page break with column break to this fourth
column, it moves down below the third column with a page break between the third
and fourth columns. This final state is what you see in the screenshot.
Let us return now to the first button on the Dashboard Editor toolbar. I saved the
Dashboard Properties button for the end of this chapter because the properties we
are modifying here affect all of the pages in the dashboard rather than each page
individually. When you click the Dashboard Properties button, the Dashboard
Properties window (see Figure 4-9) opens showing you two sections: General
Properties and Dashboard Pages.
The General Properties section of the Dashboard Properties window shows you the
path to the dashboard. There is nothing you can do here to change this path. It is
merely informational.
Also in this section of the Dashboard Properties screen is the Description field.
This is the same description that you may have entered when you created the
dashboard. You can update this description here as well.
The Dashboard Pages section is where you can modify page names, hide pages,
delete pages, and reorder pages in your dashboard. Keep in mind that we are
Please purchase PDF Split-Merge on www.verypdf.com to remove this watermark.